
一月四日 等待变化等待机会
sudo snap install --classic code
curl --proto '=https' --tlsv1.2 -sSf https://get-ghcup.haskell.org | sh
一月八日 等待变化等待机会
一月十一日 等待变化等待机会
git clone --recursive https://github.com/timsong-cpp/cppwp
一月十二日 等待变化等待机会
url.https://github.com/.insteadof=git@github.com:
url.https://gitclone.com/.insteadof=git://gitclone.com/
url.https://.insteadof=ssh://
url.https://.insteadof=git://
http.sslverify=false
[url "https://github.com/"]
        insteadof = git@github.com:
[url "https://gitclone.com/"]
        insteadof = git://gitclone.com/
[url "https://"]
  insteadOf = ssh://
[url "https://"]
  insteadOf = git://
[http]
        sslVerify = false
git clone https://github.com/mathjax/MathJax-src.git mathjax-src
cd mathjax-src
npm run --silent compile
npm run --silent make-components
cd /usr/local/bin
sudo ln -s /path/to/mathjax-node-cli/bin/* .
ls | grep -v .html| Suffixes applicable | Media type and subtype(s) |
|---|---|
| .3dm | x-world/x-3dmf |
| .3dmf | x-world/x-3dmf |
| .7z | application/x-7z-compressed |
| .a | application/octet-stream |
| .aab | application/x-authorware-bin |
| .aam | application/x-authorware-map |
| .aas | application/x-authorware-seg |
| .abc | text/vnd.abc |
| .acgi | text/html |
| .afl | video/animaflex |
| .ai | application/postscript |
| .aif | audio/aiff |
| .aif | audio/x-aiff |
| .aifc | audio/aiff |
| .aifc | audio/x-aiff |
| .aiff | audio/aiff |
| .aiff | audio/x-aiff |
| .aim | application/x-aim |
| .aip | text/x-audiosoft-intra |
| .ani | application/x-navi-animation |
| .aos | application/x-nokia-9000-communicator-add-on-software |
| .aps | application/mime |
| .arc | application/octet-stream |
| .arj | application/arj |
| .arj | application/octet-stream |
| .art | image/x-jg |
| .asf | video/x-ms-asf |
| .asm | text/x-asm |
| .asp | text/asp |
| .asx | application/x-mplayer2 |
| .asx | video/x-ms-asf |
| .asx | video/x-ms-asf-plugin |
| .au | audio/basic |
| .au | audio/x-au |
| .avi | application/x-troff-msvideo |
| .avi | video/avi |
| .avi | video/msvideo |
| .avi | video/x-msvideo |
| .avs | video/avs-video |
| .bcpio | application/x-bcpio |
| .bin | application/mac-binary |
| .bin | application/macbinary |
| .bin | application/octet-stream |
| .bin | application/x-binary |
| .bin | application/x-macbinary |
| .bm | image/bmp |
| .bmp | image/bmp |
| .bmp | image/x-windows-bmp |
| .boo | application/book |
| .book | application/book |
| .boz | application/x-bzip2 |
| .bsh | application/x-bsh |
| .bz | application/x-bzip |
| .bz2 | application/x-bzip2 |
| .c | text/plain |
| .c | text/x-c |
| .c++ | text/plain |
| .cat | application/vnd.ms-pki.seccat |
| .cc | text/plain |
| .cc | text/x-c |
| .ccad | application/clariscad |
| .cco | application/x-cocoa |
| .cdf | application/cdf |
| .cdf | application/x-cdf |
| .cdf | application/x-netcdf |
| .cer | application/pkix-cert |
| .cer | application/x-x509-ca-cert |
| .cha | application/x-chat |
| .chat | application/x-chat |
| .class | application/java |
| .class | application/java-byte-code |
| .class | application/x-java-class |
| .com | application/octet-stream |
| .com | text/plain |
| .conf | text/plain |
| .cpio | application/x-cpio |
| .cpp | text/x-c |
| .cpt | application/mac-compactpro |
| .cpt | application/x-compactpro |
| .cpt | application/x-cpt |
| .crl | application/pkcs-crl |
| .crl | application/pkix-crl |
| .crt | application/pkix-cert |
| .crt | application/x-x509-ca-cert |
| .crt | application/x-x509-user-cert |
| .csh | application/x-csh |
| .csh | text/x-script.csh |
| .css | application/x-pointplus |
| .css | text/css |
| .csv | text/csv |
| .cxx | text/plain |
| .dcr | application/x-director |
| .deepv | application/x-deepv |
| .def | text/plain |
| .der | application/x-x509-ca-cert |
| .dif | video/x-dv |
| .dir | application/x-director |
| .dl | video/dl |
| .dl | video/x-dl |
| .doc | application/msword |
| .docx | application/vnd.openxmlformats-officedocument.wordprocessingml.document |
| .dot | application/msword |
| .dp | application/commonground |
| .drw | application/drafting |
| .dump | application/octet-stream |
| .dv | video/x-dv |
| .dvi | application/x-dvi |
| .dwf | drawing/x-dwf (old) |
| .dwf | model/vnd.dwf |
| .dwg | application/acad |
| .dwg | image/vnd.dwg |
| .dwg | image/x-dwg |
| .dxf | application/dxf |
| .dxf | image/vnd.dwg |
| .dxf | image/x-dwg |
| .dxr | application/x-director |
| .el | text/x-script.elisp |
| .elc | application/x-bytecode.elisp (compiled elisp) |
| .elc | application/x-elc |
| .env | application/x-envoy |
| .eot | application/vnd.ms-fontobject |
| .eps | application/postscript |
| .es | application/x-esrehber |
| .etx | text/x-setext |
| .evy | application/envoy |
| .evy | application/x-envoy |
| .exe | application/octet-stream |
| .f | text/plain |
| .f | text/x-fortran |
| .f77 | text/x-fortran |
| .f90 | text/plain |
| .f90 | text/x-fortran |
| .fdf | application/vnd.fdf |
| .fif | application/fractals |
| .fif | image/fif |
| .flac | audio/flac |
| .fli | video/fli |
| .fli | video/x-fli |
| .flo | image/florian |
| .flx | text/vnd.fmi.flexstor |
| .fmf | video/x-atomic3d-feature |
| .for | text/plain |
| .for | text/x-fortran |
| .fpx | image/vnd.fpx |
| .fpx | image/vnd.net-fpx |
| .frl | application/freeloader |
| .funk | audio/make |
| .g | text/plain |
| .g3 | image/g3fax |
| .gif | image/gif |
| .gl | video/gl |
| .gl | video/x-gl |
| .gsd | audio/x-gsm |
| .gsm | audio/x-gsm |
| .gsp | application/x-gsp |
| .gss | application/x-gss |
| .gtar | application/x-gtar |
| .gz | application/x-compressed |
| .gz | application/x-gzip |
| .gzip | application/x-gzip |
| .gzip | multipart/x-gzip |
| .h | text/plain |
| .h | text/x-h |
| .hdf | application/x-hdf |
| .help | application/x-helpfile |
| .hgl | application/vnd.hp-hpgl |
| .hh | text/plain |
| .hh | text/x-h |
| .hlb | text/x-script |
| .hlp | application/hlp |
| .hlp | application/x-helpfile |
| .hlp | application/x-winhelp |
| .hpg | application/vnd.hp-hpgl |
| .hpgl | application/vnd.hp-hpgl |
| .hqx | application/binhex |
| .hqx | application/binhex4 |
| .hqx | application/mac-binhex |
| .hqx | application/mac-binhex40 |
| .hqx | application/x-binhex40 |
| .hqx | application/x-mac-binhex40 |
| .hta | application/hta |
| .htc | text/x-component |
| .htm | text/html |
| .html | text/html |
| .htmls | text/html |
| .htt | text/webviewhtml |
| .htx | text/html |
| .ice | x-conference/x-cooltalk |
| .ico | image/x-icon |
| .ics | text/calendar |
| .idc | text/plain |
| .ief | image/ief |
| .iefs | image/ief |
| .iges | application/iges |
| .iges | model/iges |
| .igs | application/iges |
| .igs | model/iges |
| .ima | application/x-ima |
| .imap | application/x-httpd-imap |
| .inf | application/inf |
| .ins | application/x-internett-signup |
| .ip | application/x-ip2 |
| .isu | video/x-isvideo |
| .it | audio/it |
| .iv | application/x-inventor |
| .ivr | i-world/i-vrml |
| .ivy | application/x-livescreen |
| .jam | audio/x-jam |
| .jav | text/plain |
| .jav | text/x-java-source |
| .java | text/plain |
| .java | text/x-java-source |
| .jcm | application/x-java-commerce |
| .jfif | image/jpeg |
| .jfif | image/pjpeg |
| .jfif-tbnl | image/jpeg |
| .jpe | image/jpeg |
| .jpe | image/pjpeg |
| .jpeg | image/jpeg |
| .jpeg | image/pjpeg |
| .jpg | image/jpeg |
| .jpg | image/pjpeg |
| .jps | image/x-jps |
| .js | application/x-javascript |
| .js | application/javascript |
| .js | application/ecmascript |
| .js | text/javascript |
| .js | text/ecmascript |
| .json | application/json |
| .jut | image/jutvision |
| .kar | audio/midi |
| .kar | music/x-karaoke |
| .ksh | application/x-ksh |
| .ksh | text/x-script.ksh |
| .la | audio/nspaudio |
| .la | audio/x-nspaudio |
| .lam | audio/x-liveaudio |
| .latex | application/x-latex |
| .lha | application/lha |
| .lha | application/octet-stream |
| .lha | application/x-lha |
| .lhx | application/octet-stream |
| .list | text/plain |
| .lma | audio/nspaudio |
| .lma | audio/x-nspaudio |
| .log | text/plain |
| .lsp | application/x-lisp |
| .lsp | text/x-script.lisp |
| .lst | text/plain |
| .lsx | text/x-la-asf |
| .ltx | application/x-latex |
| .lzh | application/octet-stream |
| .lzh | application/x-lzh |
| .lzx | application/lzx |
| .lzx | application/octet-stream |
| .lzx | application/x-lzx |
| .m | text/plain |
| .m | text/x-m |
| .m1v | video/mpeg |
| .m2a | audio/mpeg |
| .m2v | video/mpeg |
| .m3u | audio/x-mpequrl |
| .man | application/x-troff-man |
| .map | application/x-navimap |
| .mar | text/plain |
| .mbd | application/mbedlet |
| .mc$ | application/x-magic-cap-package-1.0 |
| .mcd | application/mcad |
| .mcd | application/x-mathcad |
| .mcf | image/vasa |
| .mcf | text/mcf |
| .mcp | application/netmc |
| .me | application/x-troff-me |
| .mht | message/rfc822 |
| .mhtml | message/rfc822 |
| .mid | application/x-midi |
| .mid | audio/midi |
| .mid | audio/x-mid |
| .mid | audio/x-midi |
| .mid | music/crescendo |
| .mid | x-music/x-midi |
| .midi | application/x-midi |
| .midi | audio/midi |
| .midi | audio/x-mid |
| .midi | audio/x-midi |
| .midi | music/crescendo |
| .midi | x-music/x-midi |
| .mif | application/x-frame |
| .mif | application/x-mif |
| .mime | message/rfc822 |
| .mime | www/mime |
| .mjf | audio/x-vnd.audioexplosion.mjuicemediafile |
| .mjpg | video/x-motion-jpeg |
| .mka | audio/x-matroska |
| .mkv | video/x-matroska |
| .mm | application/base64 |
| .mm | application/x-meme |
| .mme | application/base64 |
| .mod | audio/mod |
| .mod | audio/x-mod |
| .moov | video/quicktime |
| .mov | video/quicktime |
| .movie | video/x-sgi-movie |
| .mp2 | audio/mpeg |
| .mp2 | audio/x-mpeg |
| .mp2 | video/mpeg |
| .mp2 | video/x-mpeg |
| .mp2 | video/x-mpeq2a |
| .mp3 | audio/mpeg3 |
| .mp3 | audio/x-mpeg-3 |
| .mp3 | video/mpeg |
| .mp3 | video/x-mpeg |
| .mp4 | video/mp4 |
| .mpa | audio/mpeg |
| .mpa | video/mpeg |
| .mpc | application/x-project |
| .mpe | video/mpeg |
| .mpeg | video/mpeg |
| .mpg | audio/mpeg |
| .mpg | video/mpeg |
| .mpga | audio/mpeg |
| .mpp | application/vnd.ms-project |
| .mpt | application/x-project |
| .mpv | application/x-project |
| .mpx | application/x-project |
| .mrc | application/marc |
| .ms | application/x-troff-ms |
| .mv | video/x-sgi-movie |
| .my | audio/make |
| .mzz | application/x-vnd.audioexplosion.mzz |
| .nap | image/naplps |
| .naplps | image/naplps |
| .nc | application/x-netcdf |
| .ncm | application/vnd.nokia.configuration-message |
| .nif | image/x-niff |
| .niff | image/x-niff |
| .nix | application/x-mix-transfer |
| .nsc | application/x-conference |
| .nvd | application/x-navidoc |
| .o | application/octet-stream |
| .oda | application/oda |
| .ogg | audio/ogg |
| .ogg | video/ogg |
| .omc | application/x-omc |
| .omcd | application/x-omcdatamaker |
| .omcr | application/x-omcregerator |
| .otf | font/otf |
| .p | text/x-pascal |
| .p10 | application/pkcs10 |
| .p10 | application/x-pkcs10 |
| .p12 | application/pkcs-12 |
| .p12 | application/x-pkcs12 |
| .p7a | application/x-pkcs7-signature |
| .p7c | application/pkcs7-mime |
| .p7c | application/x-pkcs7-mime |
| .p7m | application/pkcs7-mime |
| .p7m | application/x-pkcs7-mime |
| .p7r | application/x-pkcs7-certreqresp |
| .p7s | application/pkcs7-signature |
| .part | application/pro_eng |
| .pas | text/pascal |
| .pbm | image/x-portable-bitmap |
| .pcl | application/vnd.hp-pcl |
| .pcl | application/x-pcl |
| .pct | image/x-pict |
| .pcx | image/x-pcx |
| .pdb | chemical/x-pdb |
| application/pdf | |
| .pfunk | audio/make |
| .pfunk | audio/make.my.funk |
| .pgm | image/x-portable-graymap |
| .pgm | image/x-portable-greymap |
| .pic | image/pict |
| .pict | image/pict |
| .pkg | application/x-newton-compatible-pkg |
| .pko | application/vnd.ms-pki.pko |
| .pl | text/plain |
| .pl | text/x-script.perl |
| .plx | application/x-pixclscript |
| .pm | image/x-xpixmap |
| .pm | text/x-script.perl-module |
| .pm4 | application/x-pagemaker |
| .pm5 | application/x-pagemaker |
| .png | image/png |
| .pnm | application/x-portable-anymap |
| .pnm | image/x-portable-anymap |
| .pot | application/mspowerpoint |
| .pot | application/vnd.ms-powerpoint |
| .pov | model/x-pov |
| .ppa | application/vnd.ms-powerpoint |
| .ppm | image/x-portable-pixmap |
| .pps | application/mspowerpoint |
| .pps | application/vnd.ms-powerpoint |
| .ppt | application/mspowerpoint |
| .ppt | application/powerpoint |
| .ppt | application/vnd.ms-powerpoint |
| .ppt | application/x-mspowerpoint |
| .pptx | application/vnd.openxmlformats-officedocument.presentationml.presentation |
| .ppz | application/mspowerpoint |
| .pre | application/x-freelance |
| .prt | application/pro_eng |
| .ps | application/postscript |
| .psd | application/octet-stream |
| .pvu | paleovu/x-pv |
| .pwz | application/vnd.ms-powerpoint |
| .py | text/x-script.phyton |
| .pyc | application/x-bytecode.python |
| .qcp | audio/vnd.qcelp |
| .qd3 | x-world/x-3dmf |
| .qd3d | x-world/x-3dmf |
| .qif | image/x-quicktime |
| .qt | video/quicktime |
| .qtc | video/x-qtc |
| .qti | image/x-quicktime |
| .qtif | image/x-quicktime |
| .ra | audio/x-pn-realaudio |
| .ra | audio/x-pn-realaudio-plugin |
| .ra | audio/x-realaudio |
| .ram | audio/x-pn-realaudio |
| .ras | application/x-cmu-raster |
| .ras | image/cmu-raster |
| .ras | image/x-cmu-raster |
| .rast | image/cmu-raster |
| .rar | application/vnd.rar |
| .rexx | text/x-script.rexx |
| .rf | image/vnd.rn-realflash |
| .rgb | image/x-rgb |
| .rm | application/vnd.rn-realmedia |
| .rm | audio/x-pn-realaudio |
| .rmi | audio/mid |
| .rmm | audio/x-pn-realaudio |
| .rmp | audio/x-pn-realaudio |
| .rmp | audio/x-pn-realaudio-plugin |
| .rng | application/ringing-tones |
| .rng | application/vnd.nokia.ringing-tone |
| .rnx | application/vnd.rn-realplayer |
| .roff | application/x-troff |
| .rp | image/vnd.rn-realpix |
| .rpm | audio/x-pn-realaudio-plugin |
| .rt | text/richtext |
| .rt | text/vnd.rn-realtext |
| .rtf | application/rtf |
| .rtf | application/x-rtf |
| .rtf | text/richtext |
| .rtx | application/rtf |
| .rtx | text/richtext |
| .rv | video/vnd.rn-realvideo |
| .s | text/x-asm |
| .s3m | audio/s3m |
| .saveme | application/octet-stream |
| .sbk | application/x-tbook |
| .scm | application/x-lotusscreencam |
| .scm | text/x-script.guile |
| .scm | text/x-script.scheme |
| .scm | video/x-scm |
| .sdml | text/plain |
| .sdp | application/sdp |
| .sdp | application/x-sdp |
| .sdr | application/sounder |
| .sea | application/sea |
| .sea | application/x-sea |
| .set | application/set |
| .sgm | text/sgml |
| .sgm | text/x-sgml |
| .sgml | text/sgml |
| .sgml | text/x-sgml |
| .sh | application/x-bsh |
| .sh | application/x-sh |
| .sh | application/x-shar |
| .sh | text/x-script.sh |
| .shar | application/x-bsh |
| .shar | application/x-shar |
| .shtml | text/html |
| .shtml | text/x-server-parsed-html |
| .sid | audio/x-psid |
| .sit | application/x-sit |
| .sit | application/x-stuffit |
| .skd | application/x-koan |
| .skm | application/x-koan |
| .skp | application/x-koan |
| .skt | application/x-koan |
| .sl | application/x-seelogo |
| .smi | application/smil |
| .smil | application/smil |
| .snd | audio/basic |
| .snd | audio/x-adpcm |
| .sol | application/solids |
| .spc | application/x-pkcs7-certificates |
| .spc | text/x-speech |
| .spl | application/futuresplash |
| .spr | application/x-sprite |
| .sprite | application/x-sprite |
| .src | application/x-wais-source |
| .ssi | text/x-server-parsed-html |
| .ssm | application/streamingmedia |
| .sst | application/vnd.ms-pki.certstore |
| .step | application/step |
| .stl | application/sla |
| .stl | application/vnd.ms-pki.stl |
| .stl | application/x-navistyle |
| .stp | application/step |
| .sv4cpio | application/x-sv4cpio |
| .sv4crc | application/x-sv4crc |
| .svf | image/vnd.dwg |
| .svf | image/x-dwg |
| .svg | image/svg+xml |
| .svr | application/x-world |
| .svr | x-world/x-svr |
| .swf | application/x-shockwave-flash |
| .t | application/x-troff |
| .talk | text/x-speech |
| .tar | application/x-tar |
| .tbk | application/toolbook |
| .tbk | application/x-tbook |
| .tcl | application/x-tcl |
| .tcl | text/x-script.tcl |
| .tcsh | text/x-script.tcsh |
| .tex | application/x-tex |
| .texi | application/x-texinfo |
| .texinfo | application/x-texinfo |
| .text | application/plain |
| .text | text/plain |
| .tgz | application/gnutar |
| .tgz | application/x-compressed |
| .tif | image/tiff |
| .tif | image/x-tiff |
| .tiff | image/tiff |
| .tiff | image/x-tiff |
| .tr | application/x-troff |
| .ts | video/mp2t |
| .tsi | audio/tsp-audio |
| .tsp | application/dsptype |
| .tsp | audio/tsplayer |
| .tsv | text/tab-separated-values |
| .turbot | image/florian |
| .txt | text/plain |
| .uil | text/x-uil |
| .uni | text/uri-list |
| .unis | text/uri-list |
| .unv | application/i-deas |
| .uri | text/uri-list |
| .uris | text/uri-list |
| .ustar | application/x-ustar |
| .ustar | multipart/x-ustar |
| .uu | application/octet-stream |
| .uu | text/x-uuencode |
| .uue | text/x-uuencode |
| .vcd | application/x-cdlink |
| .vcs | text/x-vcalendar |
| .vda | application/vda |
| .vdo | video/vdo |
| .vew | application/groupwise |
| .viv | video/vivo |
| .viv | video/vnd.vivo |
| .vivo | video/vivo |
| .vivo | video/vnd.vivo |
| .vmd | application/vocaltec-media-desc |
| .vmf | application/vocaltec-media-file |
| .voc | audio/voc |
| .voc | audio/x-voc |
| .vos | video/vosaic |
| .vox | audio/voxware |
| .vqe | audio/x-twinvq-plugin |
| .vqf | audio/x-twinvq |
| .vql | audio/x-twinvq-plugin |
| .vrml | application/x-vrml |
| .vrml | model/vrml |
| .vrml | x-world/x-vrml |
| .vrt | x-world/x-vrt |
| .vsd | application/x-visio |
| .vst | application/x-visio |
| .vsw | application/x-visio |
| .w60 | application/wordperfect6.0 |
| .w61 | application/wordperfect6.1 |
| .w6w | application/msword |
| .wav | audio/wav |
| .wav | audio/x-wav |
| .wb1 | application/x-qpro |
| .wbmp | image/vnd.wap.wbmp |
| .web | application/vnd.xara |
| .webm | video/webm |
| .webp | image/webp |
| .wiz | application/msword |
| .wk1 | application/x-123 |
| .wmf | windows/metafile |
| .wml | text/vnd.wap.wml |
| .wmlc | application/vnd.wap.wmlc |
| .wmls | text/vnd.wap.wmlscript |
| .wmlsc | application/vnd.wap.wmlscriptc |
| .word | application/msword |
| .woff | font/woff |
| .woff2 | font/woff2 |
| .wp | application/wordperfect |
| .wp5 | application/wordperfect |
| .wp5 | application/wordperfect6.0 |
| .wp6 | application/wordperfect |
| .wpd | application/wordperfect |
| .wpd | application/x-wpwin |
| .wq1 | application/x-lotus |
| .wri | application/mswrite |
| .wri | application/x-wri |
| .wrl | application/x-world |
| .wrl | model/vrml |
| .wrl | x-world/x-vrml |
| .wrz | model/vrml |
| .wrz | x-world/x-vrml |
| .wsc | text/scriplet |
| .wsrc | application/x-wais-source |
| .wtk | application/x-wintalk |
| .xbm | image/x-xbitmap |
| .xbm | image/x-xbm |
| .xbm | image/xbm |
| .xdr | video/x-amt-demorun |
| .xgz | xgl/drawing |
| .xif | image/vnd.xiff |
| .xl | application/excel |
| .xla | application/excel |
| .xla | application/x-excel |
| .xla | application/x-msexcel |
| .xlb | application/excel |
| .xlb | application/vnd.ms-excel |
| .xlb | application/x-excel |
| .xlc | application/excel |
| .xlc | application/vnd.ms-excel |
| .xlc | application/x-excel |
| .xld | application/excel |
| .xld | application/x-excel |
| .xlk | application/excel |
| .xlk | application/x-excel |
| .xll | application/excel |
| .xll | application/vnd.ms-excel |
| .xll | application/x-excel |
| .xlm | application/excel |
| .xlm | application/vnd.ms-excel |
| .xlm | application/x-excel |
| .xls | application/excel |
| .xls | application/vnd.ms-excel |
| .xls | application/x-excel |
| .xls | application/x-msexcel |
| .xlt | application/excel |
| .xlt | application/x-excel |
| .xlv | application/excel |
| .xlv | application/x-excel |
| .xlw | application/excel |
| .xlw | application/vnd.ms-excel |
| .xlw | application/x-excel |
| .xlw | application/x-msexcel |
| .xm | audio/xm |
| .xml | application/xml |
| .xml | text/xml |
| .xmz | xgl/movie |
| .xpix | application/x-vnd.ls-xpix |
| .xpm | image/x-xpixmap |
| .xpm | image/xpm |
| .x-png | image/png |
| .xlsx | application/vnd.openxmlformats-officedocument.spreadsheetml.sheet |
| .xsr | video/x-amt-showrun |
| .xwd | image/x-xwd |
| .xwd | image/x-xwindowdump |
| .xyz | chemical/x-pdb |
| .yaml | application/x-yaml |
| .yml | application/x-yaml |
| .z | application/x-compress |
| .z | application/x-compressed |
| .zip | application/x-compressed |
| .zip | application/x-zip-compressed |
| .zip | application/zip |
| .zip | multipart/x-zip |
| .zoo | application/octet-stream |
| .zsh | text/x-script.zsh |
openFile: resource exhausted (Too many open files)我一开始并没有意识到这个是我系统默认文件打开总数是1024的关系。这个可以很容易解决:
ulimit -n 5000
要是永远的改变需要修改这个文件:/etc/security/limits.conf
nick hard nofile 5000
一月十三日 等待变化等待机会
sudo apt-get install git npm cabal-install graphviz
curl --proto '=https' --tlsv1.2 -sSf https://get-ghcup.haskell.org | sh
sudo apt-get install build-essential curl libffi-dev libffi8ubuntu1 libgmp-dev libgmp10 libncurses-dev libncurses5 libtinfo5npm install split mathjax-full mathjax-node-sre
git clone https://github.com/mathjax/mathjax-node-cli/
echo "export PATH=\"$PWD/mathjax-node-cli/bin:\$PATH\"" >> ~/.bashrc && source ~/.bashrc
一月十五日 等待变化等待机会
ami-0bcd06f1209545cd6)是openvpn公司或者社区创建的,它通过了aws/ec2来收取的一个费用。
General Purpose SSD (gp2) $0.12 of GB of provisioned storage per month我现在使用的是8G,所以一个月应该是 8x$0.12=$0.96。所以,如果开一个月的话大约是11美元。我使用internet speed test,结果好几个没有结果,唯一的一个反映我的下载速度有500+M,这个速度的确是令人满意的。至少我看youtube非常的流畅应证了这一点。当 然这个vpn肯定有些古怪的地方因为我的android手机,
看到谷歌的IP,而是被GFW拦截了,这个不是在DNS出问题,那么你使用通常的运营商的路径就是死路一条。但是如何让我的OS知道我需要使用vpn自带的DNS服务呢?这个就是问题的核心,这个也是我遇到openvpn的文档里反复读到但是一直不得要领的地方:
One major feature that is missing with the command line client is the ability to automatically implement DNS servers that are pushed by the VPN server. It is possible, but it requires you to install a DNS management program such as resolvconf or openresolv, and it may or may not clash with existing network management software in your OS. The idea here, however, is that you use a script that runs when the connection goes up, and when it goes down, that uses resolvconf or openresolv to implement the DNS servers for you. The reason why this client is not able to manage it completely by itself is mainly because in an operating system like Windows, Macintosh, Android, or iOS, there is already an established single method of handling DNS management. It is therefore easy for us to create a software client for those operating systems that already knows how to handle DNS. But Linux is available in so many variations and also supports different programs and methods of implementing DNS servers, and so it was only reasonable to leave built-in DNS support out of the OpenVPN program and instead to provide, where possible, a script that handles DNS implementation. Such a script could even be written by yourself to do whatever tasks are necessary to implement the DNS servers in your unique situation.我一直在想这个文档要表达什么意思呢?为什么要把DNS server推送给我们的client系统呢?
这里所说的后一个use case,我还是不理解。总之,这个是我之前没有作的一个步骤,很可能是影响route的一个原因吧?If your VPN setup consists of a site-to-site setup between your cloud instances and your machines on-premises, ensure you disable source destination check protection on Amazon; otherwise, routing won’t function properly.
Turn off source/destination checks:
- Right-click on the VPN instance
- Select Change Source/Dest.
- Check and make sure the status is Disabled.
Source/destination checking can also block traffic if you want VPC data to go directly to the IP addresses of your VPN clients in the VPN client subnet. For that use case, turn off the check as well.
那么不要NAT要routing,要怎么做呢?OpenVPN Access Server’s default routing uses network address translation (NAT). Traffic originating from the VPN clients appears to come from the local IP address of the Access Server with NAT, and this is simpler than setting up routing.
However, when using NAT, your traffic from the VPC itself can’t directly access a VPN client as the NAT engine prevents direct contact. You must configure routing instead of NAT to allow direct access to a VPN client.
这么作的结果是这样子的
- Sign in to the Admin Web UI.
- Click Configuration > VPN Settings.
- Scroll to the Routing section, where you can click Yes, using Routing.
- Configure your subnets for your network.
最后一句实际上我还是看不懂,在ec2/vpc上的route难道aws已经自动作了吗?我看了半天也不理解。After setting up routing, the source IP address of packets coming from the VPN clients is kept intact, and direct access from the VPC network to the VPN client subnet is possible. However, because the VPC doesn’t automatically recognize the VPN subnet within the VPN instance, it doesn’t know how to send the return traffic back to the instance. To correct this problem, add a static route in the Amazon routing table for your VPC so that the return traffic flows properly. Refer to Amazon’s AWS VPC routing documentation: Route tables for your VPC (Amazon).
Entering user data:这里有两个我很感兴趣的部分:
- During the steps above for creating an AMI, when you reach step 7, Advanced details, expand that section.
- Scroll down to the text field, User data.
- Enter your data for one or more of the available settings below. Ensure you enter each row as key1=value1, and don’t use quote keys or spaces on either side of the equal character.
Key Description reroute_gw (boolean, default=0) If 1, clients route internet traffic through the VPN. reroute_dns (boolean, default=0) If 1, clients route DNS queries through the VPN. Note: If the VPC CIDR block is defined, it is made accessible to VPN clients via NAT.
Should client Internet traffic be routed through the VPN?设定为Yes
dig +short www.google.com
nslookup www.google.com
resolvectl query -4 www.google.com
静夜思
斜月三星伴,
意马心猿牵。
万里相思刻,
灵台方寸间。
一月十八日 等待变化等待机会
sudo mkdir /etc/qemu; echo "allow virtbr0" | sudo tee /etc/qemu/bridge.confsudo chmod +s /usr/lib/qemu/qemu-bridge-helper
sudo brctl addbr virtbr0
sudo brctl addif virtbr0 enp0s31f6
sudo ip addr add 192.168.1.23/24 dev virtbr0
sudo ip link set virtbr0 up
sudo iptables -I FORWARD -m physdev --physdev-is-bridged -j ACCEPT我刚刚还在担心结果网卡就挂了。
qemu-system-x86_64 -boot d -m 2G -hda serverdisk.img -enable-kvm -net nic,model=virtio,macaddr=52:54:00:00:00:01 -net bridge,br=virtbr0
nick@nick-sager:~/ami$ route
Kernel IP routing table
Destination     Gateway         Genmask         Flags Metric Ref    Use Iface
0.0.0.0         172.27.232.1    128.0.0.0       UG    0      0        0 tun0
default         192.168.1.1     0.0.0.0         UG    100    0        0 enp0s31f6
ec2-54-67-3-66. 192.168.1.1     255.255.255.255 UGH   0      0        0 virtbr0
128.0.0.0       172.27.232.1    128.0.0.0       UG    0      0        0 tun0
link-local      0.0.0.0         255.255.0.0     U     1000   0        0 enp0s31f6
172.27.232.0    0.0.0.0         255.255.248.0   U     0      0        0 tun0
192.168.1.0     0.0.0.0         255.255.255.0   U     0      0        0 virtbr0
192.168.1.0     0.0.0.0         255.255.255.0   U     100    0        0 enp0s31f6
192.168.1.0     0.0.0.0         255.255.255.0   U     425    0        0 virtbr0
一月二十日 等待变化等待机会
	sudo apt-get update -y && sudo apt-get install -y ruby unzip
wget https://s3.amazonaws.com/ec2-downloads/ec2-ami-tools.zip
sudo mkdir -p /usr/local/ec2
sudo unzip ec2-ami-tools.zip -d /usr/local/ec2
export EC2_AMITOOL_HOME=/usr/local/ec2/ec2-ami-tools-1.5.19
export PATH=$EC2_AMITOOL_HOME/bin:$PATH
sudo lshw -C disk
sudo parted /dev/sdb
1) Start parted as follows:sudo parted /dev/sdb2) Create a new GPT disklabel (aka partition table):
(parted) mklabel gpt3) Set the default unit to TB:
(parted) unit TB4) Create one partition occupying all the space on the drive. For a 4TB drive:
(parted) mkpart
Partition name?  []? primary
File system type?  [ext2]? ext4
Start? 0
End? 4
Alternatively, you can set the partition size as a percentage of the disk. To create a partition occupying all the space on the drive:
(parted) mkpart
Partition name?  []? primary
File system type?  [ext2]? ext4
Start? 0%
End? 100%
5) Check that the results are correct:
(parted) printThere should be one partition occupying the entire drive.
6) Save and quit "parted":
(parted) quit
sudo fdisk /dev/sdb
curl "https://awscli.amazonaws.com/awscli-exe-linux-x86_64.zip" -o "awscliv2.zip"
unzip awscliv2.zip
sudo ./aws/install
Only the following instance types support an instance store volume as the root volume: C3, D2, G2, I2, M3, and R3.我发现实际上自己制作ebs-ami是一件很麻烦的事情,我决定放弃了。
一月二十二日 等待变化等待机会
git clone --recursive https://github.com/AUTOMATIC1111/stable-diffusion-webui.git
pip install torch torchvision
sudo apt-get install nvidia-cuda-dev python3-pycudapip install git+https://github.com/crowsonkb/k-diffusion.git --prefer-binary类似的
pip install git+https://github.com/TencentARC/GFPGAN.git --prefer-binarypip install pytorch_lightning类似的要安装gradio
git clone https://github.com/Stability-AI/generative-models.git repositories/generative-models
git clone https://github.com/Stability-AI/generative-models.git repositories/generative-models
cd generative-models
python3 -m venv .pt2
source .pt2/bin/activate
pip3 install -r requirements/pt2.txt
pip3 install .
sdatafor training
pip3 install -e git+https://github.com/Stability-AI/datapipelines.git@main#egg=sdata
pip install hatch
hatch build -t wheel
pip install dist/*.whlTried something else, as well. there are a series of errors due to
pytorch_lightning.utilities.distributedin
- /stable-diffusion-webui/repositories/stable-diffusion-stability-ai/ldm/models/diffusion/ddpm.py (Line: 20)
- /stable-diffusion-webui/extensions-builtin/LDSR/sd_hijack_ddpm_v1.py (Line: 17)
In both the files, just change
pytorch_lightning.utilities.distributedtopytorch_lightning.utilities.rank_zeroat above stated lines. And the issues will be resolved.It worked for me. Might work for you as well.
一月二十五日 等待变化等待机会
Table 5 Meta Packages Available for CUDA 12.3 Meta Package
Purpose
cuda
Installs all CUDA Toolkit and Driver packages. Handles upgrading to the next version of the
cudapackage when it’s released.cuda-12-3
Installs all CUDA Toolkit and Driver packages. Remains at version 12.3 until an additional version of CUDA is installed.
cuda-toolkit-12-3
Installs all CUDA Toolkit packages required to develop CUDA applications. Does not include the driver.
cuda-toolkit-12
Installs all CUDA Toolkit packages required to develop applications. Will not upgrade beyond the 12.x series toolkits. Does not include the driver.
cuda-toolkit
Installs all CUDA Toolkit packages required to develop applications. Handles upgrading to the next 12.x version of CUDA when it’s released. Does not include the driver.
cuda-tools-12-3
Installs all CUDA command line and visual tools.
cuda-runtime-12-3
Installs all CUDA Toolkit packages required to run CUDA applications, as well as the Driver packages.
cuda-compiler-12-3
Installs all CUDA compiler packages.
cuda-libraries-12-3
Installs all runtime CUDA Library packages.
cuda-libraries-dev-12-3
Installs all development CUDA Library packages.
cuda-drivers
Installs all Driver packages. Handles upgrading to the next version of the Driver packages when they’re released.
sudo apt-get purge libnvidia-compute-510 libnvidia-compute-525 libnvidia-compute-525:i386 libnvidia-ml-dev
然后使用官方的所谓的p类型的包:aptitude search '~P cuda-'
PING www.google.com(edge-star-mini6-shv-01-vie1.facebook.com (2a03:2880:f107:83:face:b00c:0:25de)) 56 data bytes这个让我有些毛骨悚然,也许这个openvpn免费的东西是在把我引流到某个广告引擎,甚至是黑客的过滤网站?然后启动web.sh的时候注意到一个 git的option居然没有--refetch,然后我才意识到开发者们使用的是高版本的git,我默认的ubuntu22.04的版本太老了。
repositories/stable-diffusion-stability-ai/ldm/models/diffusion/ddpm.py里有一个
diff --git a/ldm/models/diffusion/ddpm.py b/ldm/models/diffusion/ddpm.py
index bbedd04..ef0990e 100644
--- a/ldm/models/diffusion/ddpm.py
+++ b/ldm/models/diffusion/ddpm.py
@@ -16,7 +16,7 @@ from contextlib import contextmanager
 from functools import partial
 from tqdm import tqdm
 from torchvision.utils import make_grid
-from pytorch_lightning.utilities.distributed import rank_zero_only
+from pytorch_lightning.utilities.rank_zero import rank_zero_only

 from ldm.util import log_txt_as_img, exists, default, ismap, isimage, mean_flat, count_params, instantiate_from_config
 from ldm.modules.ema import LitEma
models/Stable-diffusion目录下。
Medium
Medium defines a category of artwork.
keyword Note Portrait Very realistic drawings. Good to use with people. Digital painting Digital art style. Concept art Illustration style, 2D. Ultra realistic illustration Drawings that are very realistic. Good to use with people. Underwater portrait Use with people. Underwater. Hair floating. Underwater steampunk Very realistic drawings. Good to use with people. Style
These keywords further refine the art style.
keyword Note hyperrealistic Increases details and resolution pop-art Pop-art style Modernist vibrant color, high contrast art nouveau Add ornaments and details, building style Artist
Mentioning the artist in the prompt is a strong effect. Study their work and choose wisely.
keyword Note John Collier 19th century portrait painter. Add elegancy Stanley Artgerm Lau Good to use with woman portrait, generate 19th delicate clothing, some impressionism Frida Kahlo Quite strong effect following Kahlo’s portrait style. Sometimes result in picture frame John Singer Sargent Good to use with woman portraits, generate 19th delicate clothing, some impressionism Alphonse Mucha 2D portrait painting in style of Alphonse Mucha Website
Mentioning an art or photo site is a strong effect, probably because each site has its niche genre.
keyword Note pixiv Japanese anime style pixabay Commercial stock photo style artstation Modern illustration, fantasy Resolution
keyword Note unreal engine Very realistic and detailed 3D sharp focus Increase resolution 8k Increase resolution, though can lead to it looking more fake. Makes the image more camera like and realistic vray 3D rendering best for objects, landscape and building. Additional details
Add specific details to your image.
keyword Note dramatic shot from a low angle silk Add silk to clothing expansive More open background, smaller subject low angle shot shot from low angle god rays sunlight breaking through the cloud psychedelic vivid color with distortion Color
Add an additional color scheme to the image.
keyword Note iridescent gold Shinny gold silver Silver color vintage vintage effect Lighting
keyword Note rim lighting light on edge of an object cinematic lighting A generic term to improve contrast by using light crepuscular rays sunlight breaking through the cloud
一月二十七日 等待变化等待机会
photo of young woman, [fan bingbing:0.96], highlight hair, sitting outside restaurant, wearing dress, rim lighting, studio lighting, looking at the camera, dslr, ultra quality, sharp focus, tack sharp, dof, film grain, Fujifilm XT3, crystal clear, 8K UHD, highly detailed glossy eyes, high detailed skin, skin pores我感觉AI是先产生了一个女人在酒吧的图片然后再换脸,这个可以似乎是我看到webui产生缩略图的步骤这么猜测的。这里是negative prompt
disfigured, ugly, bad, immature, cartoon, anime, 3d, painting, b&w当然这里还可以把两个名人的名字串在一起搞出一个混合的脸。
 但是这个完全取决于模型,我发现似乎prune的模型不再认识名人的脸了。
embedding目录下,然后当提示的关键字出现就可以了。
一月二十九日 等待变化等待机会
修图,这个以前在使用photoshop是一个很大的工程,如今对于一个门外汉只是几分钟的工作,而且超越了普通美工的水平了。
A variational autoencoder (VAE) is a technique used to improve the quality of AI generated images you create with the text-to-image model Stable Diffusion. VAE encodes the image into a latent space and then that latent space is decoded into a new, higher quality image.就是说它是一个提高图像质量的工具。什么是latent space呢?未知的?隐含的?让我想起了WarCraft里的咒语:From light to darkness. From darkness to light.
a lower-dimensional representation of the image
There are two main types of VAEs that can be used with Stable Diffusion: exponential moving average (EMA) and mean squared error (MSE). EMA is generally considered to be the better VAE for most applications, as it produces images that are sharper and more realistic. MSE can be used to produce images that are smoother and less noisy, but it may not be as realistic as images generated by EMA.
To use VAE with Stable Diffusion, you will need to download a VAE
model and place it in the stable-diffusion-webui/models/VAE directory.
You can then select the VAE model that you want to use in the Settings > Stable Diffusion > SD VAE
一月三十日 等待变化等待机会
AnimateDiff is a text-to-video module for Stable Diffusion. It was trained by feeding short video clips to a motion model to learn how the next video frame should look like. Once this prior is learned, animateDiff injects the motion module to the noise predictor U-Net of a Stable Diffusion model to produce a video based on a text description.目前还不理解,先抄笔记再说。这里的结论是说视频的生成完全取决于模型,这个比较好理解,就是和文字图像没有本质区别的的方式,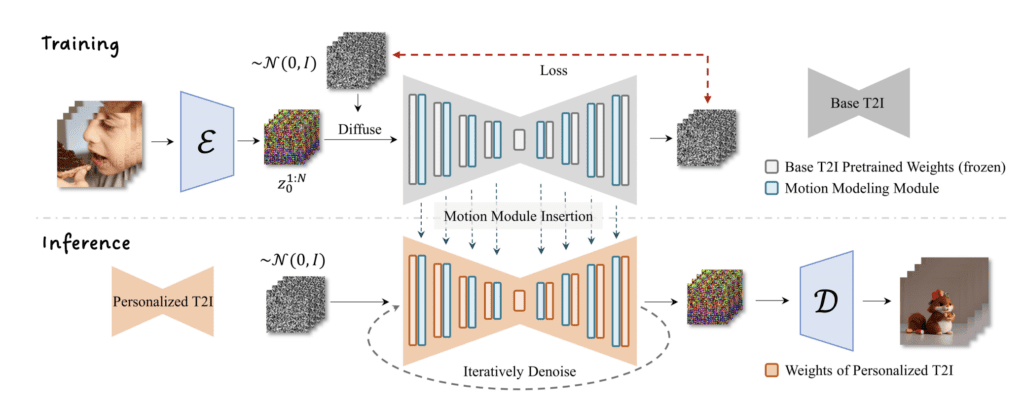
You can use AnimateDiff with any Stable Diffusion checkpoint model and LoRA.安装步骤
https://github.com/continue-revolution/sd-webui-animatediffstable-diffusion-webui > extensions > sd-webui-animatediff > model folder.
Direct download link for v1.5 v2 motion model:
https://huggingface.co/guoyww/animatediff/resolve/main/mm_sd_v15_v2.ckptDirect download link for v1.4 motion model:
https://huggingface.co/guoyww/animatediff/resolve/main/mm_sd_v14.ckptDirect download link for v1.5 motion model:
https://huggingface.co/guoyww/animatediff/resolve/main/mm_sd_v15.ckpt似乎要配合这个动画的model才行? 这里是很多的动画的model 这里是使用指南因为我运行了一次后就在webui找不到了To use AnimateDiff in AUTOMATIC1111, navigate to the txt2img page. In the AnimateDiff section,
- Enable AnimateDiff: Yes
- Motion Module: There are two motion modules you can choose from. The v1.4 model creates more motion, but the v1.5 model creates clearer animations.
Then write a prompt and a negative prompt as usual. For example
prompt 1girl, looking at viewer, anime, cherry blossomsnegative prompt disfigured, deformed, ugly
AnimateDiff turns a text prompt into a video using a Stable Diffusion model. You can think of it as a slight generalization of text-to-image: Instead of generating an image, it generates a video.
我觉得另一个核心概念是controlNet:AnimateDiff uses a control module to influence a Stable Diffusion model. It is trained with a variety of short video clips. The control module conditions the image generation process to produce a series of images that look like the video clips it learns.
Like ControlNet, the control module of AnimateDiff can be used with ANY Stable Diffusion model. Currently, only Stable Diffusion v1.5 models are supported.
不可能有过多的创造想象的成分,不大可能造出没有见过的。Since it follows the motion learned from the training data, it produces a generic motion that’s typically seen. It won’t produce a video that follows a detailed sequence of motions in the prompt.
The quality of motion is sensitive to the training data. It can’t animate exotic graphics that is not present in the training data.
- Change the prompt during video generation. This technique is called prompt travel.
- Use a reference video with ControlNet.
Embedding, also called textual inversion, is an alternative way to control the style of your images in Stable Diffusion.就是说重定义?
Embedding is the result of textual inversion, a method to define new keywords in a model without modifying it. The method has gained attention because its capable of injecting new styles or objects to a model with as few as 3 -5 sample images.就是说它不是模型,而是重定义旧的模型,这个工作量很小,仿佛思想钢印里打错一个真与假的符号就完全改变了信仰。
The amazing thing about textual inversion is NOT the ability to add new styles or objects — other fine-tuning methods can do that as well or better. It is the fact that it can do so without changing the model.去哪里找呢?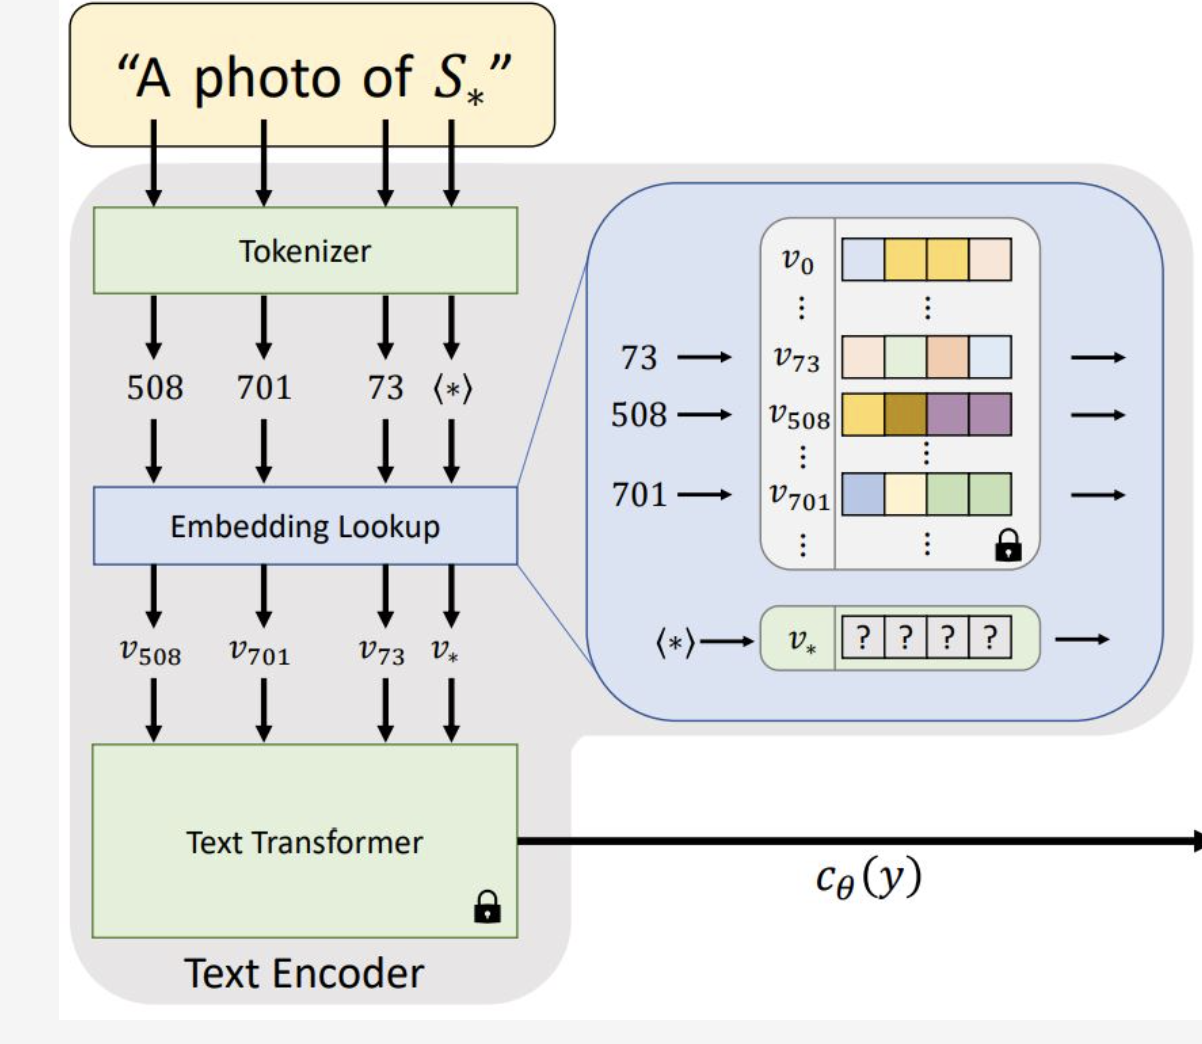
总之,它是一些.bin文件要放在embedding目录下。它是使用文件名作为提示符号的。启动时候可以看到加载信息。The go-to place to download embeddings is Civitai. Filter with textual inversion to view embeddings only.
Hugging Face hosts the Stable Diffusion Concept Library, which is a repository of a large number of custom embeddings.
https://raw.githubusercontent.com/AUTOMATIC1111/stable-diffusion-webui-extensions/master/index.json
我尝试从命令行的确被拒绝了,我怀疑是vpn的问题,于是尝试curl/wget就发现同样的问题,使用nslookup raw.githubusercontent.com看到的是0.0.0.0,我怀疑这个是dns的设置问题。我尝试修改NetworkManager上的dns server ip。还安装bind9/dnsutil之类ubuntu的工具来手动修改。也许dns需要forward,总之过了好一会才有效果。这个和我启动webui.sh脚本应该是无关的。
pip install --upgrade setuptools
pip install -r requirements.txt
Stable Video Diffusion (SVD) Image-to-Video is a diffusion model that takes in a still image as a conditioning frame, and generates a video from it.所以,它的核心还是conditioning。
首先,安装就是很有意思。我感觉python和java一样非常复杂的运行环境,所以,使用所谓的虚拟环境很重要。
git clone https://github.com/Stability-AI/generative-models.git
cd generative-models
# install required packages from pypi
python3 -m venv .pt2
source .pt2/bin/activate
pip3 install -r requirements/pt2.txt
pip3 install .
pip3 install -e git+https://github.com/Stability-AI/datapipelines.git@main#egg=sdata
fairscale安装总是失败的问题,那么就提前安装一下吧。实在是不行还有从源码安装的选项。
git clone https://github.com/facebookresearch/fairscale.git
cd fairscale
pip install -r requirements.txt
# -e signified dev mode since e stands for editable
pip install -e .
pip install hatch
hatch build -t wheel
Streamlit is an open-source Python library that makes it easy to create and share beautiful, custom web apps for machine learning and data science. In just a few minutes you can build and deploy powerful data apps. So let's get started!所以,它是一个python的库,可以作非常令人震惊的app应用,我看它的hello demo简直完全不知道它是怎么做出来的。这个是完全偏离了ai的部分,但是它非常的强大,以至于对于大量数据需要展示的应用的制作应该是非常的有用,我 不知道它是怎么作出那些漂亮的统计图表,简直就是行走的office应用。
Fine-tuning is a common technique in machine learning. It takes a model trained on a wide dataset and trains a bit more on a narrow dataset.简而言之,就是
回锅肉。人们之所以要训练fine-tuned,就是因为原本的大模型广而不精。
这个是SDXL模型
export COMMANDLINE_ARGS="--opt-split-attention --opt-sub-quad-attention --lowvram"
((best quality)), ((masterpiece)), ((realistic)), long highlighted hair, (fan bingbing:0.95), Asian girl in red Chinese ancient armor, confident stance, high-resolution, living room, smiling, head tiltedCyberRealistic_Negative-neg然后产生的这个结果:
 而在img2img里选择这个
motion module其实是相当关键的,因为在没有这个模型之前产生的图像变化很大,作出的视频还是gif都是巨大的跨越导致人眼看起来很不舒服。这里就是模仿范冰冰的视频和动画:
 制作了一个简单的录频加以记录。
一月三十一日 等待变化等待机会
ControlNet is a neural network that controls image generation in Stable Diffusion by adding extra conditions.这个是原始论文的出处。我下载了一份备份。
- Specify human poses.
- Copy the composition from another image.
- Generate a similar image.
- Turn a scribble into a professional image.
而这里的核心又是conditioning,这里有一个更加深刻的定义:就是通过改变noise predictor,这个是什么我还不清楚,但是有个概念也好。ControlNet is a neural network model for controlling Stable Diffusion models. You can use ControlNet along with any Stable Diffusion models.
The purpose of conditioning is to steer the noise predictor so that the predicted noise will give us what we want after subtracting from the image.我发现这个是整个工作机制的最好的介绍,但是我现在还没有能力一个个消化。
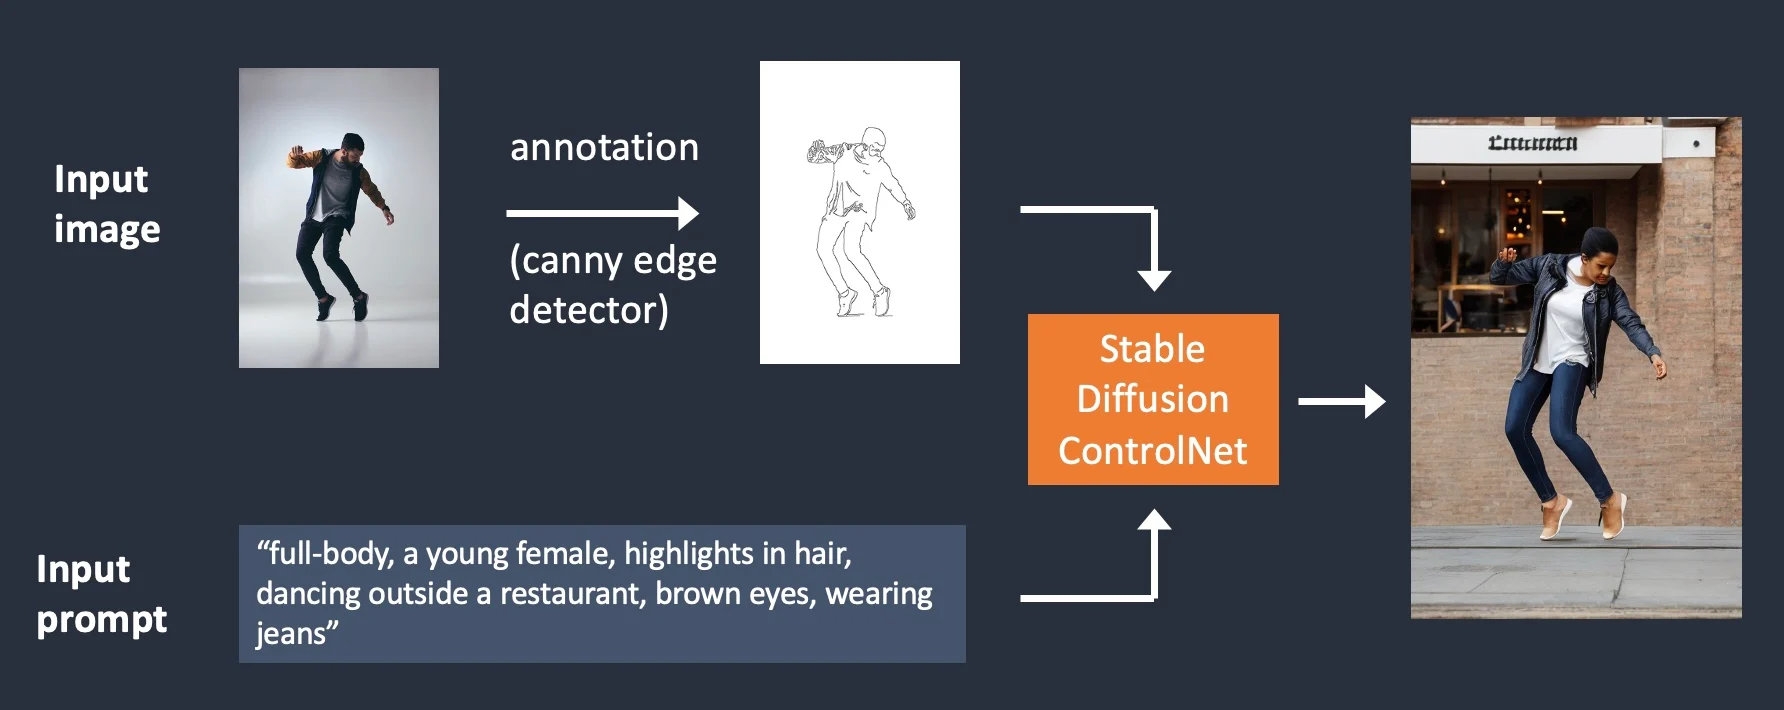
ControlNet adds one more conditioning in addition to the text prompt. The extra conditioning can take many forms in ControlNet.ControlNet本身是一种额外的conditioning,是在原有的text prompt基础上的。作者举了两个实例来说明:
Controlling image generation with (1) edge detection and (2) human pose detection.
ControlNet takes an additional input image and detects its outlines using the Canny edge detector. An image containing the detected edges is then saved as a control map. It is fed into the ControlNet model as an extra conditioning to the text prompt.
 能不能说controlNet需要
图文并茂来给模型作提示,
连说带比划。
The process of extracting specific information (edges in this case) from the input image is called annotation (in the research article) or preprocessing (in the ControlNet extension).图形轮廓是annotation,或者是脚注。而在controlNet内部是所谓的预处理。这些都是高级的概念,我听听就好。
human pose detection和
edge detection也许就是更加偏重于以人物为对象吧?
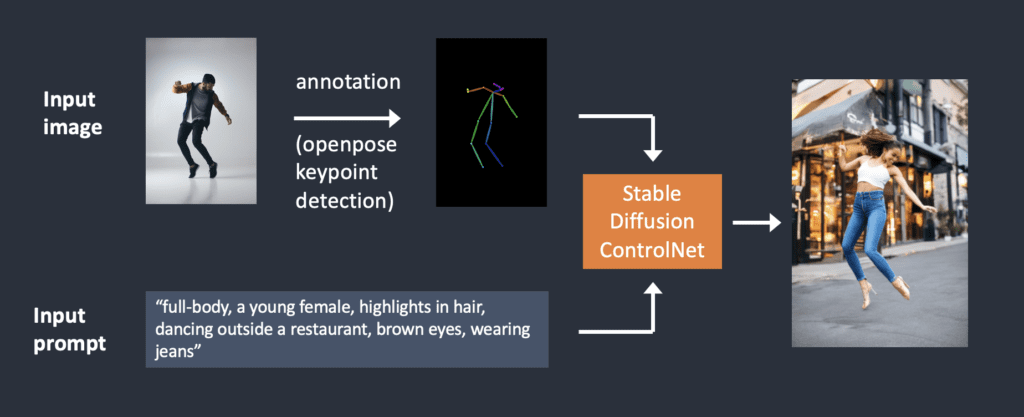
Edge detection is not the only way an image can be preprocessed. Openpose is a fast human keypoint detection model that can extract human poses like positions of hands, legs, and head. See the example below.这里又提到了它内部使用的机制是一个什么openPose,人工智能的链条极其的长,任何一个环节都是无数人的心血劳动努力。

Below is the ControlNet workflow using OpenPose. Keypoints are extracted from the input image using OpenPose, and saved as a control map containing the positions of key points. It is then fed to Stable Diffusion as an extra conditioning together with the text prompt. Images are generated based on these two conditionings.我称之为
精读
 这里是一个从图像到语言,又从语言到图像的过程。又一次让我想起了:
From light to darkness; From darkness to light;这个是符合马克思主义唯物辩证法关于人类认识世界改造世界的过程的一般论述的。就是从具体到抽象,再从抽象到具体。这个就是人眼识别的一般做法。 这里作者还给出了Openpose和Canny的区别:
What’s the difference between using Canny edge detection and Openpose? The Canny edge detector extracts the edges of the subject and background alike. It tends to translate the scene more faithfully. You can see the dancing man became a woman, but the outline and hairstyle are preserved.Canny更加的忠实还原,或者说抽象程度低一些,而Openpose更加的触及图像的本质,更加的抽象。当然这个是有代价的,就是它更加的专注于人物的主要部分,而不是通用吧?
OpenPose only detects human key points such as positions of the head, arms, etc. The image generation is more liberal but follows the original pose.这里作者的敏锐的观察力给你作更加细致的分析两者的结果
The above example generated a woman jumping up with the left foot pointing sideways, different from the original image and the one in the Canny Edge example. The reason is that OpenPose’s keypoint detection does not specify the orientations of the feet.
这个我好像没有看到,可能要等很久吧?
- Navigate to the Extensions page.
- Select the Install from URL tab.
- Put the following URL in the URL for extension’s repository field.
https://github.com/Mikubill/sd-webui-controlnet- Click the Install button.
- Wait for the confirmation message saying the extension is installed.
- Restart AUTOMATIC1111.
- Visit the ControlNet models page.
- Download all model files (filename ending with
.pth).(If you don’t want to download all of them, you can download the openpose and canny models for now, which are most commonly used.)
- Put the model file(s) in the ControlNet extension’s models directory.
stable-diffusion-webui\extensions\sd-webui-controlnet\models- Restart AUTOMATIC1111 webui.
If the extension is successfully installed, you will see a new collapsible section in the txt2img tab called ControlNet. It should be right above the Script drop-down menu.
 然后运行过程中发现这个动作一直不前进
Downloading: "https://huggingface.co/lllyasviel/Annotators/resolve/main/body_pose_model.pth" to /home/nick/workspace/stable-diffusion-webui/extensions/sd-webui-controlnet/annotator/downloads/openpose/body_pose_model.pthhuggingface.co的错误,说tls的certificated之类的。这个是完全和AI无关的问题。这个应该是最好的答案。
ex +'/BEGIN CERTIFICATE/,/END CERTIFICATE/p' <(echo | openssl s_client -showcerts -connect huggingface.co:443) -scq > huggingface.crt
SNI和非SNI的处理,但是对于我来说,我甚至都懒得考虑certificate chain要取多少个的问题。总之,得到对方的证书是要使用的:
sudo cp huggingface.crt /usr/local/share/ca-certificates/
sudo update-ca-certificates
https://huggingface.co/lllyasviel/Annotators/resolve/main/body_pose_model.pthhttps://huggingface.co/lllyasviel/ControlNet-v1-1/tree/mainbody_pose_model.pth,
hand_pose_model.pth,
facenet.pth,把它们拷贝到
extensions/sd-webui-controlnet/annotator/downloads/openpos
Preprocessor Model depth_xxxx control_xxxx_depth lineart_xxxx control_xxxx_lineart openpose_xxxx control_xxxx_openpose
二月一日 等待变化等待机会
- Sci-Fi
- caspian Sci-Fi
- Star Citizen
- Star Atlas
- Spaceship
- Render
- charliebo artstyle
- holliemengert artstyle
- marioalberti artstyle
- pepelarraz artstyle
- andreasrocha artstyle
- jamesdaly artstyle
鼻祖模型呢? 这里对于模型的介绍我还是要反复来理解:
Custom checkpoint models are made with (1) additional training and (2) Dreambooth. They both start with a base model like Stable Diffusion v1.5 or XL.
Additional training is achieved by training a base model with an additional dataset you are interested in. For example, you can train the Stable Diffusion v1.5 with an additional dataset of vintage cars to bias the aesthetic of cars towards the vintage sub-genre.
Dreambooth, developed by Google, is a technique to inject custom subjects into text-to-image models. It works with as few as 3-5 custom images. You can take a few pictures of yourself and use Dreambooth to put yourself into the model. A model trained with Dreambooth requires a special keyword to condition the model.
The checkpoint model is not the only model type. We also have textual inversion (also called embedding), LoRA, LyCORIS, and hypernetwork.
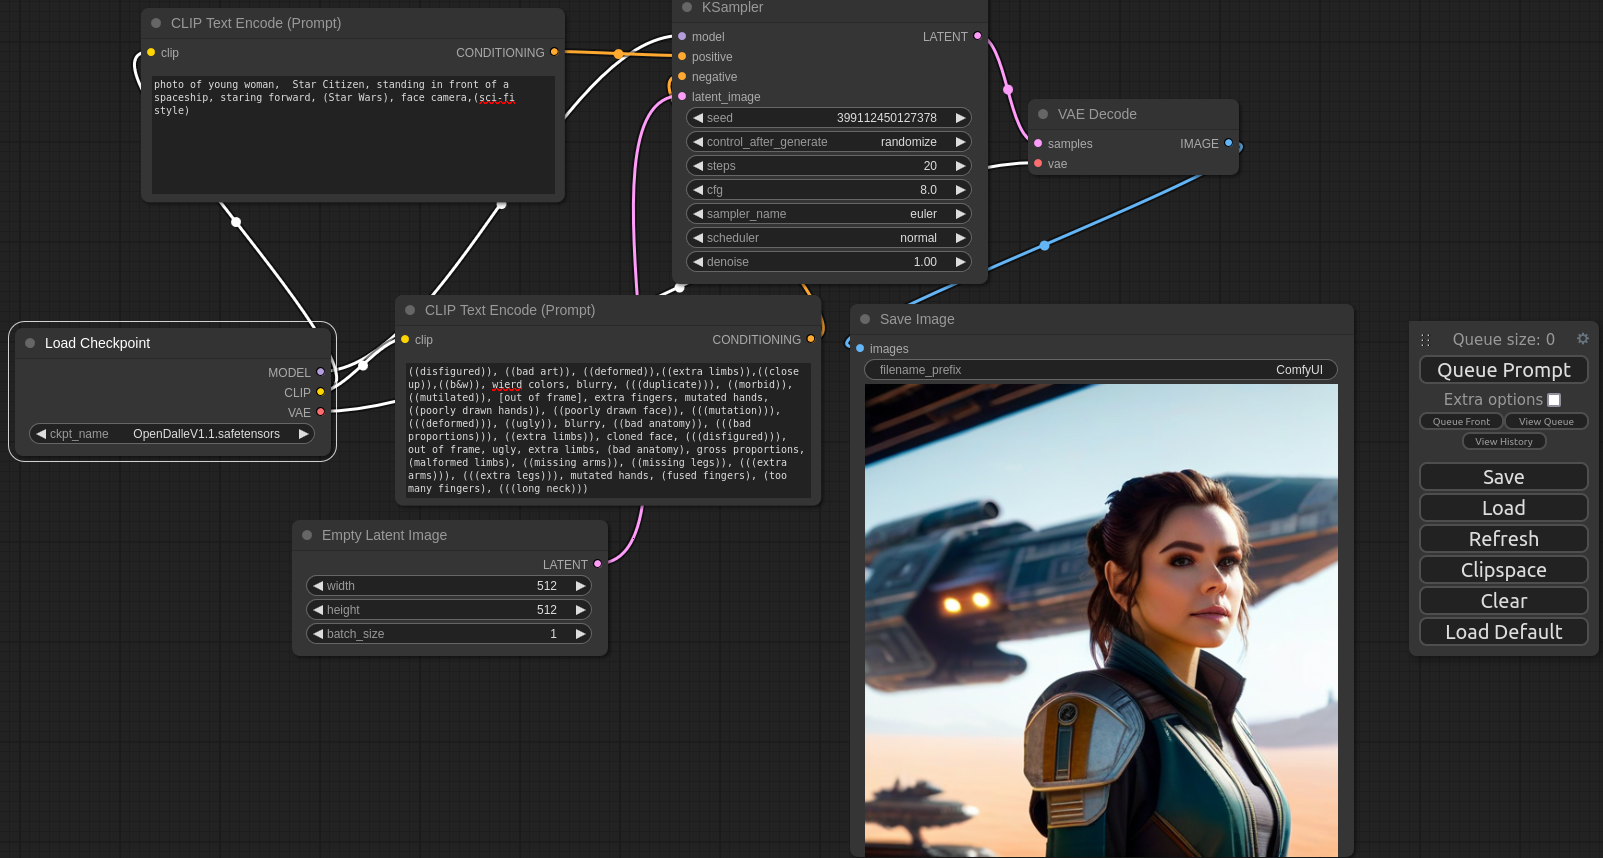
photo of young woman, Star Citizen, standing in front of a spaceship, staring forward, (Star Wars), face camera,(sci-fi style)

$>od -N 8 -t d8 3dAnimationDiffusion_v10.safetensors
0000000               154656
0000010
dd if=3dAnimationDiffusion_v10.safetensors of=/tmp/3dAnimationDiffusion_v10.txt bs=1 skip=8 count=154656
...
"model.diffusion_model.output_blocks.7.1.norm.weight":{"dtype":"F16","shape":[640],"data_offsets":[2049025648,2049026928]},"model.diffusion_model.output_blocks.7.1.proj_in.bias":{"dtype":"F16","shape":[640],"data_offsets":[2049026928,2049028208]},"model.diffusion_model.output_blocks.7.1.proj_in.weight":{"dtype":"F16","shape":[640,640,1,1],
...
Many AI image generators, including Stable Diffusion, can use an image as a prompt to generate a similar image. On the other hand, we use text prompts to describe what we want and negative prompts to describe what we don’t want. How about a negative image prompt?还真的是这个作法!
source ../stable-diffusion-webui/venv/bin/activate
python main.py
ln -s ~/workspace/stable-diffusion-webui/models/Stable-diffusion/OpenDalleV1.1.safetensors .
黑群晖到货了,看来我是小看了这些国内的年轻人,非常的有技术含量,因为那个引导u盘为什么要重启一次呢?从它的输出说是生成启动引导文件,给人一种动态产生的感觉。这个我的猜想是第一次启动得到真实的硬件信息或者驱动,第二次要适配群晖的硬件要求吧?这里的一些资料可以慢慢看吧?
二月二日 等待变化等待机会
| model type | model path |
|---|---|
| Checkpoint | stable-diffusion-webui/models/Stable-diffusion |
| VAE | stable-diffusion-webui/models/VAE |
| LoRA | stable-diffusion-webui/models/Lora |
| LyCORIS | stable-diffusion-webui/models/LyCORIS |
| Embeddings | stable-diffusion-webui/embeddings |
| Hypernetworks | stable-diffusion-webui/hypernetworks |
| Controlnet | stable-diffusion-webui/ControlNet |
原图
模仿图

www.digicert.com的根证书吗?似乎还真的没有:
nick@nick-sager:~/Downloads$ awk -v cmd='openssl x509 -noout -subject' '
    /BEGIN/{close(cmd)};{print | cmd}' < /etc/ssl/certs/ca-certificates.crt | grep DigiCert
subject=C = US, O = DigiCert Inc, OU = www.digicert.com, CN = DigiCert Assured ID Root CA
subject=C = US, O = DigiCert Inc, OU = www.digicert.com, CN = DigiCert Assured ID Root G2
subject=C = US, O = DigiCert Inc, OU = www.digicert.com, CN = DigiCert Assured ID Root G3
subject=C = US, O = DigiCert Inc, OU = www.digicert.com, CN = DigiCert Global Root CA
subject=C = US, O = DigiCert Inc, OU = www.digicert.com, CN = DigiCert Global Root G2
subject=C = US, O = DigiCert Inc, OU = www.digicert.com, CN = DigiCert Global Root G3
subject=C = US, O = DigiCert Inc, OU = www.digicert.com, CN = DigiCert High Assurance EV Root CA
subject=C = US, O = DigiCert Inc, OU = www.digicert.com, CN = DigiCert Trusted Root G4
subject=C = US, O = "DigiCert, Inc.", CN = DigiCert TLS ECC P384 Root G5
subject=C = US, O = "DigiCert, Inc.", CN = DigiCert TLS RSA4096 Root G5
nick@nick-sager:~/Downloads$ openssl x509 -noout -subject -in cdn-lfs.huggingface.crt
subject=C = US, ST = California, L = Menlo Park, O = "Meta Platforms, Inc.", CN = *.facebook.com
nick@nick-sager:~/Downloads$ ex +'/BEGIN CERTIFICATE/,/END CERTIFICATE/p' <(echo | openssl s_client -showcerts -connect www.bing.com:443) -scq | openssl x509 -noout -subject
depth=2 C = US, O = DigiCert Inc, OU = www.digicert.com, CN = DigiCert Global Root G2
verify return:1
depth=1 C = US, O = Microsoft Corporation, CN = Microsoft Azure TLS Issuing CA 02
verify return:1
depth=0 C = US, ST = WA, L = Redmond, O = Microsoft Corporation, CN = www.bing.com
verify return:1
DONE
subject=C = US, ST = WA, L = Redmond, O = Microsoft Corporation, CN = www.bing.com
openvpnas@ip-172-31-35-59:~$ ex +'/BEGIN CERTIFICATE/,/END CERTIFICATE/p' <(echo | openssl s_client -showcerts -connect www.google.com:443) -scq | openssl x509 -noout -subject
depth=2 C = US, O = Google Trust Services LLC, CN = GTS Root R1
verify return:1
depth=1 C = US, O = Google Trust Services LLC, CN = GTS CA 1C3
verify return:1
depth=0 CN = www.google.com
verify return:1
DONE
subject=CN = www.google.com
openvpnas@ip-172-31-35-59:~$ ex +'/BEGIN CERTIFICATE/,/END CERTIFICATE/p' <(echo | openssl s_client -showcerts -connect huggingface.co:443) -scq | openssl x509 -noout -subject
depth=2 C = US, O = Amazon, CN = Amazon Root CA 1
verify return:1
depth=1 C = US, O = Amazon, CN = Amazon RSA 2048 M01
verify return:1
depth=0 CN = huggingface.co
verify return:1
DONE
subject=CN = huggingface.co
openvpnas@ip-172-31-35-59:~$ ex +'/BEGIN CERTIFICATE/,/END CERTIFICATE/p' <(echo | openssl s_client -showcerts -connect cdn-lfs.huggingface.co:443) -scq | openssl x509 -noout -subject
depth=2 C = US, O = Amazon, CN = Amazon Root CA 1
verify return:1
depth=1 C = US, O = Amazon, CN = Amazon RSA 2048 M01
verify return:1
depth=0 CN = cdn-lfs.huggingface.co
verify return:1
DONE
subject=CN = cdn-lfs.huggingface.co
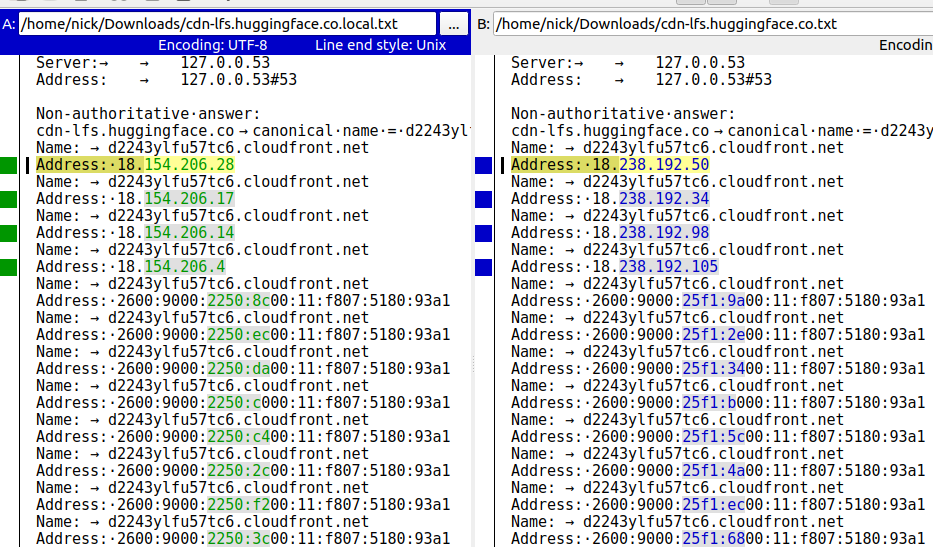 为什么会造成这个区别呢?是地域不同所以自然的就不同吗?
这里的回答相当的全面。
为什么会造成这个区别呢?是地域不同所以自然的就不同吗?
这里的回答相当的全面。
我在openvpn上看到类似的:This is because after connecting to a VPN with
vpnc, it puts a line in/etc/resolv.confso it looks like:# Dynamic resolv.conf(5) file for glibc resolver(3) generated by resolvconf(8) # DO NOT EDIT THIS FILE BY HAND -- YOUR CHANGES WILL BE OVERWRITTEN nameserver 1.2.3.4 nameserver 127.0.0.1 search MyDomain
nameserver 127.0.0.53
options edns0 trust-ad
search us-west-1.compute.internal
If true all connections to the server will be encrypted. Note that this mode requires a DNS server that supports DNS-over-TLS and has a valid certificate. If the hostname was specified in这个systemd-resolved似乎是我要找的。我太累了。记录一下,随后再找。DNS=by using the formataddress#server_nameit is used to validate its certificate and also to enable Server Name Indication (SNI) when opening a TLS connection. Otherwise the certificate is checked against the server's IP. If the DNS server does not support DNS-over-TLS all DNS requests will fail. When set toopportunisticDNS request are attempted to send encrypted with DNS-over-TLS. If the DNS server does not support TLS, DNS-over-TLS is disabled. Note that this mode makes DNS-over-TLS vulnerable to "downgrade" attacks, where an attacker might be able to trigger a downgrade to non-encrypted mode by synthesizing a response that suggests DNS-over-TLS was not supported. If set to false, DNS lookups are send over UDP. If set todefault, uses the system default.
二月三日 等待变化等待机会
openvpn-systemd-resolved
这里也始终是我不理解的,究竟DNS的服务是通过哪一个?systemd-resolved还是resolvectl,这个文件/etc/resolv.conf还
是起作用的?那么127.0.0.53是做什么用的?而且DNS的解析哪怕你设置对了,在实际运行过程中哪一方的返回快最终决定了实际使用的结果,甚至于
有时候你设置了正确的可是因为缓存的缘故不能立刻看到正确的结果导致你对于正确的设置产生怀疑?种种问题的最根本问题还是我不理解问题是什么。连最基本的
概念都没有。
nick@nick-sager:~/workspace/DS918$ dig www.google.com

; <<>> DiG 9.18.18-0ubuntu0.22.04.1-Ubuntu <<>> www.google.com
;; global options: +cmd
;; Got answer:
;; ->>HEADER<<- opcode: QUERY, status: NOERROR, id: 55053
;; flags: qr rd ra; QUERY: 1, ANSWER: 1, AUTHORITY: 4, ADDITIONAL: 9

;; OPT PSEUDOSECTION:
; EDNS: version: 0, flags:; udp: 65494
;; QUESTION SECTION:
;www.google.com.			IN	A

;; ANSWER SECTION:
www.google.com.		227	IN	A	74.86.3.208

;; AUTHORITY SECTION:
google.com.		227	IN	NS	ns3.google.com.
google.com.		227	IN	NS	ns2.google.com.
google.com.		227	IN	NS	ns1.google.com.
google.com.		227	IN	NS	ns4.google.com.

;; ADDITIONAL SECTION:
ns2.google.com.		227	IN	AAAA	2001:4860:4802:34::a
ns1.google.com.		227	IN	A	216.239.32.10
ns1.google.com.		227	IN	AAAA	2001:4860:4802:32::a
ns2.google.com.		227	IN	A	216.239.34.10
ns4.google.com.		227	IN	AAAA	2001:4860:4802:38::a
ns4.google.com.		227	IN	A	216.239.38.10
ns3.google.com.		227	IN	A	216.239.36.10
ns3.google.com.		227	IN	AAAA	2001:4860:4802:36::a

;; Query time: 0 msec
;; SERVER: 127.0.0.53#53(127.0.0.53) (UDP)
;; WHEN: Sat Feb 03 05:29:10 +08 2024
;; MSG SIZE  rcvd: 307
Record Type Record Definition Record Function A record The A record is the most important DNS record type. The "A" in A record stands for "address." An A record shows the IP address for a specific hostname or domain. The A record only supports IPV4 addresses. The main use of A record is for IP address lookup. Using an A record, a web browser is able to load a website using the domain name. As a result, we can access websites on the internet without knowing their IP addresses. Another use of A record is in the domain name system-based blackhole list (DNSBL). Here, the A record is used to block mail from known spam sources. AAAA record AAAA record, just like A record, point to the IP address for a domain. However, this DNS record type is different in the sense that it points to IPV6 addresses. IPV6 is an upgrade over IPV4 as it offers more IP addresses. As a result, IPV6 solves the issue of running out of unique IP addresses. Usage of the AAAA record for DNS resolution has great potential because it uses IPV6, which is an improvement over IPV4. Also, as the internet keeps growing and we're running out of IPV4 addresses, the potential for AAAA records is high. AAAA records are used to resolve a domain name to the newer IPV6 protocol address. CNAME record CNAME—or, in full, "canonical name"—is a DNS record that points a domain name (an alias) to another domain. In a CNAME record, the alias doesn't point to an IP address. And the domain name that the alias points to is the canonical name. For example, the subdomain ng.example.com can point to example.com using CNAME. A practical example for the use of CNAME records is running multiple subdomains for different purposes on the same server. For example, we can use ftp.example.com for file transfer protocol (FTP) and serve webpages via www.example.com. We can then use a CNAME record to point both subdomains to example.com. The main domain example.com then points to the server's IP address using an A record. It's also possible to point a CNAME to another CNAME. However, doing so is inefficient and can lead to slow load speed and poor user experience. NS record A nameserver (NS) record specifies the authoritative DNS server for a domain. In other words, the NS record helps point to where internet applications like a web browser can find the IP address for a domain name. Usually, multiple nameservers are specified for a domain. For example, these could look like ns1.examplehostingprovider.com and ns2.examplehostingprovider.com. If you've purchased a web hosting service or set up a simple website, you probably received an email with nameserver details. Those nameservers, in simple terms, connect your domain name to the actual server your site is hosted on. The nameserver contains other DNS records for the domain like an A record and MX record. MX record A mail exchange (MX) record, is a DNS record type that shows where emails for a domain should be routed to. In other words, an MX record makes it possible to direct emails to a mail server. You can have multiple MX records for a single domain name. And what this means is that you can have backup email servers. With an MX record, it's possible to hand off emails to a dedicated email server. For example, you can decide to leave all the trouble of setting up webmail on a server you own to a specialized email provider. This comes with many benefits, including custom email clients for reading and sending emails, and improved security and spam filters. Also, you can use a service like Site24x7 to monitor and verify issues with the mail server your MX records point to. SOA record SOA stands for "start of authority." It's an important DNS record type that stores admin information about a domain. This information includes the email address of the admin and when the domain was last updated. TXT record TXT stands for "text," and this record type lets the owner of a domain store text values in the DNS. Several services use this record to verify ownership of a domain. PTR record A pointer (PTR) record provides a domain name for reverse lookup. It's the opposite of an A record as it provides the domain name linked to an IP address instead of the IP address for a domain. SRV record SRV stands for service, obviously. Using this DNS record type, it's possible to store the IP address and port for specific services. CERT record CERT stands for certificate, obviously. This record type stores public keys certificates. DCHID DHCP configuration record This DNS record type stores information related to dynamic host configuration protocol (DHCP). DNAME The full meaning of DNAME is "delegation name." This record type works very similarly to CNAME; however, it points all the subdomains for the alias to the canonical domain name. That is, pointing the DNAME for secondsite.com to example.com will also apply to staff.secondsite.com and any other subdomain.
This is a helper script designed to integrate OpenVPN with the `systemd-resolved` service via DBus instead of trying to override `/etc/resolv.conf`, or manipulate `systemd-networkd` configuration files.它的工作原理揭示了它必须要配合openvpn服务起来的时候,我作为客户端是否也应该这样子呢?
Since systemd-229, the `systemd-resolved` service has an API available via DBus which allows directly setting the DNS configuration for a link. This script makes use of `busctl` from systemd to send DBus messages to `systemd-resolved` to update the DNS for the link created by OpenVPN.安装部分ubuntu都不需要操心,使用前提也说明了:
OpenVPN 2.1 or greater,iproute2, and have at least version 229 of systemd。而且我已经明确知道系统是运行systemd-resolved.service服务的。然后文档提到了NSS,这个又是一个全新的领域,难道
Name Service Switch又会横插一杠子?怎么能够集中统一呢?我的初步理解是NSS定义了一个解析的顺序或者说优先级。总之我看不懂,先不要管了。接下来是关于
stub的:
The `systemd-resolved` service (since systemd-231) also listens on `127.0.0.53` via the `lo` interface, providing a stub resolver which any client can call to request DNS, whether or not it uses the system libraries to resolve DNS, and you no longer have to worry about trying to manage your `/etc/resolv.conf` file.然后解释的是结果吗?
This set up can be installed by linking to `stub-resolv.conf`我发现系统已经是这样子了。我看的头疼死了。歇一歇吧。 这个是更容易阅读的版本。ln -sf /run/systemd/resolve/stub-resolv.conf /etc/resolv.conf
二月四日 等待变化等待机会
git clone --recursive git@codeberg.org:OpenVPN/openvpn3-linux.git
dig @172.27.232.49 -q www.google.com
sudo sysctl -w net.ipv6.conf.all.disable_ipv6=1
sudo sysctl -w net.ipv6.conf.default.disable_ipv6=1
sudo sysctl -w net.ipv6.conf.lo.disable_ipv6=1
DeepBooru得到的这个范冰冰好一些:
1girl, 3d, bare shoulders, blurry, blurry background, blurry foreground, bokeh, cosplay photo, depth of field, hand on own face, head rest, lips, lipstick, long hair, looking at viewer, makeup, photo \(medium\), photo background, photorealistic, realistic, red lips, smile, solo, upper body
dreamshaper的模型,我得到的相当准确的图像,至少穿着打扮姿态是狠准的:
 而
而CLIP得到的是更加的简单:
a woman sitting at a table with a laptop computer in her hand and a brick wall behind her, with a yellow light behind her, phuoc quan, Du Qiong, a character portrait, private press
The IPAdapter are very powerful models for image-to-image conditioning. Given a reference image you can do variations augmented by text prompt, controlnets and masks. Think of it as a 1-image lora.安装 这里有两个encoder需要下载
IPAdapter also needs the image encoders. You need the CLIP-ViT-H-14-laion2B-s32B-b79K and CLIP-ViT-bigG-14-laion2B-39B-b160k image encoders, you may already have them. If you don't, download them but be careful because the file name is the same! Rename them to something easy to remember and place them in the ComfyUI/models/clip_vision/ directory.
这个表看样子很重要,因为牵涉到不同的模型和image-encoder的组合
SD v. IPadapter Img encoder Notes v1.5 ip-adapter_sd15 ViT-H Basic model, average strength v1.5 ip-adapter_sd15_light ViT-H Light model, very light impact v1.5 ip-adapter-plus_sd15 ViT-H Plus model, very strong v1.5 ip-adapter-plus-face_sd15 ViT-H Face model, use only for faces v1.5 ip-adapter-full-face_sd15 ViT-H Strongher face model, not necessarily better v1.5 ip-adapter_sd15_vit-G ViT-bigG Base model trained with a bigG encoder SDXL ip-adapter_sdxl ViT-bigG Base SDXL model, mostly deprecated SDXL ip-adapter_sdxl_vit-h ViT-H New base SDXL model SDXL ip-adapter-plus_sdxl_vit-h ViT-H SDXL plus model, stronger SDXL ip-adapter-plus-face_sdxl_vit-h ViT-H SDXL face model
A brief history of negative prompts
Initially, diffusion-based AI image generators could generate random, high-quality images. But there was no way to control what you generate. It just generates images that resembles the training data.
Then, classifier-free guidance came into play. It hijacks the attention layers to inject the text embeddings to the sampling steps. The model is then trained with image and caption pairs. When generating an image, the model steers the images toward the prompt and away from the random images.
Classifier guidance is a way to incorporate image labels in diffusion models. You can use a label to guide the diffusion process.这样子举例就容易懂了就是训练时候加标签来分类。这里又引出了CFS这个常见的参数
The classifier guidance scale is a parameter for controlling how closely should the diffusion process follow the label.这里我们记录一下引用的最原始的论文。这是拷贝。
With high classifier guidance, the images produced by the diffusion model would be biased toward the extreme or unambiguous examples. If you ask the model for a cat, it will return an image that is unambiguously a cat and nothing else.也就是说CFS高的话,AI会选择最无争议的图。
The classifier guidance scale controls how closely the guidance is followed. In the figure above, the sampling on the right has a higher classifier guidance scale than the one in the middle. In practice, this scale value is simply the multiplier to the drift term toward the data with that label.这里的drift term toward the data with that labe指的是什么参数呢?
Although classifier guidance achieved record-breaking performance, it needs an extra model to provide that guidance. This has presented some difficulties in training.当然不希望反反复复去训练,能不能在模型的基础上改进一下就行了呢?
Classifier-free guidance, in its authors’ terms, is a way to achieve “classifier guidance without a classifier”. Instead of using class labels and a separate model for guidance, they proposed to use image captions and train a conditional diffusion model, exactly like the one we discussed in text-to-image.我觉得这段话就是核心要深刻领会。首先是不用模型来再训练改变模型,靠的是什么?condition吗?还有uncondition。原论文概要里这句话也非常的重要:
Classifier guidance combines the score estimate of a diffusion model with the gradient of an image classifier and thereby requires training an image classifier separate from the diffusion model. It also raises the question of whether guidance can be performed without a classifier.这里都是关键点。难怪作者说
classifier guidance without a classifier。
classifier guidance without a classifier。
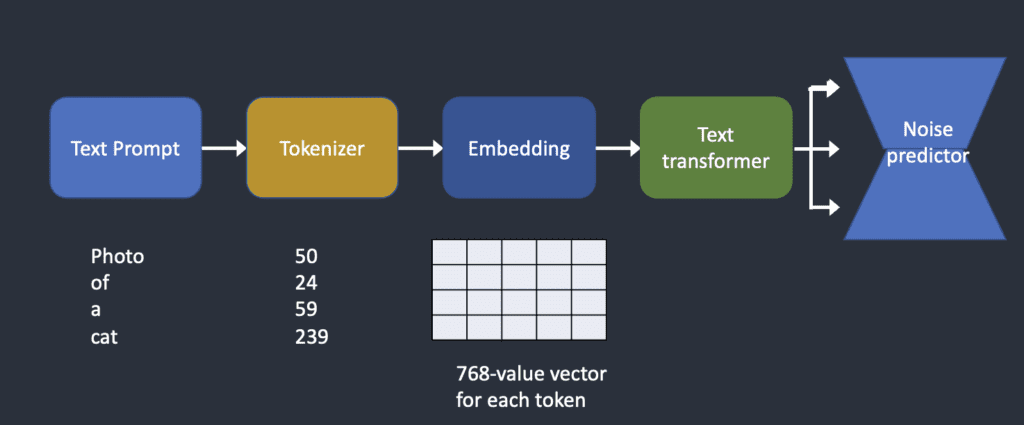
Tokenizer first converts each word in the prompt to a number called a token. Each token is then converted to a 768-value vector called embedding. The embeddings are then processed by the text transformer and are ready to be consumed by the noise predictor.
The CLIP model was proposed in Learning Transferable Visual Models From Natural Language Supervision .从标题猜测是从基本模型直接转用到图形吗?梗概很难懂。看实际的说明吧。
CLIP is a multi-modal vision and language model. It can be used for image-text similarity and for zero-shot image classification. CLIP uses a ViT like transformer to get visual features and a causal language model to get the text features. Both the text and visual features are then projected to a latent space with identical dimension. The dot product between the projected image and text features is then used as a similar score.这是需要好好阅读的核心定义。为什么使用dot product呢?两个向量的点乘的数学含义是什么?
The dot product, also called scalar product, is a measure of how closely two vectors align, in terms of the directions they point.,的确,这个就是计算两个向量的相似度,所以,这个就是使用点乘的意思。
To feed images to the Transformer encoder, each image is split into a sequence of fixed-size non-overlapping patches, which are then linearly embedded. A [CLS] token is added to serve as representation of an entire image.所以,这个就是我们怎么计算图像的
数字签名或者说特征值吧,一个个grid或者patch的向量。当然还有总的
CLS stands for classification and its there to represent sentence-level classification.这里来理解一下什么是CLS token。
In order to better understand the role of [CLS] let's recall that BERT model has been trained on 2 main tasks:
- Masked language modeling: some random words are masked with [MASK] token, the model learns to predict those words during training. For that task we need the [MASK] token.
- Next sentence prediction: given 2 sentences, the model learns to predict if the 2nd sentence is the real sentence, which follows the 1st sentence. For this task, we need another token, output of which will tell us how likely the current sentence is the next sentence of the 1st sentence. And here comes the [CLS]. You can think about the output of [CLS] as a probability.
CLIP, which stands for Contrastive Language-Image Pre-training, is a model for telling you how well a given image and a given text caption fit together. In training, it tries to maximize the “cosine similarity” between correct image-caption vector pairs, and minimize the similarity scores between all incorrect pairs.
The adjective contrastive means "showing the difference between two things when you compare them" — like a contrastive analysis of American and British English. To contrast two things is to think about how they are different.
二月五日 等待变化等待机会
State-of-the-art (SOTA) Deep Neural Networks (DNNs) are the best models you can employ for a specific task. A DNN can earn the SOTA label based on its accuracy, speed, or any other relevant metric. However, in many computer vision domains, there exists a trade-off among these metrics. In other words, you might have a DNN that is very fast, but its accuracy falls short. Conversely, there are DNNs with impressive accuracy metrics that lack the necessary latency or throughput across various tasks, such as image classification and object detection. In these domains, a DNN will be deemed SOTA if it delivers an optimal trade-off between the relevant metrics.而这句话里有多少缩写单词我看不懂:
The metrics we usually use to compare and evaluate DNNs are accuracy, precision, recall, F1-score, IoU, and mAP.
Convolutional Neural Networks (CNNs) and Vision Transformers (ViTs) are architectures commonly used in computer vision, each using a unique method of processing visual data.
- CNNs have been the cornerstone for image processing tasks. They employ convolutional layers to systematically scan images, initially detecting basic features like edges and progressively identifying more intricate patterns deeper in the network. Due to their structured approach, CNNs have excelled in tasks such as image classification and object detection.
- ViTs introduce a novel approach to image analysis. Originating from transformer architectures initially developed for natural language processing, ViTs segment images into fixed-size patches and process them as sequences, not grids. Their inherent attention mechanisms enable them to discern relationships between various patches, capturing context and offering an interpretation distinct from CNNs. This innovative perspective by ViTs has enriched the computer vision domain, igniting extensive research into synergies between them and CNNs.
In essence, CNNs methodically sift through an image, detect hierarchical features using convolutions, distill essential information, and employ dense layers to draw conclusions about the image’s content.那么ViT呢?
In a nutshell, ViTs deconstruct an image into numerical representations, infuse it with spatial context, and harness the transformer’s capabilities to evaluate and classify the visual data.我对于ViT是如何保持其空间感知能力感到不解,这个具体是什么意思
ViTs incorporate a positional embedding to each patch embedding, ensuring the model retains spatial awareness of each segment’s origin within the image.什么叫做positional embedding?是其中某一个?
A transformer is a deep learning architecture based on the multi-head attention mechanism, proposed in a 2017 paper "Attention Is All You Need".Attention这个词反复出现
Transformers provides APIs and tools to easily download and train state-of-the-art pretrained models. Using pretrained models can reduce your compute costs, carbon footprint, and save you the time and resources required to train a model from scratch.或者说我看到的论文是训练的机制,那么这里是使用GPT,机制当然是不同的。
The idea was simple: Instead of steering away from a random image, you steer away from the images described by the negative prompt. Technically, you only need to replace the unconditioned latent image with the one that’s conditioned with the negative prompt.
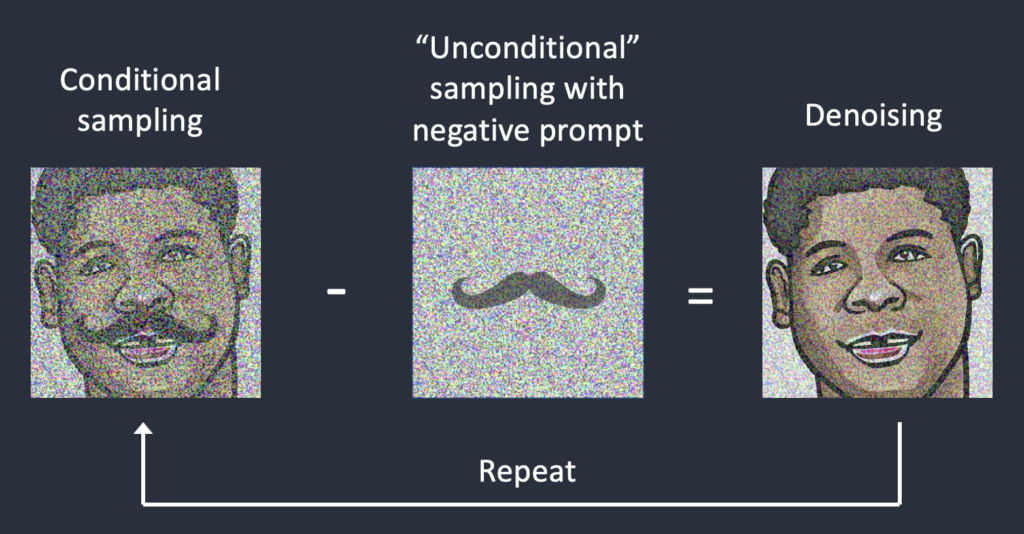 这幅图是很容易理解,但是什么叫做
unconditionalsampling with negative prompt?这里为什么是
unconditional
The technique for enabling the negative prompt can be applied to images. We encode the negative image to an embedding and inject it into the sampling process of the “unconditioned” latent.因为这里的unconditioned latent我不明所以。不过我实验的结果并不满意,也许是模型使用的问题,也许是参数输入的问题。总之,我决定继续。
...this text encoder is a special Transformer language model (technically: the text encoder of a CLIP model). It takes the input text and outputs a list of numbers representing each word/token in the text (a vector per token).这个和我看的论文是相符合的。
这里是总的概述
Image information creator
This component runs for multiple steps to generate image information. This is the steps parameter in Stable Diffusion interfaces and libraries which often defaults to 50 or 100. The image information creator works completely in the image information space (or latent space). The word “diffusion” describes what happens in this component. It is the step by step processing of information that leads to a high-quality image being generated in the end (by the next component, the image decoder).Image Decoder
The image decoder paints a picture from the information it got from the information creator. It runs only once at the end of the process to produce the final pixel image.
With this we come to see the three main components (each with its own neural network) that make up Stable Diffusion:
ClipText for text encoding.
Input: text.
Output: 77 token embeddings vectors, each in 768 dimensions.UNet + Scheduler to gradually process/diffuse information in the information (latent) space.
Input: text embeddings and a starting multi-dimensional array (structured lists of numbers, also called a tensor) made up of noise.
Output: A processed information arrayAutoencoder Decoder that paints the final image using the processed information array.
Input: The processed information array (dimensions: (4,64,64))
Output: The resulting image (dimensions: (3, 512, 512) which are (red/green/blue, width, height))
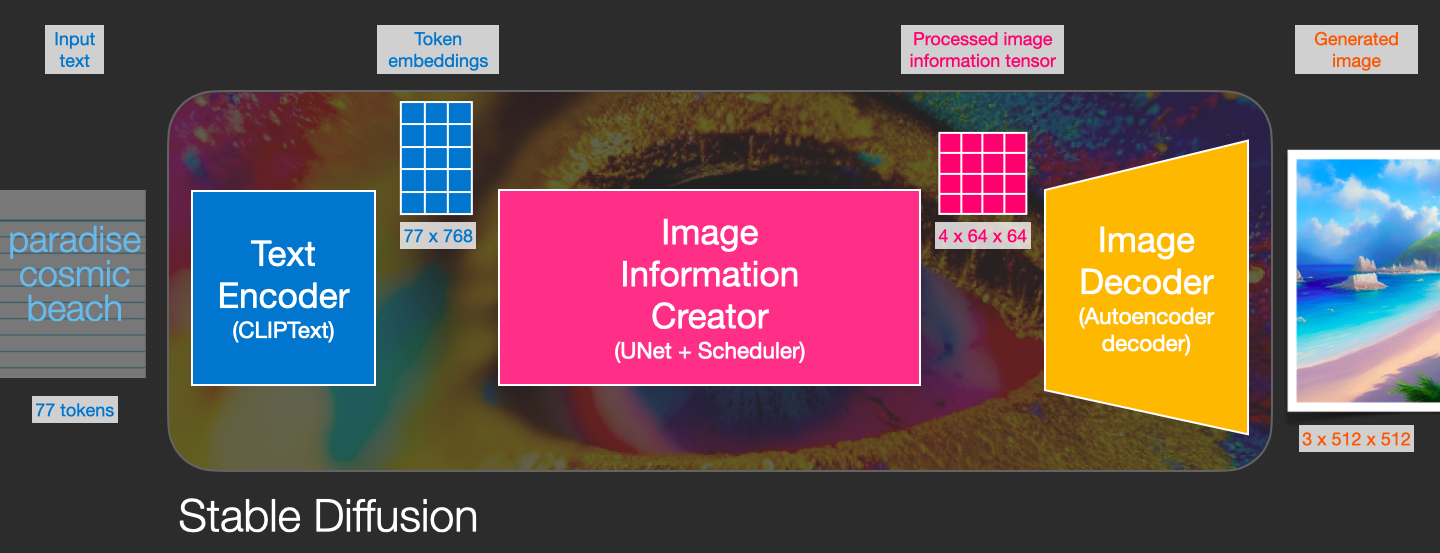
In mathematics, a tensor is an algebraic object that describes a multilinear relationship between sets of algebraic objects related to a vector space. Tensors may map between different objects such as vectors, scalars, and even other tensors. There are many types of tensors, including scalars and vectors (which are the simplest tensors), dual vectors, multilinear maps between vector spaces, and even some operations such as the dot product. Tensors are defined independent of any basis, although they are often referred to by their components in a basis related to a particular coordinate system; those components form an array, which can be thought of as a high-dimensional matrix.
如果使用了这么长时间我不能回答这个问题,我就是白学了。What is Diffusion Anyway?
Diffusion is the process that takes place inside the pink “image information creator” component. Having the token embeddings that represent the input text, and a random starting image information array (these are also called latents), the process produces an information array that the image decoder uses to paint the final image.
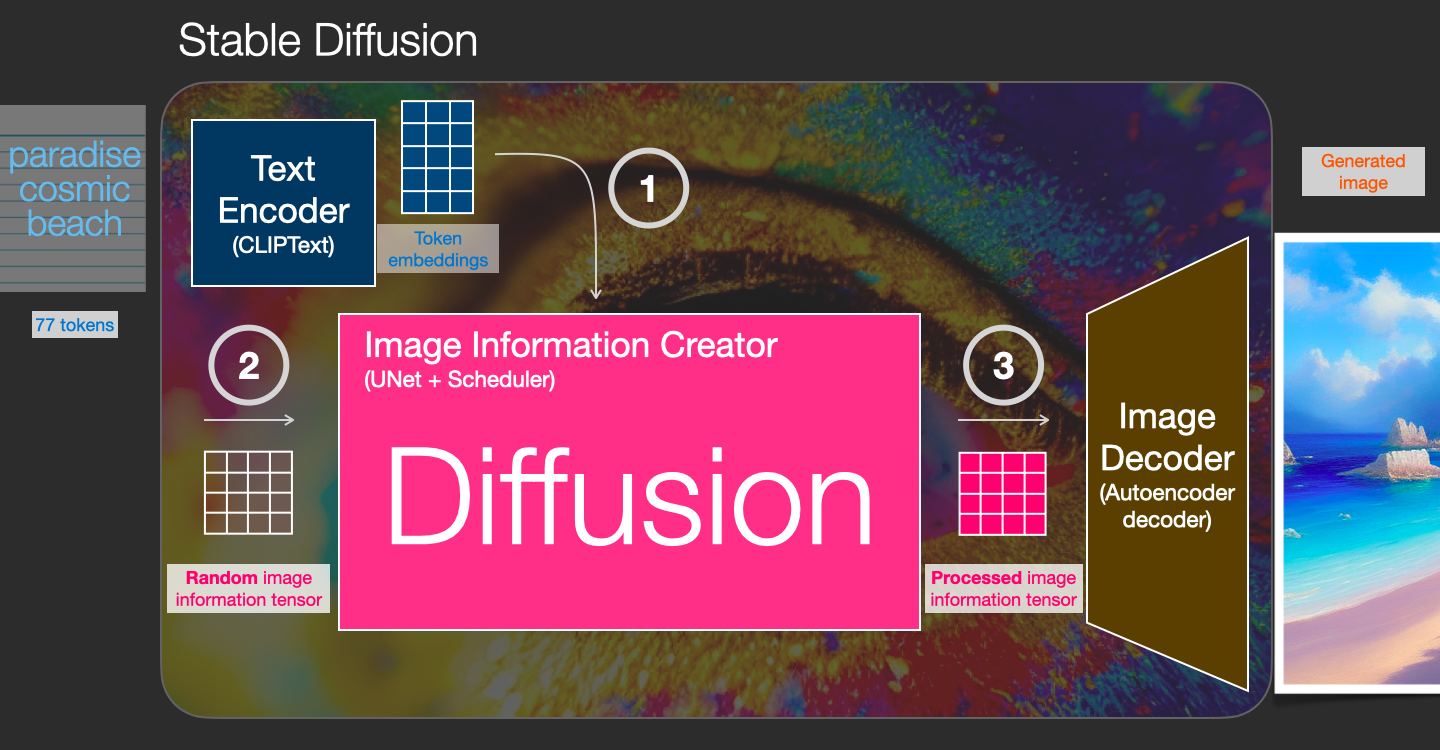 可以搞笑的回答,diffusion就像是在炒菜,把一堆输入的文字配合一系列的调味品炒出一锅菜。这个当然是向大妈大爷们解释的方式了。
二月七日 等待变化等待机会
Departure to Latent Space。
A latent space, also known as a latent feature space or embedding space, is an embedding of a set of items within a manifold in which items resembling each other are positioned closer to one another. Position within the latent space can be viewed as being defined by a set of latent variables that emerge from the resemblances from the objects.说来惭愧,英文定义我也看的不是很明白。对照一些中文版本来更准确的理解吧:
潜空间(Latent Space)也被称为潜特征空间或嵌入空间,是一组元素在流形内的嵌入,相似的元素在潜空间内的距离较小。潜空间中的位置由一组潜变量定义,这些潜变量产生于元素间的相似性。这个概念之所以重要就是因为latent space并不一定和feature space有相同的dimension,通常是低维的,而
降维打击在这里形成了所谓的数据压缩。这个形象非常的重要,因为只有理解了这一点才能理解为什么之前浙大的那篇论文他们能够
通过平面图脑补三维模型,因为在模型的创建的根本意义就在于数据的压缩和提纯,否则模型如果是简单的客观世界的直接反映那就失去了建立模型的根本意义,没有对客观世界的数据压缩就不算机器学习,学习的过程就是一个
降维打击的过程或者说数据压缩的过程。如果没有领悟这个最最浅显的基本道理,就不要再学习机器学习了,因为机器都比你懂学习!
但是这个说法其实也有一种自相矛盾的悖论的感觉。本身我们看到的二维图像难道其本质是高维的吗?在图像识别的意义(semantical)层面肯定 是的。就连人们输入的text prompt看起来是一维的字符串在意义层面也要高维来解释。而latent space的一个做法是把它映射到二维图像,这个当然不是从二维到二维的简单映射,这个是我一时犯糊涂才会这么想。
从一个空间到另一个空间的映射经过了从低维到高维,又从高维到低维的复杂的转换,这个也许就是transformer吧?总之像极了那句咒语:From light to darkness; From darkness, light!模型的另一重意义在于它的可复用性,否则也是没有意义的。也就是论文里说的:训练一次,反复使用。
A notable advantage of this approach is that we need to train the universal autoencoding stage only once and can therefore reuse it for multiple DM trainings or to explore possibly completely different tasks.
A Markov process is a stochastic process that satisfies the Markov property[1] (sometimes characterized as "memorylessness"). In simpler terms, it is a process for which predictions can be made regarding future outcomes based solely on its present state and—most importantly—such predictions are just as good as the ones that could be made knowing the process's full history.
在我看来Markov Chain的特点有一点点类比于Context-Free-Language(CFG),至少从上下文无关的 条件概率的角度来看,只不过CFG的概率只能是0或者100。而推而广之,也许世界上都是CFG,只不过有些Context Sensitive的语言的上下文相当的大,而且要打破某种递归循环导致的无限性。总而言之,condiitional和unconditional也许 也不过是某种准确性与性能可接受的准确度的妥协的结果,在概率模型下,只要准确度超过一定临界值它的上下文或者条件就可以放宽。
那么概率模型是否注定不是一个准确的模型呢?人类的罗辑的无模糊性是否天生就和人类自然学习过程的概率模型不兼容?或者说机器学习模仿人类的学习过程反而 从一开始就背离了无含糊余地的罗辑推理模型。也许从概率模型进行归纳的过程从而最终上升到罗辑推理模型是一个本质的飞跃,而不是一个量变的简单积累。这个 是几十年后才会面对的问题,人类现在不需要操心。注意力机制模型(Attention-Model)。
Machine learning-based attention is a mechanism which intuitively mimicks cognitive attention. It calculates "soft" weights for each word, more precisely for its embedding, in the context window. These weights can be computed either in parallel (such as in transformers) or sequentially (such as recurrent neural networks). "Soft" weights can change during each runtime, in contrast to "hard" weights, which are (pre-)trained and fine-tuned and remain frozen afterwards.是否可以通俗的理解就是赋予不同部分不同的重要性,事实上就是根据权值来取舍,这个是一种很粗暴的压缩方式,直接忽略。简单粗暴导致了质量的不稳定。因为 不明白注意力的规律,硬权值往往不可靠便改成了软权值,然而软权值像极了DM这种条件概率模型的方式,只不过怎么产生软权值永远是最核心的部分:怎么实现 才是最重要的,因为人人都明白要什么。
Attention的机制实际上是模仿人类的语言理解过程,在《Yes, (Prime) Minister》里说普通人只能一次理解一个句子,因为长句子导致听众在听了后半截就已经忘了前半段。这个就是现代普通人的注意力机制,尤其是妇女它们 的注意力不能保持三秒。从这个角度来看Attention的机制可以看作是一个简单的上下文机制。线性递减。
An autoencoder is a type of artificial neural network used to learn efficient codings of unlabeled data (unsupervised learning). An autoencoder learns two functions: an encoding function that transforms the input data, and a decoding function that recreates the input data from the encoded representation. The autoencoder learns an efficient representation (encoding) for a set of data, typically for dimensionality reduction.然后数学部分我就看不懂了,只明白这一句话:
An autoencoder, by itself, is simply a tuple of two functions.
CLIP is trained on a dataset of images and their captions. In actuality, CLIP was trained on images crawled from the web along with their “alt” tags.这个是我没有想到的,原来利用了
alttag。
CLIP is a combination of an image encoder and a text encoder. Its training process can be simplified to thinking of taking an image and its caption. We encode them both with the image and text encoders respectively. We then compare the resulting embeddings using cosine similarity.这个所谓的cosine similarity应该指的就是计算text vector和image vector的dot product。
python3 scripts/knn2img.py --prompt "a happy bear reading a newspaper, oil on canvas"
--W 256 --H 256二月八日 等待变化等待机会
BERT is basically a trained Transformer Encoder stack.这个难道是我唯一看得懂的吗?看来我需要先理解它的基础transformer。再强调一遍:CLS here stands for Classification.
二月九日 等待变化等待机会
Stable Diffusion belongs to a class of deep learning models called diffusion models. They are generative models, meaning they are designed to generate new data similar to what they have seen in training. In the case of Stable Diffusion, the data are images.这里很有趣的是指出了名字的由来:
Why is it called the diffusion model? Because its math looks very much like diffusion in physics.
A forward diffusion process adds noise to a training image, gradually turning it into an uncharacteristic noise image. The forward process will turn any cat or dog image into a noise image. Eventually, you won’t be able to tell whether they are initially a dog or a cat. (This is important)为什么要在训练好的模型里添加噪音呢?我模糊记得论文提到了不同类型的噪音,但是这个用意我却没有理解,你把你清晰的印象掺沙子让你的印象模糊起来,这样子才能经受住未来的考验?彷佛令狐冲学习
独孤九剑的 剑法之后,风轻扬大师问他忘记了多少,最后以至于完全忘记了才能无招胜有招,因为从具体到抽象的过程似乎就是一个逐渐遗忘或者说忽略细节存留根本的过程, 也许遗忘不是最好的提取方法,但是往往最本质的特征之所以是最根本的特征就在于它的抗干扰最强,所以,我们掺沙子就以为着我们希望我们的模型能够
举一反三抓住模型的根本特征,而不是简单的
猫有四条腿,狗有四条腿,所以,狗就是猫的形而上学式的学习。
reverse diffusion才是目的与关键。
Technically, every diffusion process has two parts: (1) drift and (2) random motion. The reverse diffusion drifts towards either cat OR dog images but nothing in between. That’s why the result can either be a cat or a dog.这句话很关键,但是drift and random这两个是什么含义呢?它的效果我是理解了,这个逆向过程一定是一个明确的答案,是或者不是,已经没有概率的问题了,就是你的根本的特征值是被绛帷了,失去了一些额外的细节导致你可以抓住事物最根本的属性,而这个成为判断的最有力的证据,所以,你的答案是斩钉截铁的。
Most ones know the path, but only few can actually walk the path.
To reverse the diffusion, we need to know how much noise is added to an image. The answer is teaching a neural network model to predict the noise added. It is called the noise predictor in Stable Diffusion. It is a U-Net model.这里的细节就是加噪音不是随便的,否则连小孩子都会掺沙子,关键是加噪音的时候要训练预测噪音,这一点就很高深了。
这个过程在我看来似乎是说我们人类的记忆遗忘并不是线性或者随机的,遗忘的过程是有模板特征的,如果我们能够学习怎么遗忘那么我们就能学会怎样回忆。如果 我们能够学会从零星的记忆碎片重新拼凑出原始的记忆,我们甚至于根本不需要记忆那么多的细节,这个就是压缩数据的高超的做法,对于有规律的数据我们用科学 的算法进行冗余数据归类式的无损压缩,但是对于无规律的记忆数据我们模仿记忆模糊的规律来复原最初的记忆从而起到了如梦境般的效果,
- Pick a training image, like a photo of a cat.
- Generate a random noise image.
- Corrupt the training image by adding this noisy image up to a certain number of steps.
- Teach the noise predictor to tell us how much noise was added. This is done by tuning its weights and showing it the correct answer.
似幻似真就是太虚幻境,也就是梦境,那么我们能不能把stable diffusion称作
梦工厂呢?
If you'd prefer that conda's base environment not be activated on startup,
   run the following command when conda is activated:

conda config --set auto_activate_base false

You can undo this by running `conda init --reverse bash`?
You have chosen to not have conda modify your shell scripts at all.
To activate conda's base environment in your current shell session:

eval "$(/home/nick/anaconda3/bin/conda shell.bash hook)"

To install conda's shell functions for easier access, first activate, then:

conda init
numpy-1.19.2         | 10 KB     | ############################################################# | 100%
ca-certificates-2023 | 126 KB    | ############################################################# | 100%
intel-openmp-2021.4. | 4.2 MB    | ############################################################# | 100%
mkl-service-2.4.0    | 59 KB     | ############################################################# | 100%
torchvision-0.8.1    | 17.9 MB   | ############################################################# | 100%
libffi-3.3           | 50 KB     | ############################################################# | 100%
wheel-0.41.2         | 108 KB    | ############################################################# | 100%
libdeflate-1.17      | 64 KB     | ############################################################# | 100%
pip-20.3.3           | 1.8 MB    | ############################################################# | 100%
libuv-1.44.2         | 864 KB    | ############################################################# | 100%
mkl-2021.4.0         | 142.6 MB  | ############################################################# | 100%
mkl_random-1.2.2     | 308 KB    | ############################################################# | 100%
cudatoolkit-11.0.221 | 622.9 MB  | #####################################################7        |  88%
mkl_fft-1.3.1        | 180 KB    | ############################################################# | 100%
typing_extensions-4. | 54 KB     | ############################################################# | 100%
pytorch-1.7.0        | 663.0 MB  | #############################################1                |  74%
python-3.8.5         | 49.3 MB   | ############################################################# | 100%
setuptools-68.2.2    | 948 KB    | ############################################################# | 100%
ninja-1.10.2         | 8 KB      | ############################################################# | 100%
xz-5.4.5             | 646 KB    | ############################################################# | 100%
numpy-base-1.19.2    | 10.1 MB   | ############################################################# | 100%
 ... (more hidden) ...
conda env create -f environment.yaml
conda activate ldm
二月十日 等待变化等待机会
After training, we have a noise predictor capable of estimating the noise added to an image.很多的技术核心都是在训练中,否则也不可能有这些年的突破。这里有关于sampler的文章,可以接下去阅读。
Stable Diffusion is a latent diffusion model. Instead of operating in the high-dimensional image space, it first compresses the image into the latent space. The latent space is 48 times smaller so it reaps the benefit of crunching a lot fewer numbers. That’s why it’s a lot faster.就是说压缩了48倍,为什么是48?
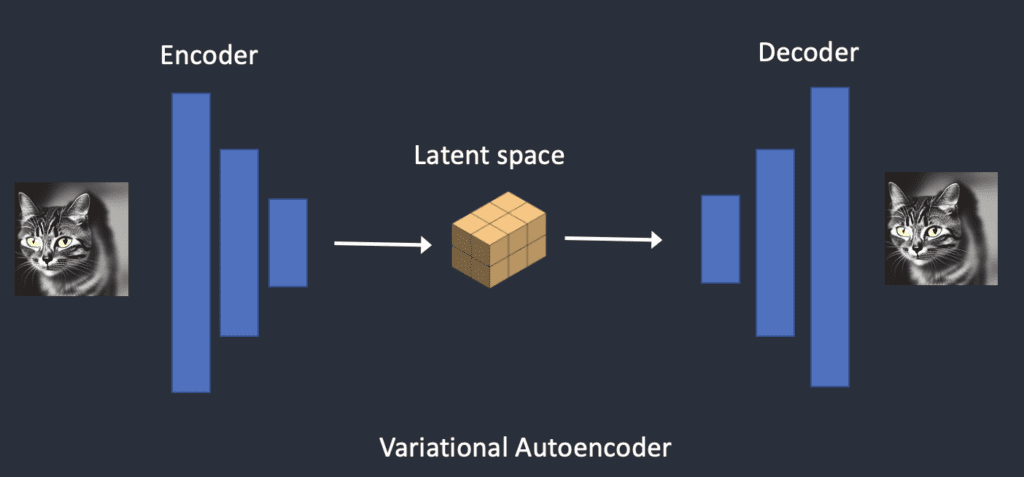 这里的核心自然是latent space,它是一个什么样子的空间?
So during training, instead of generating a noisy image, it generates a random tensor in latent space (latent noise). Instead of corrupting an image with noise, it corrupts the representation of the image in latent space with the latent noise. The reason for doing that is it is a lot faster since the latent space is smaller.核心依旧是latent-tensor,我的英文的理解始终卡在这些基本的概念上,tensor是向量的更高阶的物件吗?否则它怎么能够代替或者说压缩了 image space的向量呢?也许它就是图形里的所谓的特征值,就是你把图形的512x512x3这个纬度划分出一个个区块,比如一个区块全是空白自然没有必要罗 列那些纬度,这个和压缩是一个原理,只不过实现的方式是不一样吧?
The image resolution is reflected in the size of the latent image tensor. The size of the latent image is 4x64x64 for 512×512 images only. It is 4x96x64 for a 768×512 portrait image. That’s why it takes longer and more VRAM to generate a larger image.读到这里我以为这个想法并没有那么难的想到,为什么是48?512/64=8,然后它的平方的3/4就是48,为什么是三通道的三原色改成了四通道?总之,我觉得一般人都能够想到用grid来代替最初的逐个像素,至少如同缩略图一样牺牲一些细节吧?
image-to-image function for image upscaling看来大图也是可以拼起来的吧?或者不是拼,是某种放大?作者还提到了第三种途径就是使用大的训练的模型图SDXL模型
Natural images can be readily compressed into the much smaller latent space without losing any information. This is called the manifold hypothesis in machine learning.第一句定义就让人哑口无言!
The manifold hypothesis posits that many high-dimensional data sets that occur in the real world actually lie along low-dimensional latent manifolds inside that high-dimensional space.latent-manifold这是个什么东西?这个是embedding的定义:
In mathematics, an embedding (or imbedding) is one instance of some mathematical structure contained within another instance, such as a group that is a subgroup.我对于拓扑学最最朴素的认识大概就是这个笑话:

An often-repeated mathematical joke is that topologists cannot tell the difference between a coffee mug and a donut,[1] since a sufficiently pliable donut could be reshaped to the form of a coffee mug by creating a dimple and progressively enlarging it, while preserving the donut hole in the mug's handle. This illustrates that a coffee mug and a donut (torus) are homeomorphic.
这个过程堪比化腐朽为神奇,因为古人认为苍蝇蚊子是无中生有的,你能够从一堆噪音里经过提纯剥去噪音得到最终的隐藏的真相,这个简直就是奇迹。也许是从混乱到秩序的一个过程?
- A random latent space matrix is generated.
- The noise predictor estimates the noise of the latent matrix.
- The estimated noise is then subtracted from the latent matrix.
- Steps 2 and 3 are repeated up to specific sampling steps.
- The decoder of VAE converts the latent matrix to the final image.
Stability AI released two variants of fine-tuned VAE decoders, EMA and MSE. (Exponential Moving Average and Mean Square Error are metrics for measuring how good the autoencoders are.)原来EMA-pruned是指的这个。
EMA produces sharper images while MSE’s images are smoother.这个也许就够了。下载stabilityAI公司的EMA和MSE也许也是必要的。
Compressing an image into the latent space does lose information since the original VAE did not recover the fine details. Instead, the VAE decoder is responsible for painting fine details.这一点还是很重要的,不要以为存在无损压缩这个事情。而VAE decoder是负责细节的。
This is where conditioning comes in. The purpose of conditioning is to steer the noise predictor so that the predicted noise will give us what we want after subtracting from the image.这里先歇一下吧。
二月十一日 等待变化等待机会
Each token is then converted to a 768-value vector called embedding.
The text prompt is first tokenized by a CLIP tokenizer. CLIP is a deep learning model developed by Open AI to produce text descriptions of any images. Stable Diffusion v1 uses CLIP’s tokenizer.这里的关键还是CLIP,我之前曾经读了一点它的介绍,结果还是忘了。
CLIP (Contrastive Language-Image Pre-Training) is a neural network trained on a variety of (image, text) pairs. It can be instructed in natural language to predict the most relevant text snippet, given an image, without directly optimizing for the task, similarly to the zero-shot capabilities of GPT-2 and 3.这里让我吃惊的是它似乎是反过来的,就是给一幅图它去预测文字,当然这个确实是我在webui里使用的用途,但是难道它训练的时候不是反过来的吗?难道不是给文字训练匹配图像,或者是计算两个向量的点乘吗?使用是训练的逆过程?
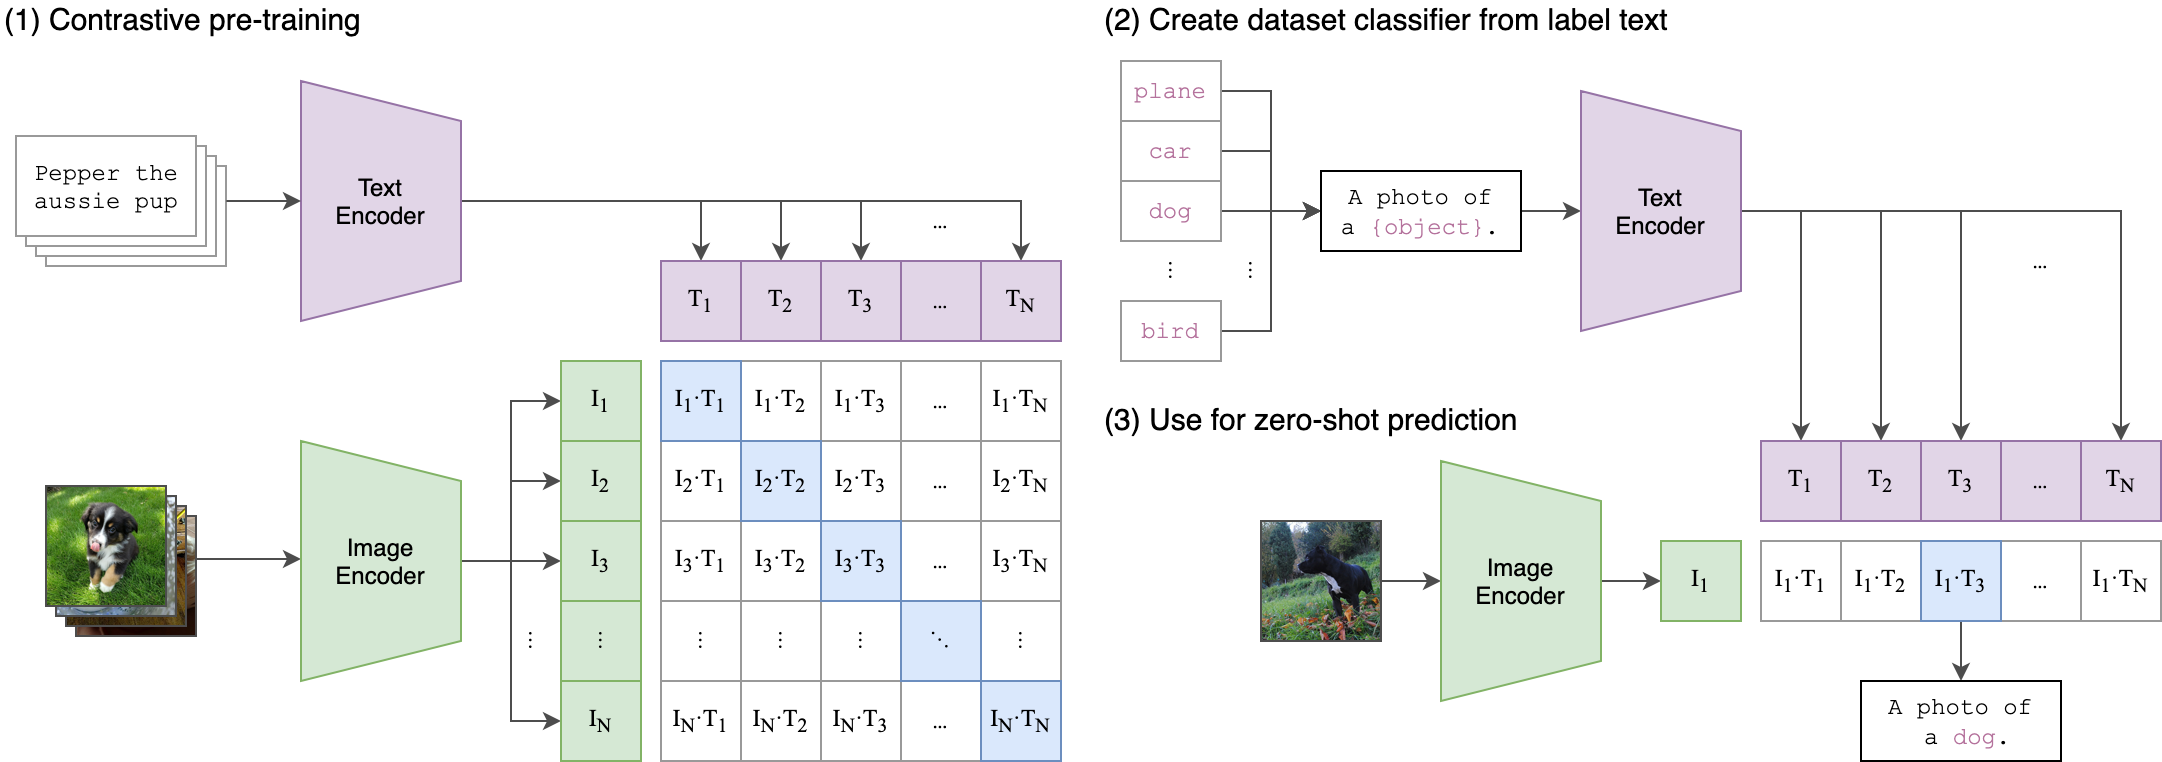 这幅示意图是写实的吗?文字和图片的向量似乎是组合成了一个矩阵,难道要选择所有的组合对子?但是我上面的理解是每一个token都是一个embedding,如果理解不错的话这个是多少个token就是多少个向量要怎么。。。
至少我学习了CLIP的缩写,这个也许是唯一理解的东西。
这幅示意图是写实的吗?文字和图片的向量似乎是组合成了一个矩阵,难道要选择所有的组合对子?但是我上面的理解是每一个token都是一个embedding,如果理解不错的话这个是多少个token就是多少个向量要怎么。。。
至少我学习了CLIP的缩写,这个也许是唯一理解的东西。
A tokenizer can only tokenize words it has seen during training.这里透露的是它纯粹就是一个字典,或者说就是一个记忆模型,难怪我当时使用
哪吒的三头六臂作为输入,结果模型完全不理解。因为训练材料是事先有筛选的。
nick@nick-sager:~/workspace$ nvidia-smi
Sun Feb 11 05:05:06 2024
+---------------------------------------------------------------------------------------+
| NVIDIA-SMI 545.23.08              Driver Version: 545.23.08    CUDA Version: 12.3     |
|-----------------------------------------+----------------------+----------------------+
| GPU  Name                 Persistence-M | Bus-Id        Disp.A | Volatile Uncorr. ECC |
| Fan  Temp   Perf          Pwr:Usage/Cap |         Memory-Usage | GPU-Util  Compute M. |
|                                         |                      |               MIG M. |
|=========================================+======================+======================|
|   0  NVIDIA GeForce RTX 4050 ...    On  | 00000000:01:00.0 Off |                  N/A |
| N/A   41C    P8               5W / 115W |    218MiB /  6141MiB |      0%      Default |
|                                         |                      |                  N/A |
+-----------------------------------------+----------------------+----------------------+

+---------------------------------------------------------------------------------------+
| Processes:                                                                            |
|  GPU   GI   CI        PID   Type   Process name                            GPU Memory |
|        ID   ID                                                             Usage      |
|=======================================================================================|
|    0   N/A  N/A    137163      G   /usr/lib/xorg/Xorg                            4MiB |
|    0   N/A  N/A    186449      C   python3                                     192MiB |
+---------------------------------------------------------------------------------------+
import torch
import clip

print("models:", clip.available_models())
models: ['RN50', 'RN101', 'RN50x4', 'RN50x16', 'RN50x64', 'ViT-B/32', 'ViT-B/16', 'ViT-L/14', 'ViT-L/14@336px']
import torch
import clip
from PIL import Image

device = "cuda" if torch.cuda.is_available() else "cpu"
model, preprocess = clip.load("ViT-B/32", device=device)

image = preprocess(Image.open("CLIP.png")).unsqueeze(0).to(device)
text = clip.tokenize(["a diagram", "a dog", "a cat"]).to(device)

with torch.no_grad():
    image_features = model.encode_image(image)
    text_features = model.encode_text(text)

    logits_per_image, logits_per_text = model(image, text)
    probs = logits_per_image.softmax(dim=-1).cpu().numpy()

print("Label probs:", probs)  # prints: [[0.9927937  0.00421068 0.00299572]]
100%|████████████████████████████████████████| 338M/338M [07:53<00:00, 748kiB/s]
Label probs: [[0.9927   0.004185 0.002968]]
_MODELS = {
    "RN50": "https://openaipublic.azureedge.net/clip/models/afeb0e10f9e5a86da6080e35cf09123aca3b358a0c3e3b6c78a7b63bc04b6762/RN50.pt",
    "RN101": "https://openaipublic.azureedge.net/clip/models/8fa8567bab74a42d41c5915025a8e4538c3bdbe8804a470a72f30b0d94fab599/RN101.pt",
    "RN50x4": "https://openaipublic.azureedge.net/clip/models/7e526bd135e493cef0776de27d5f42653e6b4c8bf9e0f653bb11773263205fdd/RN50x4.pt",
    "RN50x16": "https://openaipublic.azureedge.net/clip/models/52378b407f34354e150460fe41077663dd5b39c54cd0bfd2b27167a4a06ec9aa/RN50x16.pt",
    "RN50x64": "https://openaipublic.azureedge.net/clip/models/be1cfb55d75a9666199fb2206c106743da0f6468c9d327f3e0d0a543a9919d9c/RN50x64.pt",
    "ViT-B/32": "https://openaipublic.azureedge.net/clip/models/40d365715913c9da98579312b702a82c18be219cc2a73407c4526f58eba950af/ViT-B-32.pt",
    "ViT-B/16": "https://openaipublic.azureedge.net/clip/models/5806e77cd80f8b59890b7e101eabd078d9fb84e6937f9e85e4ecb61988df416f/ViT-B-16.pt",
    "ViT-L/14": "https://openaipublic.azureedge.net/clip/models/b8cca3fd41ae0c99ba7e8951adf17d267cdb84cd88be6f7c2e0eca1737a03836/ViT-L-14.pt",
    "ViT-L/14@336px": "https://openaipublic.azureedge.net/clip/models/3035c92b350959924f9f00213499208652fc7ea050643e8b385c2dac08641f02/ViT-L-14-336px.pt",
}
| model | a diagram | a dog% | a cat% |
|---|---|---|---|
| RN50 | 0.984 | 0.01298 | 0.003307 |
| RN101 | 0.9893 | 0.00607 | 0.004726 |
| RN50x4 | 0.972 | 0.01837 | 0.009384 |
| RN50x16 | 0.905 | 0.08417 | 0.01087 |
| RN50x64 | 0.8774 | 0.09467 | 0.02798 |
| ViT-B/32 | 0.9927 | 0.004185 | 0.002968 |
| ViT-B/16 | 0.7607 | 0.2284 | 0.01085 |
| ViT-L/14 | 0.9453 | 0.04855 | 0.005985 |
| ViT-L/14@336px | 0.932 | 0.0629 | 0.00478 |
import matplotlib.pyplot as plt

# Prepare the inputs
image, class_id = cifar100[3637]
# we just show it with image loaded
plt.imshow(image)
plt.show()
img = Image.open("my.png")
img.show()
二月十二日 等待变化等待机会
a cat, a dog, a diagram的标准表现的很不错,如果把a diagram换成
a panda结果是毛和狗的比例都上升了,这个也许是有道理的,可是在我看来返回的总概率是100%本身这个做法就是强人所难,三个都不是怎么办?其次,就是如果我多几个text prompt,结果都不对了。
import open_clip
open_clip.list_pretrained()
[('RN50', 'openai'), ('RN50', 'yfcc15m'), ('RN50', 'cc12m'), ('RN50-quickgelu', 'openai'), ('RN50-quickgelu', 'yfcc15m'), ('RN50-quickgelu', 'cc12m'), ('RN101', 'openai'), ('RN101', 'yfcc15m'), ('RN101-quickgelu', 'openai'), ('RN101-quickgelu', 'yfcc15m'), ('RN50x4', 'openai'), ('RN50x16', 'openai'), ('RN50x64', 'openai'), ('ViT-B-32', 'openai'), ('ViT-B-32', 'laion400m_e31'), ('ViT-B-32', 'laion400m_e32'), ('ViT-B-32', 'laion2b_e16'), ('ViT-B-32', 'laion2b_s34b_b79k'), ('ViT-B-32', 'datacomp_xl_s13b_b90k'), ('ViT-B-32', 'datacomp_m_s128m_b4k'), ('ViT-B-32', 'commonpool_m_clip_s128m_b4k'), ('ViT-B-32', 'commonpool_m_laion_s128m_b4k'), ('ViT-B-32', 'commonpool_m_image_s128m_b4k'), ('ViT-B-32', 'commonpool_m_text_s128m_b4k'), ('ViT-B-32', 'commonpool_m_basic_s128m_b4k'), ('ViT-B-32', 'commonpool_m_s128m_b4k'), ('ViT-B-32', 'datacomp_s_s13m_b4k'), ('ViT-B-32', 'commonpool_s_clip_s13m_b4k'), ('ViT-B-32', 'commonpool_s_laion_s13m_b4k'), ('ViT-B-32', 'commonpool_s_image_s13m_b4k'), ('ViT-B-32', 'commonpool_s_text_s13m_b4k'), ('ViT-B-32', 'commonpool_s_basic_s13m_b4k'), ('ViT-B-32', 'commonpool_s_s13m_b4k'), ('ViT-B-32-256', 'datacomp_s34b_b86k'), ('ViT-B-32-quickgelu', 'openai'), ('ViT-B-32-quickgelu', 'laion400m_e31'), ('ViT-B-32-quickgelu', 'laion400m_e32'), ('ViT-B-32-quickgelu', 'metaclip_400m'), ('ViT-B-32-quickgelu', 'metaclip_fullcc'), ('ViT-B-16', 'openai'), ('ViT-B-16', 'laion400m_e31'), ('ViT-B-16', 'laion400m_e32'), ('ViT-B-16', 'laion2b_s34b_b88k'), ('ViT-B-16', 'datacomp_xl_s13b_b90k'), ('ViT-B-16', 'datacomp_l_s1b_b8k'), ('ViT-B-16', 'commonpool_l_clip_s1b_b8k'), ('ViT-B-16', 'commonpool_l_laion_s1b_b8k'), ('ViT-B-16', 'commonpool_l_image_s1b_b8k'), ('ViT-B-16', 'commonpool_l_text_s1b_b8k'), ('ViT-B-16', 'commonpool_l_basic_s1b_b8k'), ('ViT-B-16', 'commonpool_l_s1b_b8k'), ('ViT-B-16', 'dfn2b'), ('ViT-B-16-quickgelu', 'metaclip_400m'), ('ViT-B-16-quickgelu', 'metaclip_fullcc'), ('ViT-B-16-plus-240', 'laion400m_e31'), ('ViT-B-16-plus-240', 'laion400m_e32'), ('ViT-L-14', 'openai'), ('ViT-L-14', 'laion400m_e31'), ('ViT-L-14', 'laion400m_e32'), ('ViT-L-14', 'laion2b_s32b_b82k'), ('ViT-L-14', 'datacomp_xl_s13b_b90k'), ('ViT-L-14', 'commonpool_xl_clip_s13b_b90k'), ('ViT-L-14', 'commonpool_xl_laion_s13b_b90k'), ('ViT-L-14', 'commonpool_xl_s13b_b90k'), ('ViT-L-14-quickgelu', 'metaclip_400m'), ('ViT-L-14-quickgelu', 'metaclip_fullcc'), ('ViT-L-14-quickgelu', 'dfn2b'), ('ViT-L-14-336', 'openai'), ('ViT-H-14', 'laion2b_s32b_b79k'), ('ViT-H-14-quickgelu', 'metaclip_fullcc'), ('ViT-H-14-quickgelu', 'dfn5b'), ('ViT-H-14-378-quickgelu', 'dfn5b'), ('ViT-g-14', 'laion2b_s12b_b42k'), ('ViT-g-14', 'laion2b_s34b_b88k'), ('ViT-bigG-14', 'laion2b_s39b_b160k'), ('roberta-ViT-B-32', 'laion2b_s12b_b32k'), ('xlm-roberta-base-ViT-B-32', 'laion5b_s13b_b90k'), ('xlm-roberta-large-ViT-H-14', 'frozen_laion5b_s13b_b90k'), ('convnext_base', 'laion400m_s13b_b51k'), ('convnext_base_w', 'laion2b_s13b_b82k'), ('convnext_base_w', 'laion2b_s13b_b82k_augreg'), ('convnext_base_w', 'laion_aesthetic_s13b_b82k'), ('convnext_base_w_320', 'laion_aesthetic_s13b_b82k'), ('convnext_base_w_320', 'laion_aesthetic_s13b_b82k_augreg'), ('convnext_large_d', 'laion2b_s26b_b102k_augreg'), ('convnext_large_d_320', 'laion2b_s29b_b131k_ft'), ('convnext_large_d_320', 'laion2b_s29b_b131k_ft_soup'), ('convnext_xxlarge', 'laion2b_s34b_b82k_augreg'), ('convnext_xxlarge', 'laion2b_s34b_b82k_augreg_rewind'), ('convnext_xxlarge', 'laion2b_s34b_b82k_augreg_soup'), ('coca_ViT-B-32', 'laion2b_s13b_b90k'), ('coca_ViT-B-32', 'mscoco_finetuned_laion2b_s13b_b90k'), ('coca_ViT-L-14', 'laion2b_s13b_b90k'), ('coca_ViT-L-14', 'mscoco_finetuned_laion2b_s13b_b90k'), ('EVA01-g-14', 'laion400m_s11b_b41k'), ('EVA01-g-14-plus', 'merged2b_s11b_b114k'), ('EVA02-B-16', 'merged2b_s8b_b131k'), ('EVA02-L-14', 'merged2b_s4b_b131k'), ('EVA02-L-14-336', 'merged2b_s6b_b61k'), ('EVA02-E-14', 'laion2b_s4b_b115k'), ('EVA02-E-14-plus', 'laion2b_s9b_b144k'), ('ViT-B-16-SigLIP', 'webli'), ('ViT-B-16-SigLIP-256', 'webli'), ('ViT-B-16-SigLIP-i18n-256', 'webli'), ('ViT-B-16-SigLIP-384', 'webli'), ('ViT-B-16-SigLIP-512', 'webli'), ('ViT-L-16-SigLIP-256', 'webli'), ('ViT-L-16-SigLIP-384', 'webli'), ('ViT-SO400M-14-SigLIP', 'webli'), ('ViT-SO400M-14-SigLIP-384', 'webli'), ('ViT-L-14-CLIPA', 'datacomp1b'), ('ViT-L-14-CLIPA-336', 'datacomp1b'), ('ViT-H-14-CLIPA', 'datacomp1b'), ('ViT-H-14-CLIPA-336', 'laion2b'), ('ViT-H-14-CLIPA-336', 'datacomp1b'), ('ViT-bigG-14-CLIPA', 'datacomp1b'), ('ViT-bigG-14-CLIPA-336', 'datacomp1b'), ('nllb-clip-base', 'v1'), ('nllb-clip-large', 'v1'), ('nllb-clip-base-siglip', 'v1'), ('nllb-clip-large-siglip', 'v1')]问题是这些模型和这个表对不起来。也许是一大类的模型的规格吧?
model image_size image_width text_width embed_dim mparams image_mparams text_mparams gflops image_gflops text_gflops ViT-S-32-alt 224 384 256 256 43.22 22.59 20.63 3.56 2.29 1.27 ViT-S-32 224 384 384 384 63.09 22.64 40.44 5.66 2.29 3.38 ViT-M-32-alt 224 512 384 384 80.07 39.63 40.44 7.37 3.99 3.38 ViT-M-32 224 512 512 512 103.12 39.69 63.43 9.95 3.99 5.96 ViT-S-16-alt 224 384 256 256 42.4 21.76 20.63 10.47 9.2 1.27 ViT-S-16 224 384 384 384 62.26 21.81 40.44 12.58 9.2 3.38 ViT-B-32 224 768 512 512 151.28 87.85 63.43 14.78 8.82 5.96 ViT-B-32-quickgelu 224 768 512 512 151.28 87.85 63.43 14.78 8.82 5.96 convnext_tiny 224 768 512 1024 92.3 28.61 63.69 14.87 8.91 5.96 ViT-B-32-256 256 768 512 512 151.29 87.86 63.43 17.46 11.5 5.96 RN50 224 64 512 1024 102.01 38.32 63.69 18.18 12.22 5.96 RN50-quickgelu 224 64 512 1024 102.01 38.32 63.69 18.18 12.22 5.96 ViT-M-16-alt 224 512 384 384 78.98 38.53 40.44 19.36 15.98 3.38 ViT-M-16 224 512 512 512 102.02 38.59 63.43 21.94 15.98 5.96 vit_relpos_medium_patch16_cls_224 224 768 512 512 101.94 38.51 63.43 21.99 16.03 5.96 mt5-base-ViT-B-32 224 768 512 512 365.71 87.85 277.86 22.12 8.82 13.3 convnext_small 224 768 512 512 113.28 49.85 63.43 23.33 17.37 5.96 ViT-B-32-plus-256 256 896 640 640 210.3 119.13 91.16 24.83 15.56 9.27 RN101 224 64 512 512 119.69 56.26 63.43 25.5 19.54 5.96 RN101-quickgelu 224 64 512 512 119.69 56.26 63.43 25.5 19.54 5.96 vit_medium_patch16_gap_256 256 768 512 512 102.04 38.61 63.43 27.1 21.14 5.96 coca_ViT-B-32 224 768 512 512 253.56 89.16 63.43 33.34 9.19 5.96 convnext_base 224 768 512 512 151.52 88.09 63.43 36.67 30.71 5.96 swin_base_patch4_window7_224 224 768 640 640 178.56 87.4 91.16 40.13 30.86 9.27 ViT-B-16 224 768 512 512 149.62 86.19 63.43 41.09 35.13 5.96 ViT-B-16-quickgelu 224 768 512 512 149.62 86.19 63.43 41.09 35.13 5.96 EVA02-B-16 224 768 512 512 149.69 86.26 63.43 41.09 35.13 5.96 ViT-B-16-SigLIP 224 768 768 768 203.16 92.88 110.27 46.44 35.42 11.02 convnext_base_w 256 768 640 640 179.39 88.22 91.16 49.38 40.11 9.27 RN50x4 288 80 640 640 178.3 87.14 91.16 51.82 42.56 9.27 coca_roberta-ViT-B-32 224 768 768 512 420.37 87.85 124.45 53.12 8.82 13.12 ViT-B-16-plus 224 896 640 640 208.35 117.19 91.16 56.75 47.49 9.27 ViT-B-16-SigLIP-256 256 768 768 768 203.2 92.93 110.27 57.84 46.82 11.02 ViT-B-16-SigLIP-i18n-256 256 768 768 768 370.63 92.93 277.7 57.84 46.82 11.02 ViT-B-16-plus-240 240 896 640 640 208.38 117.21 91.16 64.03 54.76 9.27 convnext_base_w_320 320 768 640 640 179.39 88.22 91.16 71.94 62.67 9.27 convnext_large 224 768 768 768 321.06 197.41 123.65 82.02 68.72 13.3 coca_base 288 768 768 512 440.34 86.4 134.66 99.09 46.47 13.3 roberta-ViT-B-32 224 768 512 512 212.72 87.85 124.87 105.87 8.82 97.05 xlm-roberta-base-ViT-B-32 224 768 512 512 366.12 87.85 278.27 105.87 8.82 97.05 convnext_large_d 256 768 768 768 351.77 199.77 152.0 107.5 89.76 17.73 ViT-B-16-SigLIP-384 384 768 768 768 203.45 93.18 110.27 123.15 112.13 11.02 ViT-L-16 224 1024 768 768 427.74 304.09 123.65 136.41 123.11 13.3 convnext_large_d_320 320 768 768 768 351.77 199.77 152.0 157.98 140.25 17.73 RN50x16 384 96 768 768 290.98 167.33 123.65 162.69 149.39 13.3 ViT-L-14-CLIPA 224 1024 768 768 414.21 303.96 110.25 167.5 162.03 5.47 EVA02-L-14 224 768 768 768 427.76 304.11 123.65 175.3 162.0 13.3 ViT-L-14 224 1024 768 768 427.62 303.97 123.65 175.33 162.03 13.3 ViT-L-14-quickgelu 224 1024 768 768 427.62 303.97 123.65 175.33 162.03 13.3 convnext_xlarge 256 768 1024 1024 653.89 350.25 303.65 198.38 159.14 39.24 ViT-L-16-SigLIP-256 256 768 1024 1024 652.15 315.96 336.19 201.62 162.56 39.06 coca_ViT-L-14 224 1024 768 768 638.45 306.72 123.65 214.52 163.64 13.3 ViT-B-16-SigLIP-512 512 768 768 768 203.79 93.52 110.27 227.26 216.24 11.02 ViT-SO400M-14-SigLIP 224 768 1152 1152 877.36 427.68 449.68 233.54 220.35 13.19 ViT-L-14-280 280 1024 768 768 427.76 304.11 123.65 271.79 258.49 13.3 ViT-L-16-320 320 1024 768 768 427.95 304.3 123.65 271.93 258.63 13.3 ViT-H-16 224 1280 1024 1024 986.26 632.23 354.03 301.72 254.63 47.09 ViT-H-14-CLIPA 224 1280 1024 1024 968.24 632.07 336.16 354.02 334.59 19.43 nllb-clip-base 224 768 512 512 501.89 87.85 414.04 369.6 8.82 360.78 ViT-H-14 224 1280 1024 1024 986.11 632.08 354.03 381.68 334.59 47.09 ViT-H-14-quickgelu 224 1280 1024 1024 986.11 632.08 354.03 381.68 334.59 47.09 ViT-L-14-CLIPA-336 336 1024 768 768 414.54 304.29 110.25 387.39 381.92 5.47 EVA02-L-14-336 336 768 768 768 428.08 304.43 123.65 395.16 381.86 13.3 ViT-L-14-336 336 1024 768 768 427.94 304.29 123.65 395.22 381.92 13.3 ViT-L-16-SigLIP-384 384 768 1024 1024 652.48 316.28 336.19 422.91 383.85 39.06 convnext_xxlarge 256 768 1024 1024 1200.58 846.54 354.03 443.03 395.94 47.09 nllb-clip-base-siglip 384 768 512 768 507.47 93.18 414.3 472.91 112.13 360.78 mt5-xl-ViT-H-14 224 1280 512 1024 2306.75 632.08 1674.68 514.04 334.59 179.45 EVA01-g-14 224 768 768 1024 1136.44 1012.59 123.85 547.36 534.06 13.3 RN50x64 448 128 1024 1024 623.26 420.38 202.88 552.65 529.11 23.55 EVA01-g-14-plus 224 768 1024 1024 1366.62 1012.59 354.03 581.15 534.06 47.09 ViT-g-14 224 1408 1024 1024 1366.68 1012.65 354.03 581.15 534.06 47.09 convnext_xxlarge_320 320 768 1024 1024 1200.58 846.54 354.03 665.74 618.65 47.09 xlm-roberta-large-ViT-H-14 224 1280 512 1024 1193.01 632.08 560.94 671.01 334.59 336.42 ViT-SO400M-14-SigLIP-384 384 768 1152 1152 877.96 428.23 449.73 723.48 670.35 53.13 ViT-H-14-CLIPA-336 336 1280 1024 1024 968.64 632.48 336.16 800.88 781.45 19.43 ViT-bigG-14-CLIPA 224 1664 1280 1280 2517.22 1844.9 672.32 1007.93 967.5 40.44 ViT-H-14-378-quickgelu 378 1280 1024 1024 986.71 632.68 354.03 1054.05 1006.96 47.09 ViT-bigG-14 224 1664 1280 1280 2539.57 1844.91 694.66 1065.36 967.5 97.86 nllb-clip-large 224 1280 512 1024 1399.22 632.08 767.14 1468.46 334.59 1133.87 nllb-clip-large-siglip 384 768 512 1152 1195.5 428.23 767.27 1804.22 670.35 1133.87 ViT-e-14 224 1792 1280 1280 4581.09 3807.72 773.37 2091.45 1981.35 110.1 ViT-bigG-14-CLIPA-336 336 1664 1280 1280 2517.76 1845.44 672.32 2271.58 2231.15 40.44 EVA02-E-14 224 768 1024 1024 4704.59 4350.56 354.03 2311.42 2264.33 47.09 EVA02-E-14-plus 224 768 1280 1024 5044.89 4350.56 694.33 2362.19 2264.33 97.86
ssh -T git@hf.co
#GRUB_TIMEOUT_STYLE=hidden
GRUB_TIMEOUT=5
sudo apt-get purge "^nvidia-*"
sudo apt-get purge "^libnvidia*" "^libcuda*"
nick@nick-sager:~$ ubuntu-drivers devices
== /sys/devices/pci0000:00/0000:00:01.0/0000:01:00.0 ==
modalias : pci:v000010DEd000028A1sv00001558sd0000A650bc03sc00i00
vendor   : NVIDIA Corporation
driver   : nvidia-driver-535-server-open - distro non-free
driver   : nvidia-driver-545-open - distro non-free
driver   : nvidia-driver-525-open - distro non-free
driver   : nvidia-driver-545 - third-party non-free
driver   : nvidia-driver-525-server - distro non-free
driver   : nvidia-driver-535 - third-party non-free
driver   : nvidia-driver-525 - third-party non-free
driver   : nvidia-driver-550 - third-party non-free recommended
driver   : nvidia-driver-550-open - third-party non-free
driver   : nvidia-driver-535-server - distro non-free
driver   : nvidia-driver-530 - third-party non-free
driver   : nvidia-driver-535-open - distro non-free
driver   : xserver-xorg-video-nouveau - distro free builtin
huggingface-cli,所以,我的问题可以在这个复现:
huggingface-cli download gpt2 config.json
export HF_ENDPOINT=https://hf-mirror.com
python -c "from huggingface_hub import model_info; print(model_info('gpt2'))"
.numpy()能有些帮助吧?
wget https://secure.nic.cz/files/knot-resolver/knot-resolver-release.deb
sudo dpkg -i knot-resolver-release.deb
sudo apt update
sudo apt install -y knot-resolver
sudo sh -c 'echo `hostname -I` `hostname` >> /etc/hosts'
sudo sh -c 'echo nameserver 127.0.0.1 > /etc/resolv.conf'
sudo systemctl stop systemd-resolved
/volume1/photo  *(rw,async,no_wdelay,crossmnt,all_squash,insecure_locks,sec=sys,anonuid=1025,anongid=100)
/volume1/music  *(rw,async,no_wdelay,crossmnt,all_squash,insecure_locks,sec=sys,anonuid=1025,anongid=100)
/volume1/video  *(rw,async,no_wdelay,crossmnt,all_squash,insecure_locks,sec=sys,anonuid=1024,anongid=100)
wget https://huggingface.co/datasets/ChristophSchuhmann/MS_COCO_2017_URL_TEXT/resolve/main/mscoco.parquet
img2dataset --url_list mscoco.parquet --input_format "parquet"\
         --url_col "URL" --caption_col "TEXT" --output_format webdataset\
           --output_folder mscoco --processes_count 16 --thread_count 64 --image_size 256\
             --enable_wandb False
二月十三日 等待变化等待机会
find . -type d -not -path '*/\.*'
split DNS的问题,要么我全部都依赖vpn的DNS,一切都从海外,国内慢一些也 无妨?问题是这个问题是否有解?为什么防火墙能够阻挡我?我有没有可能使用ec2上的DNS解析?我到达ec2不也是要我本地的DNS指路才行吗?这个基 本的过程我始终不清楚,还有就是ec2上我为什么不能使用ssh+x11远程显示?
authorized_keys2呢?这个我通过改变sshd_config的log level到DEBUG然后看/var/log/auth.log来看到sshd是两个文件都找一遍,虽然注解上说也许将来后者有可能放弃。总之这个问题解决了,我省的每次都要多加一个亚马逊的key。X11 connection rejected because of wrong authentication.就是个别应用的,所以,这个帖子是解决办法。
export XAUTHORITY=$HOME/.Xauthority
firefox
二月十四日 等待变化等待机会
/dev/disk/by-uuid/9343f884-54dc-481f-a702-9a74ca0e025f /home/nick/workspace auto nosuid,nodev,nofail,x-gvfs-show,x-gvfs-name=fanxiang 0 0
/etc/apparmor.d/感觉这一套体系非常的复杂,希望我不要遇到这类问题。大多数在公司上班的人不认为VPN配置有什么问题的都是第一种在公司远程上班的,因为你的普通家用的DNS也不知道公司防火墙后面有什么,你毫不费力的转 向了VPN的DNS来询问,而我的情况是比以上两种都复杂的情况,明明家里普通的DNS都能找到的外网路径我不能使用,需要指明使用VPN的专项路径,同 时国内网络我又不想绕到国外去转一大圈,结果就是一个混乱的解决。也许我完全采用第二种就是放弃内网的访问效率就是一个简单的解决?Let’s first define two distinct VPN use-cases:
Corporate VPNs, i.e. VPNs that open access to a specific set of additional hosts. Only specific domains should be resolved via the VPN’s DNS servers, and everything that is not related to the company’s domain names should go to regular, non-VPN DNS instead.
Privacy VPNs, i.e. VPNs that should be used for basically all DNS traffic, once they are up. If this type of VPN is used, any regular, non-VPN DNS servers should not get any traffic anymore.
Then, let’s briefly introduce three DNS routing concepts that software managing a network interface may configure.
Search domains: these are traditional DNS configuration parameters and are used to suffix non-qualified domain names (i.e. single-label ones), to turn them into fully qualified domain names. Traditionally (before
systemd-resolved.service), search domain names are attached to a system’s IP configuration as a whole, insystemd-resolved.servicethey are associated to individual interfaces instead, since they are typically acquired through some network associated concept, such as a DHCP, IPv6RA or PPP lease. Most importantly though: insystemd-resolved.servicethey are not just used to suffix single-label domain names, but also for routing domain name lookups: if a network interface has a search domainfoo.comconfigured on it, then any lookups for names ending in.foo.com(or forfoo.comitself) are preferably routed to the DNS servers configured on the same network interface.Routing domains: these are very similar to search domains, but are purely about DNS domain name lookup routing — they are not used for qualifying single-label domain names. When it comes to routing, assigning a routing domain to a network interface is identical to assigning a search domain to it.
Why the need to have both concepts, i.e. search and routing domains? Mostly because in many cases the qualifying of single-label names is not desirable (as it has security implications), but needs to be supported for specific use-cases. Routing domains are a concept
systemd-resolved.serviceintroduced, while search domains are traditionally available and are part of DHCP/IPv6RA/PPP leases and thus universally supported. In many cases routing domains are probably the more appropriate concept, but not easily available, since they are not part of DHCP/IPv6RA/PPP.Routing domains for
systemd-resolved.serviceare usually presented along with search domains in mostly the same way, but prefixed with~to differentiate them. i.e.~foo.comis a configured routing domain, whilefoo.comwould be a configured search domain.One routing domain is particularly interesting:
~.— the catch-all routing domain. (The dot domain.is how DNS denotes the “root” domain, i.e. the parent domain of all domains, but itself.) When used on an interface any DNS traffic is preferably routed to its DNS servers. (A search domain – i.e..instead of~.— would have the same effect, but given that it’s mostly pointless to suffix an unqualified domain with., we generally declare it as a routing domain, not a search domain).Routing domains also have particular relevance when it comes to the reverse lookup DNS domains
.in-addr.arpaand.ip6.arpa. An interface that has these (or sub-domains thereof) defined as routing domains, will be preferably used for doing reverse IP to domain name lookups. e.g. declaring~168.192.in-addr.arpaon an interface means that all lookups to find the domain names for IPv4 addresses 192.168.x.y are preferably routed to it.The
default-routeboolean. This is a simple boolean value that may be set on an interface. If true (the default), any DNS lookups for which no matching routing or search domains are defined are routed to interfaces marked like this. If false then the DNS servers on this interface are not considered for routing lookups to except for the ones listed in the search/routing domain list. An interface that has no search/routing domain associated and also has this boolean off is not considered for any lookups.
那么接下去的常识就是FQDN和URL的关系:What is a fully qualified domain name (FQDN)?
A fully qualified domain name (FQDN) is the complete address of an internet host or computer. It provides its exact location within the domain name system (DNS) by specifying the hostname, domain name and top-level domain (TLD). For example, for the domain name www.whatis.com, "www" is the hostname, "whatis" is the domain name and ".com" is the top-level domain.
An FQDN doesn't carry the TCP/IP protocol information -- such as Hypertext Transfer Protocol (HTTP) or Hypertext Transfer Protocol Secure (HTTPS) -- which is always used at the beginning of a URL. Therefore, adding the prefix http:// or https:// to the FQDN turns it into a full URL. Also, URLs can specify directory paths, file names and TCP port numbers, which FQDNs don't include.URL可以称之为FQDN的一个超集,它完全包含了并且还可以额外提供协议以及端口。更进一步就是A PQDN is part of an FQDN that isn't fully specified.
二月十五日 等待变化等待机会
systemd-resolved的log
sudo resolvectl log-level debug
journalctl -f -u systemd-resolved.service
dig www.google.com
www.googleapis.com的解析,和www.google.com的解析结果不同,googleapis.com返回了更大uo的结果(我只保留了answer部分)
nick@nick-sager:~$ dig www.googleapis.com

;; ANSWER SECTION:
www.googleapis.com.	400	IN	A	172.217.160.106
www.googleapis.com.	400	IN	A	172.217.163.42
www.googleapis.com.	400	IN	A	142.251.42.234
www.googleapis.com.	400	IN	A	142.251.43.10
www.googleapis.com.	400	IN	A	172.217.160.74
nick@nick-sager:~$ dig www.google.com

;; ANSWER SECTION:
www.google.com.		600	IN	A	154.83.14.134
总而言之,它说到了split DNS的使用场景,我觉得是非常精准的契合我的情况,而这样的传统的DNS解决方案无法分清楚,因为从glibc模块的解决法就是第一个失败了找第二个, 然后第三个,最后失败。因为它不清楚这些有着不同意义的解析。但是作者讨论的是Fedora,也许和Ubuntu有些不同,我的是这样子的Traditional DNS with nss-dns
There are two important configuration files to discuss. The first is /etc/nsswitch.conf, which controls which NSS modules are invoked by glibc when performing name resolution.
Next, let’s look at /etc/resolv.conf. This file contains a list of up to three DNS servers to use. The servers are attempted in order. If the first server in the list is broken, then the second server will be used. If the second server is broken, the third server will be used. If the third server is also broken, then everything fails, because no matter how many servers you list here, all except the first three are ignored.
Traditional DNS Problems
Traditional DNS is all well and good for a simple case like we had above, but turns out it’s really broken once you start adding VPNs to the mix.
hosts: files mdns4_minimal [NOTFOUND=return] resolve [!UNAVAIL=return] dns mymachines
nick@nick-sager:~$ resolvectl status
Global
       Protocols: -LLMNR -mDNS DNSOverTLS=opportunistic DNSSEC=no/unsupported
resolv.conf mode: stub

Link 2 (enp0s31f6)
    Current Scopes: DNS
         Protocols: +DefaultRoute +LLMNR -mDNS DNSOverTLS=opportunistic DNSSEC=no/unsupported
Current DNS Server: fe80::1
       DNS Servers: 8.8.8.8 218.85.152.99 218.85.157.99 fe80::1%32544

Link 3 (wlp109s0)
Current Scopes: none
     Protocols: -DefaultRoute +LLMNR -mDNS DNSOverTLS=opportunistic DNSSEC=no/unsupported

Link 9 (tun0)
Current Scopes: none
     Protocols: -DefaultRoute +LLMNR -mDNS DNSOverTLS=opportunistic DNSSEC=no/unsupported
tun0有解析的功能,这个在那里设置的?
Although systemd-resolved supports several different modes for managing /etc/resolv.conf, the default mode, and the mode used in both Fedora and Ubuntu, is for /etc/resolv.conf to be a symlink to /run/systemd/resolve/stub-resolv.conf.这个结论还是很重要的,就是nss-dns只有在systemd-resolved不工作才起作用,而这个
nick@nick-sager:/etc$ ll /run/systemd/resolve/stub-resolv.conf
-rw-r--r-- 1 systemd-resolve systemd-resolve 920 Feb 12 18:27 /run/systemd/resolve/stub-resolv.conf
nick@nick-sager:/etc$ ll /etc/resolv.conf
lrwxrwxrwx 1 root root 39 Mar 31  2023 /etc/resolv.conf -> ../run/systemd/resolve/stub-resolv.conf
/etc/resolv.conf -> ../run/systemd/resolve/stub-resolv.confsystemd-resolved provides a local DNS stub listener on the IP addresses 127.0.0.53 and 127.0.0.54 on the local loopback interface. Programs issuing DNS requests directly, bypassing any local API may be directed to this stub, in order to connect them to systemd-resolved. Note however that it is strongly recommended that local programs use the glibc NSS or bus APIs instead (as described above), as various network resolution concepts (such as link-local addressing, or LLMNR Unicode domains) cannot be mapped to the unicast DNS protocol.这个man page是非常的难懂,因为背景知识的缺失,我对于D-bus始终不理解
A Word about Ubuntu
Although Ubuntu has used systemd-resolved for four years now, it has not switched from nss-dns to nss-resolve, contrary to upstream recommendations. This means that on Ubuntu, glibc still reads
/etc/resolv.conf, finds 127.0.0.53 listed there, and then makes an IP connection to systemd-resolved rather than talking to it via varlink or D-Bus, as occurs on Fedora. The practical effect is that, on Ubuntu, you can still manually edit/etc/resolv.confand applications will respond to those changes, unlike Fedora.
这里非常完美的回答了我另一个疑问domain search和domain routing的区别IP Routing Domains, DNS Routing Domains, and DNS Search Domains: Oh My!
systemd-resolved works with DNS routing domains and DNS search domains. A DNS routing domain determines only which DNS server your DNS query goes to. It doesn’t determine where IP traffic goes to: that would be an IP routing domain. Normally, when people talk about “routing domains,” they probably mean IP routing domains, not DNS routing domains, so be careful not to confuse these two concepts.
A DNS search domain is also different. When you query a name that is only a single label— a domain without any dots — a search domain gets appended to your query.这段也是很重要的,这个tilde(~)是区别于search domain和routing domain的标志:
In systemd-resolved, each DNS routing domain may or may not be used as a search domain. By default, systemd-resolved will add search domains for every configured routing domain that is not prefixed by a tilde. For example, ~example.com is a routing domain only, while example.com is both a routing domain and a search domain. There is also a global routing domain, ~.
sudo resolvectl flush-caches
nick@nick-sager:~$ resolvectl domain tun0 '~.'
nick@nick-sager:~$ resolvectl default-route tun0 true
nick@nick-sager:~$ resolvectl dns tun0 8.8.8.8
nick@nick-sager:~$ resolvectl status
Global
       Protocols: -LLMNR -mDNS DNSOverTLS=opportunistic DNSSEC=no/unsupported
resolv.conf mode: stub

Link 2 (enp0s31f6)
    Current Scopes: DNS
         Protocols: +DefaultRoute +LLMNR -mDNS DNSOverTLS=opportunistic DNSSEC=no/unsupported
Current DNS Server: fe80::1
       DNS Servers: 8.8.8.8 218.85.152.99 218.85.157.99 fe80::1%21970

Link 3 (wlp109s0)
Current Scopes: none
     Protocols: -DefaultRoute +LLMNR -mDNS DNSOverTLS=opportunistic DNSSEC=no/unsupported

Link 11 (tun0)
Current Scopes: DNS
     Protocols: +DefaultRoute +LLMNR -mDNS DNSOverTLS=opportunistic DNSSEC=no/unsupported
   DNS Servers: 8.8.8.8
    DNS Domain: ~.
ping -4 www.google.com
nick@nick-sager:~$ unset HF_ENDPOINT
nick@nick-sager:~$ huggingface-cli download gpt2 config.json
Consider using `hf_transfer` for faster downloads. This solution comes with some limitations. See https://huggingface.co/docs/huggingface_hub/hf_transfer for more details.
/home/nick/.cache/huggingface/hub/models--gpt2/snapshots/11c5a3d5811f50298f278a704980280950aedb10/config.json
nick@nick-sager:~$
openvpnas@ip-172-31-35-59:~$ resolvectl query www.google.com
www.google.com: 142.250.189.164                -- link: eth0
                2607:f8b0:4005:80e::2004       -- link: eth0
nick@nick-sager:~$ resolvectl query www.google.com
www.google.com: 172.217.164.100                -- link: tun0
                2607:f8b0:4005:80c::2004       -- link: tun0
nick@nick-sager:~$ traceroute www.google.com
traceroute to www.google.com (172.217.164.100), 30 hops max, 60 byte packets
 1  172.27.232.1 (172.27.232.1)  163.430 ms  164.283 ms  164.225 ms
 2  244.5.0.17 (244.5.0.17)  166.724 ms 244.5.0.151 (244.5.0.151)  164.419 ms 244.5.0.17 (244.5.0.17)  166.733 ms
 3  240.0.180.36 (240.0.180.36)  164.240 ms 100.65.17.96 (100.65.17.96)  175.723 ms 100.65.16.128 (100.65.16.128)  188.759 ms
 4  240.0.168.12 (240.0.168.12)  164.946 ms 100.66.8.226 (100.66.8.226)  184.148 ms 100.66.8.0 (100.66.8.0)  338.800 ms
 5  100.66.10.66 (100.66.10.66)  178.329 ms * *
 6  241.0.6.199 (241.0.6.199)  164.177 ms 72.14.197.18 (72.14.197.18)  164.947 ms 241.0.6.207 (241.0.6.207)  164.339 ms
 7  240.0.168.13 (240.0.168.13)  164.994 ms 240.0.168.15 (240.0.168.15)  165.019 ms  165.015 ms
 8  142.251.66.108 (142.251.66.108)  167.275 ms * 142.251.224.172 (142.251.224.172)  165.467 ms
 9  192.178.105.118 (192.178.105.118)  166.057 ms 209.85.252.251 (209.85.252.251)  166.081 ms  166.159 ms
10  sfo03s18-in-f4.1e100.net (172.217.164.100)  165.434 ms 192.178.105.113 (192.178.105.113)  165.433 ms sfo03s18-in-f4.1e100.net (172.217.164.100)  164.973 ms
openvpnas@ip-172-31-35-59:~$ traceroute www.google.com
traceroute to www.google.com (142.251.32.36), 30 hops max, 60 byte packets
 1  244.5.0.147 (244.5.0.147)  4.191 ms 216.182.237.205 (216.182.237.205)  7.062 ms 216.182.237.199 (216.182.237.199)  7.470 ms
 2  * 100.65.17.128 (100.65.17.128)  12.839 ms 100.65.19.160 (100.65.19.160)  21.472 ms
 3  240.0.168.12 (240.0.168.12)  0.996 ms 100.66.8.160 (100.66.8.160)  12.075 ms 100.66.8.148 (100.66.8.148)  18.355 ms
 4  * 100.66.10.130 (100.66.10.130)  13.099 ms 100.66.10.234 (100.66.10.234)  22.329 ms
 5  72.14.203.108 (72.14.203.108)  2.291 ms 241.0.6.199 (241.0.6.199)  0.300 ms 241.0.6.195 (241.0.6.195)  0.317 ms
 6  * 240.0.168.15 (240.0.168.15)  1.009 ms *
 7  142.251.228.80 (142.251.228.80)  1.485 ms 142.251.241.102 (142.251.241.102)  1.488 ms 142.251.224.172 (142.251.224.172)  1.502 ms
 8  192.178.105.98 (192.178.105.98)  1.464 ms 192.178.105.106 (192.178.105.106)  1.478 ms 142.251.224.179 (142.251.224.179)  1.440 ms
 9  * 192.178.105.95 (192.178.105.95)  1.562 ms sfo03s26-in-f4.1e100.net (142.251.32.36)  1.364 ms
openvpnas@ip-172-31-35-59:~$ traceroute -6 www.google.com
traceroute to www.google.com (2607:f8b0:4005:812::2004), 30 hops max, 80 byte packets
connect: Network is unreachable
hostname -f二月十六日 等待变化等待机会
Stable diffusion v1 uses Open AI’s ViT-L/14 Clip model. Embedding is a 768-value vector. Each token has its own unique embedding vector. Embedding is fixed by the CLIP model, which is learned during training.对于SDv1这个古老的遗迹我觉得有必要熟悉起来。不了解历史是无法深刻领会现实的。
Note: Stable Diffusion v1 is a general text-to-image diffusion model and therefore mirrors biases and (mis-)conceptions that are present in its training data. Details on the training procedure and data, as well as the intended use of the model can be found in the corresponding model card.保存一份相当不错的论文。我的理解就是团队发现语言模型的完善可以自动完善text-image的训练过程,难道语言和图像有着某种内在的联系?人们说一幅画包含了千言万语,这个不是没有道理的:
画
远看山有色,近听水无声。
春去花还在,人来鸟不惊。
We discover that large frozen language models trained only on text data are surprisingly very effective text encoders for text-to-image generation, and that scaling the size of frozen text encoder improves sample quality significantly more than scaling the size of image diffusion model.这篇论文的核心贡献!这里有一个排行榜,看来挺有用的,可以了解趋势。
二月十七日 等待变化等待机会
It thus becomes natural to explore both families of text encoders for the text-to-image task. Imagen explores pretrained text encoders: BERT, T5 and CLIP. For simplicity, we freeze the weights of these text encoders. Freezing has several advantages such as offline computation of embeddings, resulting in negligible computation or memory footprint during training of the text- to-image model.看起来我也应该学习使用现成的text-encoder,比如openClip就应该成为下一个目标任务。就是说我也可以在我的简陋条件下来训练?
Diffusion models are a class of generative models that convert Gaussian noise into samples from a learned data distribution via an iterative denoising process. These models can be conditional, for example on class labels, text, or low-resolution images.补习数学:什么是Gaussian noise?
In signal processing theory, Gaussian noise, named after Carl Friedrich Gauss, is a kind of signal noise that has a probability density function (pdf) equal to that of the normal distribution (which is also known as the Gaussian distribution). In other words, the values that the noise can take are Gaussian-distributed.为什么是Gaussian noise,其实要理解它的来源。如果它是我们很普通的电子设备和传感器天然得到的,那么人脑也应该有类似的机制产生,那么。。。
Principal sources of Gaussian noise in digital images arise during acquisition e.g. sensor noise caused by poor illumination and/or high temperature, and/or transmission e.g. electronic circuit noise.所以,降噪是一个还原图像的逆过程?难道说熵减少?充满了噪音的信号显然是宇宙中最普遍的现象,而人脑是训练可以降噪的,人类的神经系统肯定不可能如我们 的硅基电子设备来的精密,所以,人类的大脑天天都在和信号传输过程的噪音做斗争,因此,这个是人脑的天然的过程。那么降噪的方法呢?
In digital image processing Gaussian noise can be reduced using a spatial filter, though when smoothing an image, an undesirable outcome may result in the blurring of fine-scaled image edges and details because they also correspond to blocked high frequencies. Conventional spatial filtering techniques for noise removal include: mean (convolution) filtering, median filtering and Gaussian smoothing.
A spatial filter is an optical device which uses the principles of Fourier optics to alter the structure of a beam of light or other electromagnetic radiation, typically coherent laser light. Spatial filtering is commonly used to "clean up" the output of lasers, removing aberrations in the beam due to imperfect, dirty, or damaged optics, or due to variations in the laser gain medium itself.那么又要首先明白什么是Fourier optics?
Fourier optics is the study of classical optics using Fourier transforms (FTs), in which the waveform being considered is regarded as made up of a combination, or superposition, of plane waves. It has some parallels to the Huygens–Fresnel principle, in which the wavefront is regarded as being made up of a combination of spherical wavefronts (also called phasefronts) whose sum is the wavefront being studied. A key difference is that Fourier optics considers the plane waves to be natural modes of the propagation medium, as opposed to Huygens–Fresnel, where the spherical waves originate in the physical medium.这一段相当的深奥,结果维基百科很贴心的没有中文版本!TMD连越南语版本都有为什么没有中文版!难道中文里没有
傅里叶光学?这里深奥的就是传播介质还是物理介质,波是能量自然会引起介质的运动,电磁波难道不是像微波炉一样的给介质加热传播能量吗?其核心的研究方法是傅里叶变换,这个难道是数字化作为研究的数学手段?总之它是一门科学。我需要的是具体的手段,而不是理论。
In physics, coherence expresses the potential for two waves to interfere. Two monochromatic beams from a single source always interfere. Physical sources are not strictly monochromatic: they may be partly coherent. Beams from different sources are mutually incoherent.就是说这个干扰原是天生的!不过我对于这句话就不大理解了:
Beams from different sources are mutually incoherent.但是话说回来了,我需要了解或者理解这些信号领域的深奥概念吗?这是一个人穷尽一生都未必能够精通的概念领域。我需要的是理解为什么而不是怎么做。
Conventional spatial filtering techniques for noise removal include: mean (convolution) filtering, median filtering and Gaussian smoothing.
The main idea of the median filter is to run through the signal entry by entry, replacing each entry with the median of neighboring entries.我觉得这个思路就是利用了正态分布的噪音特点,凡是超出周边范畴的就去除?也许不准确,不过算法是比较好理解的,有点interpolition的反向操作?
In image processing, a Gaussian blur (also known as Gaussian smoothing) is the result of blurring an image by a Gaussian function (named after mathematician and scientist Carl Friedrich Gauss).这个要怎么理解呢?能不能理解它是一种特殊的convolution呢?
magen uses noise conditioning augmentation for both the super-resolution models. We find this to be a critical for generating high fidelity images.什么是
noise conditioning augmentation
Given a conditioning low-resolution image and augmentation level (a.k.a aug_level) (e.g., strength of Gaussian noise or blur), we corrupt the low-resolution image with the augmentation (corresponding to aug_level), and condition the diffusion model on aug_level. During training, aug_level is chosen randomly, while during inference, we sweep over its different values to find the best sample quality. In our case, we use Gaussian noise as a form of augmentation, and apply variance preserving Gaussian noise augmentation resembling the forward process used in diffusion model.这里能不能理解就是augmentation level=strength of Gaussian noise or blur?训练的时候是遍历所有的可能,也就是用随机数,而推理的时候则是反向的使用所有的可能性来找到最佳值。什么是diffusion model的forward process?看来我要重温一下基本的概念。
Both FID and CLIP scores have limitations, for example FID is not fully aligned with perceptual quality, and CLIP is ineffective at counting.作者指出的这些缺陷是什么意思?这里人为鉴定的方法很有趣:
第一个回答可信度也就是质量问题。第二个是准确度,这个很好理解,但是似乎作者对于COCO数据库原来的标题也不是很信赖,否则为什么要独立的验证它?难 道我理解错了?也许原本的训练库就不够贴合。注意,作者的模型是没有在COCO上训练过的,这一点很重要,不像很多是在训练库里训练出的模型再回炉去那么 它能证明什么?记忆力吗?我甚至怀疑这么大量的相类似的库难免有重叠,或者说相类似吧?这个是逃不掉的。人类总是类似的吧?这样子的训练就不是什么开创性 的了,而是比赛记忆力了。而作者的训练是一个纯粹的语言模型,只不过它借用了之前别人训练好的模型提高了质量,这里有着非常微妙的差别?
- To probe image quality, the rater is asked to select between the model generation and reference image using the question: “Which image is more photorealistic (looks more real)?”. We report the percentage of times raters choose model generations over reference images (the preference rate).
- To probe alignment, human raters are shown an image and a prompt and asked “Does the caption accurately describe the above image?”. They must respond with “yes”, “somewhat”, or “no”. These responses are scored as 100, 50, and 0, respectively. These ratings are obtained independently for model samples and reference images, and both are reported.
Zero-shot learning (ZSL) is a problem setup in deep learning where, at test time, a learner observes samples from classes which were not observed during training, and needs to predict the class that they belong to.这个和我直觉是一样的,当然是要训练时候没有见过才行,否则就是考验记忆力了。这和人类学习中的举一反三有异曲同工之效。不过比我想象的要难的多,就是
For example, given a set of images of animals to be classified, along with auxiliary textual descriptions of what animals look like, an artificial intelligence model which has been trained to recognize horses, but has never been given a zebra, can still recognize a zebra when it also knows that zebras look like striped horses.这里的反三不是简单的类比而是要上一个层次,是真正的要理解语言的描述,而不是平行类比。
 虽然是借鸡生蛋,但是很有独创性,而且我对于它的drawbench很感兴趣。这个是有人对于它的比较。这些prompt是特意挑选的吗?这个描述是自行车:
A vehicle composed of two wheels held in a frame one behind the other, propelled by pedals and steered with handlebars attached to the front wheel.我觉得很多人类都未必能理解。
source ../stable-diffusion-webui/venv/bin/activate
python setup.py install
Generative adversarial networks (GANs) are an exciting recent innovation in machine learning. GANs are generative models: they create new data instances that resemble your training data.没什么关系,但是为什么当初这个东西和generative content有关系呢?在我看来这个是相当传统的人工智能的模式。
A generative adversarial network (GAN) is a class of machine learning frameworks and a prominent framework for approaching generative AI. The concept was initially developed by Ian Goodfellow and his colleagues in June 2014. In a GAN, two neural networks contest with each other in the form of a zero-sum game, where one agent's gain is another agent's loss.这个训练方式是很有意思的,就是双方是博弈关系,你的训练对手给你的是错误的指引?
The core idea of a GAN is based on the "indirect" training through the discriminator, another neural network that can tell how "realistic" the input seems, which itself is also being updated dynamically. This means that the generator is not trained to minimize the distance to a specific image, but rather to fool the discriminator. This enables the model to learn in an unsupervised manner.这样子岂不是越跑越偏吗?这个结果还能看吗?
weixin.qq.com不提供Linux版本,于是我就是下载windows版本使用本地的wine的loader来运行安装,结果高级功能会crash,不过备份还是可以做得到的。二月十八日 等待变化等待机会
The embedding needs to be further processed by the text transformer before feeding into the noise predictor. The transformer is like a universal adapter for conditioning.这里点出了conditioning要在什么节点发力。而embedding如何成为latent space的向量恐怕不是那么简单的。这里就是语言模型的关键,否则单单靠词频上下文产生的tokenizer不可能有这么强大吧?
In this case, its input is text embedding vectors, but it could as well be something else like class labels, images, and depth maps. The transformer not only further processes the data but also provides a mechanism to include different conditioning modalities.这里点出了一个关键点,text-prompt最后是映射到了什么?它是等同于image-text-pair里的caption部分?显然不是,但是分 类是这些caption的一部分功能,所以,如果简简单单就是class label也许是一个shortcut,但是我不清楚它和内部的embedding是什么关系,也许class-label仅仅是一个比较特殊的 text-prompt,正像很多人口中的咒语一样,但是这一点看起来也很像是conditioning,也许两者本来就是一样的东西。只是实际使用起来 我感觉这些keywords的位置似乎没有关系,这个在向量生成里说不通了。也许我的观察是不对的,但是它的特殊性是一定的。很prompt专门加各种挂 号引号,仅仅是为了强调这个要单独tokenize吗?还是要作为class-label?这个是今后要回答的问题。另一方面,img2img的机制显然 和text2img的不一样,但是似乎它们使用了同样的模型,这里难道说text-prompt最后的embedding转化结果就是image的 latent space vector?这个也是需要进一步理解的。到时候水到渠成,瓜熟蒂落。这里的插曲是depth image。作 者专门有一篇教程来利用它做一些高难度的动作,这个似乎看上去像是controlNet异曲同工之效,所有的text-prompt都是某种 conditioning,问题是如何才是最有效的,动作指引edge detection以及其他做法从直觉上看是给text-image过程一个类似模板的东西,就是说在Gaussian noise下原始的信号是什么?你给的越是贴近目标那么降噪的偏差就越小,这个是不言而喻的。原理人人都明白,但是魔鬼都在细节。
Knowing the path is totally diffferent from actually walking the path.很多人不屑于具体的操作法门,认为那是不重要的实作,然而练拳不练功,到头一场空,作为战场格斗的士兵的基本职能并不是你自己以为的武林宗师一样要你在观众席上作不负责任的指指点点。

treat depth-to-image as an enhanced version of image-to-image. They can be used in exactly the same way — given an image and a text prompt, it will generate a new image.用普通的img2img产生的就是和图片人体形体基本无关的摔跤场景。那么depth-to-image在哪里呢?不过这里让我亲身感到如果denoise调的较小的话,那么产生的图片就和原来的基本一致,仿佛就是这个量是一个变形参数一样。
In depth-to-image, Stable Diffusion similarly takes an image and a prompt as inputs. The model first estimates the depth map of the input image using MIDaS, an AI model developed in 2019 for estimating monocular depth perception (that is estimating depth from a single view). The depth map is then used by Stable Diffusion as an extra conditioning to image generation.一言以蔽之:
an extra conditioning
In other words, depth-to-image uses three conditionings to generate a new image:但是这里的foreground-object和background是什么呢?
- text prompt
- original image
- depth map
Equipped with the depth map, the model has some knowledge of the three-dimensional composition of the scene. Image generations of foreground objects and the background can be separated.
resolvectl status可以看到原来的设置消失了。我又要重复一下,以后看能不能用脚本运行,不过这些需要sudo权利,是否在D-Bus那里可以使用user权利?raw.githubusercontent.com,结果可能就是0.0.0.0,这个也许是DNS的cache也许是人为设置障碍,总之这个是正确的解析:
$ nslookup raw.githubusercontent.com
Server:		127.0.0.53
Address:	127.0.0.53#53

Non-authoritative answer:
Name:	raw.githubusercontent.com
Address: 185.199.111.133
Name:	raw.githubusercontent.com
Address: 185.199.109.133
Name:	raw.githubusercontent.com
Address: 185.199.110.133
Name:	raw.githubusercontent.com
Address: 185.199.108.133
Name:	raw.githubusercontent.com
Address: 2606:50c0:8000::154
Name:	raw.githubusercontent.com
Address: 2606:50c0:8001::154
Name:	raw.githubusercontent.com
Address: 2606:50c0:8002::154
Name:	raw.githubusercontent.com
Address: 2606:50c0:8003::154
1boy, 1girl, brown hair, city, city lights, dancing, dress, facial hair, fireworks, high heels, necktie, night, outdoors, outstretched arm, outstretched arms, outstretched hand, pants, road, shoes, short hair, sky, spread arms, street, tree, water, yellow dress
 应该说卡通化可以掩盖大部分的缺陷,这个也许是目前的一个解决办法。
git clone --recursive https://github.com/openai/whisper
cd whisper
pip install .
whisper --model "medium" --output_format srt --verbose True --task transcribe --language Mandarin --output_dir ./output output.mp3
ffmpeg -i input.mp4 -vf subtitles=./output/output.srt ./output.mp4
The output of the text transformer is used multiple times by the noise predictor throughout the U-Net. The U-Net consumes it by a cross-attention mechanism. That’s where the prompt meets the image.它是在U-Net里?被noise predictor使用的机制?
A side note: Hypernetwork, a technique to fine-tune Stable Diffusion models, hijacks the cross-attention network to insert styles. LoRA models modify the weights of the cross-attention module to change styles. The fact that modifying this module alone can fine-tune a Stabe Diffusion model tells you how important this module is.这就意味着我需要了解LoRA
LoRA (Low-Rank Adaptation) is a training technique for fine-tuning Stable Diffusion models.也就是说训练模型是费时费力的,修改模型也是费时费力,更加麻烦的是模型文件的大小经常是好几个G,那么TI比较小,但是功能有限,而LoRA大小只有几百兆比较适中。
LoRA applies small changes to the most critical part of Stable Diffusion models: The cross-attention layers. It is the part of the model where the image and the prompt meet.
 这幅图是从这篇stable diffusion paper里来的。再看看论文作者的关于latent space的描述:
Compared to the high-dimensional pixel space, this space is more suitable for likelihood-based generative models, as they can now这是diffusion model的数学描述:
- focus on the important, semantic bits of the data and
- train in a lower dimensional, computationally much more efficient space.
Diffusion Models are probabilistic models designed to learn a data distribution p(x) by gradually denoising a nor- mally distributed variable, which corresponds to learning the reverse process of a fixed Markov Chain of length T . For image synthesis, the most successful models rely on a reweighted variant of the variational lower bound on p(x), which mirrors denoising score-matching. These models can be interpreted as an equally weighted sequence of denoising autoencoders εΘ (xt , t); t = 1 . . . T , which are trained to predict a denoised variant of their input xt , where xt is a noisy version of the input x. The corre- sponding objective can be simplified to我费了好大的力气去写这个公式,其实根本就不理解数学符号的意义,但是从描述大概能够猜出来可能的大概意思。就是说。。。
The weights of a cross-attention layer are arranged in matrices. A LoRA model fine-tunes a model by adding its weights to these matrices. The trick of LoRA is breaking a matrix into two smaller (low-rank) matrices.因为LoRA就是weight matrix。
...the learned over-parametrized models in fact reside on a low intrinsic dimension. We hypothesize that the change in weights during model adaptation also has a low “intrinsic rank”...LoRA allows us to train some dense layers in a neural network indirectly by optimizing rank decomposition matrices of the dense layers’ change during adaptation instead, while keeping the pre-trained weights froze这里有LoRA的源代码, 在其说明文字里解释的就更清楚了,它不是shipment的节约,因为你还是需要原始的模型,但是训练的时候你节约了,因为有很多的参数不需要训练。那么 我认为运行期模型需要的资源也相对减少了。所以,你可以在原来模型基础上训练自己的模型,而且更省力。这个专业的说法叫做
fine-tuning。 这里是LoRA的优点
简而言之,训练效率提高,部署有优势(假定通用模型已经部署,只是分发fine-tuned的LoRA模型),运用时候没有额外成本,方法独立可以和其他方法并用。就是说它是训练方便,使用没有区别。
- A pre-trained model can be shared and used to build many small LoRA modules for dif- ferent tasks. We can freeze the shared model and efficiently switch tasks by replacing the matrices A and B in Figure 1, reducing the storage requirement and task-switching over- head significantly.
- LoRA makes training more efficient and lowers the hardware barrier to entry by up to 3 times when using adaptive optimizers since we do not need to calculate the gradients or maintain the optimizer states for most parameters. Instead, we only optimize the injected, much smaller low-rank matrices.
- Our simple linear design allows us to merge the trainable matrices with the frozen weights when deployed, introducing no inference latency compared to a fully fine-tuned model, by construction.
- LoRA is orthogonal to many prior methods and can be combined with many of them, such as prefix-tuning.
An autoregressive language model is a type of Machine Learning model that uses autoregressive techniques to predict the next word in a sequence of words based on the words that have come before it.可以说现在通常所说的模型都是AutoRegressive language model。
In linear algebra, the rank of a matrix A is the dimension of the vector space generated (or spanned) by its columns. This corresponds to the maximal number of linearly independent columns of A.
The column rank of A is the dimension of the column space of A, while the row rank of A is the dimension of the row space of A.而这个matrix的rank只有2,因为column1和column2的线性组合是column3。
从这就可以看出来我之前的直觉也没有错,如果部分的matrix是0,那当然可以舍弃,其实这个是从化简后的row/column echelon form的角度来看问题,直觉能看到0却没有看到线性相关,当然线性相关意味着可以被化简为0。所以,最深奥的理论往往来自于最肤浅的直觉。Decomposition rank
The rank of A is the smallest integer k such that A can be factored as A = C R, where C is an m × k matrix and R is a k × n matrix. In fact, for all integers k, the following are equivalent:Indeed, the following equivalences are obvious: ( 1 ) ⇔ ( 2 ) ⇔ ( 3 ) ⇔ ( 4 ) ⇔ ( 5 ) . For example, to prove (3) from (2), take C to be the matrix whose columns are c1 , … , ck from (2). To prove (2) from (3), take c1 , … , ck to be the columns of C.
- the column rank of A is less than or equal to k,
- there exist k columns c1 , … , ck of size m such that every column of A is a linear combination of c1 , … , ck,
- there exist an m × k matrix C and a k × n matrix R such that A = C R (when k is the rank, this is a rank factorization of A),
- there exist k rows r1 , … , rk of size n such that every row of A is a linear combination of r1 , … , rk,
- the row rank of A is less than or equal to k.
In this work we propose the Transformer, a model architecture eschewing recurrence and instead relying entirely on an attention mechanism to draw global dependencies between input and output. The Transformer allows for significantly more parallelization and can reach a new state of the art in translation quality after being trained for as little as twelve hours on eight P100 GPUs.要明白这里的关键就是attention。而要明白作者提出的cross attention首先要明白原先的Self-attention
Self-attention, sometimes called intra-attention is an attention mechanism relating different positions of a single sequence in order to compute a representation of the sequence. Self-attention has been used successfully in a variety of tasks including reading comprehension, abstractive summarization, textual entailment and learning task-independent sentence representations.
Transduction (machine learning), the process of directly drawing conclusions about new data from previous data, without constructing a model而这一段解释非常的深奥:
In logic, statistical inference, and supervised learning, transduction or transductive inference is reasoning from observed, specific (training) cases to specific (test) cases. In contrast, induction is reasoning from observed training cases to general rules, which are then applied to the test cases. The distinction is most interesting in cases where the predictions of the transductive model are not achievable by any inductive model. Note that this is caused by transductive inference on different test sets producing mutually inconsistent predictions.这些概念的语言版本有莫名其妙的少数族裔语言,比如亚美尼亚,波斯,俄语,可是居然没有汉语! 就是说要解决逻辑推理苏格拉底是人类需要从具体到一般的归纳总结能力吗?
induction requires solving a more general problem (inferring a function) before solving a more specific problem. When solving a problem of interest, do not solve a more general problem as an intermediate step. Try to get the answer that you really need but not a more general one.这的确是一个很深奥的问题,这个quora回答的大致和wiki相似,不过更加的形象生动一些。 这个抽象的概括总结一开始把人吓死了:
其实如果这么解释就好懂的多了,inductive是一种严格的supervised learning模式,它有着优越的地方在于它的学习数据被严格筛选过,就是说学习数据都有标记;而与之相对应的transductive则没有那种奢侈 可以事先把学习数据严格标记,只有部分标记,也不存在inductive那样可以用同样严格筛选过的实验数据来检验。粗略的看就是 transductive就是时间紧任务重来不及准备充分就让你去边学边练。Inductive learning is nothing but the principle behind the supervised machine learning algorithms where a model tries to build a relationship between the feature variables and target variable by examining the hidden patterns in the train data. Although the model is exposed to a restricted scope of the training data, the learning of the model will be according to a generic nature of data such that it can predict the value of any data point from an unlabelled dataset (test dataset). This kind of learning is termed inductive learning. It is to be noted here that the model is not exposed to the test data during the learning phase and is only provided with the training data for the learning purpose.p
In transductive learning, both training and testing data set is exposed to the model in the learning phase itself. The model tries to find any information about the pattern in the combined dataset (training + testing) and later uses this information for predicting the values of the unlabelled testing data points.
- Inductive learning trains the model with labeled data points and tries to predict the label of unlabeled data points. However, transductive learning trains the entire data set and tries to predict the label of unlabeled data points.
- In inductive learning, if a new unlabelled data point is getting introduced then we can use the already trained model for the prediction. However, in transductive learning, we may need to retrain the entire model.
- Transductive learning is computationally expensive than inductive learning.
二月十九日 等待变化等待机会
这里说的是作者出发地。几乎所有的革命性发现发明都是建立在前人的成果基础上的,所以,站在巨人的肩膀上。Departure to Latent Space
Our approach starts with the analysis of already trained diffusion models in pixel space.
As with any likelihood-based model, learning can be roughly divided into two stages: First is a perceptual compression stage which removes high-frequency details but still learns little semantic variation. In the second stage, the actual generative model learns the semantic and conceptual composition of the data (semantic compression).
A variation is a relation between a set of values of one variable and a set of values of other variables.这个在我看来更像是映射的定义? 这里的定义似乎更加的详细:
In problems relating to two or more variables, it is seen that the value of a variable changes with the change in the value ( or values ) of the related variable (or variables). Suppose a train running at a uniform speed of v km./h. travels a distance of d km. in t hours. Obviously, if t remains unchanged then v increases or decreases according as d increases or decreases. But if d remains unchanged, then v decreases or increases according as t increases or decreases. This shows that the change in the value of a variable may be accompanied differently with the change in the values of related variables. Such relationship with regards to the change in the value of a variable when the values of the related variables change, is termed as variation.在概率论里我们定义随机变量的前提是有一个所谓的随机过程,所以,我们可以相类似的定义一个相关变量的数值变化而引起的一个变化过程,我们关注的是相关变量数值变化的对应关系。我想中文的所谓的简而言之的
变化似乎遗漏了巨大的特定数学含义吧?
We thus aim to first find a perceptually equivalent, but computationally more suitable space, in which we will train diffusion models for high-resolution image synthesis.要记住这个就是所谓的latent space的由来,就是从识别的角度来看是等价的但是计算量小的多的空间。
we train an autoencoder which provides a lower-dimensional (and thereby efficient) representational space which is perceptually equivalent to the data space.这个部分回答了之前的问题,lower-dimensional representational space当然是目的,只有降低维度才能降低计算量,从向量的角度来看当然就是减少其中的元素。矩阵就复杂一些,LoRA的就是一种比较高级的降低维度的技巧。但是怎么能够做到perceptually equivalent呢?关键是这里。
Importantly, and in contrast to previous work, we do not need to rely on excessive spatial compression, as we train DMs in the learned latent space, which exhibits better scaling properties with respect to the spatial dimensionality. The reduced complexity also provides efficient image generation from the latent space with a single network pass. We dub the resulting model class Latent Diffusion Models (LDMs).这个是十分重要的总结,就是在实现手段上一开始就否定了方法的本质不是所谓的空间压缩,这个是太低级了?因为传统的压缩是欺骗眼睛,当然眼睛背后是用来识别的大脑。我的理解就好像说普通的视频压缩对于大脑来说还是
无损的压缩,故而压缩的力度还不高,而从generative的角度来看不需要这么高保真,可以失去更多的细节只留下概念性的部分?这些是我的猜测,在后面的阅读看看对不对?同时最重要的是这里点出了模型的名称LDM。
A notable advantage of this approach is that we need to train the universal autoencoding stage only once and can therefore reuse it for multiple DM trainings or to explore possibly completely different tasks这里点出了模型的可复用性让我有些吃惊,难道这不就是模型的意义吗?能够复用,否则为什么叫做模型呢?难道之前的所谓的模型是不可复用的?或者说之前的智能学习还没有建立可复用的模型?让我们再次学习autoencoder的定义
An autoencoder is a type of artificial neural network used to learn efficient codings of unlabeled data (unsupervised learning). An autoencoder learns two functions: an encoding function that transforms the input data, and a decoding function that recreates the input data from the encoded representation. The autoencoder learns an efficient representation (encoding) for a set of data, typically for dimensionality reduction.所以,这个是在unsupervised learning阶段的分类标签学习过程,目的是建立
降维打击手段得到的输入数据的表达方式,同时能够完满的逆过程把输入数据再用降维后的表达来还原。这个就是一个高级的
识别过程,因为真正的认知不是简单的像素级的细节比对,也不是简单的
猫有四条腿,狗有四条腿,所以猫就是狗,狗就是猫的简单特征推理。总之,真正的识别必然是去除大量不重要细节的抓主要矛盾的
压缩,这个压缩的概念不同于数据的压缩而是在高维度到低维度的压缩,是
概念性的提取特征,是不依赖于各种各样不同品种的狗的特征细节而能够一眼望去肯定的回答什么是一只狗的概念性压缩后的特征提取。我以为这个是非常的高级的智能学习步骤,因为几乎所有的智能过程都充斥着对象的识别与认知,而这个最最基本的功能是其他高级能力的基础。
An autoencoder is defined by the following components:
这些是数学的严格定义,还有关于如何检验autoencoder的质量牵扯出了一个Gradient descent的概念。Two sets: the space of decoded messages X; the space of encoded messages Z. Almost always, both X and Z are Euclidean spaces, that is, X = Rm , Z = Rn for some m , n .
Two parametrized families of functions: the encoder family Eϕ : X → Z, parametrized by ϕ ; the decoder family Dθ : Z → X , parametrized by θ .
For any x ∈ X , we usually write z = Eϕ ( x ) , and refer to it as the code, the latent variable, latent representation, latent vector, etc. Conversely, for any z ∈ Z , we usually write x ′ = Dθ ( z ) , and refer to it as the (decoded) message.
Usually, both the encoder and the decoder are defined as multilayer perceptrons. For example, a one-layer-MLP encoder Eϕ is:
where σ is an element-wise activation function such as a sigmoid function or a rectified linear unit, W is a matrix called "weight", and b is a vector called "bias".
we design an architecture that connects transformers to the DM’s UNet backbone and enables arbitrary types of token-based conditioning mechanisms作者的设计的架构是什么意思?UNet的定义是什么?
二月二十一日 等待变化等待机会
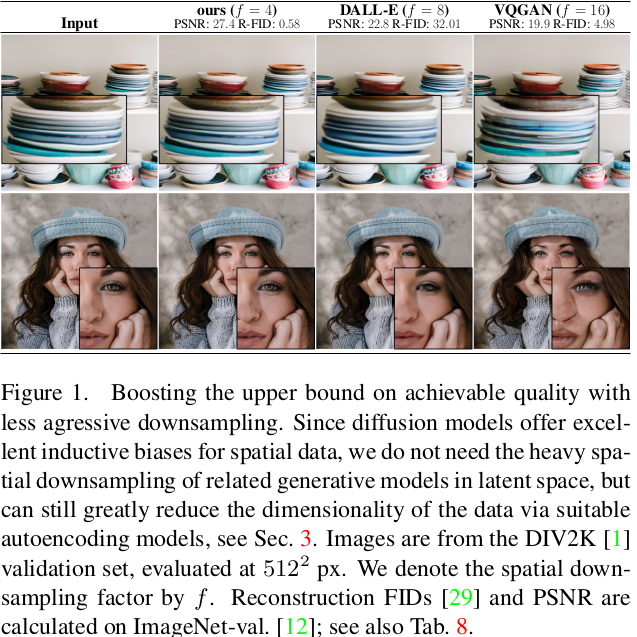 压缩效果的比较是硬碰硬的指标,不论你的算法有多么高明,压缩率有多高,但是一旦你的还原质量不够,那几乎就立刻被判了死刑了。
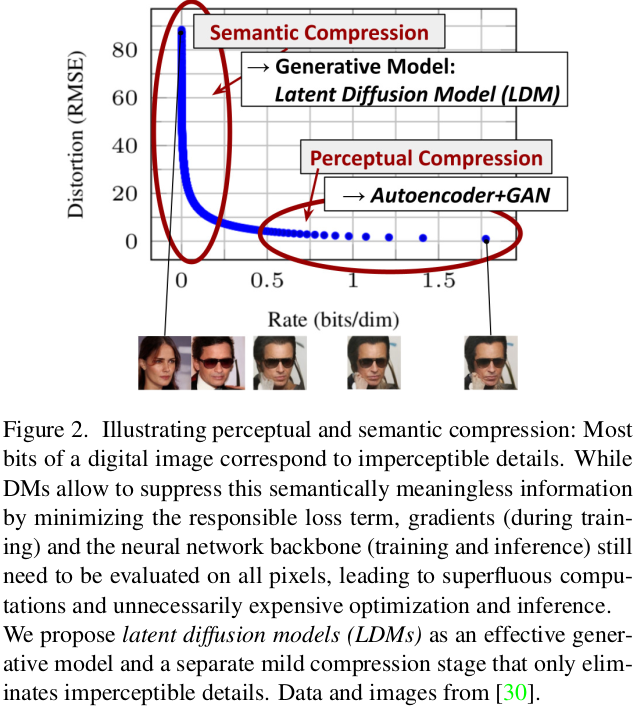 这幅图是阅读理解的关键,而其中的含义是非常深刻的,我至今还是不能完全掌握。这里要先补课学习gradient的概念,一言以蔽之,
A gradient is a derivative of a function that has more than one input variable.这个是它的定义,但是要真正理解它还需要理解它的作用:
The gradient is the generalization of the derivative to multivariate functions. It captures the local slope of the function, allowing us to predict the effect of taking a small step from a point in any direction.说到底是给你一个工具来判断那个方向变化最快从而给你一个获取极值的方向。这个当然是局部优化的概念,但是通常简单有效。
We achieve competitive performance on multiple tasks (unconditional image synthesis, inpainting, stochastic super-resolution) and datasets while significantly lowering computational costs. Compared to pixel-based diffusion approaches, we also significantly decrease inference costs.它的压缩效果是和谁相比?当然是和传统的像素空间,那里充斥了大量的无意义的细节,对于保持semantic并无多大帮助,这个也是引入latent space的最核心原因,这个也就是目前AGC能够流行起来的最根本原因。量变引发的质变,不要简单的认为一个压缩算法就不能带来革命,当前的人工智能大 多数想法并不是什么绝对的新鲜概念,很多都是几十年前就有了,只不过当时的算力不足以支撑而不被看好,今天的想法也不是前人想不到只是认为当时的现实做不 到而不被人看好而已。
We show that, in contrast to previous work which learns both an encoder/decoder architecture and a score-based prior simultaneously, our approach does not require a delicate weighting of reconstruction and generative abilities. This ensures extremely faithful reconstructions and requires very little regularization of the latent space.这里的意义也是非常重大的,这里也许就是模型的本质意义,能够轻易的复用是一个模型的最根本的意义,不论多么复杂的训练过程,模型一旦完成,可以很简单的 重复使用达到它的逆过程的还原而无需做过多的调整配置修改。这个是架构革命的重大创新,我的觉得这个意义是仅次于压缩的大贡献。
We find that for densely conditioned tasks such as super-resolution, inpainting and semantic synthesis, our model can be applied in a convolutional fashion and render large, consistent images of ∼ 10242 px.它的应用场景也是其重大贡献,否则一个无用的发明不论多么精巧高明都是无意义的玩具而已,对于实际工作需要高强度的扩展这种最基本的需求的满足是足以夸耀的贡献!
Moreover, we design a general-purpose conditioning mechanism based on cross-attention, enabling multi-modal training. We use it to train class-conditional, text-to-image and layout-to-image models.这里是非常的高级的功能,这个cross-attention是有一个核心的贡献,而它能够让多个模型同时训练更是超出我目前能够理解的范畴,这个需要在随后的阅读里深刻理解领会。难道可以把controlNet之类的形体指示,或者深度图之类的作为提示条件来综合训练?这个也是开创性的贡献。
Finally, we release pretrained latent diffusion and autoencoding models at https://github.com/CompVis/latent-diffusion which might be reusable for a various tasks besides training of DMs还有什么共享更高尚的贡献呢?一个伟大的发明创造如果不是为了人类的共同福祉而共享,那么它的意义终将是有限的。更何况它的用途并不限于训练模型,这个更加令人神往。
The high dimensional nature of images presents distinct challenges to generative modeling.这里开宗明义说出了问题和挑战,这才引出了各个方向方法的孰优孰劣。
Generative Adversarial Networks (GAN) allow for efficient sampling of high resolution images with good perceptual quality, but are difficult to optimize and struggle to capture the full data distribution.GAN虽然不错,但是很难优化,而且不能掌握全部的数据分布。
Variational autoencoders (VAE) and flow-based models enable efficient synthesis of high resolution images, but sample quality is not on par with GANs.VAE在我看来和作者的过程有着非常相似的部分,这个是需要格外注意理解的。
Variational autoencoders are often associated with the autoencoder model because of its architectural affinity, but with significant differences in the goal and mathematical formulation. Variational autoencoders are probabilistic generative models that require neural networks as only a part of their overall structure.VAE似乎就是autoencoder,但是又不同?很复杂。
The neural network components are typically referred to as the encoder and decoder for the first and second component respectively. The first neural network maps the input variable to a latent space that corresponds to the parameters of a variational distribution. In this way, the encoder can produce multiple different samples that all come from the same distribution. The decoder has the opposite function, which is to map from the latent space to the input space, in order to produce or generate data points. Both networks are typically trained together with the usage of the reparameterization trick, although the variance of the noise model can be learned separately.就是说VAE只是利用了autoencoder架构的encoder/decoder而已?很难理解其中的微妙区别。这里有大量的概率数学部分,照例我准 本忽略,因为我的感觉实际上VAE的核心还是要假设prio和posterior的概率分布模型,这个直接关系到还原噪音的效果,到底是正态分布还是波努 力分布这似乎要根据具体的现实吧?总之,我看起来很吃力。暂时先放一放吧。
While autoregressive models (ARM) achieve strong performance in density estimation, computationally demanding architectures and a sequential sampling process limit them to low resolution images. Because pixel based representations of images contain barely perceptible, high-frequency details, maximum-likelihood training spends a disproportionate amount of capacity on modeling them, resulting in long training times. To scale to higher resolutions, several two-stage approaches use ARMs to model a compressed latent image space instead of raw pixels.说老实话,我根本不明白autoregressive (AR) model和Variational autoencoders (VAE)到底有什么不同?这里的回答比较清楚
能不能理解,虽然autoregressive指的是泛泛的概率模型,但是VAE更加具体是一个和时间相关的随机过程,而flow-based model更像是一个原则性的假设你能够根据逆过程计算原本的概率分布,这个似乎是encoder/decoder的理论基础?总之,它们是非常紧密联系 的,这是我唯一能够确定的。Autoregressive models are basically modeling a time series, or a random process. They can be used in VAEs as well, which is what happens in the case of text, the decoder models p(x|z) in an autoregressive way, i.e the current word to be predicted is dependent on the previously predicted words.
Variational Autoencoders are a general representation learning and generative modeling framework, they try to model your data, by learning a latent variable representation p(z|x) and then generate p(x|z). They use variational inference to estimate these distributions accurately. i.e they assume a general class of distributions and then use an optimization scheme to find parameters that allow them to match the target distribution well.
The idea behind normalizing flows is that given a simple distribution, you can perform invertible transformations on them to get more complex distributions, if you can compute the log probabilities of these transformed distributions efficiently, then basically you can perform variational inference with more complex distributions, which might help.
Looking at the definitions it is clear that all of them are interconnected, you can use normalizing flows to improve the class of distributions you are using in a VAE, you can use an autoregressive decoder to generate p(x|z) if your data is sequential.
就是说从x变成ε(x)是大大减少了计算强度。
The Fréchet inception distance (FID) is a metric used to assess the quality of images created by a generative model, like a generative adversarial network (GAN). Unlike the earlier inception score (IS), which evaluates only the distribution of generated images, the FID compares the distribution of generated images with the distribution of a set of real images ("ground truth").
千人同尝不同味,
万人同道不同心。
有人理解我之幸,
无人理解我独行。
知我者慰我心忧,
不知我者谓我何求?
世间万物皆可有,
唯有懂字最难求。
二月二十二日 等待变化等待机会
A transformer is a deep learning architecture based on the multi-head attention mechanism, proposed in a 2017 paper "Attention Is All You Need". It has no recurrent units, and thus requires less training time than previous recurrent neural architectures, such as long short-term memory (LSTM), and its later variation has been prevalently adopted for training large language models on large (language) datasets, such as the Wikipedia corpus and Common Crawl. Input text is split into n-grams encoded as tokens and each token is converted into a vector via looking up from a word embedding table. At each layer, each token is then contextualized within the scope of the context window with other (unmasked) tokens via a parallel multi-head attention mechanism allowing the signal for key tokens to be amplified and less important tokens to be diminished. The transformer paper, published in 2017, is based on the softmax-based attention mechanism proposed by Bahdanau et. al. in 2014 for machine translation, and the Fast Weight Controller, similar to a transformer, proposed in 1992.所以,这里究竟有多少概念需要学习呢?
融合或者是交锋,因为结果是一个矩阵,它代表了两个向量在每一个维度上的比较。
Given two vectors of size m × 1 and n × 1 respectively, their outer product, denoted u ⊗ v , is defined as the m × n matrix A obtained by multiplying each element of u by each element of v : Or, in index notation:
官方网页,至少我看是比较靠谱?
A recurrent neural network (RNN) is a type of artificial neural network which uses sequential data or time series data. These deep learning algorithms are commonly used for ordinal or temporal problems, such as language translation, natural language processing (nlp), speech recognition, and image captioning; they are incorporated into popular applications such as Siri, voice search, and Google Translate. Like feedforward and convolutional neural networks (CNNs), recurrent neural networks utilize training data to learn. They are distinguished by their “memory” as they take information from prior inputs to influence the current input and output. While traditional deep neural networks assume that inputs and outputs are independent of each other, the output of recurrent neural networks depend on the prior elements within the sequence. While future events would also be helpful in determining the output of a given sequence, unidirectional recurrent neural networks cannot account for these events in their predictions.这里要注意的是结果也能再影响下一次的输入结果,似乎预示着某种动态的模型?也许这个就是其中提到的时间敏感性的意思?wiki的解释一般更加的权威,而且把CNN放到一起来对比是更加的精准全面。
A recurrent neural network (RNN) is one of the two broad types of artificial neural network, characterized by direction of the flow of information between its layers. In contrast to the uni-directional feedforward neural network, it is a bi-directional artificial neural network, meaning that it allows the output from some nodes to affect subsequent input to the same nodes. Their ability to use internal state (memory) to process arbitrary sequences of inputs makes them applicable to tasks such as unsegmented, connected handwriting recognition or speech recognition. The term "recurrent neural network" is used to refer to the class of networks with an infinite impulse response, whereas "convolutional neural network" refers to the class of finite impulse response. Both classes of networks exhibit temporal dynamic behavior. A finite impulse recurrent network is a directed acyclic graph that can be unrolled and replaced with a strictly feedforward neural network, while an infinite impulse recurrent network is a directed cyclic graph that can not be unrolled.流动是双向的?反复看到所谓的Long short-term memory
Long short-term memory (LSTM)[1] network is a recurrent neural network (RNN), aimed to deal with the vanishing gradient problem present in traditional RNNs. Its relative insensitivity to gap length is its advantage over other RNNs, hidden Markov models and other sequence learning methods. It aims to provide a short-term memory for RNN that can last thousands of timesteps, thus "long short-term memory".
二月二十三日 等待变化等待机会
Recurrent models typically factor computation along the symbol positions of the input and output sequences. Aligning the positions to steps in computation time, they generate a sequence of hidden states ht , as a function of the previous hidden state ht−1 and the input for position t. This inherently sequential nature precludes parallelization within training examples, which becomes critical at longer sequence lengths, as memory constraints limit batching across examples.它点出了
Transformer, a model architecture eschewing recurrence and instead relying entirely on an attention mechanism to draw global dependencies between input and output.
Convolutional neural network (CNN) is a regularized type of feed-forward neural network that learns feature engineering by itself via filters (or kernel) optimization. Vanishing gradients and exploding gradients, seen during backpropagation in earlier neural networks, are prevented by using regularized weights over fewer connections.这里的关键字是什么呢?依赖filter优化。而为什么它是convolution机制呢?我之前一直不太理解,现在有些明 白这个是模仿人类五官尤其是视觉作为传感器采集外界光能量刺激的机制,所谓的convolution计算的是光通量,这就是理解的核心,因为积分机制原本 就是研究过程累积的数学方式,那么这个方案它的前提就是和平面以及时序紧密关联的,这是纯粹的依靠视觉来理解人类识别的路径。而RNN则至少是更加的抽象 了一层,因为不论你的眼睛作为传感器采集的具体光信号的总和要怎样存储,最终抽象出来的信号提取,或者是特征提取都是向量来存储,因为即便是向量空间也不 过是一族向量,在本质上不需要强加的空间强相关性,因为在向量空间里的basis是唯一能够识别的基础向量,它们的顺序似乎是不重要的,我以为这个才是处 理提纯过的本征信号。那么作为一般性的思想,CNN要去除空间干扰,RNN去除时序敏感性,这些都是对于一个过程的信号总量采集之后的特征提取方式不同而 已。
抽象还原机制有自我提高的机制,也就是学习性,能够随着训练数量的增长而提高有效性与可靠性,这个正增长机制不论多么微不足道随着训练数量的增加它一定能够达到某种质的飞跃,也就是增长或者学习能力的几何级数的增加。这个是正反馈的机制。
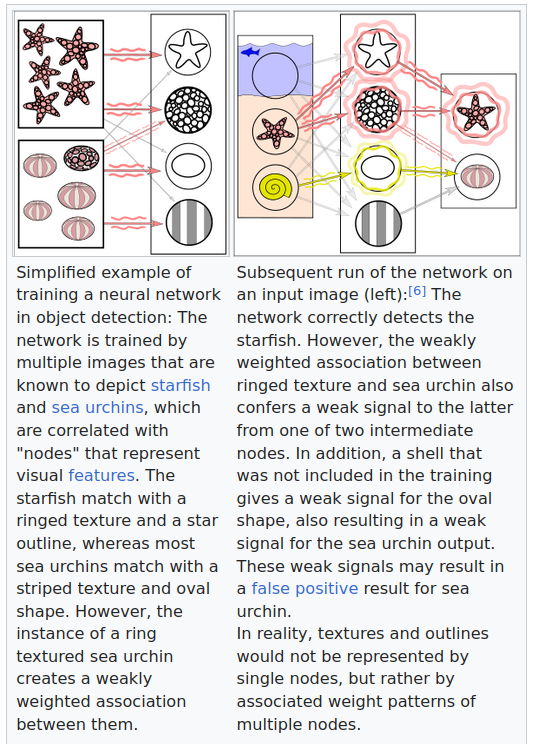 如果自然界的确能够被细分为一个个所谓的feature或者说特征,那么识别特征就是识别对象的简单组合。而神经网络基于光通量来过滤所谓的杂音之后的坚
强的连接自然而然的成为下一次识别或者说还原的快车道。自然往往选择最简单可靠的路径,人们总结为奥卡姆剃刀原则,因为精锐所以锋利,从哪里来就回哪里
去:From light to darkness; From darkness,
light!既然光信号经过损耗杂音干扰后存留的信号肯定是本征信号,那么反复出现的就必然是本征信号。我们需要解决的往往是怎么最大限度的模拟信号的损
失而又能够尽可能的还原,这里说是还原还不如说是经过检验可以接受就算成功。人类的反馈外界客观世界的唯一标准就是有用,画画像不像是由谁决定的?是通过
比较来决定的,这个图灵实验是一个原理,没有什么数学方法来定义这个复制是否可信,只能用使用者能否发现区别来作为检验的唯一标准:实践是检验真理的唯一
标准,人如果是唯一的实践者,人就是检验的唯一标准。如果学习的机器是唯一的实践者,那么让机器来做机器的检验者吧。
如果自然界的确能够被细分为一个个所谓的feature或者说特征,那么识别特征就是识别对象的简单组合。而神经网络基于光通量来过滤所谓的杂音之后的坚
强的连接自然而然的成为下一次识别或者说还原的快车道。自然往往选择最简单可靠的路径,人们总结为奥卡姆剃刀原则,因为精锐所以锋利,从哪里来就回哪里
去:From light to darkness; From darkness,
light!既然光信号经过损耗杂音干扰后存留的信号肯定是本征信号,那么反复出现的就必然是本征信号。我们需要解决的往往是怎么最大限度的模拟信号的损
失而又能够尽可能的还原,这里说是还原还不如说是经过检验可以接受就算成功。人类的反馈外界客观世界的唯一标准就是有用,画画像不像是由谁决定的?是通过
比较来决定的,这个图灵实验是一个原理,没有什么数学方法来定义这个复制是否可信,只能用使用者能否发现区别来作为检验的唯一标准:实践是检验真理的唯一
标准,人如果是唯一的实践者,人就是检验的唯一标准。如果学习的机器是唯一的实践者,那么让机器来做机器的检验者吧。
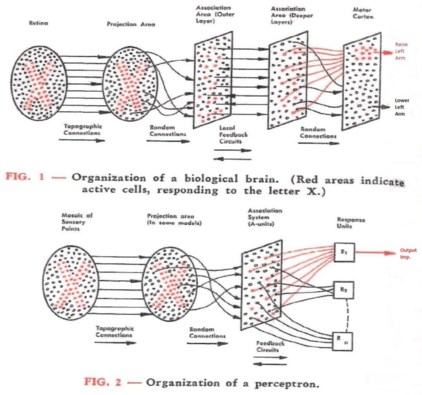 我
以为这个对于客观复杂世界作出机械刻板一比一复刻的思路是过于天真的,因为现实是资源永远是有限的宝贵的,而自然界的信息几乎是无穷的,以有限的处理能力
硬抗无限的输入信息是徒劳的。人类智能进化史就是压缩还原的不断自我平衡,去粗取精,去伪存真的真正目的是自然处理能力的不足。同样的,现在人类发明的种
种算法也是现实的计算能力与客观处理的要求的之间的矛盾的某种妥协产物,如果有一天在虚拟现实里实现真正的Perceptron我也不会感到惊奇,但是不
是现在。
我
以为这个对于客观复杂世界作出机械刻板一比一复刻的思路是过于天真的,因为现实是资源永远是有限的宝贵的,而自然界的信息几乎是无穷的,以有限的处理能力
硬抗无限的输入信息是徒劳的。人类智能进化史就是压缩还原的不断自我平衡,去粗取精,去伪存真的真正目的是自然处理能力的不足。同样的,现在人类发明的种
种算法也是现实的计算能力与客观处理的要求的之间的矛盾的某种妥协产物,如果有一天在虚拟现实里实现真正的Perceptron我也不会感到惊奇,但是不
是现在。
二月二十四日 等待变化等待机会
...the number of operations required to relate signals from two arbitrary input or output positions grows in the distance between positions...This makes it more difficult to learn dependencies between distant positions. In the Transformer this is reduced to a constant number of operations, albeit at the cost of reduced effective resolution due to averaging attention-weighted positions, an effect we counteract with Multi-Head Attention...这里说的是什么呢?就是核心的问题是位置。如果没有位置,那么一切都是非常简单的,我的理解位置是核心因为上下文敏感本质上就是位置敏感,而所谓的上下文 那更加是一个资源与准确性平衡的结果,目前的概率模型是类似于条件概率,那么多大的前置条件要纳入条件呢?无限大的上下文敏感自然是无限,可是可能吗?所 以,要引入上下文的一个类似于活动窗口(attention),但是一词多义就是很典型的上下文敏感,要解决这个问题依靠的是什么办法呢?
Self-attention, sometimes called intra-attention is an attention mechanism relating different positions of a single sequence in order to compute a representation of the sequence.这里的所谓的self-attention就是把上下文限制在输入?为什么引入上一次的输出也作为上下文的一部分呢?我感觉这个想法是非常的聪明的,上一 次的结果是上一次上下文的结果但是从attention的角度来看它会作为一个潜在的变量影响到下一次的结果,这个本身就是上下文,而且是非常聪明的把几 乎无限的前置输入做了一个限制,也就是把上一次的活动窗口的结果作为前置输入,这个是很自然的。从数学上看像是递归函数,很优美的一个表达。
The Transformer is the first transduction model relying entirely on self-attention to compute representations of its input and output without using sequence-aligned RNNs or convolution.我始终对于transduction model很在意,因为我对于它很敬畏,维基百科说它的每一次变动都要重新训练,这个不知道是不是我理解错误了?这里点出了Transformer的本质是抛弃了顺序相关的传统做法。
Most competitive neural sequence transduction models have an encoder-decoder structure. Here, the encoder maps an input sequence of symbol representations (x1 , ..., xn ) to a sequence of continuous representations z = (z1 , ..., zn ). Given z, the decoder then generates an output sequence (y1 , ..., ym ) of symbols one element at a time. At each step the model is auto-regressive, consuming the previously generated symbols as additional input when generating the next.重温一下transformer model的架构。 最后一句最重要,上一次产生的符号会作为额外的输入。这个思想就是解决无限上下文难题的核心。但是所有的秘密也都在于这里。
Encoder: The encoder is composed of a stack of N = 6 identical layers. Each layer has two sub-layers. The first is a multi-head self-attention mechanism, and the second is a simple, position-wise fully connected feed-forward network. We employ a residual connection around each of the two sub-layers, followed by layer normalization. That is, the output of each sub-layer is LayerNorm(x + Sublayer(x)), where Sublayer(x) is the function implemented by the sub-layer itself. To facilitate these residual connections, all sub-layers in the model, as well as the embedding layers, produce outputs of dimension dmodel = 512.这里字字珠玑,信息量非常的大,因为它肯定是非常的复杂,否则也不可能有那么神奇的效果。只能慢慢的消化了。这个还仅仅是encoder。
Decoder: The decoder is also composed of a stack of N = 6 identical layers. In addition to the two sub-layers in each encoder layer, the decoder inserts a third sub-layer, which performs multi-head attention over the output of the encoder stack. Similar to the encoder, we employ residual connections around each of the sub-layers, followed by layer normalization. We also modify the self-attention sub-layer in the decoder stack to prevent positions from attending to subsequent positions. This masking, combined with fact that the output embeddings are offset by one position, ensures that the predictions for position i can depend only on the known outputs at positions less than i.这个比encoder更难懂,而且为什么说六层是identical呢?结合架构图我很难理解六层在哪里?
An attention function can be described as mapping a query and a set of key-value pairs to an output, where the query, keys, values, and output are all vectors. The output is computed as a weighted sum of the values, where the weight assigned to each value is computed by a compatibility function of the query with the corresponding key.这里的定义非常的复杂,我只能说现在终于正式看到了QKV这个定义了。在架构图上看到过它们,不理解是什么,现在看来这个是一个函数,函数 的值是一个相当复杂的就在于说这里的weight是什么角色和用意呢?因为如果没有这个weight简单的query/key pair几乎是任何学过计算机的人都能明白的,几乎就是传统的数据库查询的原理,可是有了这个weight据说还要和query/key关联,那么这么做 的用意是什么呢?
The softmax function, also known as softargmax or normalized exponential function, converts a vector of K real numbers into a probability distribution of K possible outcomes.单单使用看起来是很简单的,但是它的真正含义却很深奥
It is a generalization of the logistic function to multiple dimensions, and used in multinomial logistic regression.这里为什么是Logistic function?它的最早引入是和预测人口增长的:
The initial stage of growth is approximately exponential (geometric); then, as saturation begins, the growth slows to linear (arithmetic), and at maturity, growth stops.这个似乎是一种人们对于事物发展的一般规律的描述,任何一个新事物或者新刺激,在一开始的时候增长都是几何级数的,随着时间的推移,增长变缓慢了成为线性增长,最后停滞了。我喜欢它的标准公式:
后面这个形式更加的直观:一个以指数增长的事物它的可持续增长的概率是怎么样子的呢?很明显的一个国家的GDP增长就是这个典型,在初期指数增长的确很 快,但是增长越大基数越大意味着后续增长的动力越来越相对变弱,最后高增长变成低增长以至于零增长甚至倒退。我觉得选取这个概率模型来表示信号处理强度是 恰如其分的,一个信号刺激的烈度逐步减退也是如此的,至于为什么是指数我的理解可以看作是维度的增加,这个在图形里是显而易见的,曝光的过程就是面积的增 大,自然而然的维度增大,当然就是指数的增长,这个从convolution的概念就是一个体现。
Scaled Dot-Product Attention:The input consists of queries and keys of dimension dk , and values of dimension dv . We compute the dot products of the query with all keys, divide each by , and apply a softmax function to obtain the weights on the values.这个是原理
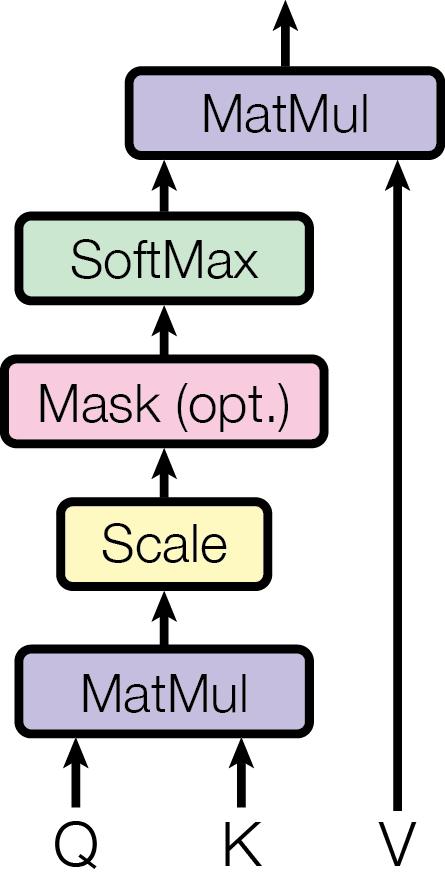 真正的跨越是并行计算,而这其中的道理却又出奇的简单,看起来伟大的跳跃都只不过是平时散步的时候把脚尖颠起来走一走而已。就是说原本是一个个向量的计算,现在换成了矩阵,那么可以利用计算机的矩阵计算优化一个个单独的向量计算,尤其是高维度的矩阵。
In practice, we compute the attention function on a set of queries simultaneously, packed together into a matrix Q. The keys and values are also packed together into matrices K and V . We compute the matrix of outputs as:
Overfitting is an undesirable machine learning behavior that occurs when the machine learning model gives accurate predictions for training data but not for new data. When data scientists use machine learning models for making predictions, they first train the model on a known data set. Then, based on this information, the model tries to predict outcomes for new data sets. An overfit model can give inaccurate predictions and cannot perform well for all types of new data.简而言之,就是测试不尽如人意。原因吗?
这里甚至有对于单个训练数据过长时间训练的问题!这个真的是有趣。总而言之,只能归罪于训练数据质量不高,否则你还能说是训练过程有错误?所以是单个数据重复训练?
- The training data size is too small and does not contain enough data samples to accurately represent all possible input data values.
- The training data contains large amounts of irrelevant information, called noisy data.
- The model trains for too long on a single sample set of data.
- The model complexity is high, so it learns the noise within the training data.
Ensemble learning is a machine learning technique that enhances accuracy and resilience in forecasting by merging predictions from multiple models. It aims to mitigate errors or biases that may exist in individual models by leveraging the collective intelligence of the ensemble.三个臭皮匠,顶个诸葛亮。
In machine learning, support vector machines (SVMs, also support vector networks[1]) are supervised max-margin models with associated learning algorithms that analyze data for classification and regression analysis.如果这里看的云里雾里,这里的例子就很清楚了In addition to performing linear classification, SVMs can efficiently perform a non-linear classification using what is called the kernel trick, implicitly mapping their inputs into high-dimensional feature spaces. SVMs can also be used for regression tasks, where the objective becomes ϵ-sensitive.
In the case of support vector machines, a data point is viewed as a p-dimensional vector (a list of p numbers), and we want to know whether we can separate such points with a ( p − 1 ) -dimensional hyperplane. This is called a linear classifier.简而言之,降维!分类!
H1 does not separate the classes. H2 does, but only with a small margin. H3 separates them with the maximal margin.
In the context of artificial neural networks, the rectifier or ReLU (rectified linear unit) activation function
不过我感觉这个也不是好办法,因为似乎Yann LeCun后来在很多论文上署名是一种背书的意义。大家应该都争先恐后把他拉在论文的署名最后,而他也很随和乐意。
二月二十五日 等待变化等待机会
for file in $(find stable-diffusion/*.pdf -cnewer stable-diffusion/1706.03762.pdf); do name=$(basename $file) && s3cmd put --mime-type='application/pdf' stable-diffusion/$name s3://www.staroceans.org/stable-diffusion/$name; done
Zero-shot learning (ZSL) is a problem setup in deep learning where, at test time, a learner observes samples from classes which were not observed during training, and needs to predict the class that they belong to. Zero-shot methods generally work by associating observed and non-observed classes through some form of auxiliary information, which encodes observable distinguishing properties of objects. For example, given a set of images of animals to be classified, along with auxiliary textual descriptions of what animals look like, an artificial intelligence model which has been trained to recognize horses, but has never been given a zebra, can still recognize a zebra when it also knows that zebras look like striped horses. This problem is widely studied in computer vision, natural language processing, and machine perception.这个描述的是学习过程的设置,但是它要解决的问题的本质是transduction。2008n年提出的时候乘坐dataless classification。
In computer vision, zero-shot learning models learned parameters for seen classes along with their class representations and rely on representational similarity among class labels so that, during inference, instances can be classified into new classes.这怎么看都是
类比,就是举一反三。
Unlike standard generalization in machine learning, where classifiers are expected to correctly classify new samples to classes they have already observed during training, in ZSL, no samples from the classes have been given during training the classifier. It can therefore be viewed as an extreme case of domain adaptation.核心要义就是要分类的是绝对没有训练过的类别。可以理解为移花接木式的运用已经学习的分类来做新的分类,这个半主动学习如果成功,机器学习当然可以半自动学习了,那效率自然大为提高了。
应该是最后的class-class similarity是我理解的CLIP的机制吧?
- Learning with attributes: classes are accompanied by pre-defined structured description. For example, for bird descriptions, this could include "red head", "long beak". These attributes are often organized in a structured compositional way, and taking that structure into account improves learning.While this approach was used mostly in computer vision, there are some examples for it also in natural language processing.
- Learning from textual description. As pointed out above, this has been the key direction pursued in natural language processing. Here class labels are taken to have a meaning and are often augmented with definitions or free-text natural-language description. This could include for example a wikipedia description of the class.
- Class-class similarity. Here, classes are embedded in a continuous space. a zero-shot classifier can predict that a sample corresponds to some position in that space, and the nearest embedded class is used as a predicted class, even if no such samples were observed during training.
二月二十六日 等待变化等待机会
所以,这个就是当年这个思路成功的根本原因,在人类视觉识别过程中,小块的图像的识别,或者说pattern的识别肯定是最最核心的部分,而这个是依赖于 这种特征的大量的出现在训练过程,并且它的出现的方位却是随机无规律的,这个是显而易见的,人眼如同摄像机,在不断变换方位角度对于同一个对象的审视自然 会在不同的方位得到同一影像特征块。至于说这个印象块要多小这个倒是一个细节问题,太大太小都是一个问题。
- First, in array data such as images, local groups of values are often highly correlated, forming distinctive local motifs that are easily detected.
- Second, the local statistics of images and other signals are invariant to location. In other words, if a motif can appear in one part of the image, it could appear anywhere, hence the idea of units at different locations sharing the same weights and detecting the same pattern in different parts of the array. Mathematically, the filtering operation performed by a feature map is a discrete convolution, hence the name.
pooling layer一直不理解它的作用,这里有一个解读:
Although the role of the convolutional layer is to detect local conjunctions of features from the previous layer, the role of the pooling layer is to merge semantically similar features into one.在很多软件应用层里有去重,而这里我们希望发现重复并且反复引用它,这正好相压缩算法寻找重复的字符串一样,某种意义上说学习就是一个寻找最大限度压缩的 办法。否则不是因为记忆有限,为什么要学习?直接记忆就好了。这正如同监控录像一眼,如果存储是无限的,而分析查询时间没有限制的,就直接机械录像好了。
Deep neural networks exploit the property that many natural signals are compositional hierarchies, in which higher-level features are obtained by composing lower-level ones.
二月二十九日 等待变化等待机会
三月一日 等待变化等待机会
 RNN能够识别出woman throwing frisbee,我使用Interrogate CLIP得到:
a woman and a child playing frisbee in a field of grass with trees in the background and a river running through the grass, promotional image, Elizabeth Durack, a stock photo, heidelberg school似乎更加的详细,如果使用Interrogate DeepBooru得到的
3d, 4girls, audience, aurora, ball, baseball, bicycle, blur censor, blurry, blurry background, blurry foreground, bokeh, building, camera, caution tape, cellphone picture, chain-link fence, christmas tree, chromatic aberration, concert, cosplay photo, day, depth of field, electric fan, fence, field, figure, film grain, focused, garden, glowstick, graffiti, grass, gyaru, gym, hammock, hands on own head, holding ball, holding phone, in the face, jungle, kicking, kogal, leaf, leggings, looking at viewer, male focus, messy hair, motion blur, multiple girls, on grass, outdoors, park, path, people, phone screen, photo \(medium\), photo \(object\), photo background, photo inset, photorealistic, pool, poster \(object\), pov, pov hands, rainbow, recording, reference inset, selfie, shadow, shiny pokemon, shorts, shouji, shrine, sketchbook, soccer, soccer ball, solo focus, sport, stadium, storefront, taking picture, tanaka mamimi, tanzaku, tatami, tennis, throwing, timestamp, tree shade, unconventional media, viewfinder, volleyball
三月三日 等待变化等待机会
Cannot import ClipProcessor的错误,发现需要先更新transformaers这个模块:
pip install --upgradie transformers
pip install --upgradie torch
三月五日 等待变化等待机会
sudo systemctl mask packagekit.service
nick@nick-sager:~$ grep --include=*.conf -rnw '/' -e "nvidia-drm" 2>/dev/null
/etc/modprobe.d/nvidia-graphics-drivers-kms.conf:3:options nvidia-drm modeset=1
/usr/lib/modprobe.d/nvidia-kms.conf:3:options nvidia-drm modeset=1
/usr/share/X11/xorg.conf.d/10-nvidia.conf:3:    MatchDriver "nvidia-drm"
/usr/src/nvidia-550.40.07/dkms.conf:12:BUILT_MODULE_NAME[2]="nvidia-drm"
要编译它需要先安装rust:
- It's reversible and lossless, so you can convert tokens back into the original text
- It works on arbitrary text, even text that is not in the tokeniser's training data
- It compresses the text: the token sequence is shorter than the bytes corresponding to the original text. On average, in practice, each token corresponds to about 4 bytes.
- It attempts to let the model see common subwords. For instance, "ing" is a common subword in English, so BPE encodings will often split "encoding" into tokens like "encod" and "ing" (instead of e.g. "enc" and "oding"). Because the model will then see the "ing" token again and again in different contexts, it helps models generalise and better understand grammar.
sudo apt install rust-all
pip install .
 因为这个目的就是防止机器行为,这个应该是简单的OCR程序难以胜任的。即便训练可能也不行吧?

sudo journalctl --rotate
sudo journalctl --vacuum-time=1s
三月七日 等待变化等待机会
ClipText for text encoding.
Input: text.
Output: 77 token embeddings vectors, each in 768 dimensions.UNet + Scheduler to gradually process/diffuse information in the information (latent) space.
Input: text embeddings and a starting multi-dimensional array (structured lists of numbers, also called a tensor) made up of noise.
Output: A processed information arrayAutoencoder Decoder that paints the final image using the processed information array.
Input: The processed information array (dimensions: (4,64,64))
Output: The resulting image (dimensions: (3, 512, 512) which are (red/green/blue, width, height))
forward diffusion的名字的印象,但是具体是什么才是最要紧的步骤:
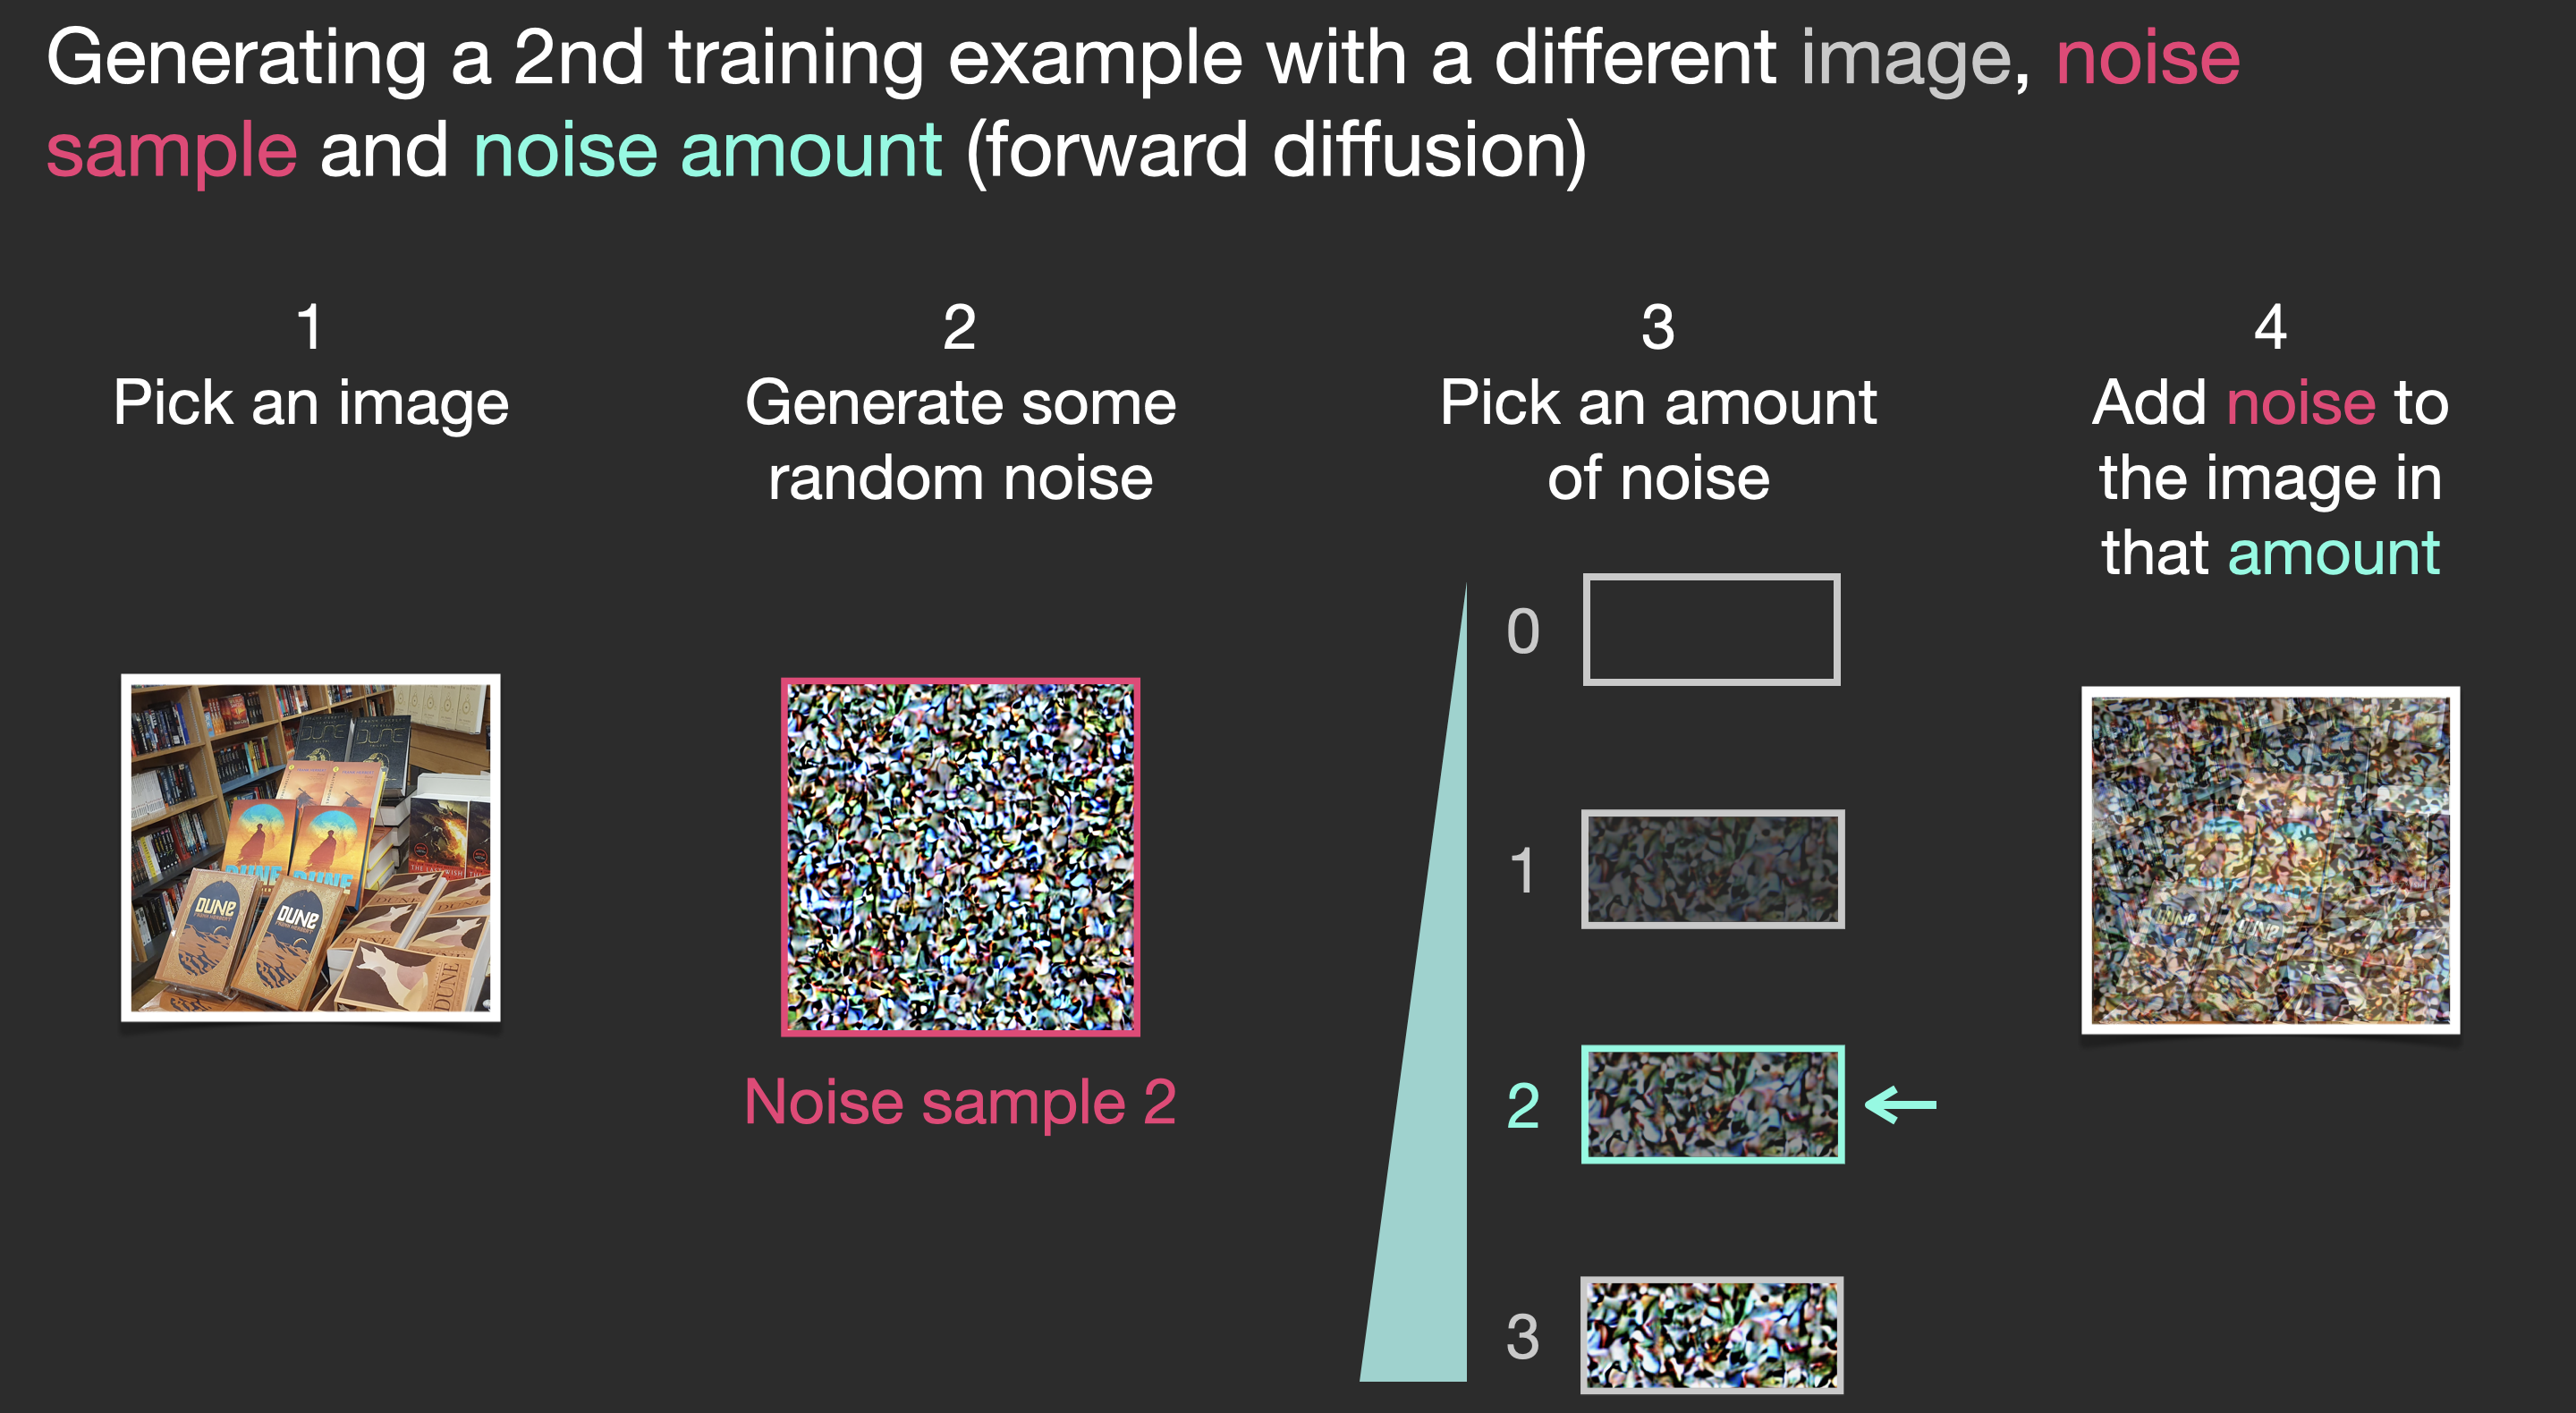 就是给原始图片依次添加噪音这个过程在我看来是模仿信号传输过程的衰减与人类记忆存储里的自然存储失效的随机过程。
降噪!因为这个好像是一个大数据量的叠加增量部分,这个δ的数据量小的多!
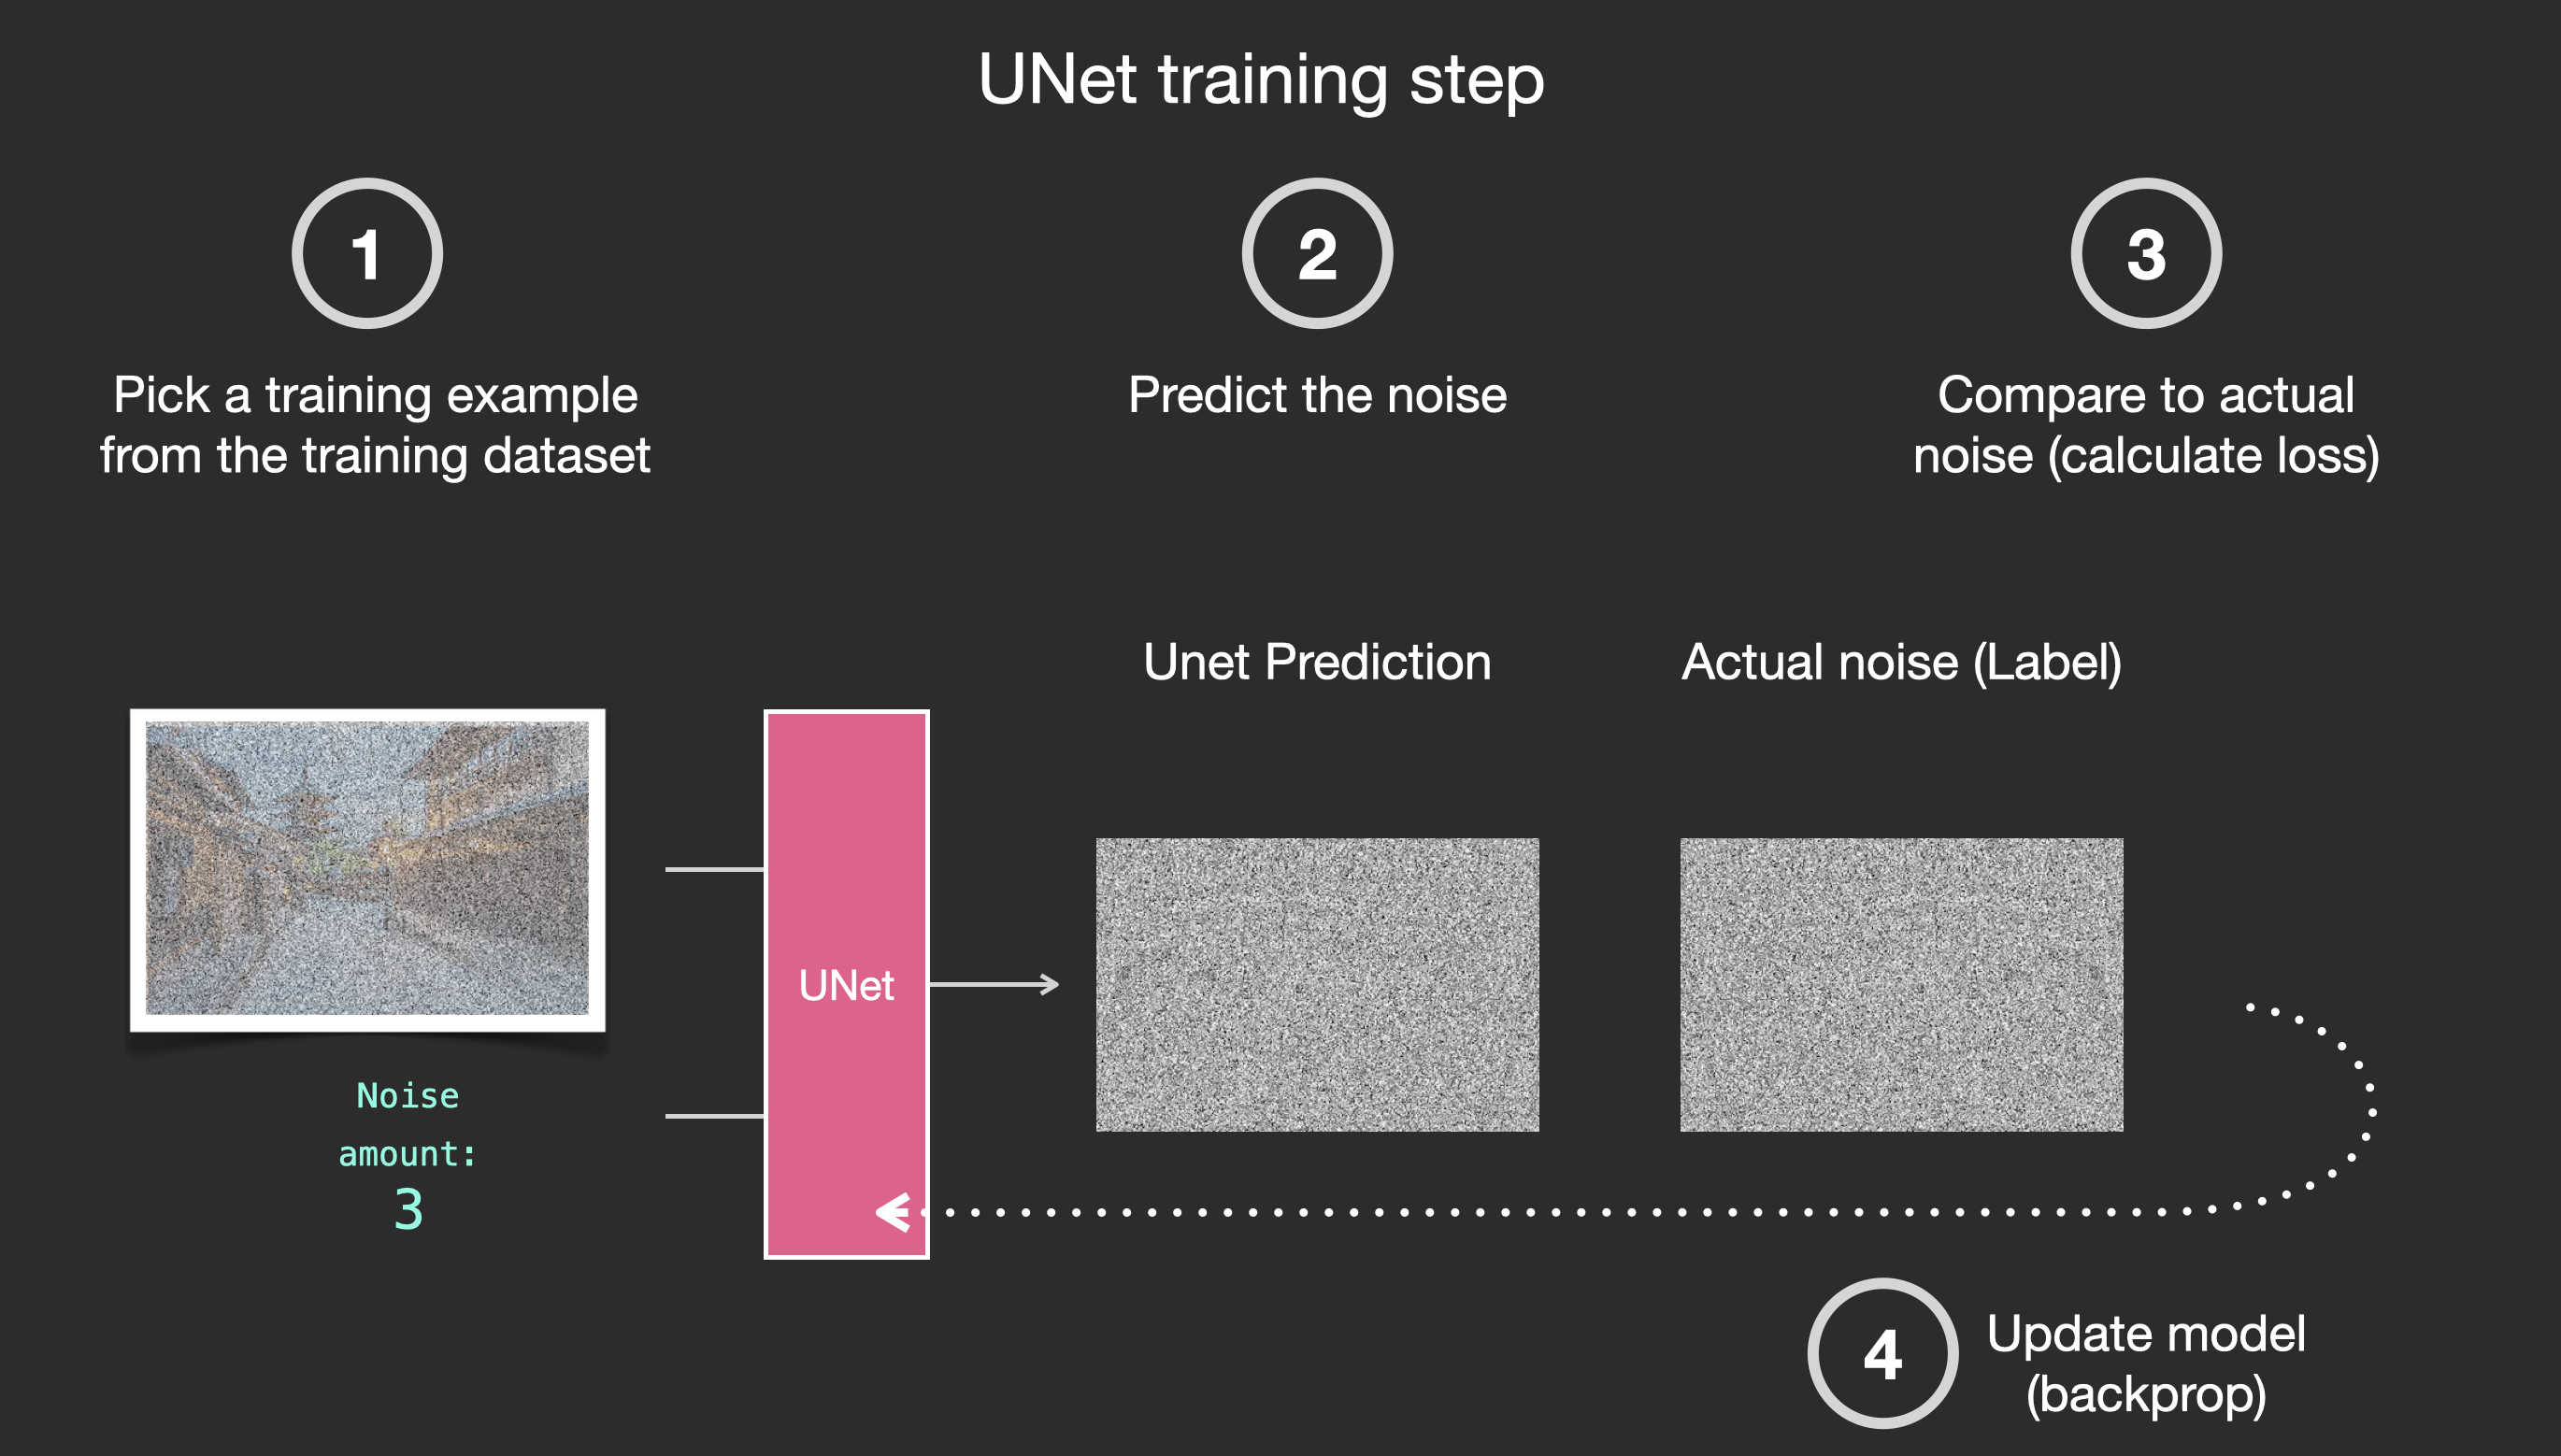 这里是把事先添加的噪音量作为预测的对象,相当于训练一个
降噪器,那么这个和图像的性质似乎是无关,也就是说不同的图片在latent space的数据对于噪音的敏感度也许是更高一阶的函数,往往高维度的信息的函数也要变化率慢于低阶函数吧?这里预测与修正的都是噪音部分,而我们对于图 像空间的理解是肤浅的,可是对于噪音空间目前可以说是完全可以先简化为一个标准模型,就是说为什么可以选在常见的正态分布等等,因为磁盘失效,信号衰减在 没有人为干预的情况下就是一个标准的随机过程,而且可以简化为白噪音一样。所以,这个预测容易的多!
三月八日 等待变化等待机会
Now the forward diffusion process is done on the compressed latents. The slices of noise are of noise applied to those latents, not to the pixel image. And so the noise predictor is actually trained to predict noise in the compressed representation (the latent space).这个原理图当然是容易理解的,可是具体步骤却依然不甚了了
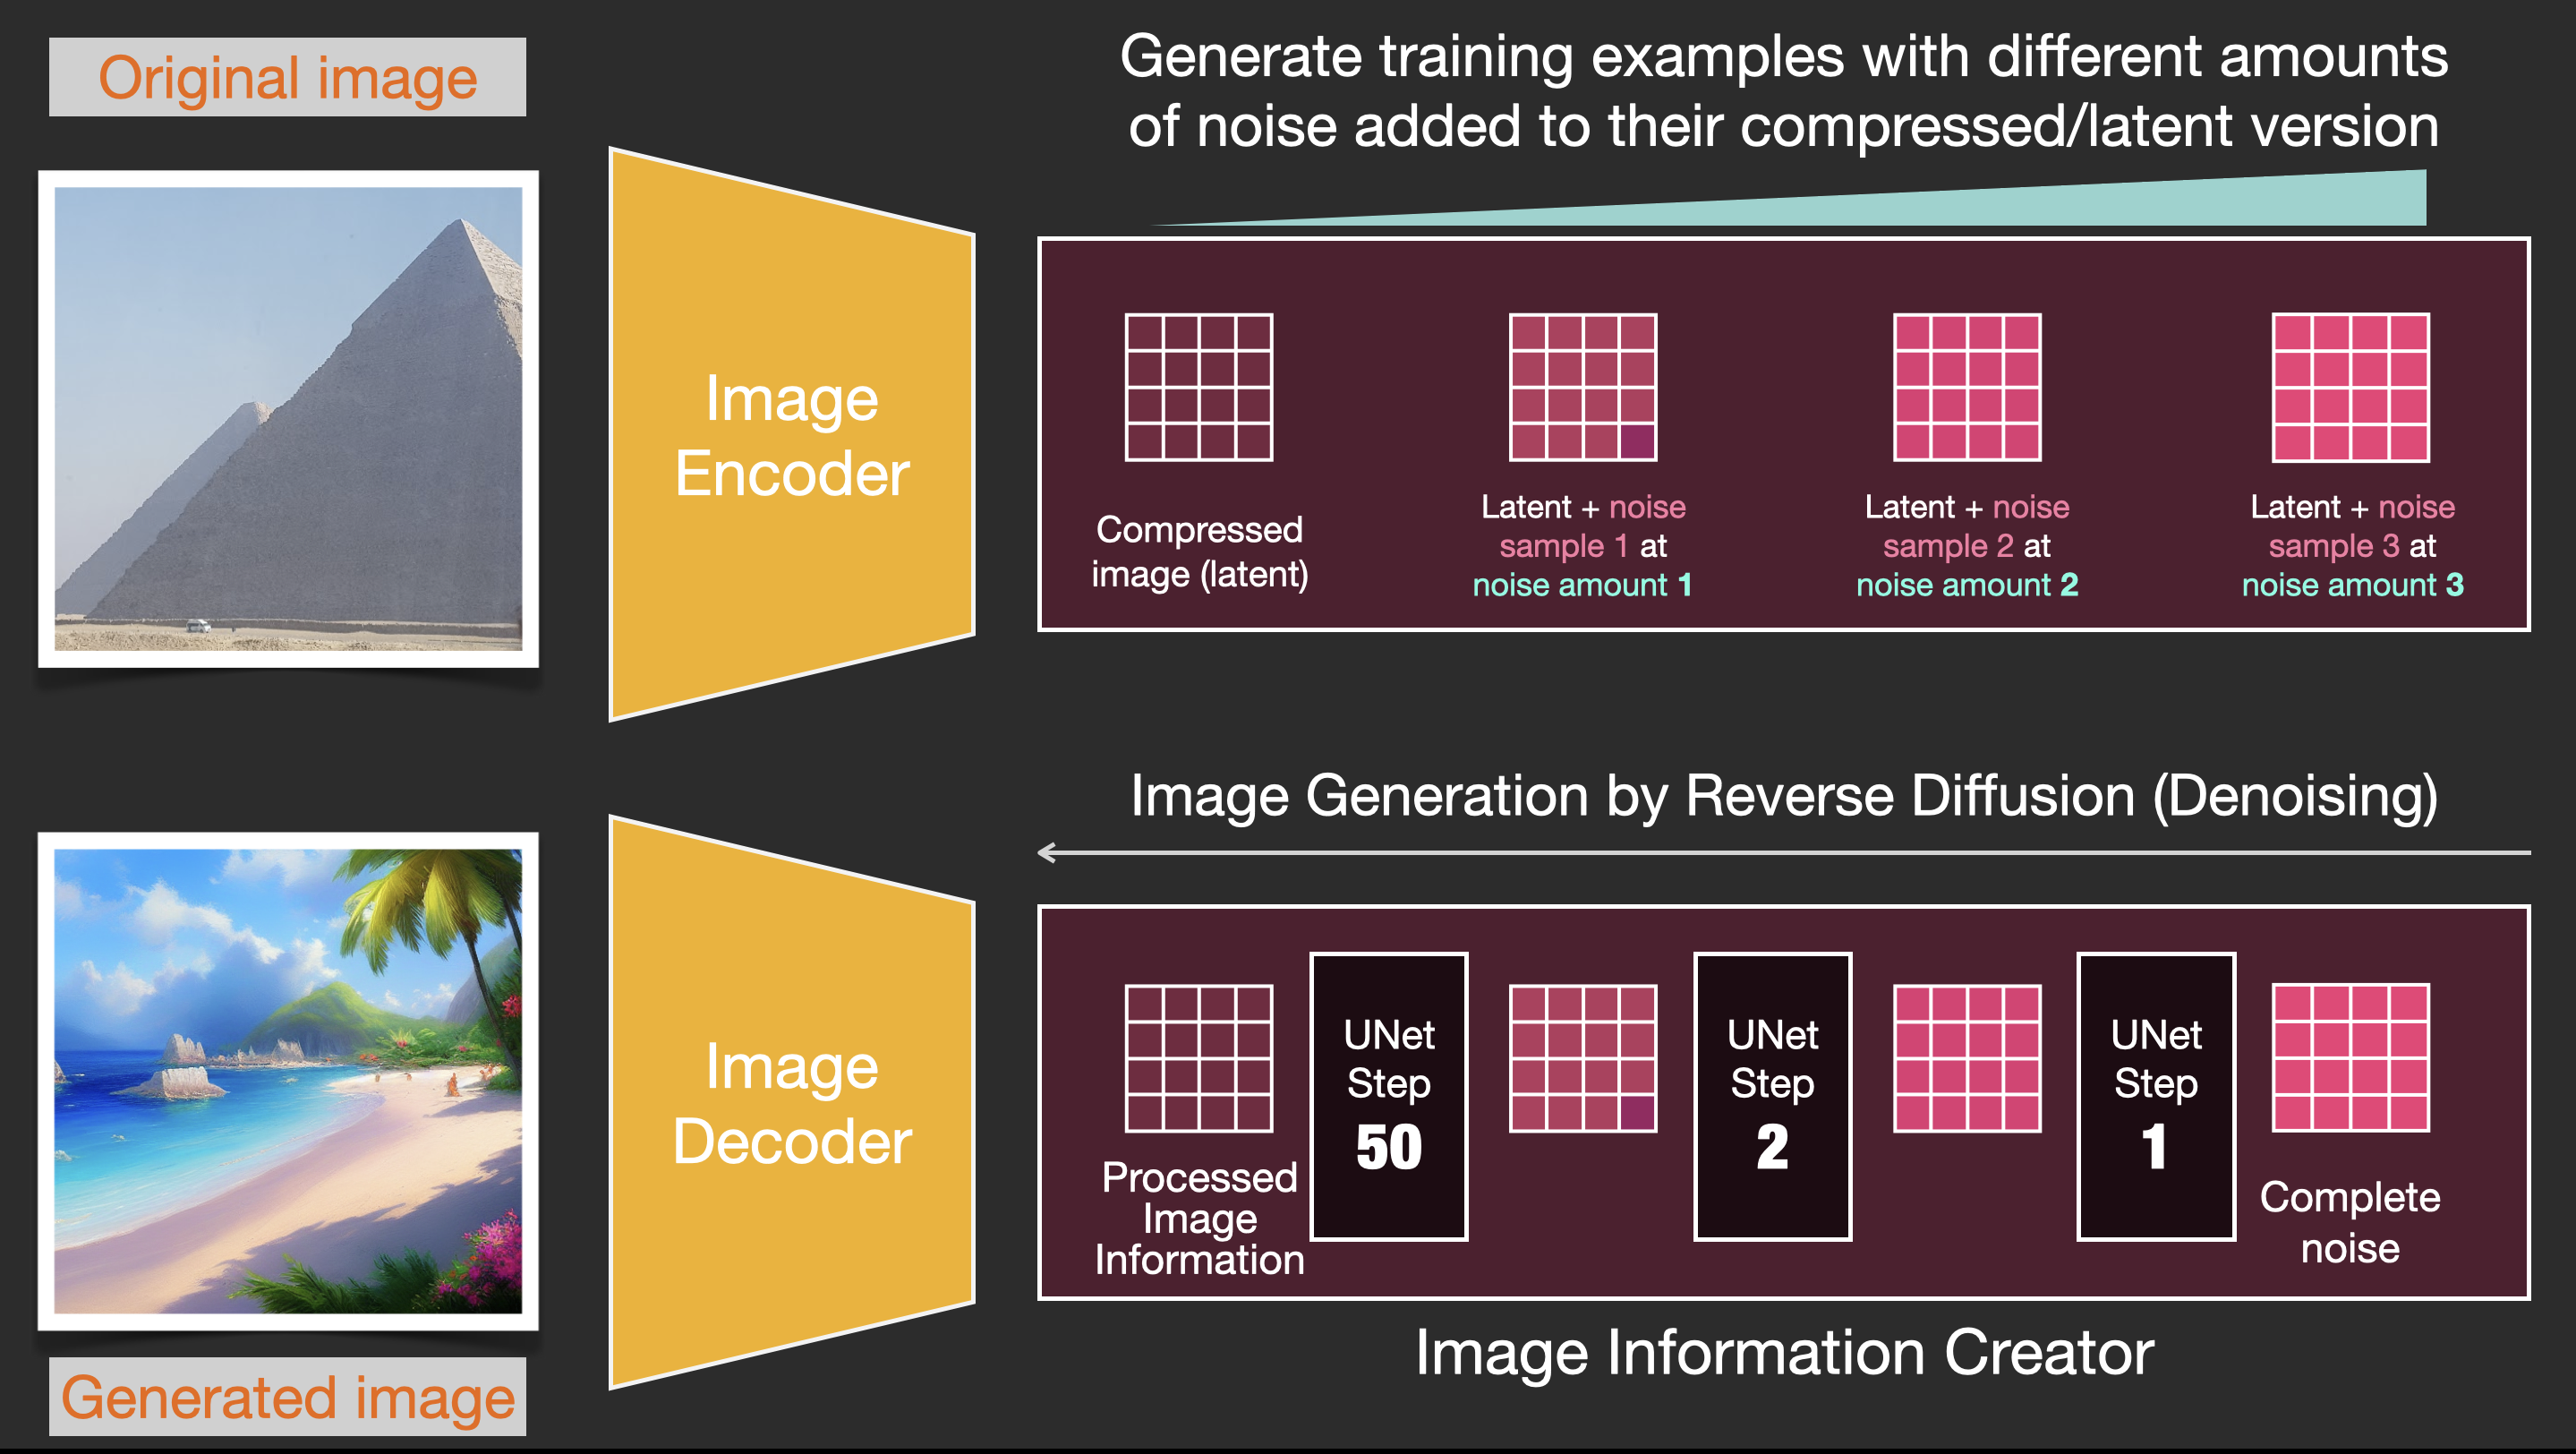 这幅图是怎么和这个反复看到的流程图联系起来的呢?我以为最最核心的也是最最复杂的细节就是在这里
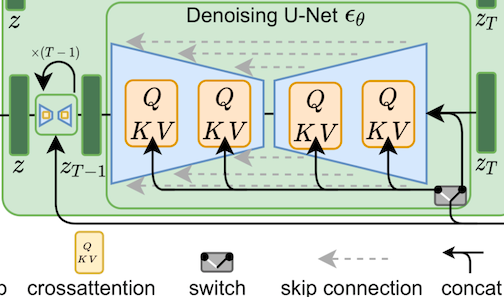 因为其他部分都是普通人都能理解的原理部分,而所有的改进与数学算法就在这个核心部分,而恰恰是这个核心部分看不懂!论文里的数学部分太多了,而这个仅仅是一个部分,更主要的是训练是一个逆过程,
Their importance is partly due to the central limit theorem. It states that, under some conditions, the average of many samples (observations) of a random variable with finite mean and variance is itself a random variable—whose distribution converges to a normal distribution as the number of samples increases. Therefore, physical quantities that are expected to be the sum of many independent processes, such as measurement errors, often have distributions that are nearly normal.其实我需要熟记得是标准的正态分布
The simplest case of a normal distribution is known as the standard normal distribution or unit normal distribution. This is a special case when μ = 0 and σ = 1, and it is described by this probability density function (or density):我现在可以熟练的使用mathtml这个本身是一个加深对于公式记忆的好方法。 我似乎发现了一个wiki的笔误,就是高斯分布是标准正态分布的一个变形,那是当σ(variance)的平方等于½而不是σ本身: 只有这样子才是高斯分布 到这里我们可以明白其实如果假定分布符合正太分布,那么核心就是发现σ或者说variance。明白了这一点就好理解多了,至于说Markov链的前件后件之类的概念我感觉就是纯粹的数学计算吧?这个我不确定,不过今天的学习到此为止了。
三月九日 等待变化等待机会
N-gram
三月十日 等待变化等待机会
Language models have a huge advantage over most other machine learning models. That advantage is that we are able to train them on running text – which we have an abundance of. Think of all the books, articles, Wikipedia content, and other forms of text data we have lying around. Contrast this with a lot of other machine learning models which need hand-crafted features and specially-collected data.
A joint distribution is a probability distribution having two or more independent random variables. In a joint distribution, each random variable will still have its own probability distribution, expected value, variance, and standard deviation. In addition, probabilities will exist for ordered pair values of the random variables. Furthermore, the strength of any relationship between the two variables can be measured.而作为joint distribution的两个随机变量这个是基本的公式: 我喜欢这个标准化的公式的一个原因是作者有现成的mathtml代码:
Suppose a joint distribution of the random variables X and Y are given in table form, so that PXY(X=x,Y=y), typically abbreviated as PXY(x,y), is given for each pair (x,y), of random variables. As with all discrete distributions, two requirements must hold for each pair (x,y):而这个所谓的
marginal probabilities我一开始被吓了一跳,后来才回想起这个是很普通的概念:
Then the marginal probabilities PX(X=x) and PY(Y=y), the expected values E(X) and E(Y), and the variances Var(X) and Var(Y) can be found by the following formulas.之所以重温这个概念是因为这篇很重要的论文要解决的所谓的
curse of dimensionality,而这个核心的难题curse of dimensionality就在于要把一组词作为一个joint distribution来训练的天文数字的组合:
For example, if one wants to model the joint distribution of 10 consecutive words in a natural language with a vocabulary V of size 100,000, there are potentially 10000010 − 1 = 1050 − 1 free parameters.这个就是基本的问题,如果没有理解问题根本谈不上寻找解决问题的方法!
The models we saw in the previous chapters share a common root: all of them are parametric. This means that they assume a certain structure on the regression function m, which is controlled by parameters185. If this assumption truly holds, then parametric methods are the best approach for estimating m. But in practice it is rarely the case where parametric methods work out-of-the-box, and several tricks are needed in order to expand their degree of flexibility in a case-by-case basis. Avoiding this nuisance is the strongest point of nonparametric methods: they do not assume major hard-to-satisfy hypotheses on the regression function, but just minimal assumptions, which makes them directly employable. Their weak points are that they usually are more computationally demanding and are harder to interpret.这个是一个概率推理的范畴,我之前基础很薄弱。具体的公式开头看明白了,后面就丢了,就比如这个density的问题,本来以为很简单,但是只看懂了开头。
transduct可以不用在训练中实际出现过,那么推而广之,训练图像识别是否是否可以从文字识别的高成功率来推动?一个强大的语言模型最后联合一个普通的图像标题模型训练居然成为更高准确率的方式,这些都是革命性的。而这篇论文的核心要解决的是这个
curse of dimentionality难道不会出现在别的领域吗?作者的思路是什么?不是简单的N-gram的机械的有序词组n- grams with n up to 5 (i.e. 4 words of context) have been reported, though, but due to data scarcity, most predictions are made with a much shorter context.(这个是作者指出的问题实质:N-gram其实没有普遍性,四字成语不是大多数语言的特征),那是什么?前人的工作缺陷在哪里?
First, it is not taking into account contexts farther than 1 or 2 words, second it is not taking into account the “similarity” between words.对,就是不能机械的固定几个N-gram,而且要考虑相似性,也就是要能够
触类旁通,举一反三。但是这个是多么的难啊,如果自主学习做得到我们还发愁吗?
我的理解就是这里的word feature vector就是现在人们常说的
- associate with each word in the vocabulary a distributed word feature vector (a real-valued vector in Rm),
- express the joint probability function of word sequences in terms of the feature vectors of these words in the sequence, and
- learn simultaneously the word feature vectors and the parameters of that probability function.
embedding吧?这里是作者的核心思想解释:
The feature vector represents different aspects of the word: each word is associated with a point in a vector space. The number of features (e.g. m =30, 60 or 100 in the experiments) is much smaller than the size of the vocabulary (e.g. 17,000).这个是两个思考方式的碰撞:通常人们把一组词看作是一个有机的整体,比如一个有十万词汇的词库里每十个有序词组就是一个整体,可是现实中有那么多吗?中文 的四字成语也许是它的例证,可是大多数语言里没有这个整齐划一的结构实体,反而是硬性的机械的这个处理方式出现了难以克服的维度诅咒;那么换种思考,也许 确实有这个潜在的实体,可是能不能把这个十个词扩展到三十,五十?不敢,因为十个就很大了何况三十五十?而这里就是出彩的思考,就是每一个词也许都有这么 一个出现在几十个词的上下文的属性,那么用什么来表达呢?太具体的不一定有,可以用向量来表达,其实有的词很活跃,它说不定三十个维度还不够,可是很多词 三十个维度绰绰有余,但是不管怎么样,我们得到了一个统一。这个计算空间立刻从指数级降低到了线性的空间了。这个真的是高明。
三月十一日 等待变化等待机会
A probability mass function differs from a probability density function (PDF) in that the latter is associated with continuous rather than discrete random variables. A PDF must be integrated over an interval to yield a probability.仅仅因为它是离散的概率密度函数而已。而使用Log Likelihood Function的原因是因为我们可以把乘法变加法,其次画图也更容易一些。
三月十二日 等待变化等待机会
... the probability function is a smooth function of these feature values, a small change in the features will induce a small change in the probability.作者是在这里解释为什么
相似的字词能够获益于其算法。可是在我看来这个是很深奥的概率理论。比如阅读这个讲演是很有长进的: 就比如这里的∏是数学上的连乘的符号,而不能简单的用π来代表。至少不好看。其实我内心是理解了
likelihood function的只是嘴上说不出,它本身不能看作是概率分布,但是它是相关的,因为是看作在一个带参数的概率分布观察到的实际的随机变量的值之后人们用来推测的这些值再次发生的一个可能性,这个似乎也是字面的理解,可能性和概率在中文有什么不同呢?这个不是数学语言。
The likelihood function is not a probability distribution.可是这些空洞的概念对于我有什么意义呢?我觉得我会用到的是求它的最大值的log,后者是因为∏取对数转化为加法可以简化计算量,前者是因为研究正态分布时候倒退它的参数在最大值点可以得到mean。
- It does not transform like a probability distribution.
- Normalization is not defined.
The likelihood function (often simply called the likelihood) is the joint probability mass (or probability density) of observed data viewed as a function of the parameters of a statistical model. Intuitively, the likelihood function is the probability of observing data x assuming θ is the actual parameter.这里要注意的是在统计学里parameter是有独特含义的,说白了就是关于随机过程的mean和standard deviation。因为研究一个概率模型最基本的就是这两样东西,它们描述了一个模型的基本样貌。而这里的概率模型其实反而是一个更加虚拟的假设,是一 个数学的假设公式化的推测。那么人们在模型未建立之前的观察得到的实际数据成为一种经验值来作为推测的随机过程再次发生的可能性,这就是这个 likelihood function的本意。
模吧?
In statistics, maximum likelihood estimation (MLE) is a method of estimating the parameters of an assumed probability distribution, given some observed data. This is achieved by maximizing a likelihood function so that, under the assumed statistical model, the observed data is most probable. The point in the parameter space that maximizes the likelihood function is called the maximum likelihood estimate. The logic of maximum likelihood is both intuitive and flexible, and as such the method has become a dominant means of statistical inference.这里是多么清楚的解释和定义啊!一目了然的,根本不需要多余的话!它就是一种inference,而且是做了很合理的假设。
The probability function is expressed as a product of conditional probabilities of the next word given the previous ones, (e.g. using a multilayer neural network to predict the next word given the previous ones, in the experiments). This function has parameters that can be iteratively tuned in order to maximize the log-likelihood of the training data or a regularized criterion, e.g. by adding a weight decay penalty. The feature vectors associated with each word are learned, but they could be initialized using prior knowledge of semantic features.这段文字可谓是字字珠玑,它描述了整个过程,说到底这个Markov链它就是一个条件概率的结果,所以,我们所谓的预测下一个字就是当初观察到的实际发生 的随机变量实际值来倒推概率模型,而反复微调迭代取得概率最大值实际上也是在摸索寻找假设的概率模型的参数,因为我们已经假设了正态分布。这里
weight decay penalty作者的注解是
Like in ridge regression, the squared norm of the parameters is penalized.这里又要补课:
Ridge regression is a statistical regularization technique. It corrects for overfitting on training data in machine learning models.这里提到的multicollinearity指的是Ridge regression—also known as L2 regularization—is one of several types of regularization for linear regression models. Regularization is a statistical method to reduce errors caused by overfitting on training data. Ridge regression specifically corrects for multicollinearity in regression analysis. This is useful when developing machine learning models that have a large number of parameters, particularly if those parameters also have high weights.
Multicollinearity denotes when independent variables in a linear regression equation are correlated. Multicollinear variables can negatively affect model predictions on unseen data. Several regularization techniques can detect and fix multicollinearity.
In the simple stochastic linear model这个概念其实是更加泛泛的数学概念。yi = a + bxi + ei
the term yi is the ith value of the dependent variable and xi is the ith value of the independent variable. The term ei is known as the "error" and contains the variability of the dependent variable not explained by the independent variable.
A linear regression model describes the relationship between a dependent variable, y, and one or more independent variables, X. The dependent variable is also called the response variable. Independent variables are also called explanatory or predictor variables. Continuous predictor variables are also called covariates, and categorical predictor variables are also called factors. The matrix X of observations on predictor variables is usually called the design matrix.A multiple linear regression model is
yi=β0+β1Xi1+β2Xi2+⋯+βpXip+εi, i=1,⋯,n,
where
- n is the number of observations.
- yi is the ith response.
- βk is the kth coefficient, where β0 is the constant term in the model. Sometimes, design matrices might include information about the constant term. However, fitlm or stepwiselm by default includes a constant term in the model, so you must not enter a column of 1s into your design matrix X.
- Xij is the ith observation on the jth predictor variable, j = 1, ..., p.
- εi is the ith noise term, that is, random error.
Regression analysis, a statistical technique for estimating the relationships among variables. There are several types of regression:看了这些我才有些开窍,现实世界里我们从现象来推测事物运行的本质规律就是一个归纳的过程,有些时候我们为了简化或者我们已经有证据支持某些模型,所以,我们可以用很少的实验数据来勾勒出概率模型公式。与此相对的是Nonparametric
Nonparametric regression is a category of regression analysis in which the predictor does not take a predetermined form but is constructed according to information derived from the data. That is, no parametric form is assumed for the relationship between predictors and dependent variable. Nonparametric regression requires larger sample sizes than regression based on parametric models because the data must supply the model structure as well as the model estimates.这里的不完全列表把我都看吐了。
三月十三日 等待变化等待机会
线性回归(Linear Regression)是一个非常复杂的课题,其中有大量的概念与理论要学 习,而它背后的这些根本原因其实是更加的深奥,而这一切都是基于很多的关于一个观察的现象中假定有多少个独立变量,有多少个依赖变量,而它们直接的关系又 是如何,这个简直就像是要靠单单的观察一个复杂的多齿轮精密的钟表来推理它的齿轮间转动规律一般。单单学习这个领域就可能穷尽一个人的一生,因为这个彷佛 是一个数学的
逆向工程,大自然写了一个复杂的函数然后把这个函数作为概率密度函数让你依靠仍色子来猜出这个函数,这个简直就是在破解上帝设置的大自然的密码!
In linear algebra, it is often important to know which vectors have their directions unchanged by a given linear transformation. An eigenvector (/ˈaɪɡən-/ EYE-gən-) or characteristic vector is such a vector. Thus an eigenvector v of a linear transformation T is scaled by a constant factor λ when the linear transformation is applied to it: T v = λ v. The corresponding eigenvalue, characteristic value, or characteristic root is the multiplying factor λ.而它的几何意义其实更加的有用和直观
Geometrically, vectors are multi-dimensional quantities with magnitude and direction, often pictured as arrows. A linear transformation rotates, stretches, or shears the vectors upon which it acts. Its eigenvectors are those vectors that are only stretched, with no rotation or shear. The corresponding eigenvalue is the factor by which an eigenvector is stretched or squished. If the eigenvalue is negative, the eigenvector's direction is reversed.很显然的这个对于线性变换肯定是非常的有针对性的意义的特殊指向,简直就是线性变换的变换方向,由此而知其发力的方向,那么它的意义能不大吗?它的数学表达是这样子的:
If T is a linear transformation from a vector space V over a field F into itself and v is a nonzero vector in V, then v is an eigenvector of T if T(v) is a scalar multiple of v. This can be written asT ( v ) = λ v , (in Matrix language, it is Au = λu where A is the matrix representation of T and u is the coordinate vector of v. )
where λ is a scalar in F, known as the eigenvalue, characteristic value, or characteristic root associated with v.
三月十四日 等待变化等待机会
The idea of using neural networks for language modeling is not new either (e.g. Miikkulainen and Dyer, 1991). In contrast, here we push this idea to a large scale, and concentrate on learning a statistical model of the distribution of word sequences, rather than learning the role of words in a sentence.这段话其实很关键,作者有划重点,我认为这肯定是作者要强调的核心思想。在肯定前人的成就基础上的,并不是完全的新思想,只是把前人的想法放大。但是也有创新的,就是这个我还没有理解的是distribution of word sequences,那么什么是role of words in a sentence?这个要好好体会。而前人的思想是
each word is associated deterministically or probabilistically with a discrete class, and words in the same class are similar in some respect.作者的不同在于:
In the model proposed here, instead of characterizing the similarity with a discrete random or deterministic variable (which corresponds to a soft or hard partition of the set of words), we use a continuous real-vector for each word, i.e. a learned distributed feature vector, to represent similarity between words.这篇论文的核心要点就是这里learned distributed feature vector。我们要搞明白的它是什么,它为什么可以,要怎么做。
An important difference is that here we look for a representation for words that is helpful in representing compactly the probability distribution of word sequences from natural language text.所以,我们要理解这里的表达不是单个词而是一组词,这个和N-gram要取得的效果目的是类似的,但是是聪明的解脱了
维度诅咒(curse of dimentionality)的 一个好方法,把一个词库里几何级数的组合概率改为了某种线性的一维,代价是每一个单词是有远远大于通常人们做N-gram的维度,据我所知只有不到5维。 这个就是一个非常的强悍的地方。因为对于词组这样子的有序序列实际上也是很难的一个模型,大量的语言现象其实是无序的,或者说是不值得有序,汉语中四字一 组的成语是大多数语言中罕见的,那么结果就是要构造常用词组的模型是非常困难或者说模糊的,我想这里的向量空间是一个足够模糊的方式,甚至于好像人类 DNA序列一样的看起来模糊的。这个比喻似乎很不恰当,DNA也许像程序代码一样的有特殊含义,可是人类自然语言似乎没有那么严格的语法。
Experiments suggest that learning jointly the representation (word features) and the model is very useful.这里的一鱼两吃是什么意思?到底学的是什么?建立的是什么?这个是理解的真正核心,我能回答这个问题这篇论文才算理解了。作者接下来的描述我同样的不理解
We tried (unsuccessfully) using as fixed word features for each word w the first principal components of the co-occurrence frequencies of w with the words occurring in text around the occurrence of w.为什么是unsuccessfully?难道这个是另一个方向的尝试?我曾经预想过fixed word features不大可能,那么不是fixed,哪能怎么办?还能是动态的?或者意思是我的英文理解有问题,这里指的是单词相对于上下文的不同而不同?那这个和N-gram有什么区别?我越看越糊涂了。
The training set is a sequence w1 · · · wT of words wt ∈ V , where the vocabulary V is a large but finite set. The objective is to learn a good model , in the sense that it gives high out-of-sample likelihood. Below, we report the geometric average of , also known as perplexity, which is also the exponential of the average negative log-likelihood这里先科普一下perplexity:
In information theory, perplexity is a measure of uncertainty in the value of a sample from a discrete probability distribution. The larger the perplexity, the less likely it is that an observer can guess the value which will be drawn from the distribution.简而言之就是复杂度或者难易程度,如果一个考公务员的
特殊试卷只有对和错两个选择,那么白痴也能得的满分几率几乎就是50%,这个让一个白痴AI去随机猜对的可能是很大的,算不得本事。只有选择空间很大才方显英雄本色。
Symbol Name Date of earliest use First author to use horizontal bar for division 14th century (approx.) Nicole Oresme plus sign 1360 (approx.), abbreviation for Latin et resembling the plus sign Nicole Oresme minus sign 1489 (first appearance of minus sign, and also first appearance of plus sign in print) Johannes Widmann radical symbol (for square root) 1525 (without the vinculum above the radicand) Christoff Rudolff parentheses (for precedence grouping) 1544 (in handwritten notes) Michael Stifel parentheses (for precedence grouping) 1556 Niccolò Tartaglia equals sign 1557 Robert Recorde decimal separator 1593 Christopher Clavius multiplication sign 1618 William Oughtred plus–minus sign 1628 William Oughtred proportion sign 1628 William Oughtred radical symbol (for nth root) 1629 Albert Girard
>strict inequality signs (less-than sign and greater-than sign) 1631 Thomas Harriot
superscript notation (for exponentiation) 1636 (using Roman numerals as superscripts) James Hume
Use of the letter x for an independent variable or unknown value. See History of algebra: The symbol x. 1637[2] René Descartes (La Géométrie)
superscript notation (for exponentiation) 1637 (in the modern form) René Descartes (La Géométrie) radical symbol (for square root) 1637 (with the vinculum above the radicand) René Descartes (La Géométrie) percent sign 1650 (approx.) unknown infinity sign 1655 John Wallis division sign (a repurposed obelus variant) 1659 Johann Rahn
≥unstrict inequality signs (less-than or equals to sign and greater-than or equals to sign) 1670 (with the horizontal bar over the inequality sign, rather than below it) John Wallis integral sign 1675 Gottfried Leibniz differential sign 1675 Gottfried Leibniz colon (for division) 1684 (deriving from use of colon to denote fractions, dating back to 1633) Gottfried Leibniz middle dot (for multiplication) 1698 (perhaps deriving from a much earlier use of middle dot to separate juxtaposed numbers) Gottfried Leibniz division slash (a.k.a. solidus) 1718 (deriving from horizontal fraction bar, invented by Abu Bakr al-Hassar in the 12th century) Thomas Twining
≥unstrict inequality signs (less-than or equals to sign and greater-than or equals to sign) 1734 (with double horizontal bar below the inequality sign) Pierre Bouguer prime symbol (for derivative) 1748 Leonhard Euler summation symbol 1755 Leonhard Euler proportionality sign 1768 William Emerson partial differential sign (a.k.a. curly d or Jacobi's delta) 1770 Marquis de Condorcet identity sign (for congruence relation) 1801 (first appearance in print; used previously in personal writings of Gauss) Carl Friedrich Gauss factorial 1808 Christian Kramp integral part (a.k.a. floor) 1808 Carl Friedrich Gauss product symbol 1812 Carl Friedrich Gauss
⊃set inclusion signs (subset of, superset of) 1817 Joseph Gergonne absolute value notation 1841 Karl Weierstrass determinant of a matrix 1841 Arthur Cayley matrix notation 1843[3] Arthur Cayley nabla symbol (for vector differential) 1846 (previously used by Hamilton as a general-purpose operator sign) William Rowan Hamilton
∪intersection
union1888 Giuseppe Peano
⊃set inclusion signs (subset of, superset of) 1890 Ernst Schröder aleph symbol (for transfinite cardinal numbers) 1893 Georg Cantor membership sign (is an element of) 1894 Giuseppe Peano Big O Notation 1894 Paul Bachmann braces, a.k.a. curly brackets (for set notation) 1895 Georg Cantor Blackboard bold capital N (for natural numbers set) 1895 Giuseppe Peano Blackboard bold capital Q (for rational numbers set) 1895 Giuseppe Peano existential quantifier (there exists) 1897 Giuseppe Peano middle dot (for dot product) 1902 J. Willard Gibbs multiplication sign (for cross product) 1902 J. Willard Gibbs logical disjunction (a.k.a. OR) 1906 Bertrand Russell matrix notation 1909[3] Maxime Bôcher
matrix notation 1909[3] Gerhard Kowalewski contour integral sign 1917 Arnold Sommerfeld Blackboard bold capital Z (for integer numbers set) 1930 Edmund Landau universal quantifier (for all) 1935 Gerhard Gentzen arrow (for function notation) 1936 (to denote images of specific elements) Øystein Ore empty set sign 1939 André Weil / Nicolas Bourbaki[4] Blackboard bold capital C (for complex numbers set) 1939 Nathan Jacobson arrow (for function notation) 1940 (in the present form of f: X → Y) Witold Hurewicz end of proof sign (a.k.a. tombstone) 1950[5] Paul Halmos greatest integer ≤ x (a.k.a. floor)
smallest integer ≥ x (a.k.a. ceiling)1962[6] Kenneth E. Iverson inequality sign (not equal to) unknown Leonhard Euler
In statistics, a circumflex (ˆ), called a "hat", is used to denote an estimator or an estimated value. For example, in the context of errors and residuals, the "hat" over the letter indicates an observable estimate (the residuals) of an unobservable quantity called ε (the statistical errors).
In statistics and optimization, errors and residuals are two closely related and easily confused measures of the deviation of an observed value of an element of a statistical sample from its "true value" (not necessarily observable). The error of an observation is the deviation of the observed value from the true value of a quantity of interest (for example, a population mean). The residual is the difference between the observed value and the estimated value of the quantity of interest (for example, a sample mean). The distinction is most important in regression analysis, where the concepts are sometimes called the regression errors and regression residuals and where they lead to the concept of studentized residuals. In econometrics, "errors" are also called disturbances.都是
偏差可是原因不同。这个是中文的名词对照:误差(error)和残差(residual)。 而Population Mean在中文里叫做
总体平均值,相对应的Sample Mean叫做
样本平均值。这些在中文里意思似乎很清楚,但是会误导。它们真正的数学或者说统计学上的意义是深奥的。
In statistical inference, a subset of the population (a statistical sample) is chosen to represent the population in a statistical analysis. Moreover, the statistical sample must be unbiased and accurately model the population (every unit of the population has an equal chance of selection). The ratio of the size of this statistical sample to the size of the population is called a sampling fraction. It is then possible to estimate the population parameters using the appropriate sample statistics.这个是statistical inference的基本出发点,而这些概念也许在descriptive statistic的角度来看就是官僚主义的正常节奏,可是在推本逐源的探索过程就是大学问。
A statistical error (or disturbance) is the amount by which an observation differs from its expected value, the latter being based on the whole population from which the statistical unit was chosen randomly.而与之相对的是
A residual (or fitting deviation), on the other hand, is an observable estimate of the unobservable statistical error.看起来两者的来源是截然不同的。前者是不可避免的因为你的取样总是小于总体样本,如果不是的话根本就不用研究统计学直接去暴力调查所有样本就可以了吗?统 计学就是要少花钱多办事才对,见微知卓,管中窥豹。所以,这个是不可避免的,除非是理想的概率分布严格的发生,可是上帝会掷色子吗?上帝的色子是绝对均匀 的吗?即便是,我们能够有幸在少数样本里正好得到准确的概率分布的样本吗?
后者是有些主观因素在起作用,能否观察到是一个问题,选取合适的样本也是一个问题,就是人为去除噪音这个需要人的信念支持,或者说有主观成分了。
The sample mean is the average of the values of a variable in a sample, which is the sum of those values divided by the number of values.总而言之,两者非常的相似,甚至在实际工作中是一回事,但是理论上能否避免则有不同,前者是不可能,后者是可能。
We decompose the function in two parts:
- A mapping C from any element i of V to a real vector C(i) ∈ ℝm. It represents the distributed feature vectors associated with each word in the vocabulary. In practice, C is represented by a|V| × m matrix of free parameters.
- The probability function over words, expressed with C: a function g maps an input sequence of feature vectors for words in context, (C(wt−n+1), ...,C(wt−1)), to a conditional probability distribution over words in V for the next word wt . The output of g is a vector whose i-th element estimates the probability as in Figure 1.
f (i, wt−1, ... , wt−n+1) = g(i,C(wt−1), ...,C(wt−n+1))
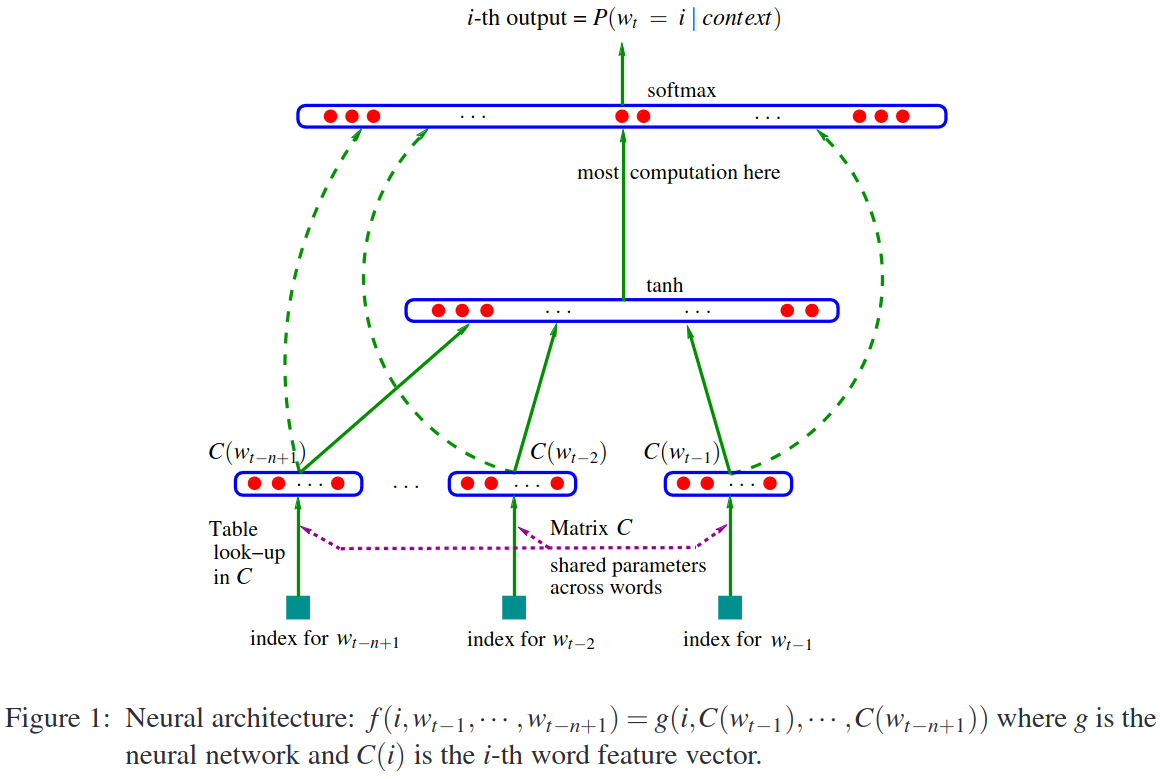 我先把定义抄了一遍,文字部分还比较清楚,但是这个架构图就非常的复杂,需要花至少一两天来理解。
三月十五日 等待变化等待机会
A group is a non-empty set G together with a binary operation on G, here denoted " ⋅ ", that combines any two elements a and b of G to form an element of G , denoted a ⋅ b, such that the following three requirements, known as group axioms, are satisfied:
Associativity
For all a , b, c in G , one has ( a ⋅ b ) ⋅ c = a ⋅ ( b ⋅ c ) .Identity element
There exists an element e in G such that, for every a in G , one has e ⋅ a = a and a ⋅ e = a . Such an element is unique. It is called the identity element (or sometimes neutral element) of the group.Inverse element
For each a in G , there exists an element b in G such that a ⋅ b = e and b ⋅ a = e , where e is the identity element. For each a , the element b is unique; it is called the inverse of a and is commonly denoted a-1 .
In mathematics, a metric space is a set together with a notion of distance between its elements, usually called points. The distance is measured by a function called a metric or distance function.为什么我们需要这个概念呢?原因是我们需要distance-preserving transformation的概念,这个是线性变换的一个特殊变换,它的严格的数学定义是显而易见的:这里有一个小的技巧我花了快一个小时才找到,就是数学上定义集合的blackboard bold字体我不想使用unicode就是用
mathvariant来定义字体,这里使用
Double-struck就可以取得这个效果。
Let and be metric spaces with metrics (e.g., distances) dX and dY . A map is called an isometry or distance preserving map if for any one has
MathML Symbol HTML Entity Hex Code Description - − − To specify subtraction × × × To specify multiplication ÷ ÷ ÷ To specify division ≠ ≠ ≠ To specify not equals ≈ ≈ ≈ To specify approximately equals < < < To specify less than ≤ ≤ ≤ To specify less than or equals > > > To specify greater than ≥ ≥ ≥ To specify greater than or equal ± ± ± To specify plus or minus ∝ ∝ ∝ To specify proportional to ∑ ∑ ∑ To specify summation ∏ ∏ ∏ To specify product ⌊ ⌊ ⌊ To specify left floor ⌋ ⌋ ⌋ To specify right floor ⌈ ⌈ ⌈ To specify left ceiling ⌉ ⌉ ⌉ To specify right ceiling … … … To specify horizontal ellipsis ⋮ ⋮ ⋮ To specify vertical ellipsis ⋯ ⋯ ⋯ To specify midline horizontal ellipsis ⋰ ⋰ ⋰ To specify diagonal ellipsis ⋱ ⋱ ⋱ To specify downright diagonal ellipsis ° ° ° To specify degrees ∠ ∠ ∠ To specify angle ∡ ∡ ∡ To specify measured angle ∟ ∟ ∟ To specify right angle ⦜ ⦜ ⦜ To specify right angle with square ⊿ ⊿ ⊿ To specify right triangle ○ ○ ○ To specify circle △ △ △ To specify triangle □ □ □ To specify square ▱ ▱ ▱ To specify parallelogram ∥ ∥ ∥ To specify parallel ∦ ∦ ∦ To specify not parallel ⊥ ⊥ ⊥ To specify perpendicular ≅ ≅ ≅ To specify congruent → → → To specify ray (used with <mover>) ↔ ↔ ↔ To specify line (used with <mover>) - (n/a) - To specify line segment (used with <mover>) ′ ′ ′ Prime (1st derivative) ″ ′ ″ Double prime (2nd derivative) ‴ ‴ ‴ Triple prime (3nd derivative) ∂ ∂ ∂ To specify partial differential δ δ Δ To specify increment ∇ &del; ∇ To specify gradient ∫ ∫ ∫ To specify integral ∬ ∫ ∬ To specify double integral ∭ ∭ ∭ To specify triple integral ⨌ ⨌ ⨌ To specify quadruple integral ∮ ∮ ∮ To specify contour integral ∲ ∲ ∲ To specify clockwise contour integral ∳ ∳ ∳ To specify anticlockwise contour integral ∯ ∮ ∯ To specify surface integral ∰ &cconint; ∰ To specify volume integral ∞ ∞ ∞ To specify infinity ⋅ ⋅ ⋅ To specify dot product ⨯ ✗ ⨯ To specify cross product ‖ | ‖ To specify norm (magnitude) bars ⟨ ⟨ ⟨ To specify left angle bracket ⟩ ⟩ ⟩ To specify right angle bracket ∘ ∘ ∘ To specify function composition → → → To specify general function mapping ↦ ↦ ↦ To specify concrete function mapping ı ı ı To specify dotless i ȷ ȷ ȷ To specify dotless j &applyfunction; ⁡ ⁡ It is used to specify function application &invisibletimes; ⁢ ⁢ It is used to specify invisible multiplication &invisiblecomma; ⁣ ⁣ It is used to specify invisible separator ¬ ¬ ¬ To specify negation ∧ ∧ ∧ To specify logical conjunction ∨ ∨ ∨ To specify logical disjunction ⊻ ⊻ ⊻ To specify exclusive disjunction ∀ ∀ ∀ To specify universal quantification ∃ ∃ ∃ To specify existential quantification ⇒ → ⇒ To specify material implication ⇔ ↔ ⇔ To specify material equivalence ◻ &emptysmallsquare; ◻ To specify necessarily ◊ ◊ ◊ To specify possibly ⊢ ⊢ ⊢ To specify provable ⊨ ⊢ ⊨ To specify entails ∴ ∴ ∴ To specify therefore ∅ ∅ ∅ To specify the empty set ∈ ∈ ∈ To specify the member of set ∉ ∉ ∉ It specifies not a member of set ⊆ ⊆ ⊆ To specify a subset ⊈ ⊈ ⊈ To specify not a subset ⊂ ⊂ ⊂ To specify a strict subset ⊄ ⊄ ⊄ To specify not a strict subset ⊇ ⊇ ⊇ To specify a superset ⊉ ⊉ ⊉ To specify not a superset ⊃ ⊃ ⊃ To specify strict superset ⊅ ⊅ ⊅ To specify not a strict superset ∩ ∩ ∩ To specify intersection ∪ ∪ ∪ To specify union ∖ ∖ ∖ To specify complement
Capital Letter (C) Small Letter (S) Entities(C) Entities(S) Hex Codes(C) Hex Codes(S) Α α α α Α α Β β β β Β β Γ γ γ γ Γ γ Δ δ δ δ Δ δ Ε ε ε ε Ε ε Ζ ζ ζ ζ Ζ ζ Η η η η Η η Θ θ θ θ Θ θ Ι ι ι ι Ι ι Κ κ κ κ Κ κ Λ λ λ λ Λ λ Μ μ μ μ Μ μ Ν ν ν ν Ν ν Ξ ξ ξ ξ Ξ ξ Ο ο ο ο Ο ο Π π π π Π π Ρ ρ ρ ρ Ρ ρ Σ σ σ σ Σ σ Τ τ τ τ Τ τ Υ υ υ υ Υ υ Φ φ φ φ Φ φ Χ χ χ χ Χ χ Ψ ψ ψ ψ Ψ ψ Ω ω ω ω Ω ω
三月十六日 等待变化等待机会
Let f(x) have derivatives of all orders at x=c.那么简单的Maclaurin Series也就是当c=0时的特殊形式我打算手写一下:
手写公式要写的漂亮要注意挂号不要扩张mo的属性是stretchy="false"。
这个是自然指数的泰勒展开,也是最常用的。而这个所谓的
几何级数我很惭愧似乎没有印象:
它的更加简化的模式
三月十七日 等待变化等待机会
Derivation of the Formula for the Coefficients of a Power Series.
One way of finding the coefficients is using Taylor's theorem, derived as follows: Given this polynomial series, We evaluate both sides of equation above at the point z=a, to obtain: Since all of the terms, except the first, on the right hand side of are zero, the equation simplifies to: To find the next coefficient, , we first differentiate We then evaluate it at z=a to obtain: We continue to differentiate equation above and then evaluate at z=a, reordering the equation as necessary The nth coefficient is given by By plugging these values of the coefficients into equation , we obtain the following form of the power series:
三月十八日 等待变化等待机会
Why should you care about power series? One reason is because they allow us to approximate functions at a point to any desired accuracy.这是一个非常的好的直观的工具,它帮助我非常的信服的演示了泰勒展开式来模拟函数的威力和准确度。比如我仅仅使用了最高项11次方就可以很好的拟合正弦曲线了。
x=var('x')
f(x)=sin(x)
p1(x)=x
p2(x)=-x^3/6
p3(x)=x^5/120
p4(x)=-x^7/5040
p5(x)=x^9/362880
p6(x)=-x^11/39916800
s(x)=p1(x)+p2(x)+p3(x)+p4(x)+p5(x)
S=plot(s(x),(x,-5,5),ymin=-2,ymax=2,color=Color('blue'))
F=plot(f(x),(x,-5,5),ymin=-2,ymax=2,color=Color('red'))
P1=plot(p1(x),(x,-5,5),ymin=-2,ymax=2,color=Color('green'))
P2=plot(p2(x),(x,-5,5),ymin=-2,ymax=2,color=Color('green'))
P3=plot(p3(x),(x,-5,5),ymin=-2,ymax=2,color=Color('green'))
P4=plot(p4(x),(x,-5,5),ymin=-2,ymax=2,color=Color('green'))
P5=plot(p5(x),(x,-5,5),ymin=-2,ymax=2,color=Color('green'))
P6=plot(p6(x),(x,-5,5),ymin=-2,ymax=2,color=Color('green'))
F+P1+P2+P3+P4+P5+P6+S
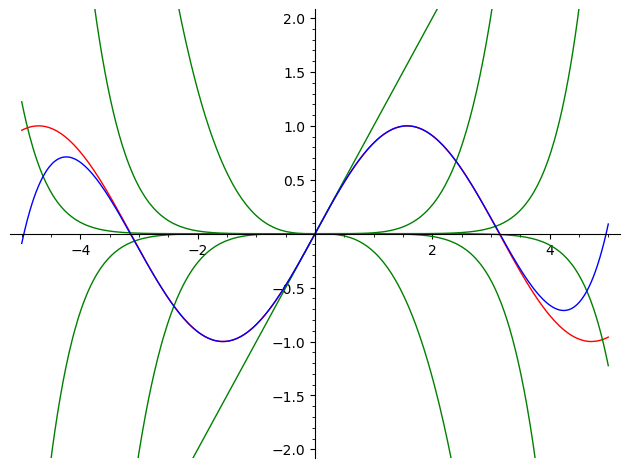 针对课后练习题要求解任意的点拟合曲线,我一开始就糊涂了,我还以为这个Maclaurin Series式的公式能够任意的求解,后来看了之前的教程才明白我只能利用泰勒展开式的定义一步一步的求解。
于是这个是求解在函数f=sin(x)当x=π/2的拟合曲线
针对课后练习题要求解任意的点拟合曲线,我一开始就糊涂了,我还以为这个Maclaurin Series式的公式能够任意的求解,后来看了之前的教程才明白我只能利用泰勒展开式的定义一步一步的求解。
于是这个是求解在函数f=sin(x)当x=π/2的拟合曲线
x=var('x')
f(x)=sin(x)
p1(x)=1
p2(x)=-(x-3.14/2)^2/2
p3(x)=(x-3.14/2)^4/24
p4(x)=-(x-3.14/2)^6/720
p5(x)=(x-3.14/2)^8/40320
p6(x)=-(x-3.14/2)^10/362880
s(x)=p1(x)+p2(x)+p3(x)+p4(x)+p5(x)
S=plot(s(x),(x,-3,7),ymin=-2,ymax=2,color=Color('blue'))
F=plot(f(x),(x,-3,7),ymin=-2,ymax=2,color=Color('red'))
P1=plot(p1(x),(x,-3,7),ymin=-2,ymax=2,color=Color('green'))
P2=plot(p2(x),(x,-3,7),ymin=-2,ymax=2,color=Color('green'))
P3=plot(p3(x),(x,-3,7),ymin=-2,ymax=2,color=Color('green'))
P4=plot(p4(x),(x,-3,7),ymin=-2,ymax=2,color=Color('green'))
P5=plot(p5(x),(x,-3,7),ymin=-2,ymax=2,color=Color('green'))
P6=plot(p6(x),(x,-3,7),ymin=-2,ymax=2,color=Color('green'))
F+P1+P2+P3+P4+P5+P6+S
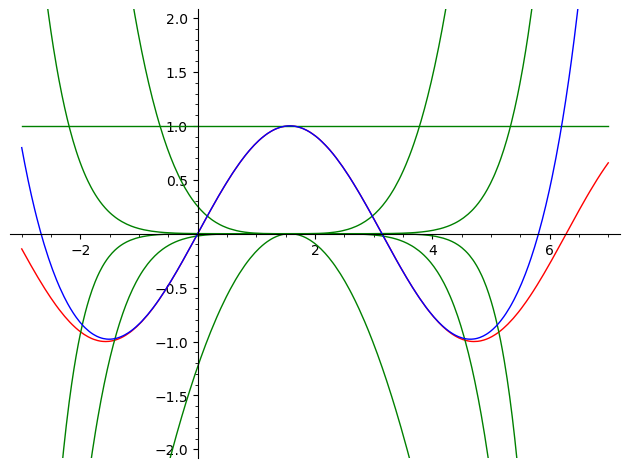 注意红色和蓝色曲线在x=π/2的周围拟合度非常的高。泰勒级数真的是诚不我欺也!我似乎是第一次对于这种微积分的逼近思想有了信服的认识,泰勒多项式虽然是一种近似,但是泰勒级数却是数学上的严格的相等,因为无穷大的逼近就是真的相等而不是有限项的近似。这里的这个工具可以让你选择任意的函数来具象化拟合曲线。非常棒!
三月二十日 等待变化等待机会
Theorem 76 states that the error between a function f(x) and its nth--degree Taylor polynomial pn(x) is Rn(x),where If Rn(x) goes to 0 for each x in an interval I as n approaches infinity, we conclude that the function is equal to its Taylor series expansion.这里的结论是怎么跳跃的我没有搞明白,因为每一个Rn(x)都趋近于0怎么就能够得到它们的加总也趋近于0呢?就是这个结论是怎么来的呢?
Let f(x) have derivatives of all orders at x=c,let Rn(x) be as stated in Theorem 76, and let I be an interval on which the Taylor series of f(x) converges. If for all x in I,then这个就是泰勒定理吧也就是泰勒展开的最最标准的公式吧?
三月二十二日 等待变化等待机会
nick@nick-sager:~$ cat ~/.sage/init.sage
%colors Linux
三月二十三日 等待变化等待机会
been there before的感觉,就是说即便不知道准确的含义,但是混了个脸熟的好处就是知道去哪里找,或者说知道它大概的重要性或者方向。
A premise or premiss is a proposition—a true or false declarative statement—used in an argument to prove the truth of another proposition called the conclusion. Arguments consist of a set of premises and a conclusion.这里就是三段论
Aristotle held that any logical argument could be reduced to two premises and a conclusion.很多中文的名词和英文对起来是一个学习的过程。这个既是中文教育的缺点也是一种独特优势。
Generative pre-trained transformers (GPT) are a type of large language model (LLM) and a prominent framework for generative artificial intelligence. They are artificial neural networks that are used in natural language processing tasks. GPTs are based on the transformer architecture, pre-trained on large data sets of unlabelled text, and able to generate novel human-like content. As of 2023, most LLMs have these characteristics and are sometimes referred to broadly as GPTs.这里有必要在重新引述一下Transformer的概念。它的核心是引入了所谓的
attention机制去除了RNN从而减少了训练时间。这些在名词上我知道,但是真正的含义我依然不清楚,比如attention机制是怎么回事我始终搞不懂,这些看样子只有在实现细节才能接触到。那么基于这个概念,GPT论文的 核心是什么呢?首先使用Transformer依靠自主学习来使用大量未标记的语言素材来训练大语言模型,然后在不对模型作大调整的前提下来针对其他领域 做微调和优化。这个可以称之为本主动学习,因为之前的领域是完全的自主的未分类的学习样本。这个好处是可以充分利用资源,否则人工标记分类是不值得在第一 步去做的,人工指导应该放在第二步的特定目标领域去做。这个仿佛是一个培养徒弟的过程,一开始在少林寺里练了七年的挑水做饭的自学是没有师傅指点的,只有 等徒弟动心忍性开始领悟的时候师傅才开始点播他。从这一点来看,GPT实际上解决了一个入门的问题,就是我们有大量的训练资料但是不知道要怎么
喂给 模型,而如果解决了语言模型那么大量的下一阶段的专项学习就可以事半功倍了。就好比操作系统的成熟与发展都在于一个shell的完善能够让我们在这个平台 上自由驰骋。想象看互联网上有着近乎无限的信息可以用来训练,但是如何入手是一个难题,更难的是训练的结果如何转化运用。而GPT开创的正是这个。
三月二十四日 等待变化等待机会
sage: T1 = RealDistribution('gaussian',0.3)
sage: T2 = RealDistribution('gaussian',1)
sage: T3 = RealDistribution('gaussian',2)
sage: T4 = RealDistribution('gaussian',3)
sage: P1=plot(T1, xmin=-5, xmax=5, color="red")
sage: P2=plot(T2, xmin=-5, xmax=5, color="yellow")
sage: P3=plot(T3, xmin=-5, xmax=5, color="blue")
sage: P4=plot(T4, xmin=-5, xmax=5, color="brown")
sage: g=Graphics()
sage: g+=P1
sage: g+=P2
sage: g+=P3
sage: g+=P4
sage: g.show()
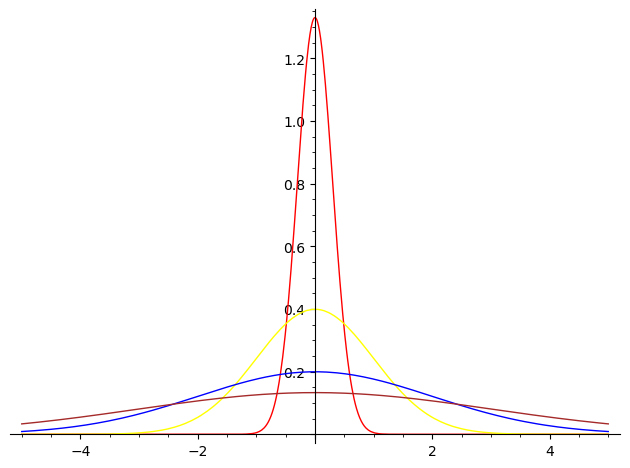
sage: C1=T1.cum_distribution_function
sage: C2=T2.cum_distribution_function
sage: C3=T3.cum_distribution_function
sage: C4=T4.cum_distribution_function
sage: g=Graphics()
sage: g+=plot(C1, color="red")
sage: g+=plot(C2, color="blue")
sage: g+=plot(C3, color="black")
sage: g+=plot(C4, color="brown")
sage: g.show()
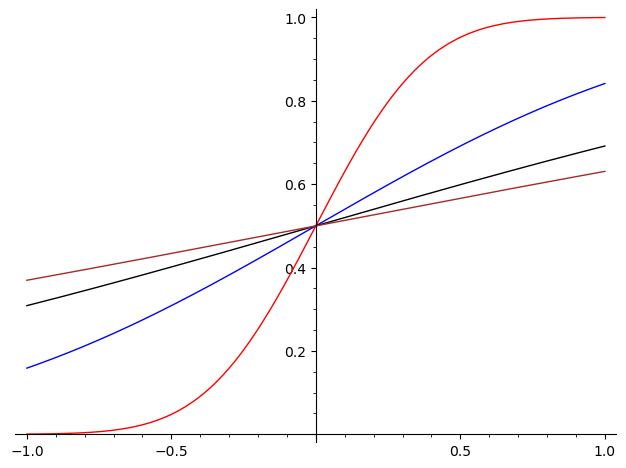
sage: T1.set_distribution("gaussian", sqrt(0.2))
sage: T2.set_distribution("gaussian", sqrt(1))
sage: T3.set_distribution("gaussian", sqrt(5.0))
sage: T4.set_distribution("gaussian", sqrt(0.5))
sage: P1=plot(T1, xmin=-5, xmax=5, color="red")
sage: P2=plot(T2, xmin=-5, xmax=5, color="yellow")
sage: P3=plot(T3, xmin=-5, xmax=5, color="blue")
sage: P4=plot(T4, xmin=-5, xmax=5, color="brown")
sage: g=Graphics()
sage: g+=P1
sage: g+=P2
sage: g+=P3
sage: g+=P4
sage: g.show()
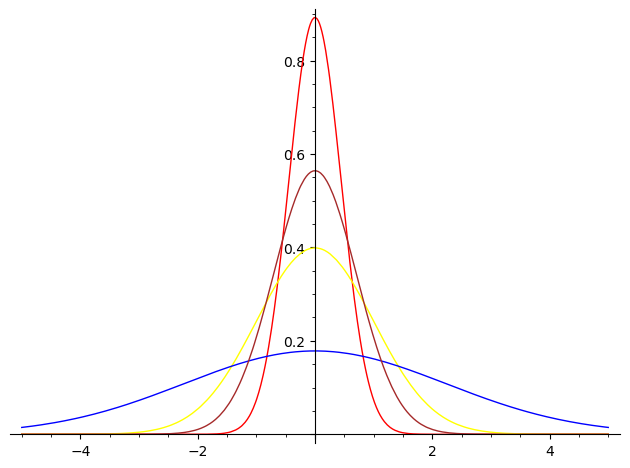
三月二十六日 等待变化等待机会
In mathematics, the tensor algebra of a vector space V, denoted T(V) or T•(V), is the algebra of tensors on V (of any rank) with multiplication being the tensor product. It is the free algebra on V, in the sense of being left adjoint to the forgetful functor from algebras to vector spaces: it is the "most general" algebra containing V, in the sense of the corresponding universal property.这个定义非常的难懂,我先要明白Tensor Product的定义:
In mathematics, the tensor product V ⊗ W of two vector spaces V and W (over the same field) is a vector space to which is associated a bilinear map V × W → V ⊗ W that maps a pair ( v , w ) , v ∈ V , w ∈ W to an element of V ⊗ W denoted v ⊗ w .那么什么是tensor呢?
In mathematics, a tensor is an algebraic object that describes a multilinear relationship between sets of algebraic objects related to a vector space. Tensors may map between different objects such as vectors, scalars, and even other tensors. There are many types of tensors, including scalars and vectors (which are the simplest tensors), dual vectors, multilinear maps between vector spaces, and even some operations such as the dot product. Tensors are defined independent of any basis, although they are often referred to by their components in a basis related to a particular coordinate system; those components form an array, which can be thought of as a high-dimensional matrix.
三月二十八日 等待变化等待机会
In mathematics, specifically set theory, the Cartesian product of two sets A and B, denoted A × B, is the set of all ordered pairs (a, b) where a is in A and b is in B. In terms of set-builder notation, that is A × B = { ( a , b ) ∣ a ∈ A and b ∈ B } .我看的头疼,最后这个简单的说明就解决了我的基本的需求:对于这样两个矩阵
 它们的tensor product是什么呢?

 明明右边看起来像是一个项和∑不相干,其实这个就是爱因斯坦的写法,居然省略了∑
三月二十九日 等待变化等待机会
textual entailment, question answering, semantic similarity assessment, and document classification。这些任何一项都是要穷经皓首才能解决的难题。单单理解问题就是超过普通人想象的困难。
discriminatively trained models。这个是什么意思呢?是指的很多训练者在模型转为非训练域作应用的时候必须要再针对使用目标做特化或者优化?还是有一点点通用模型的意味?总而言之,我的理解这篇论文的核心是这个词:generative pre-training,就是GPT的前两个字母,至于最后一个字母T是Transformer是之前就已经解决了的现成的模型架构。所以,作者要解决的是如何运用这个模型架构。用作者的话就是训练的时候使用的数据是
unlabelled,之后针对具体的运用做微调就是
discriminative fine-tuning。
we make use of task-aware input transformations during fine-tuning to achieve effective transfer while requiring minimal changes to the model architecture.什么是task-aware input transformations?这个需要再理解。
The ability to learn effectively from raw text is crucial to alleviating the dependence on supervised learning in natural language processing (NLP).机器学习什么是最重要的?当然是自主学习。什么是最困难的?当然是训练。什么是训练最需要的?当然是训练素材的取得。那么放着广阔无垠的互联网海洋知识库 不能使用而只能在海滩边建一个小小的人工水池来模拟学习游泳是不是机器训练的痛点?怎么才能让机器自由的在互联网里畅游而随后能够自然而然的积累经验?这 个就是机器学习最紧要的地方。
这两个问题是有某种相似性或者联系性的。学以致用是每个人的目标,只有实践才是检验真理的唯一标准。那么在学习中要带着问题和目标去学,这个是被广泛接受 的好方式。但是对于机器学习的训练阶段却是不可取的,因为你不能彻底沦为南翔技校学习挖掘机式的培训,换言之,很多时候训练的通用性决定了训练成果的价 值。训练时候的某种定向优化彷佛是现行教育里的定向代培,导致了模型固化的偏废。一个方面的优化意味着其他方面的弱化。这个固然是优化的本来意义,但是如 果伤筋动骨的大的调整就失去了培训的意义。就是说一事一训的成本太高。第二个问题实际上是第一个问题的进一步深入,就是假如我们要举一反三的能力要怎么 做?这个问题实际上比第一个问题还重要。一事一训固然是成本问题,举一反三是能力建设!前者只是成本问题,而后者是无价的。理解了问题的核心就理解了问题的重要性,这个是理解过程的一体两面。
- First, it is unclear what type of optimization objectives are most effective at learning text representations that are useful for transfer.
- Second, there is no consensus on the most effective way to transfer these learned representations to the target task.
...we explore a semi-supervised approach for language understanding tasks using a combination of unsupervised pre-training and supervised fine-tuning. Our goal is to learn a universal representation that transfers with little adaptation to a wide range of tasks.就是说这个是半自主学习领域的一种尝试,预训练是自主式的学习,而微调是监督学习。而训练的范畴是语言学习,目标则是不限于语言的更广泛的运用,需要很小 的适配。这一点我是在第一次读论文所没有意识到的。训练的领域是语言,应用的领域却不一定,这才是巨大的跃进!也就是突破,举一反三才是能力建设。
We employ a two-stage training procedure. First, we use a language modeling objective on the unlabeled data to learn the initial parameters of a neural network model. Subsequently, we adapt these parameters to a target task using the corresponding supervised objective.也许一个能够掌握语言的头脑才是有智能的潜力的头脑,所以,学习必须要先从学习语言开始。语言学习所掌握的参数作调整后可以运用到其他领域。
This model choice provides us with a more structured memory for handling long-term dependencies in text, compared to alternatives like recurrent networks, resulting in robust transfer performance across diverse tasks.其实回想一下那篇Transformer的论文的标题是什么?是
Attention Is All You Need。这个标题在我一开始 的时候觉得很突兀,为什么人工智能和Attention杠上了?现在才开始明白,这一切的一切,包括GPT都是在解决一个记忆的问题,这些模型都是人类记 忆的某种实现形式。而记忆是有长期短期的,上下文是短期记忆,也就是attention的实质。使用RNN到底不好在哪里呢?我现在并不能知道具体 Transformer的multihead attention机制的原理是什么,可是一言以蔽之,肯定是多快好省。这个连YesPrimeMinister里的白痴都能理解的,不用说普通人。一定 的,否则为什么要进步。声称是AI的机理究竟是什么?是记忆再现?还是知识存储方式的本质揭示,不管如何,知识本身就是记忆的一种表现形式,去粗取精,拨 云见日是知识的提取,也是记忆的优化。能够智能的处理记忆本身就是智能。当然这个是悖论,也是费话。应该说在不失去本质特征前提下的记忆优化是一种智能提 取。总之,压缩就是某种智能也是智能的必要,否则就没有智能。
These approaches, however, mainly transfer word-level information, whereas we aim to capture higher-level semantics.。当然更近的是很多工作已经开始在句子层级上的研究了。我觉得这个也是顺理成章的,因为计算量自然就上去了,没有现代的硬件水平支撑,以前想做也困难。作者还提到了更加类似的前人的工作,但作者的改进在于使用Transformer的机制而不是LSTM 被限制了预测的能力在短期。还有其他的就是训练与应用之间需要更大的调整。以后我也找这几篇论文来翻翻。
Adding auxiliary unsupervised training objectives is an alternative form of semi-supervised learning.到底什么是Unsupervised Learning
Unsupervised learning is a method in machine learning where, in contrast to supervised learning, algorithms learn patterns exclusively from unlabeled data. The hope is that through mimicry, which is an important mode of learning in people, the machine is forced to build a concise representation of its world and then generate imaginative content from it.为什么提到这个进化论的概念mimicry? 我以为也许是模拟的意思,这个就是英语霸权主义的主要表现形式,我无法完全肯定我的理解。总而言之,训练材料无标记是核心,自主建立某种模式是结果和目 标,因此,建立什么目标还是自主学习必要设定的参数。学习是要有目的的。关键是怎么输入这个预设的目标?理解的关键是这个词的含义:
language modeling objective。目标要怎么描述?模型的内涵是什么?语言在这里是什么角色?语言即是表达的工具也是内容本身。用语言训练语言模型是语言训练的目标?简单的词语需要大量的理解。很困难。
笔记学习本身也是一种学习的过程的学习。学习可以有很多种方法,达到的目的也许只有一个,但是检验结果的方法却有几乎无数种,应用固然是目的也是检验的手段。我现在缺乏的正是这种检验与运用的手段。
Given an unsupervised corpus of tokens U = {u1 , . . . , un }, we use a standard language modeling objective to maximize the following likelihood: where k is the size of the context window, and the conditional probability P is modeled using a neural network with parameters Θ. These parameters are trained using stochastic gradient descent.这里要再复习一下likelihood的定义, 作者针对标准Transformer做了一些修改,这个公式太复杂了,我就偷懒截图如下:
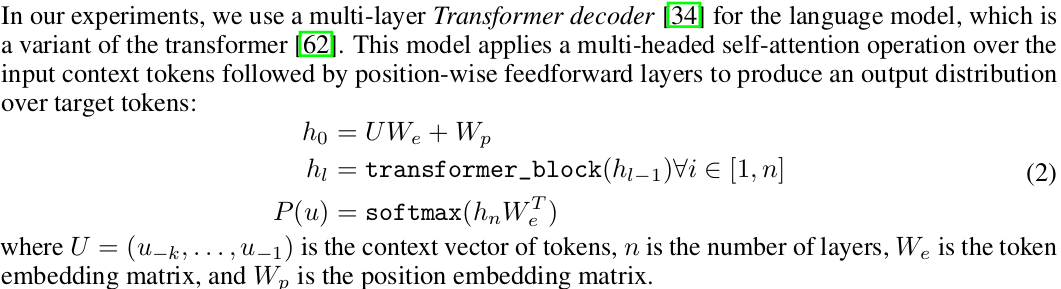

In words, the softmax applies the standard exponential function to each element zi of the input vector z (consisting of K real numbers), and normalizes these values by dividing by the sum of all these exponentials. The normalization ensures that the sum of the components of the output vector σ(z) is 1. The term "softmax" derives from the amplifying effects of the exponential on any maxima in the input vector.
三月三十一日 等待变化等待机会
校验吧?
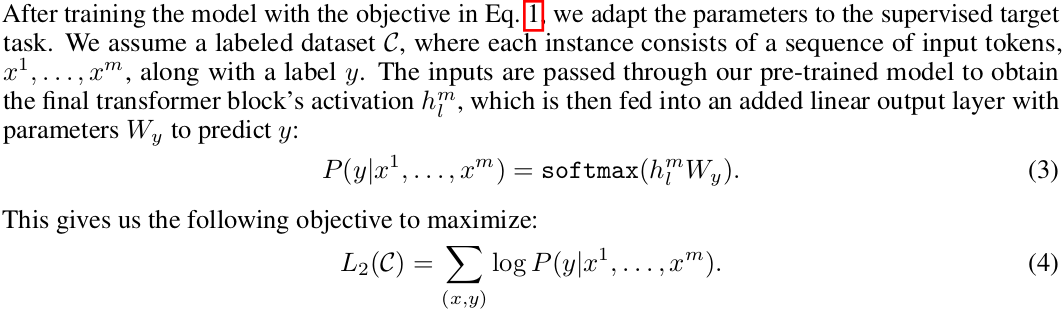 可是这里有些细节还不明白,比如这个所谓的final transformer block's activation 究竟是何方神圣?而那个神秘的
parameter Wy又是从哪里来的?
We additionally found that including language modeling as an auxiliary objective to the fine-tuning helped learning by这里为什么说including language modeling as an auxiliary objective?这里看起来 的确像是在训练一个语言模型,为什么说是auxiliary?难道说我们的本意不是在训练语言模型?或者说这些新的标记的数据和原本的训练数据是风马牛不 相及?原则上自主学习的确是要求训练数据和检验数据不能重叠,问题是这个fine-tuning算不算是在不同领域的训练,或者是同领域的校验?我始终不 明白GPT的机制是怎么样子的,难道使用和训练数据集完全无关的互联网得到的图片和它的
- improving generalization of the supervised model, and
- accelerating convergence.
alt属性的文字作为一个图形文字对可以作为微调吗?这个如果是对的,在我看来,这个只是利用的GPT语言模型对于语言的模型的有效性来更加准确的
理解那些作为标记的
alt文字,并不代表GPT模型对于图形的更深入理解。图形归图形,文字归文字,说到底GPT是根据输入的prompt的文字来
联系配对的图形和机器学习的图形理解是两码事吧?除非我对于这部分有重大的理解偏差。但是这个部分应该是所谓的GPT的Generative的部分。总之,这些不明白的地方才是GPT的关键部分。
Specifically, we optimize the following objective (with weight λ):L3(C) = L2(C) + λ ∗ L1(C)
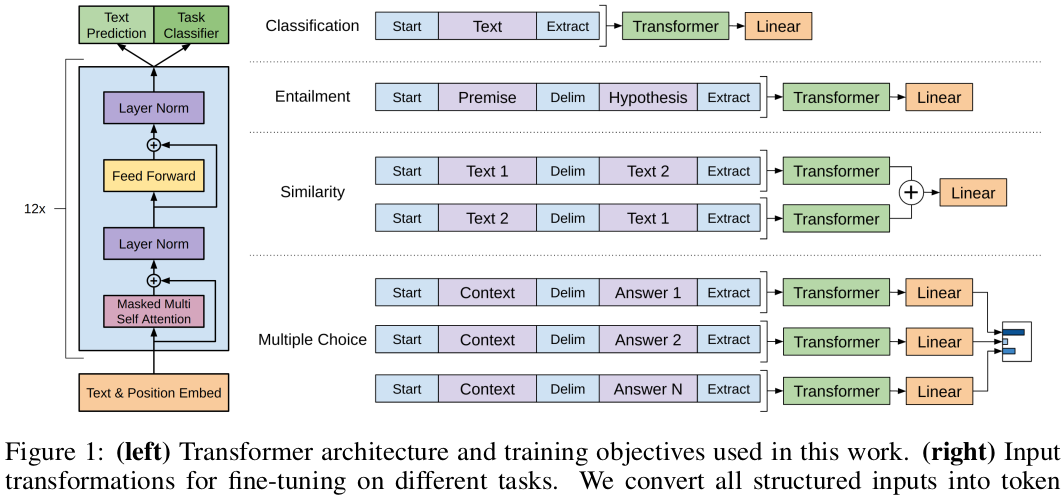 也许原理上有一个概念,但是作者并没有回答额外的训练参数Wy是怎么来的。作者的解说让我感到有些不可思议,难道人工智能就是这样子实现的吗?虽说熟读唐诗三百首不会作诗也会吟是一种通用的人类学习方法,但是这个真的只能模仿啊。比如
pre-trained model was trained on contiguous sequences of text,那么对于微调来说,分类 (classification)是不需要专门改动的,而对于文字理解或者说问答(question answering or textual entailment),它的输入是一对句子。我镇的难以想象AI就是这么练成的,一个对于阅读了大量素材之后就能侃侃而谈式的为人类指点迷津?
这个看到了吧!AI是怎么训练的?就是
- Textual entailment: For entailment tasks, we concatenate the premise p and hypothesis h token sequences, with a delimiter token ($) in between.
- Similarity For similarity tasks, there is no inherent ordering of the two sentences being compared. To reflect this, we modify the input sequence to contain both possible sentence orderings (with a delimiter in between) and process each independently to produce two sequence representations which are added element-wise before being fed into the linear output layer.
- Question Answering and Commonsense Reasoning For these tasks, we are given a context document z, a question q, and a set of possible answers {ak }. We concatenate the document context and question with each possible answer, adding a delimiter token in between to get [z; q; $; ak ]. Each of these sequences are processed independently with our model and then normalized via a softmax layer to produce an output distribution over possible answers.
背答案,对于多重选择是最典型的,就是把每一个答案选择连同原文和问题一个个的单独输入看看条件概率是不是最大。这个你不能说不对,但是总觉得似乎难以置信。
四月一日 等待变化等待机会
BLEU (bilingual evaluation understudy) is an algorithm for evaluating the quality of text which has been machine-translated from one natural language to another. Quality is considered to be the correspondence between a machine's output and that of a human: "the closer a machine translation is to a professional human translation, the better it is" – this is the central idea behind BLEU. Invented at IBM in 2001, BLEU was one of the first metrics to claim a high correlation with human judgements of quality, and remains one of the most popular automated and inexpensive metrics.这个东西实在是平淡无奇,为什么IBM会和平淡无奇经常的挂钩呢?一个纯粹要靠和主观人为的结果来比较的算法能够自动化吗?也许部分吧?这个本质上和图灵实验一样的是一种非常的别扭的定义方式。这个和之前看到的universal property相 比就落后了一大街,一个事物固然可以以它的构成方法来定义,但是更为高明或者有普遍意义的是以它的固有的属性来定义。目前AI这个领域之所以充斥了太多这 种只能简单的凭借其生成方式来定义的现象归根结底还是因为我们对于它的本质属性把握的缺失,一个工业标准制定的如同手工艺制品的鉴定水平,无法批量化客观 化。好像鉴宝大会的专家系统一样。
记忆的模式,它的输入是带有时间信息的,而这个其实是合理的,并且类似递归效应,结果会对下一次的结果有影响,这个也有人类记忆的影子。这个并非不好,但是这篇GPT-paper要 解决的并非要否定这一点,主要是针对输入和输出元素位置的敏感信息部分,作为这个RNN记忆模型天然的就是含有时间信息,那么位置敏感是自然的,这样子对 于联系输入输出里元素它们之间的距离成为天然屏障。这个是它的缺点。现代人对于信息洪流普遍能够处理的注意力带宽就是三秒,短期记忆限制了人类的联系能 力,政客们针对于此有很多的把戏。
Attention is the concentration of awareness on some phenomenon to the exclusion of other stimuli. It is a process of selectively concentrating on a discrete aspect of information, whether considered subjective or objective.在机器学习里它的定义是这样子的:
Machine learning-based attention is a mechanism which intuitively mimics cognitive attention. It calculates "soft" weights for each word, more precisely for its embedding, in the context window. These weights can be computed either in parallel (such as in transformers) or sequentially (such as recurrent neural networks). "Soft" weights can change during each runtime, in contrast to "hard" weights, which are (pre-)trained and fine-tuned and remain frozen afterwards.所以,这个是一个影响word embedding的各个值的过程。也就是换言之,word embedding里包含了全部的信息,上下文窗口范围内的重点划线词字是靠它的向量的转动来体现的。
Attention allows the calculation of the hidden representation of a token equal access to any part of a sentence directly, rather than only through the previous hidden state.RNN的问题是什么?
the weaknesses of leveraging information from the hidden outputs。为什么?
favor more recent information contained in words at the end of a sentence,, 这个本来就是RNN的地层逻辑,时间敏感性,哪怕是同一个句子,也是后面的词优先前面的词,这个是误解的,本来是它的优势,因为人类的记忆就是如此,甚至 很多电子电路也是如此,取决于你要多大的缓冲区,好像网络设备一样有这个窗口期开多大的难题一样,资源是有限的,时间延迟也是一种资源有限的体现。总之, attention从某种程度解决一定也是付出代价,它自己说:
at the cost of reduced effective resolution due to averaging attention-weighted positions,这里的averaging attention-weighted positions是什么意思我还不懂,但是结果是明白的:
reduced to a constant number of operations估计是一个常量级别的查询动作?但是它也有后续补偿机制:
counteract with Multi-Head Attention,所以,这个是以后阅读的重点理解部分。
Self-attention, sometimes called intra-attention is an attention mechanism relating different positions of a single sequence in order to compute a representation of the sequence.可以理解为在当前句子里或者是窗口期内?总之目的是对冲位置敏感性。位置不是不敏感,而是在当前句子里不应该成为障碍。尤其是长句子。其实我需要补课word embedding的细节才能真正理解这其中的关键。
四月二日 等待变化等待机会
四月三日 等待变化等待机会
sudo echo 0 | sudo tee -a /sys/bus/pci/devices/0000\:01\:00.0/numa_node
nick@nick-sager:/tmp$ sudo lshw -C cpu
  *-cpu
       description: CPU
       product: 13th Gen Intel(R) Core(TM) i9-13900HX
       vendor: Intel Corp.
       physical id: 4
       bus info: cpu@0
       version: 6.183.1
       serial: To Be Filled By O.E.M.
       slot: U29
       size: 1905MHz
       capacity: 5200MHz
       width: 64 bits
       clock: 100MHz
       capabilities: lm fpu fpu_exception wp vme de pse tsc msr pae mce cx8 apic sep mtrr pge mca cmov pat pse36 clflush dts acpi mmx fxsr sse sse2 ss ht tm pbe syscall nx pdpe1gb rdtscp x86-64 constant_tsc art arch_perfmon pebs bts rep_good nopl xtopology nonstop_tsc cpuid aperfmperf tsc_known_freq pni pclmulqdq dtes64 monitor ds_cpl vmx est tm2 ssse3 sdbg fma cx16 xtpr pdcm sse4_1 sse4_2 x2apic movbe popcnt tsc_deadline_timer aes xsave avx f16c rdrand lahf_lm abm 3dnowprefetch cpuid_fault epb ssbd ibrs ibpb stibp ibrs_enhanced tpr_shadow flexpriority ept vpid ept_ad fsgsbase tsc_adjust bmi1 avx2 smep bmi2 erms invpcid rdseed adx smap clflushopt clwb intel_pt sha_ni xsaveopt xsavec xgetbv1 xsaves split_lock_detect avx_vnni dtherm ida arat pln pts hwp hwp_notify hwp_act_window hwp_epp hwp_pkg_req hfi vnmi umip pku ospke waitpkg gfni vaes vpclmulqdq rdpid movdiri movdir64b fsrm md_clear serialize arch_lbr ibt flush_l1d arch_capabilities cpufreq
       configuration: cores=24 enabledcores=24 microcode=285 threads=32
ick@nick-sager:/tmp$ lspci | grep -i nvidia
0000:01:00.0 VGA compatible controller: NVIDIA Corporation AD107M [GeForce RTX 4050 Max-Q / Mobile] (rev a1)
0000:01:00.1 Audio device: NVIDIA Corporation Device 22be (rev a1)
pip install tensorflow[and-cuda]
pip install tensorflow
Verify the CPU setup:

python3 -c "import tensorflow as tf; print(tf.reduce_sum(tf.random.normal([1000, 1000])))"

If a tensor is returned, you've installed TensorFlow successfully.

Verify the GPU setup:

python3 -c "import tensorflow as tf; print(tf.config.list_physical_devices('GPU'))"

If a list of GPU devices is returned, you've installed TensorFlow successfully.
四月四日 等待变化等待机会
sudo apt install python3-dev python3-pip
Bazel (/ˈbeɪzəl/[3]) is a free and open-source software tool used for the automation of building and testing software.[2] Google uses the build tool Blaze internally[4] and released an open-sourced port of the Blaze tool as Bazel, named as an anagram of Blaze.[5] Bazel was first released in March 2015 and was in beta status by September 2015.[6] Version 1.0 was released in October 2019.这个是一个核心的特点:Similar to build tools like Make, Apache Ant, and Apache Maven,[2][5] Bazel builds software applications from source code using rules. Rules and macros are created in the Starlark language (previously called Skylark),[8] a dialect of Python.[5] There are built-in rules for building software written in Java, Kotlin, Scala, C, C++, Go, Python, Rust, JavaScript, Objective-C, and bash scripts.[5][6] Bazel can produce software application packages suitable for deployment for the Android and iOS operating systems.
it creates a new directory and fills it with symlinks to the explicit input dependencies for the rule,就是把include的头文件全部清晰的表达为软链接,这个的确是一个好方法。
auth-user-pass注释掉,因为我不想让它自动运行,也没有设定为startup的服务。
The compute capability of a device is represented by a version number, also sometimes called its “SM version”. This version number identifies the features supported by the GPU hardware and is used by applications at runtime to determine which hardware features and/or instructions are available on the present GPU.我一开始还以为是类似于CPU feature一样的一些名词,原来是用版本数字代替,这个好。我的显卡的能力是: GeForce RTX 4050 8.9The compute capability comprises a major revision number X and a minor revision number Y and is denoted by X.Y.
GeForce RTX 4050 Laptop GPU
NVIDIA CUDA Cores 2560
Boost Clock 1605 - 2370 MHz
Memory Size 6 GB
Memory Type GDDR6
sudo apt-get update && sudo apt-get install -y llvm-17 clang-17
The current supported version is LLVM/Clang 17.看样子只能照着做了:
wget https://github.com/llvm/llvm-project/releases/download/llvmorg-17.0.2/clang+llvm-17.0.2-x86_64-linux-gnu-ubuntu-22.04.tar.xz
tar -xvf clang+llvm-17.0.2-x86_64-linux-gnu-ubuntu-22.04.tar.xz
cp -r clang+llvm-17.0.2-x86_64-linux-gnu-ubuntu-22.04/* /usr
nick@nick-sager:~/Downloads$ clang --version clang version 17.0.2 (https://github.com/llvm/llvm-project b2417f51dbbd7435eb3aaf203de24de6754da50e) Target: x86_64-unknown-linux-gnu Thread model: posix InstalledDir: /usr/bin
这几个都是nvidia的东西,很讨厌的。从nvidia-smi我可以知道我的GPUdriver版本是够了:The following NVIDIA® software are only required for GPU support.
- NVIDIA® GPU drivers version 450.80.02 or higher.
- CUDA® Toolkit 11.8.
- cuDNN SDK 8.6.0.
- (Optional) TensorRT to improve latency and throughput for inference.
NVIDIA-SMI 550.54.15 Driver Version: 550.54.15 CUDA Version: 12.4
wget https://developer.download.nvidia.com/compute/cudnn/9.0.0/local_installers/cudnn-local-repo-ubuntu2204-9.0.0_1.0-1_amd64.deb
sudo dpkg -i cudnn-local-repo-ubuntu2204-9.0.0_1.0-1_amd64.deb
sudo cp /var/cudnn-local-repo-ubuntu2204-9.0.0/cudnn-*-keyring.gpg /usr/share/keyrings/
sudo apt-get update
sudo apt-get -y install cudnn
The NVIDIA CUDA Deep Neural Network library (cuDNN) is a GPU-accelerated library of primitives for deep neural networks. cuDNN provides highly tuned implementations for standard routines such as forward and backward convolution, attention, matmul, pooling, and normalization.所以,关键字是GPU-accelerated library就是GPU加速,但是这个几乎就是费话,否则我干嘛要装你呢?只不过是针对
deep neural networks。这里提到的几个标准很重要!
NVIDIA® TensorRT™ is an SDK for optimizing trained deep learning models to enable high-performance inference. TensorRT contains a deep learning inference optimizer for trained deep learning models, and a runtime for execution. After you have trained your deep learning model in a framework of your choice, TensorRT enables you to run it with higher throughput and lower latency.所以,这里是关于deep learning inference,这个具体是什么呢?
tensorrt据说是c++/python的接口都齐全了,为什么我还是需要再次使用pip来安装呢?我只能理解是不同的路径的殊涂同归?不过编译所谓的
python3 -m pip install --pre --upgrade tensorrt
The above pip command will pull in all the required CUDA libraries in Python wheel format from PyPI because they are dependencies of the TensorRT Python wheel. Also, it will upgrade tensorrt to the latest version if you had a previous version installed.在我看来这个所谓的dependency是编译期的并非运行期吧?
四月六日 等待变化等待机会
sudo apt install apt-transport-https curl gnupg -y
curl -fsSL https://bazel.build/bazel-release.pub.gpg | gpg --dearmor >bazel-archive-keyring.gpg
sudo mv bazel-archive-keyring.gpg /usr/share/keyrings
echo "deb [arch=amd64 signed-by=/usr/share/keyrings/bazel-archive-keyring.gpg] https://storage.googleapis.com/bazel-apt stable jdk1.8" | sudo tee /etc/apt/sources.list.d/bazel.list
sudo apt install default-jdk
sudo apt install gnome-terminal
# Add Docker's official GPG key:
sudo apt-get update
sudo apt-get install ca-certificates curl
sudo install -m 0755 -d /etc/apt/keyrings
sudo curl -fsSL https://download.docker.com/linux/ubuntu/gpg -o /etc/apt/keyrings/docker.asc
sudo chmod a+r /etc/apt/keyrings/docker.asc

# Add the repository to Apt sources:
echo \
  "deb [arch=$(dpkg --print-architecture) signed-by=/etc/apt/keyrings/docker.asc] https://download.docker.com/linux/ubuntu \
  $(. /etc/os-release && echo "$VERSION_CODENAME") stable" | \
  sudo tee /etc/apt/sources.list.d/docker.list > /dev/null
sudo apt-get update
sudo apt-get install docker-ce docker-ce-cli containerd.io docker-buildx-plugin docker-compose-plugin
sudo docker run hello-world
curl -fsSL https://nvidia.github.io/libnvidia-container/gpgkey | sudo gpg --dearmor -o /usr/share/keyrings/nvidia-container-toolkit-keyring.gpg \
  && curl -s -L https://nvidia.github.io/libnvidia-container/stable/deb/nvidia-container-toolkit.list | \
    sed 's#deb https://#deb [signed-by=/usr/share/keyrings/nvidia-container-toolkit-keyring.gpg] https://#g' | \
    sudo tee /etc/apt/sources.list.d/nvidia-container-toolkit.list
sudo apt-get update
sudo apt-get install -y nvidia-container-toolkit
docker pull tensorflow/tensorflow                     # latest stable release
docker pull tensorflow/tensorflow:devel-gpu           # nightly dev release w/ GPU support
docker pull tensorflow/tensorflow:latest-gpu-jupyter  # latest release w/ GPU support and Jupyter
sudo docker run -u $(id -u):$(id -g) -it tensorflow/tensorflow bash
docker pull tensorflow/tensorflow:devel-gpu
docker run --gpus all -it -w /tensorflow -v $PWD:/mnt -e HOST_PERMS="$(id -u):$(id -g)" \
    tensorflow/tensorflow:devel-gpu bash
git pull  # within the container, download the latest source code
________                               _______________
___  __/__________________________________  ____/__  /________      __
__  /  _  _ \_  __ \_  ___/  __ \_  ___/_  /_   __  /_  __ \_ | /| / /
_  /   /  __/  / / /(__  )/ /_/ /  /   _  __/   _  / / /_/ /_ |/ |/ /
/_/    \___//_/ /_//____/ \____//_/    /_/      /_/  \____/____/|__/


WARNING: You are running this container as root, which can cause new files in
mounted volumes to be created as the root user on your host machine.

To avoid this, run the container by specifying your user's userid:

$ docker run -u $(id -u):$(id -g) args...
error: RPC failed; curl 92 HTTP/2 stream 0 was not closed cleanly: CANCEL (err 8)
fatal: the remote end hung up unexpectedly
fatal: early EOF
fatal: index-pack failed
git config --global http.version HTTP/1.1
git config --global http.postBuffer 157286400
bazel build //tensorflow/tools/pip_package:wheel --repo_env=WHEEL_NAME=tensorflow --config=cuda --config=opt
chown $HOST_PERMS bazel-bin/tensorflow/tools/pip_package/wheel_house/tensorflow-version-tags.whl
Docker is a set of platform as a service (PaaS) products that use OS-level virtualization to deliver software in packages called containers.[4] The service has both free and premium tiers. The software that hosts the containers is called Docker Engine.[5] It was first released in 2013 and is developed by Docker, Inc.我原来认为docker就是cgroup,
Because all of the containers share the services of a single operating system kernel, they use fewer resources than virtual machines
When running on Linux, Docker uses the resource isolation features of the Linux kernel (such as cgroups and kernel namespaces) and a union-capable file system (such as OverlayFS)[10] to allow containers to run within a single Linux instance, avoiding the overhead of starting and maintaining virtual machines.
sudo apt install -y nvidia-docker2
sudo systemctl daemon-reload
sudo systemctl restart docker
docker: error response from daemon: could not select device driver "" with capabilities: [[gpu]].的错误。
/usr/include/x86_64-linux-gnu/NvUtils.h找不到的问题,我找了一下才意识到这个是我安装的标准的tensorrt-dev库的问题:
dpkg -L libnvinfer-dev The core of NVIDIA® TensorRT™ is a C++ library that facilitates high-performance inference on NVIDIA graphics processing units (GPUs). TensorRT takes a trained network, which consists of a network definition and a set of trained parameters, and produces a highly optimized runtime engine that performs inference for that network.难道是把模型也包含在里面了吗?
四月七日 等待变化等待机会
TensorRT provides APIs via C++ and Python that help to express deep learning models via the Network Definition API or load a pre-defined model via the ONNX parser that allow TensorRT to optimize and run them on an NVIDIA GPU. TensorRT applies graph optimizations, layer fusions, among other optimizations, while also finding the fastest implementation of that model leveraging a diverse collection of highly optimized kernels. TensorRT also supplies a runtime that you can use to execute this network on all of NVIDIA’s GPU’s from the NVIDIA Volta™ generation onwards.难道就是你可以操纵模型?似乎是说你给我模型参数我给你生成模型或者直接调现成的模型?这个Open Neural Network Exchange (ONNX) parser是一个关键的概念:
The Open Neural Network Exchange (ONNX) is an open-source artificial intelligence ecosystem of technology companies and research organizations that establish open standards for representing machine learning algorithms and software tools to promote innovation and collaboration in the AI sector. ONNX is available on GitHub. ONNX was originally named Toffee and was developed by the PyTorch team at Facebook.它具体是什么呢?
ONNX provides definitions of an extensible computation graph model, built-in operators and standard data types, focused on inferencing (evaluation). Each computation dataflow graph is a list of nodes that form an acyclic graph. Nodes have inputs and outputs. Each node is a call to an operator. Metadata documents the graph. Built-in operators are to be available on each ONNX-supporting framework.基本是三样:操作流程,操作运算的定义,操作数据的定义。这个是万变不离其宗的。
nick@nick-sager:~/Downloads/NVidia$ dpkg -L nv-tensorrt-local-repo-ubuntu2204-10.0.0-cuda-11.8
/.
/etc
/etc/apt
/etc/apt/sources.list.d
/etc/apt/sources.list.d/nv-tensorrt-local-ubuntu2204-10.0.0-cuda-11.8.list
/usr
/usr/share
/usr/share/doc
/usr/share/doc/nv-tensorrt-local-repo-ubuntu2204-10.0.0-cuda-11.8
/usr/share/doc/nv-tensorrt-local-repo-ubuntu2204-10.0.0-cuda-11.8/changelog.Debian.gz
/var
/var/nv-tensorrt-local-repo-ubuntu2204-10.0.0-cuda-11.8
/var/nv-tensorrt-local-repo-ubuntu2204-10.0.0-cuda-11.8/2B368663.pub
/var/nv-tensorrt-local-repo-ubuntu2204-10.0.0-cuda-11.8/InRelease
/var/nv-tensorrt-local-repo-ubuntu2204-10.0.0-cuda-11.8/Local.md5
/var/nv-tensorrt-local-repo-ubuntu2204-10.0.0-cuda-11.8/Local.md5.gpg
/var/nv-tensorrt-local-repo-ubuntu2204-10.0.0-cuda-11.8/Packages
/var/nv-tensorrt-local-repo-ubuntu2204-10.0.0-cuda-11.8/Packages.gz
/var/nv-tensorrt-local-repo-ubuntu2204-10.0.0-cuda-11.8/Release
/var/nv-tensorrt-local-repo-ubuntu2204-10.0.0-cuda-11.8/Release.gpg
/var/nv-tensorrt-local-repo-ubuntu2204-10.0.0-cuda-11.8/libnvinfer-bin_10.0.0.6-1+cuda11.8_amd64.deb
/var/nv-tensorrt-local-repo-ubuntu2204-10.0.0-cuda-11.8/libnvinfer-dev_10.0.0.6-1+cuda11.8_amd64.deb
/var/nv-tensorrt-local-repo-ubuntu2204-10.0.0-cuda-11.8/libnvinfer-dispatch-dev_10.0.0.6-1+cuda11.8_amd64.deb
/var/nv-tensorrt-local-repo-ubuntu2204-10.0.0-cuda-11.8/libnvinfer-dispatch10_10.0.0.6-1+cuda11.8_amd64.deb
/var/nv-tensorrt-local-repo-ubuntu2204-10.0.0-cuda-11.8/libnvinfer-headers-dev_10.0.0.6-1+cuda11.8_amd64.deb
/var/nv-tensorrt-local-repo-ubuntu2204-10.0.0-cuda-11.8/libnvinfer-headers-plugin-dev_10.0.0.6-1+cuda11.8_amd64.deb
/var/nv-tensorrt-local-repo-ubuntu2204-10.0.0-cuda-11.8/libnvinfer-lean-dev_10.0.0.6-1+cuda11.8_amd64.deb
/var/nv-tensorrt-local-repo-ubuntu2204-10.0.0-cuda-11.8/libnvinfer-lean10_10.0.0.6-1+cuda11.8_amd64.deb
/var/nv-tensorrt-local-repo-ubuntu2204-10.0.0-cuda-11.8/libnvinfer-plugin-dev_10.0.0.6-1+cuda11.8_amd64.deb
/var/nv-tensorrt-local-repo-ubuntu2204-10.0.0-cuda-11.8/libnvinfer-plugin10_10.0.0.6-1+cuda11.8_amd64.deb
/var/nv-tensorrt-local-repo-ubuntu2204-10.0.0-cuda-11.8/libnvinfer-samples_10.0.0.6-1+cuda11.8_all.deb
/var/nv-tensorrt-local-repo-ubuntu2204-10.0.0-cuda-11.8/libnvinfer-vc-plugin-dev_10.0.0.6-1+cuda11.8_amd64.deb
/var/nv-tensorrt-local-repo-ubuntu2204-10.0.0-cuda-11.8/libnvinfer-vc-plugin10_10.0.0.6-1+cuda11.8_amd64.deb
/var/nv-tensorrt-local-repo-ubuntu2204-10.0.0-cuda-11.8/libnvinfer10_10.0.0.6-1+cuda11.8_amd64.deb
/var/nv-tensorrt-local-repo-ubuntu2204-10.0.0-cuda-11.8/libnvonnxparsers-dev_10.0.0.6-1+cuda11.8_amd64.deb
/var/nv-tensorrt-local-repo-ubuntu2204-10.0.0-cuda-11.8/libnvonnxparsers10_10.0.0.6-1+cuda11.8_amd64.deb
/var/nv-tensorrt-local-repo-ubuntu2204-10.0.0-cuda-11.8/nv-tensorrt-local-2B368663-keyring.gpg
/var/nv-tensorrt-local-repo-ubuntu2204-10.0.0-cuda-11.8/onnx-graphsurgeon_10.0.0.6-1+cuda11.8_amd64.deb
/var/nv-tensorrt-local-repo-ubuntu2204-10.0.0-cuda-11.8/python3-libnvinfer-dev_10.0.0.6-1+cuda11.8_amd64.deb
/var/nv-tensorrt-local-repo-ubuntu2204-10.0.0-cuda-11.8/python3-libnvinfer-dispatch_10.0.0.6-1+cuda11.8_amd64.deb
/var/nv-tensorrt-local-repo-ubuntu2204-10.0.0-cuda-11.8/python3-libnvinfer-lean_10.0.0.6-1+cuda11.8_amd64.deb
/var/nv-tensorrt-local-repo-ubuntu2204-10.0.0-cuda-11.8/python3-libnvinfer_10.0.0.6-1+cuda11.8_amd64.deb
/var/nv-tensorrt-local-repo-ubuntu2204-10.0.0-cuda-11.8/tensorrt-dev_10.0.0.6-1+cuda11.8_amd64.deb
/var/nv-tensorrt-local-repo-ubuntu2204-10.0.0-cuda-11.8/tensorrt-libs_10.0.0.6-1+cuda11.8_amd64.deb
/var/nv-tensorrt-local-repo-ubuntu2204-10.0.0-cuda-11.8/tensorrt_10.0.0.6-1+cuda11.8_amd64.deb
nick@nick-sager:~/Downloads/NVidia$ cat /etc/apt/sources.list.d/nv-tensorrt-local-ubuntu2204-10.0.0-cuda-11.8.list
deb [signed-by=/usr/share/keyrings/nv-tensorrt-local-2B368663-keyring.gpg] file:///var/nv-tensorrt-local-repo-ubuntu2204-10.0.0-cuda-11.8 /
sudo apt install /var/nv-tensorrt-local-repo-ubuntu2204-10.0.0-cuda-11.8/*.deb
四月八日 等待变化等待机会
file /var/nv-tensorrt-local-repo-ubuntu2204-10.0.0-cuda-11.8/tensorrt-libs_10.0.0.6-1+cuda11.8_amd64.deb
/var/nv-tensorrt-local-repo-ubuntu2204-10.0.0-cuda-11.8/tensorrt-libs_10.0.0.6-1+cuda11.8_amd64.deb: Debian binary package (format 2.0), with control.tar.xz, data compression xz
ar x /var/nv-tensorrt-local-repo-ubuntu2204-10.0.0-cuda-11.8/tensorrt-libs_10.0.0.6-1+cuda11.8_amd64.deb
Package: tensorrt-libs
Source: tensorrt
Version: 10.0.0.6-1+cuda11.8
Architecture: amd64
Maintainer: cudatools <cudatools@nvidia.com>
Installed-Size: 8
Depends: libnvinfer10 (= 10.0.0.6-1+cuda11.8), libnvinfer-lean10 (= 10.0.0.6-1+cuda11.8), libnvinfer-plugin10 (= 10.0.0.6-1+cuda11.8), libnvinfer-vc-plugin10 (= 10.0.0.6-1+cuda11.8), libnvinfer-dispatch10 (= 10.0.0.6-1+cuda11.8), libnvonnxparsers10 (= 10.0.0.6-1+cuda11.8)
Section: multiverse/devel
Priority: optional
Description: Meta package for TensorRT runtime libraries
 Meta package for TensorRT runtime libraries.
#include <string>这样子的文件就会报出来找不到的问题,这个我以前是知道的,后来忘记了!但是我现在看到的似乎都不是我以前的解决 方法,而且似乎都不行! 比如我们看到gcc的搜索路径是
#include "..." search starts here:
#include <...> search starts here:
 /usr/include/c++/11
 /usr/include/x86_64-linux-gnu/c++/11
 /usr/include/c++/11/backward
 /usr/lib/gcc/x86_64-linux-gnu/11/include
 /usr/local/include
 /usr/include/x86_64-linux-gnu
 /usr/include
End of search list.
#include "..." search starts here:
#include <...> search starts here:
 /usr/bin/../lib/gcc/x86_64-linux-gnu/12/../../../../include/c++
 /usr/lib/llvm-15/lib/clang/15.0.7/include
 /usr/local/include
 /usr/include/x86_64-linux-gnu
 /usr/include
End of search list.
/usr/include/c++/11/string这里还有一个关于#pragma GCC system_header的解释就是压制警告信息。
The header files declaring interfaces to the operating system and runtime libraries often cannot be written in strictly conforming C. Therefore, GCC gives code found in system headers special treatment. All warnings, other than those generated by ‘#warning’ (see Diagnostics), are suppressed while GCC is processing a system header.而这个文件和clang找到的完全不一样这个需要clang添加参数-stdlib=libc++,而它是这个
/usr/bin/../include/c++/v1/string。 就是说目前我的系统不支持
-stdlib=libstdc++,至少这个是由编译clang的时候决定的。gcc的这个
string文件应该是所谓的stdc++一个头文件,它有一大堆的所谓的bits目录下的实现头文件。而与之相对比的libc++的是一个直接使用模板实现的完全的实现。
libstdc++ is the GNU c++ standard library implementation.
libc++ is the LLVM/clang c++ standard library implementation.
Even when compiling with clang, libstdc++ (gnu) is often used (on Linux).
A main reason libc++ (clang) exists is that libstdc++ (gnu) is GPL and so Apple can't ship it, so you can think of libc++ as the non-GPL libstdc++.
/usr/include/c++/11有一个版本号11,而当我使用clang -stdlib=libstdc++的时候得到的是
nick@nick-sager:~$ realpath /usr/bin/../lib/gcc/x86_64-linux-gnu/12/../../../../include/c++
/usr/include/c++
nick@nick-sager:~$ ls /usr/include/c++
11  v1
(in-process)
 "/usr/bin/clang-17" -cc1 -triple x86_64-unknown-linux-gnu -emit-obj -mrelax-all -disable-free -clear-ast-before-backend -disable-llvm-verifier -discard-value-names -main-file-name test.cpp -mrelocation-model pic -pic-level 2 -pic-is-pie -mframe-pointer=all -fmath-errno -ffp-contract=on -fno-rounding-math -mconstructor-aliases -funwind-tables=2 -target-cpu x86-64 -tune-cpu generic -debugger-tuning=gdb -v -fcoverage-compilation-dir=/home/nick/diabloforum -resource-dir /usr/lib/clang/17 -internal-isystem /usr/bin/../lib/gcc/x86_64-linux-gnu/12/../../../../include/c++ -internal-isystem /usr/bin/../lib/gcc/x86_64-linux-gnu/12/../../../../include/c++/x86_64-linux-gnu -internal-isystem /usr/bin/../lib/gcc/x86_64-linux-gnu/12/../../../../include/c++/backward -internal-isystem /usr/lib/clang/17/include -internal-isystem /usr/local/include -internal-isystem /usr/bin/../lib/gcc/x86_64-linux-gnu/12/../../../../x86_64-linux-gnu/include -internal-externc-isystem /usr/include/x86_64-linux-gnu -internal-externc-isystem /include -internal-externc-isystem /usr/include -fdeprecated-macro -fdebug-compilation-dir=/home/nick/diabloforum -ferror-limit 19 -fgnuc-version=4.2.1 -fcxx-exceptions -fexceptions -fcolor-diagnostics -faddrsig -D__GCC_HAVE_DWARF2_CFI_ASM=1 -o test.o -x c++ /tmp/test.cpp
libstdc++-12-dev。所
以,如果我们默认clang是使用libc++而这个是混蛋的许可证问题苹果作出的决定,那么就要默认使用gcc的自带的libstdc++的话,就会遇
到究竟采用哪一个gcc的版本,clang会挑选最高的版本,问题是这个对于gcc来说是自带的默认的,而clang需要额外的安装这个开发包,比如
gcc-12版本的开发包就是libstdc++-12-dev!!!真的是瞎折腾!
cp: cannot stat '/usr/include/x86_64-linux-gnu/NvUtils.h': No such file or directory
$ dpkg -S NvInferPlugin.h
libnvinfer-plugin-dev: /usr/include/x86_64-linux-gnu/NvInferPlugin.h
$ sudo apt install libnvinfer-plugin-dev
四月九日 等待变化等待机会
pip3 install tf-models-official==2.16
BERT (Pre-training of Deep Bidirectional Transformers for Language Understanding) introduced the method of pre-training language representations on a large text corpus and then using that model for downstream NLP tasks.就是说BERT可以预训练语言模型,这个应该是我目前应该熟悉的部分。
The这个不就是我现在读论文感到有些不明所以然的部分吗?就是这个预训练的语言模型在Transformer的架构里作为一个encoder的角色出现来实现word embedding生成查找的功能,至于后面的mask部分我还是不明白,至少目前读的论文没有介绍到?nlp.networks.BertEncoderclass implements the Transformer-based encoder as described in BERT paper. It includes the embedding lookups and transformer layers (nlp.layers.TransformerEncoderBlock), but not the masked language model or classification task networks.
dd if=/dev/zero of=ubuntu-disk bs=1M count=5000
mkfs -t ext3 ubuntu-disk
mkdir mnt
sudo mount -o loop ubuntu-disk mnt/
sudo apt install debootstrap
sudo debootstrap focaljammy ./mnt https://mirror.leaseweb.com/ubuntu/
root@nick-sager:/# mount
/home/nick/workspace/debootstrap/ubuntu-disk on / type ext3 (rw,relatime)
proc on /proc type proc (rw,nosuid,nodev,noexec,relatime)
sys on /sys type sysfs (ro,nosuid,nodev,noexec,relatime)
efivarfs on /sys/firmware/efi/efivars type efivarfs (rw,nosuid,nodev,noexec,relatime)
udev on /dev type devtmpfs (rw,nosuid,relatime,size=32733676k,nr_inodes=8183419,mode=755,inode64)
devpts on /dev/pts type devpts (rw,nosuid,noexec,relatime,gid=5,mode=620,ptmxmode=000)
shm on /dev/shm type tmpfs (rw,nosuid,nodev,relatime,inode64)
tmpfs on /run type tmpfs (rw,nosuid,nodev,noexec,relatime,size=6554832k,mode=755,inode64)
tmp on /tmp type tmpfs (rw,nosuid,nodev,inode64)
tmpfs on /run/systemd/resolve/stub-resolv.conf type tmpfs (rw,nosuid,nodev,noexec,relatime,size=6554832k,mode=755,inode64)
sudo arch-chroot ./mnt
dpkg-reconfigure tzdata
dpkg-reconfigure locales
dpkg-reconfigure keyboard-configuration
apt install grub-efi-amd64
qemu-system-x86_64 -hda ubuntu-disk -m 2G
sudo mount --bind /dev /mnt/installer/dev
sudo mount --bind /dev/pts /mnt/installer/dev/pts
sudo mount -t proc proc /mnt/installer/proc
sudo mount -t sysfs sys /mnt/installer/sys
sudo chroot /mnt/installer
apt install --no-install-recommends \
  linux-{,image-,headers-}generic-hwe-22.04 \
  linux-firmware initramfs-tools efibootmgr
fdisk mnt
sudo mount -o loop ubuntu-disk mnt
losetup -l | grep ubuntu-disk | cut -d' ' -f1
--target=TARGET我最后尝试使用古老的i386-pc,但是遇到grub拒绝,于是只能硬来install GRUB for TARGET platform [default=x86_64-efi]; available targets: arm-coreboot, arm-efi, arm-uboot, arm64-efi, i386-coreboot, i386-efi, i386-ieee1275, i386-multiboot, i386-pc, i386-qemu, i386-xen, i386-xen_pvh, ia64-efi, loongarch64-efi, mips-arc, mips-qemu_mips, mipsel-arc, mipsel-loongson, mipsel-qemu_mips, powerpc-ieee1275, riscv32-efi, riscv64-efi, sparc64-ieee1275, x86_64-efi, x86_64-xen
sudo grub-install --target=i386-pc --force --boot-directory=mnt/boot /dev/$(losetup -l | grep ubuntu-disk | cut -d' ' -f1)
qemu-system-x86_64 -hda ubuntu-disk -m 2G
sudo losetup -Pf ubuntu-disk
$ ll $(losetup -l | grep ubuntu-disk| cut -d' ' -f1)*
brw-rw---- 1 root disk   7, 9 Apr 10 11:38 /dev/loop9
brw-rw---- 1 root disk 259, 7 Apr 10 11:38 /dev/loop9p1
brw-rw---- 1 root disk 259, 8 Apr 10 11:38 /dev/loop9p2
四月十一日 等待变化等待机会
nick@nick-sager:~/ami$ sudo fdisk -l serverdisk.img
Disk serverdisk.img: 10 GiB, 10737418240 bytes, 20971520 sectors
Units: sectors of 1 * 512 = 512 bytes
Sector size (logical/physical): 512 bytes / 512 bytes
I/O size (minimum/optimal): 512 bytes / 512 bytes
Disklabel type: gpt
Disk identifier: 49FC2B67-59F5-4FCC-B556-CC70715F2FCE

Device          Start      End  Sectors Size Type
serverdisk.img1  2048     4095     2048   1M BIOS boot
serverdisk.img2  4096 20969471 20965376  10G Linux filesystem
A BIOS boot partition doesn't contain a filesystem; it's just a place to put some GRUB code that on an MBR disk would've been located immediately after the boot sector, before the start of the first partition. On a GPT disk, that area is used by the (larger) partition table and isn't available for bootloader code, so the bootloader code goes in a small partition instead.这个是我依稀记得的。让我看看实际的结果吧:使用fdisk选择第一个partition然后使用i查看信息:
         Device: serverdisk.img1
          Start: 2048
            End: 4095
        Sectors: 2048
           Size: 1M
           Type: BIOS boot
      Type-UUID: 21686148-6449-6E6F-744E-656564454649
           UUID: F9AA3449-71BC-4D24-959B-D1DE8D0F8C5B
dd if=/dev/zero of=ubuntu-disk bs=1M count=5000
sudo losetup -Pf --show ubuntu-disk
dev=$(losetup -l | grep ubuntu-disk | cut -d' ' -f1)
sudo mke2fs -t ext4 ${dev}p2
dev=$(losetup -l | grep ubuntu-disk | cut -d' ' -f1)
sudo mkfs.vfat -F 32 ${dev}p1
mkdir -p linux efi
dev=$(losetup -l | grep ubuntu-disk | cut -d' ' -f1)
sudo mount -t ext4 ${dev}p2 linux/
sudo mount -t vfat ${dev}p1 efi
sudo debootstrap jammy linux/
apt install vim
apt update && apt upgrade -y
apt install -y --no-install-recommends \
  linux-{,image-,headers-}generic linux-firmware \
  initramfs-tools cryptsetup{,-initramfs} efibootmgr
dpkg-reconfigure tzdata
dpkg-reconfigure locales
dpkg-reconfigure keyboard-configuration
echo "nick-emu" > /etc/hostname
touch /etc/systemd/network/ethernet.network
echo "[Match]
Name=enp0s31f6
[Network]
DHCP=yes
" > /etc/systemd/network/ethernet.network
apt install grub-pc
echo "GRUB_DISABLE_OS_PROBER=false" >> /etc/default/grub
dev=$(losetup -l | grep ubuntu-disk | cut -d' ' -f1)
grub-install ${dev}
qemu-system-x86_64 -hda ubuntu-disk -m 4G
dd if=/dev/zero of=ubutnu-efi-disk bs=1M count=5000
$ sfdisk ubuntu-efi-disk > ubuntu-efi.script
$ cat ubuntu-efi.script
label: gpt
label-id: 77615560-1E8B-724E-9415-2E9E25D1A687
device: ubuntu-efi-disk
unit: sectors
first-lba: 2048
last-lba: 10239966
sector-size: 512

ubuntu-efi-disk1 : start=        2048, size=     1048576, type=C12A7328-F81F-11D2-BA4B-00A0C93EC93B, uuid=B97AF9B8-AF27-784D-AA31-6C3A9CA9D2CD
ubuntu-efi-disk2 : start=     1050624, size=     9189343, type=0FC63DAF-8483-4772-8E79-3D69D8477DE4, uuid=F5E033F5-DE64-CB4C-8899-E2AC39CE0935
sfdisk ubuntu-efi-disk < ubuntu-efi.script
fdisk -l ubuntu-efi-disk
Disk ubuntu-efi-disk: 4.88 GiB, 5242880000 bytes, 10240000 sectors
Units: sectors of 1 * 512 = 512 bytes
Sector size (logical/physical): 512 bytes / 512 bytes
I/O size (minimum/optimal): 512 bytes / 512 bytes
Disklabel type: gpt
Disk identifier: 77615560-1E8B-724E-9415-2E9E25D1A687

Device             Start      End Sectors  Size Type
ubuntu-efi-disk1    2048  1050623 1048576  512M EFI System
ubuntu-efi-disk2 1050624 10239966 9189343  4.4G Linux filesystem
sudo losetup -Pf --show ubuntu-efi-disk
dev=$(losetup -l | grep ubuntu-efi-disk | cut -d' ' -f1)
sudo mkfs.vfat -F 32 ${dev}p1
sudo mke2fs -t ext4 ${dev}p2
mkdir -p linux efi
dev=$(losetup -l | grep ubuntu-efi-disk | cut -d' ' -f1)
sudo mount -t vfat ${dev}p1 efi
sudo mount -t ext4 ${dev}p2 linux
sudo debootstrap jammy linux
sudo arch-chroot linux
apt install --no-install-recommends \
  linux-{,image-,headers-}generic-hwe-22.04 \
  linux-firmware initramfs-tools efibootmgr
apt install grub-efi
sudo grub-install --target=x86_64-efi --boot-directory=linux/boot --efi-directory=efi ${dev}
$ sudo tree linux/boot/grub
locales-launch: Data of en_US locale not found, generating, please wait...
linux/boot/grub
├── fonts
│   └── unicode.pf2
├── grubenv
├── locale
│   ├── en_AU.mo
│   ├── en_CA.mo
│   ├── en_GB.mo
│   ├── en@quot.mo
│   └── zh_CN.mo
└── x86_64-efi
    ├── acpi.mod
    ├── adler32.mod
    ├── affs.mod
    ├── afs.mod
    ├── afsplitter.mod
    ├── ahci.mod
    ├── all_video.mod
    ├── aout.mod
    ├── appleldr.mod
    ├── archelp.mod
    ├── ata.mod
    ├── at_keyboard.mod
    ├── backtrace.mod
    ├── bfs.mod
    ├── bitmap.mod
    ├── bitmap_scale.mod
    ├── blocklist.mod
    ├── boot.mod
    ├── bsd.mod
    ├── bswap_test.mod
    ├── btrfs.mod
    ├── bufio.mod
    ├── cat.mod
    ├── cbfs.mod
    ├── cbls.mod
    ├── cbmemc.mod
    ├── cbtable.mod
    ├── cbtime.mod
    ├── chain.mod
    ├── cmdline_cat_test.mod
    ├── cmp.mod
    ├── cmp_test.mod
    ├── command.lst
    ├── configfile.mod
    ├── core.efi
    ├── cpio_be.mod
    ├── cpio.mod
    ├── cpuid.mod
    ├── crc64.mod
    ├── cryptodisk.mod
    ├── crypto.lst
    ├── crypto.mod
    ├── cs5536.mod
    ├── ctz_test.mod
    ├── datehook.mod
    ├── date.mod
    ├── datetime.mod
    ├── diskfilter.mod
    ├── disk.mod
    ├── div.mod
    ├── div_test.mod
    ├── dm_nv.mod
    ├── echo.mod
    ├── efifwsetup.mod
    ├── efi_gop.mod
    ├── efinet.mod
    ├── efi_uga.mod
    ├── ehci.mod
    ├── elf.mod
    ├── eval.mod
    ├── exfat.mod
    ├── exfctest.mod
    ├── ext2.mod
    ├── extcmd.mod
    ├── f2fs.mod
    ├── fat.mod
    ├── file.mod
    ├── fixvideo.mod
    ├── font.mod
    ├── fshelp.mod
    ├── fs.lst
    ├── functional_test.mod
    ├── gcry_arcfour.mod
    ├── gcry_blowfish.mod
    ├── gcry_camellia.mod
    ├── gcry_cast5.mod
    ├── gcry_crc.mod
    ├── gcry_des.mod
    ├── gcry_dsa.mod
    ├── gcry_idea.mod
    ├── gcry_md4.mod
    ├── gcry_md5.mod
    ├── gcry_rfc2268.mod
    ├── gcry_rijndael.mod
    ├── gcry_rmd160.mod
    ├── gcry_rsa.mod
    ├── gcry_seed.mod
    ├── gcry_serpent.mod
    ├── gcry_sha1.mod
    ├── gcry_sha256.mod
    ├── gcry_sha512.mod
    ├── gcry_tiger.mod
    ├── gcry_twofish.mod
    ├── gcry_whirlpool.mod
    ├── geli.mod
    ├── gettext.mod
    ├── gfxmenu.mod
    ├── gfxterm_background.mod
    ├── gfxterm_menu.mod
    ├── gfxterm.mod
    ├── gptsync.mod
    ├── grub.efi
    ├── gzio.mod
    ├── halt.mod
    ├── hashsum.mod
    ├── hdparm.mod
    ├── hello.mod
    ├── help.mod
    ├── hexdump.mod
    ├── hfs.mod
    ├── hfspluscomp.mod
    ├── hfsplus.mod
    ├── http.mod
    ├── iorw.mod
    ├── iso9660.mod
    ├── jfs.mod
    ├── jpeg.mod
    ├── json.mod
    ├── keylayouts.mod
    ├── keystatus.mod
    ├── ldm.mod
    ├── legacycfg.mod
    ├── legacy_password_test.mod
    ├── linux16.mod
    ├── linuxefi.mod
    ├── linux.mod
    ├── loadbios.mod
    ├── load.cfg
    ├── loadenv.mod
    ├── loopback.mod
    ├── lsacpi.mod
    ├── lsefimmap.mod
    ├── lsefi.mod
    ├── lsefisystab.mod
    ├── lsmmap.mod
    ├── ls.mod
    ├── lspci.mod
    ├── lssal.mod
    ├── luks2.mod
    ├── luks.mod
    ├── lvm.mod
    ├── lzopio.mod
    ├── macbless.mod
    ├── macho.mod
    ├── mdraid09_be.mod
    ├── mdraid09.mod
    ├── mdraid1x.mod
    ├── memdisk.mod
    ├── memrw.mod
    ├── minicmd.mod
    ├── minix2_be.mod
    ├── minix2.mod
    ├── minix3_be.mod
    ├── minix3.mod
    ├── minix_be.mod
    ├── minix.mod
    ├── mmap.mod
    ├── moddep.lst
    ├── modinfo.sh
    ├── morse.mod
    ├── mpi.mod
    ├── msdospart.mod
    ├── mul_test.mod
    ├── multiboot2.mod
    ├── multiboot.mod
    ├── nativedisk.mod
    ├── net.mod
    ├── newc.mod
    ├── nilfs2.mod
    ├── normal.mod
    ├── ntfscomp.mod
    ├── ntfs.mod
    ├── odc.mod
    ├── offsetio.mod
    ├── ohci.mod
    ├── part_acorn.mod
    ├── part_amiga.mod
    ├── part_apple.mod
    ├── part_bsd.mod
    ├── part_dfly.mod
    ├── part_dvh.mod
    ├── part_gpt.mod
    ├── partmap.lst
    ├── part_msdos.mod
    ├── part_plan.mod
    ├── part_sun.mod
    ├── part_sunpc.mod
    ├── parttool.lst
    ├── parttool.mod
    ├── password.mod
    ├── password_pbkdf2.mod
    ├── pata.mod
    ├── pbkdf2.mod
    ├── pbkdf2_test.mod
    ├── pcidump.mod
    ├── pgp.mod
    ├── play.mod
    ├── png.mod
    ├── priority_queue.mod
    ├── probe.mod
    ├── procfs.mod
    ├── progress.mod
    ├── raid5rec.mod
    ├── raid6rec.mod
    ├── random.mod
    ├── rdmsr.mod
    ├── read.mod
    ├── reboot.mod
    ├── regexp.mod
    ├── reiserfs.mod
    ├── relocator.mod
    ├── romfs.mod
    ├── scsi.mod
    ├── search_fs_file.mod
    ├── search_fs_uuid.mod
    ├── search_label.mod
    ├── search.mod
    ├── serial.mod
    ├── setjmp.mod
    ├── setjmp_test.mod
    ├── setpci.mod
    ├── sfs.mod
    ├── shift_test.mod
    ├── signature_test.mod
    ├── sleep.mod
    ├── sleep_test.mod
    ├── smbios.mod
    ├── spkmodem.mod
    ├── squash4.mod
    ├── strtoull_test.mod
    ├── syslinuxcfg.mod
    ├── tar.mod
    ├── terminal.lst
    ├── terminal.mod
    ├── terminfo.mod
    ├── test_blockarg.mod
    ├── testload.mod
    ├── test.mod
    ├── testspeed.mod
    ├── tftp.mod
    ├── tga.mod
    ├── time.mod
    ├── tpm.mod
    ├── trig.mod
    ├── tr.mod
    ├── true.mod
    ├── udf.mod
    ├── ufs1_be.mod
    ├── ufs1.mod
    ├── ufs2.mod
    ├── uhci.mod
    ├── usb_keyboard.mod
    ├── usb.mod
    ├── usbms.mod
    ├── usbserial_common.mod
    ├── usbserial_ftdi.mod
    ├── usbserial_pl2303.mod
    ├── usbserial_usbdebug.mod
    ├── usbtest.mod
    ├── video_bochs.mod
    ├── video_cirrus.mod
    ├── video_colors.mod
    ├── video_fb.mod
    ├── videoinfo.mod
    ├── video.lst
    ├── video.mod
    ├── videotest_checksum.mod
    ├── videotest.mod
    ├── wrmsr.mod
    ├── xfs.mod
    ├── xnu.mod
    ├── xnu_uuid.mod
    ├── xnu_uuid_test.mod
    ├── xzio.mod
    ├── zfscrypt.mod
    ├── zfsinfo.mod
    ├── zfs.mod
    └── zstd.mod

3 directories, 285 files
$ sudo tree efi/
efi/
└── EFI
    ├── BOOT
    │   ├── BOOTX64.EFI
    │   ├── fbx64.efi
    │   └── mmx64.efi
    └── ubuntu
        ├── BOOTX64.CSV
        ├── grub.cfg
        ├── grubx64.efi
        ├── mmx64.efi
        └── shimx64.efi

3 directories, 8 files
$ sudo arch-chroot linux
$ apt install grub-common
$ echo "GRUB_DISABLE_OS_PROBER=true"  >> /etc/default/grub
qemu-system-x86_64 -hda ubuntu-efi-disk -m 4G
this GPT partition label contains no BIOS Boot Partition; embedding won't be possible,这里有着非常的详细的解释。而这个wiiki正是我这两天最需要阅读的部分。这个官方的称法是
BIOS-based boot
The BIOS boot partition is a partition on a data storage device that GNU GRUB uses on legacy BIOS-based personal computers in order to boot an operating system, when the actual boot device contains a GUID Partition Table (GPT). Such a layout is sometimes referred to as BIOS/GPT boot.这里解释了为什么GPT需要这个partition
A BIOS boot partition is needed on GPT-partitioned storage devices to hold the second stages of GRUB. On traditional MBR-partitioned devices, the disk sectors immediately following the first are usually unused, as the partitioning scheme does not designate them for any special purpose and partitioning tools avoid them for alignment purposes. On GPT-based devices, the sectors hold the actual partition table, necessitating the use of an extra partition. On MBR-partitioned disks, boot loaders are usually implemented so the portion of their code stored within the MBR, which cannot hold more than 512 bytes, operates as a first stage that serves primarily to load a more sophisticated second stage, which is, for example, capable of reading and loading an operating system kernel from a file system.简而言之,MBR不需要的原因就是它的loader必须是小于512可以放在MBR结构里的,而GPT则不同,因为兼容512-byte-MBR的后面是真正的partition table,GPT这就要求有额外的空间。
On MBR disks, such boot loaders typically use the sectors immediately following the MBR for this storage; that space is usually known as the "MBR gap". No equivalent unused space exists on GPT disks, and the BIOS boot partition is a way to officially allocate such space for use by the boot loader.所以,教训就是我必须要创建一个传统的dos disklabel?不能使用gpt。
Disk ubuntu-disk: 4.88 GiB, 5242880000 bytes, 10240000 sectors
Units: sectors of 1 * 512 = 512 bytes
Sector size (logical/physical): 512 bytes / 512 bytes
I/O size (minimum/optimal): 512 bytes / 512 bytes
Disklabel type: dos
Disk identifier: 0xed9152a5

Device       Boot Start      End  Sectors  Size Id Type
ubuntu-disk1 *     2048 10239999 10237952  4.9G 83 Linux
sudo losetup -Pf --show -o 1048576 ubuntu-disk
sudo losetup -Pf --show ubuntu-disk
nick@nick-sager:~/workspace/debootstrap$ ll /etc/mtab
lrwxrwxrwx 1 root root 19 Mar 31  2023 /etc/mtab -> ../proc/self/mounts
nick@nick-sager:~/workspace/debootstrap$ ll /proc/mounts
lrwxrwxrwx 1 root root 11 Apr  3 12:19 /proc/mounts -> self/mounts
strace -e trace=ioctl,mount mount -o loop /tmp/block.img /mnt/
gsettings set org.gnome.shell.extensions.dash-to-dock show-mounts false
四月十二日 等待变化等待机会
所以,我怀疑这个所谓的bootloader的区域压根就是存放二进制码根本就不需要文件系统,那么也无需创建,反正dos模式下就是紧挨着0 sector后面,那么对于GPT要明确一个partition,那么也是不需要文件系统来支持的。 那么EFI的分区是怎么样的呢?On an MSDOS partitioned disk, this location is typically stuck between partitions, not even in a filesystem.
On a GPT partitioned disk, there is no room to shoehorn in the rest of the bootloader between partitions, so an explicit place needs to be made for the code -- an unformatted small partition (1MB-2MB) with the BIOS-GRUB flag.
看来我可能是没有设定boot flag! 而这个最最基本的东西我十年前就在看还是老是忘记名词:To boot in UEFI mode (assuming that capability in the hardware exists), either partition type needs an EFI partition with 1)a FAT filesystem, 2)the boot flag and 3)the ESP (EFI System Partition) flag.
The two major partitioning types of PC disks, GPT and MSDOS may each be used in either of two modes, UEFI or BIOS/legacy. Ubuntu may be installed on either partitioning type in either mode, but Windows 8/10 in UEFI mode requires GPT partitioning, and in legacy mode MSDOS partitioning.两种分区方式GPT和DOS,启动模式也是两种UEFI还是BIOS/legacy,这样子共有四种组合,ubuntu都没有问题,但是win8/10却要求必须是(UEFI/GPT),(DOS/BIOS)的组合两种。
nick@nick-sager:~/workspace/debootstrap$ sudo fdisk -l /dev/nvme0n1
Disk /dev/nvme0n1: 1.82 TiB, 2000398934016 bytes, 3907029168 sectors
Disk model: WD Blue SN570 2TB
Units: sectors of 1 * 512 = 512 bytes
Sector size (logical/physical): 512 bytes / 512 bytes
I/O size (minimum/optimal): 512 bytes / 512 bytes
Disklabel type: gpt
Disk identifier: D107060B-0D72-4008-A966-22D0BE31C1FB

Device           Start        End    Sectors  Size Type
/dev/nvme0n1p1    2048    1050623    1048576  512M EFI System
/dev/nvme0n1p2 1050624 3907028991 3905978368  1.8T Linux filesystem
四月十三日 等待变化等待机会
LBA 0 (i.e., the first logical block) of the hard disk contains either
- a legacy Master Boot Record (MBR)
The MBR contains four partition records that each define the beginning and ending LBAs that a partition consumes on a disk.
Mnemonic Byte Offset Byte Length Description BootCode 0 424 x86 code used on a non-UEFI system to select an MBR partition record and load the first logical block of that partition . This code shall not be executed on UEFI systems. UniqueMBRDiskSignature 440 4 Unique Disk Signature This may be used by the OS to identify the disk from other disks in the system. This value is always written by the OS and is never written by EFI firmware. Unknown 444 2 Unknown. This field shall not be used by UEFI firmware. PartitionRecord 446 16*4 Array of four legacy MBR partition records ( Signature 510 2 Set to 0xAA55 (i.e., byte 510 contains 0x55 and byte 511 contains 0xAA). Reserved 512 Logical BlockSize - 512 The rest of the logical block, if any, is reserved.
Mnemonic Byte Offset Byte Length Description BootIndicator 0 1 0x80 indicates that this is the bootable legacy partition. Other values indicate that this is not a bootable legacy partition. This field shall not be used by UEFI firmware. StartingCHS 1 3 Start of partition in CHS address format. This field shall not be used by UEFI firmware. OSType 4 1 Type of partition.
- 0xEF (i.e., UEFI System Partition) defines a UEFI system partition.
- 0xEE (i.e., GPT Protective) is used by a protective MBR to define a fake partition covering the entire disk.
EndingCHS 5 3 End of partition in CHS address format. This field shall not be used by UEFI firmware. StartingLBA 8 4 Starting LBA of the partition on the disk. This field is used by UEFI firmware to determine the start of the partition. SizeInLBA 12 4 Size of the partition in LBA units of logical blocks. This field is used by UEFI firmware to determine the size of the partition. - or a protective MBR
这个是专门针对Protective MBR的partition record table的规定。
Mnemonic Byte Offset Byte Length Contents Boot Code 0 440 Unused by UEFI systems. 所以,这里可以放空,反正UEFI不看! Unique MBR Disk Signature 440 4 Unused. Set to zero Unknown 444 2 Unused. Set to zero. Partition Record 446 16*4 Array of four MBR partition records. Contains:
- one partition record as defined Partition Record Table; and
- three partition records each set to zero.
Signature 510 2 Set to 0xAA55 (i.e., byte 510 contains 0x55 and byte 511 contains 0xAA). Reserved 512 Logical Block Size - 512 The rest of the logical block, if any, is reserved. Set to zero.
Mnemonic Byte Offset Byte Length Description BootIndicator 0 1 Set to 0x00 to indicate a non-bootable partition. If set to any value other than 0x00 the behavior of this flag on non-UEFI systems is undefined. Must be ignored by UEFI implementations. StartingCHS 1 3 Set to 0x000200, corresponding to the Starting LBA field. OSType 4 1 Set to 0xEE (i.e., GPT Protective) EndingCHS 5 3 Set to the CHS address of the last logical block on the disk. Set to 0xFFFFFF if it is not possible to represent the value in this field. StartingLBA 8 4 Set to 0x00000001 (i.e., the LBA of the GPT Partition Header). SizeInLBA 12 4 Set to the size of the disk minus one. Set to 0xFFFFFFFF if the size of the disk is too large to be represented in this field.
nick@nick-sager:~/workspace/debootstrap$ xxd -d -s 446 -l 16 ubuntu-efi-disk
00000446: 0000 0200 eeff ffff 0100 0000 ff3f 9c00  .............?..
所以,如果不读原始文献我差点上当了,因为这里的解释差点让我误以为应该是EF而不是EE,现在看来EE是更加的合适。
- ee Indication that this legacy MBR is followed by an EFI header
- ef Partition that contains an EFI file system
Bob Griswold (
rogris@Exchange.Microsoft.com) writes: MS plans on using EE and EF in the future for support of non-legacy BIOS booting. Mark Doran (mark.doran@intel.com) adds: these types are used to support the Extensible Firmware Interface specification (EFI); go to developer.intel.com and search for EFI. (For the types ee and ef, see Tables 16-6 and 16-7 of the EFI specification, EFISpec_091.pdf.)
protective MBR呢?就是说GPT的规范压根儿就把第一个sector也就是MBR部分留空了,这个是fdisk的说明部分
Note that the first sector is still reserved for a protective MBR in the GPT specification. It prevents MBR-only partitioning tools from mis-recognizing and overwriting GPT disks.所以,当我看到fdisk打出的
DISK LABEL如果是GPT就意味着MBR不应当被检查。其实,任何人都应该毫无困难的熟悉MBR的结构,因为就是一句话的事情:
the structure of the MBR (Master Boot Record, sector 0) is as follows: First 446 bytes boot loader code, then 64 bytes partition table (starting at offset 0x1be = 446), finally 2 bytes signature 0xaa55.这里有各种各样的关于磁盘尺寸的限制的问题,我实在是没有心思看了,因为这些都是BIOS的问题吧?ATA/IDE磁盘我早都扔光了吧?
CSM boot requires a hard disk with MBR partition type, while UEFI boot mode requires a disk with the GPT partition table.不过看起来这个似乎是不可能的,就是说如果我使用了GPT,那么CSM(Compatibility Support Module)应该是不可能吧?
An EFI system partition, often abbreviated to ESP, is a data storage device partition that is used in computers adhering to the UEFI specification. Accessed by the UEFI firmware when a computer is powered up, it stores UEFI applications and the files these applications need to run, including operating system boot loaders. Supported partition table schemes include MBR and GPT, as well as El Torito volumes on optical discs. For use on ESPs, UEFI defines a specific version of the FAT file system, which is maintained as part of the UEFI specification and independently from the original FAT specification, encompassing the FAT32, FAT16 and FAT12 file systems. The ESP also provides space for a boot sector as part of the backward BIOS compatibility.谁说UEFI不支持MBR?当然这个具体内涵是什么现在还不清楚。
Unlike the legacy PC BIOS, UEFI does not rely on boot sectors, defining instead a boot manager as part of the UEFI specification. When a computer is powered on, the boot manager checks the boot configuration and, based on its settings, then executes the specified OS boot loader or operating system kernel (usually boot loader). The boot configuration is defined by variables stored in NVRAM, including variables that indicate the file system paths to OS loaders or OS kernels.我觉得接下来是关键:这里要求OS boot loader必须明确的被定义,在
x86-64 system is \efi\boot\bootx64.efi,就是说这个是写死的,或者是默认的。
Booting UEFI systems from GPT-partitioned disks is commonly called UEFI-GPT booting. Despite the fact that the UEFI specification requires MBR partition tables to be fully supported, some UEFI firmware implementations immediately switch to the BIOS-based CSM booting depending on the type of boot disk's partition table, effectively preventing UEFI booting to be performed from EFI System Partition on MBR-partitioned disks. Such a boot scheme is commonly called UEFI-MBR.这个也许就是微软为什么强调windows只支持UEFI-GPT或者BIOS-MBR的原因,如果分区是MBR,而且你也设置了EFI system partition,可是因为CSM模块设计就是要支持BIOS-MBR的启动,结果自然是直接就呼叫了BIOS-MBR的启动了,根本不看是否存在 EFI system partition。到这里我算是初步明白为什么grub-efi对于MBR放空不写的原因了,就是不要给CSM机会,虽然这个可能性只是存在于BIOS-MBR,照例说UEFI-GPT应该是不可能调用CSM的。
dd if=/dev/zero of=ubuntu-efi-disk bs=1 count=512
grub-install: error: cannot find a GRUB drive for /dev/loop5p1. Check your device.map.,这里让我意识到我可以使用grub-mkdevicemap,但是查看之后
root@nick-sager:/# cat /boot/grub/device.map
(hd0)	/dev/disk/by-id/nvme-WD_Blue_SN570_2TB_23032A802561
(hd1)	/dev/disk/by-id/nvme-Fanxiang_S770M_4TB_FX232640342
root@nick-sager:/# cat /boot/grub/device.map
(hd0)	/dev/loop5
nick@nick-sager:~/workspace/debootstrap$ xxd -d -s 446 -l 16 ubuntu-efi-disk
00000446: 0000 0200 eeff ffff 0100 0000 07f0 8e00  ................
nick@nick-sager:~/workspace/debootstrap$ xxd -d -s 446 -l 16 ubuntu-efi-disk
00000446: 0000 0200 eeff ffff 0100 0000 ff3f 9c00  .............?..
root@nick-sager:/# cat /boot/grub/device.map
(hd0)	/dev/loop5p1
(hd1)	/dev/loop5p2
四月十四日 等待变化等待机会
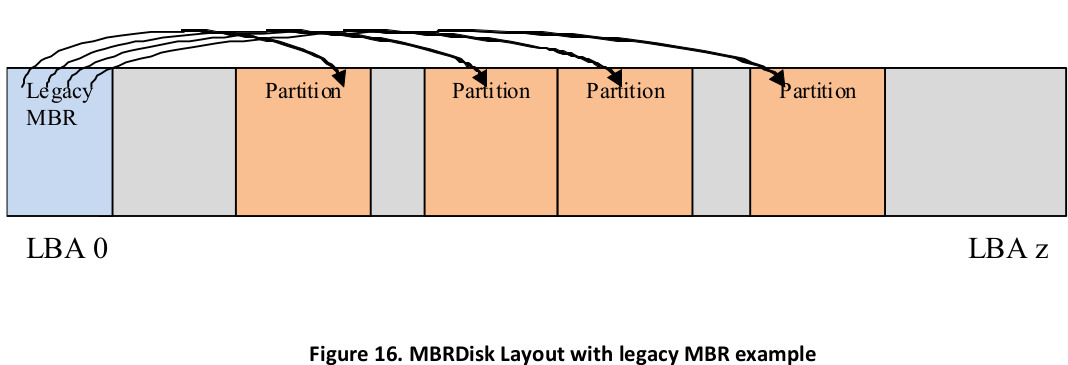
Two GPT Header structures are stored on the device: the primary and the backup. The primary GPT Header must be located in LBA 1 (i.e., the second logical block), and the backup GPT Header must be located in the last LBA of the device.一头一尾两个就限制死了整个磁盘空间了。
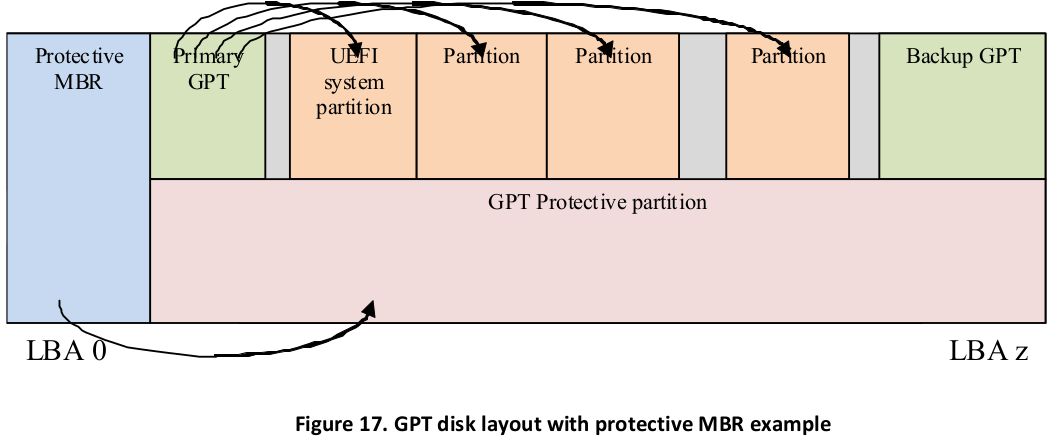 关于GPT partition table其实也就是比较容易理解了,GPT表确实有点大,因为单单一个partition entry array就至少要16k,就是32个LBA(assume 512byte/LBA)
The primary GPT Partition Entry Array must be located after the primary GPT Header and end before the First Usable LBA. The backup GPT Partition Entry Array must be located after the Last Usable LBA and end before the backup GPT Header....A minimum of 16,384 bytes of space must be reserved for the GPT Partition Entry Array.
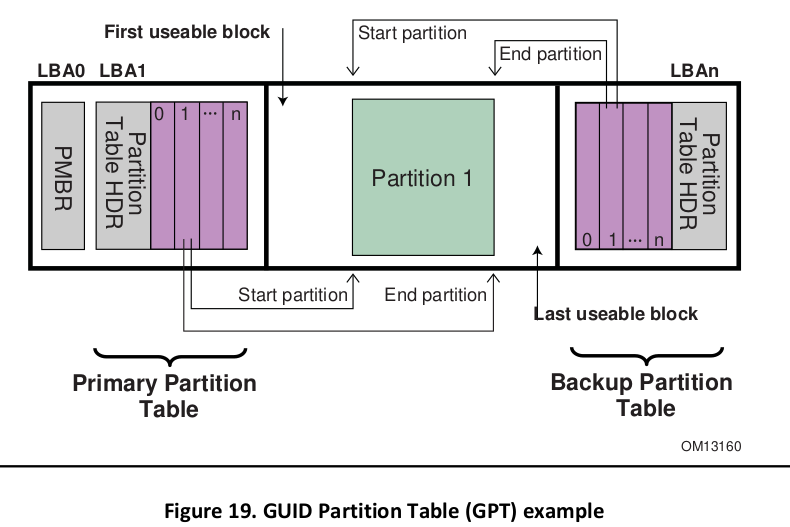 所以,这里的34就明白怎么来的吧?
If the block size is 512, the First Usable LBA must be greater than or equal to 34 (allowing 1 block for the Protective MBR, 1 block for the Partition Table Header, and 32 blocks for the GPT Partition Entry Array); if the logical block size is 4096, the First Useable LBA must be greater than or equal to 6 (allowing 1 block for the Protective MBR, 1 block for the GPT Header, and 4 blocks for the GPT Partition Entry Array).这个让我想起来当年使用IPMI破解quanta的电源设备驱动dump出来的磁盘文件就是类似这个结构,就是说一个GPT的头部34k就是这么来的。 其实磁盘或者其他存储设备相当的复杂,因为物理的存储单元和逻辑的存储单元大小不是总是匹配的,因此分区要去对齐物理存储单元,这里还有所谓的SCSI设 备的传输最小单元(optimal transfer length granularity),这些对齐的细节我就懒得了解了。 这里是GPT头的结构,摘抄一下吧。
| Mnemonic | Byte Offset | Byte Length | Description |
|---|---|---|---|
| Signature | 0 | 8 | Identifies EFI-compatible partition table header. This value must contain the ASCII string “EFI PART”, encoded as the 64-bit constant 0x5452415020494645. |
| Revision | 8 | 4 | The revision number for this header. This revision value is not related to the UEFI Specification version. This header is version 1.0, so the correct value is 0x00010000. |
| HeaderSize | 12 | 4 | Size in bytes of the GPT Header. The HeaderSize must be greater than or equal to 92 and must be less than or equal to the logical block size. |
| HeaderCRC32 | 16 | 4 | CRC32 checksum for the GPT Header structure. This value is computed by setting this field to 0, and computing the 32-bit CRC for HeaderSize bytes. |
| Reserved | 20 | 4 | Must be zero. |
| MyLBA | 24 | 8 | The LBA that contains this data structure. |
| AlternateLBA | 32 | 8 | LBA address of the alternate GPT Header. |
| FirstUsableLBA | 40 | 8 | The first usable logical block that may be used by a partition described by a GUID Partition Entry. |
| DiskGUID | 56 | 16 | GUID that can be used to uniquely identify the disk. |
| PartitionEntryLBA | 72 | 8 | The starting LBA of the GUID Partition Entry array. |
| NumberOfPartitionEntries | 80 | 4 | The number of Partition Entries in the GUID Partition Entry array. |
| SizeOfPartitionEntry | 84 | 4 | The size, in bytes, of each the GUID Partition Entry structures in the GUID Partition Entry array. This field shall be set to a value of 128 x 2n where n is an integer greater than or equal to zero (e.g., 128, 256, 512, etc.). NOTE: Previous versions of this specification allowed any multiple of 8.. |
| PartitionEntryArrayCRC32 | 88 | 4 | The CRC32 of the GUID Partition Entry array. Starts at PartitionEntryLBA and is computed over a byte length of NumberOfPartitionEntries * SizeOfPartitionEntry. |
| Reserved | 92 | BlockSize – 92 | The rest of the block is reserved by UEFI and must be zero. |
nick@nick-sager:~/workspace/debootstrap$ od -j 512 -Ad -t x4  -N8 ubuntu-efi-disk
0000512 20494645 54524150
0000520
nick@nick-sager:~/workspace/debootstrap$ xxd -e -g8 -d -s 512 -l8 ubuntu-efi-disk
00000512: 5452415020494645                   EFI PART
nick@nick-sager:~/workspace/debootstrap$ xxd -e -g4 -d -s 520 -l4 ubuntu-efi-disk
00000520: 00010000                             ....
nick@nick-sager:~/workspace/debootstrap$ xxd -d -g1 -s 520 -l4 ubuntu-efi-disk
00000520: 00 00 01 00                                      ....
nick@nick-sager:~/workspace/debootstrap$ xxd -u -e -d -g4 -s 524 -l4 ubuntu-efi-disk
00000524: 0000005C                             \...
nick@nick-sager:~/workspace/debootstrap$ xxd -u -e -d -g8 -s 536 -l8 ubuntu-efi-disk
00000536: 0000000000000001                   ........
nick@nick-sager:~/workspace/debootstrap$ xxd -u -e -d -g8 -s 552 -l8 ubuntu-efi-disk
00000552: 0000000000000800                   ........
nick@nick-sager:~/workspace/debootstrap$ xxd -u -e -d -g8 -s 560 -l8 ubuntu-efi-disk
00000560: 00000000009C3FDE                   .?......
typedef struct _GUID {
  unsigned long  Data1;
  unsigned short Data2;
  unsigned short Data3;
  unsigned char  Data4[8];
} GUID;
Disk identifier (GUID): 5B513127-16FE-B34D-A5EF-B1996CE64DCD所以,这个显示的是byte order。
nick@nick-sager:~/workspace/debootstrap$ xxd -u  -d -g1 -s 568 -l16 ubuntu-efi-disk
00000568: 27 31 51 5B FE 16 4D B3 A5 EF B1 99 6C E6 4D CD  '1Q[..M.....l.M.
nick@nick-sager:~/workspace/debootstrap$ xxd -u -e -d -g8 -s 584 -l8 ubuntu-efi-disk
00000584: 0000000000000002                   ........
nick@nick-sager:~/workspace/debootstrap$ xxd -u -e -d -g4 -s 592 -l4 ubuntu-efi-disk
00000592: 00000080
nick@nick-sager:~/workspace/debootstrap$ xxd -u -e -d -g4 -s 596 -l4 ubuntu-efi-disk
00000596: 00000080
nick@nick-sager:~/workspace/debootstrap$ xxd -u -e -d -g4 -s 600 -l4 ubuntu-efi-disk
00000600: A448F277                             w.H.
nick@nick-sager:~/workspace/debootstrap$ xxd -u -e -d -g8 -s 552 -l8 ubuntu-efi-disk
00000552: 0000000000000022                   ".......
| Mnemonic | Byte Offset | Byte Length | Description |
|---|---|---|---|
| PartitionTypeGUID | 0 | 16 | Unique ID that defines the purpose and type of this Partition. A value of zero defines that this partition entry is not being used. 这个不是分区自己的GUID而是类型的GUID,比如EFI system partition类型的GUID就是C12A7328-F81F-11D2-BA4B-00A0C93EC93B (EFI system partition)。这个都是固定的。 |
| UniquePartitionGUID | 16 | 16 | GUID that is unique for every partition entry. Every partition ever
created will have a unique GUID. This GUID must be assigned when the GPT
Partition Entry is created. The GPT Partition Entry is created whenever
the NumberOfPartitionEntrie s in the GPT Header is increased to include
a larger range of addresses.
这个是真正的分区自己的GUID
|
| StartingLBA | 32 | 8 | Starting LBA of the partition defined by this entry.
|
| EndingLBA | 40 | 8 | Ending LBA of the partition defined by this entry.
|
| Attributes | 48 | 8 | Attribute bits, all bits reserved by UEFI
我重新安装grub之后,让我们看看EFI system partition的性质有没有变化
|
| Bits | Name | Description |
|---|---|---|
| Bit 0 | Required Partition | If this bit is set, the partition is required for the platform to function. The owner/creator of the partition indicates that deletion or modification of the contents can result in loss of platform features or failure for the platform to boot or operate. The system cannot function normally if this partition is removed, and it should be considered part of the hardware of the system. Actions such as running diagnostics, system recovery, or even OS install or boot could potentially stop working if this partition is removed. Unless OS software or firmware recognizes this partition, it should never be removed or modified as the UEFI firmware or platform hardware may become non-functional. |
| Bit 1 | No Block IO Protocol | If this bit is set, then firmware must not produce an EFI_BLOCK_IO_PROTOCOL device for this partition. See Section 13.3.2 for more details. By not producing an EFI_BLOCK_IO_PROTOCOL partition, file system mappings will not be created for this partition in UEFI. |
| Bit 2 | Legacy BIOS Bootable | This bit is set aside by this specification to let systems with traditional PC-AT BIOS firmware implementations inform certain limited, special-purpose software running on these systems that a GPT partition may be bootable. For systems with firmware implementations conforming to this specification, the UEFI boot manager (see chapter 3) must ignore this bit when selecting a UEFI-compliant application, e.g., an OS loader (see 2.1.3). Therefore there is no need for this specification to define the exact meaning of this bit. |
| Bits 3-47 | Undefined and must be zero. Reserved for expansion by future versions of the UEFI specification. | |
| Bits 48-63 | Reserved for GUID specific use. The use of these bits will vary depending on the PartitionTypeGUID. Only the owner of the PartitionTypeGUID is allowed to modify these bits. They must be preserved if Bits 0–47 are modified. |
nick@nick-sager:~/workspace/debootstrap$ sudo cat /boot/efi/EFI/ubuntu/grub.cfg
search.fs_uuid 92d635c6-8ab6-4bfb-8d12-2836774e77c5 root
set prefix=($root)'/boot/grub'
configfile $prefix/grub.cfg
nick@nick-sager:~/workspace/debootstrap$ sudo blkid  /dev/nvme0n1p2
/dev/nvme0n1p2: UUID="92d635c6-8ab6-4bfb-8d12-2836774e77c5" BLOCK_SIZE="4096" TYPE="ext4" PARTUUID="1cdd8b75-0e3f-4f9d-ad6d-785f38484626"
The first block (sector) of a partition contains a data structure called the BIOS Parameter Block (BPB) that defines the type and location of FAT file system on the drive. The BPB contains a data structure that defines the size of the media, the size of reserved space, the number of FAT tables, and the location and size of the root directory (not used in FAT32). The first block (sector) also contains code that will be executed as part of the boot process on a legacy system. This code in the first block (sector) usually contains code that can read a file from the root directory into memory and transfer control to it. Since EFI firmware contains a file system driver, EFI firmware can load any file from the file system with out needing to execute any code from the media.这里是BPB 这个表是我需要了解的。
| Sector offset | BPB offset | Field length | Description |
|---|---|---|---|
0x00B |
0x00 |
25 BYTEs | DOS 3.31 BPB |
0x024 |
0x19 |
DWORD | Logical sectors per FAT |
0x028 |
0x1D |
WORD | Mirroring flags etc. |
0x02A |
0x1F |
WORD | Version |
0x02C |
0x21 |
DWORD | Root directory cluster |
0x030 |
0x25 |
WORD | Location of FS Information Sector |
0x032 |
0x27 |
WORD | Location of backup sector(s) |
0x034 |
0x29 |
12 BYTEs | Reserved (Boot file name) |
0x040 |
0x35 |
BYTE | Physical drive number |
0x041 |
0x36 |
BYTE | Flags etc. |
0x042 |
0x37 |
BYTE | Extended boot signature (0x29)
|
0x043 |
0x38 |
DWORD | Volume serial number |
0x047 |
0x3C |
11 BYTEs | Volume label |
0x052 |
0x47 |
8 BYTEs | File-system type |
| Sector offset | BPB offset | Field length | Description |
|---|---|---|---|
0x00B |
0x00 |
WORD | Bytes per logical sector |
0x00D |
0x02 |
BYTE | Logical sectors per cluster |
0x00E |
0x03 |
WORD | Reserved logical sectors |
0x010 |
0x05 |
BYTE | Number of FATs |
0x011 |
0x06 |
WORD | Root directory entries |
0x013 |
0x08 |
WORD | Total logical sectors |
0x015 |
0x0A |
BYTE | Media descriptor |
0x016 |
0x0B |
WORD | Logical sectors per FAT |
| Sector offset | BPB offset | Field length | Description |
|---|---|---|---|
0x00B |
0x00 |
13 BYTEs | DOS 2.0 BPB |
0x018 |
0x0D |
WORD | Physical sectors per track (identical to DOS 3.0 BPB) |
0x01A |
0x0F |
WORD | Number of heads (identical to DOS 3.0 BPB) |
0x01C |
0x11 |
DWORD | Hidden sectors (incompatible with DOS 3.0 BPB) |
0x020 |
0x15 |
DWORD | Large total logical sectors |
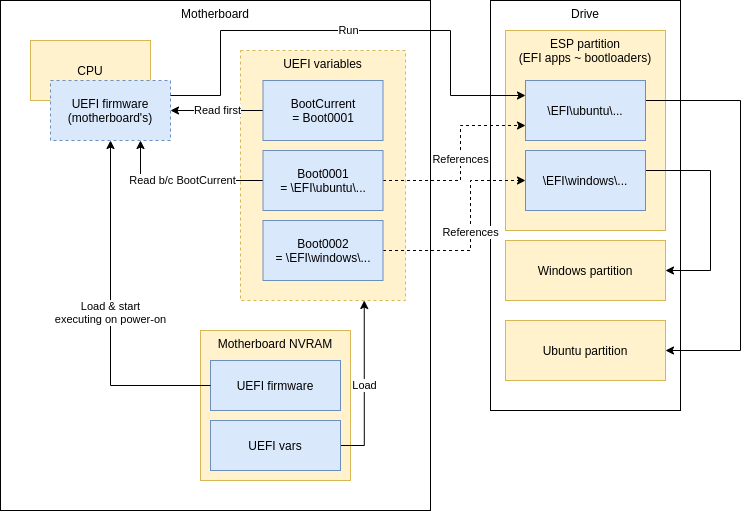 远比我想象的复杂,因为如何建立EFI-var这个就是一个大的问题。我当然不想搞乱我自己的系统吧!休息一下啊。
四月十六日 等待变化等待机会
qemu-system-x86_64 -drive if=pflash,format=raw,file=./OVMF_CODE_4M.fd -hda ubuntu-efi-disk -m 4G
四月十七日 等待变化等待机会
qemu-system-x86_64 -drive if=pflash,format=raw,file=./OVMF_CODE_4M.fd -drive if=pflash,format=raw,file=OVMF_VARS_4M.fd -hda ubuntu-efi-disk -m 4G -netdev user,id=mynet0,net=192.168.76.0/24,dhcpstart=192.168.76.9 -net nic,macaddr=52:54:00:12:34:56
root@nick-sager:/boot/grub# cat /etc/systemd/network/ethernet.network
[Match]
Name=enp0s3

[Network]
DHCP=yes
四月十九日 等待变化等待机会
这个真的是提纲契领的精辟啊!两个问题一个是虚拟硬件,一个是怎么提供数据包!There are two parts to networking within QEMU:
- the virtual network device that is provided to the guest (e.g. a PCI network card).
- the network backend that interacts with the emulated NIC (e.g. puts packets onto the host's network).
There are a range of options for each part. By default QEMU will create a SLiRP user network backend and an appropriate virtual network device for the guest (eg an E1000 PCI card for most x86 PC guests), as if you had typed -net nic -net user on your command line.
Note - if you specify any networking options on the command line (via -net or -netdev) then QEMU will require you to provide options sufficient to define and connect up both parts.这一点也是非常的关键,就是说两者缺一不可,而且一定要一一对应起来,如同两条腿走路一样必须都提供才行。
Note - if you are using the (default) SLiRP user networking, then ping (ICMP) will not work, though TCP and UDP will. Don't try to use ping to test your QEMU network configuration!这一点应该是大多数初学者都会犯的错误,就是不能期待用ping来测试。
我首先快速浏览发现这个图非常的说明问题,真是一图顶千言啊!
- QEMU Networking on wikibooks.org, mainly dealing with Linux hosts
- QEMU Networking on bsdwiki, showing used networking principles and dealing with BSD hosts
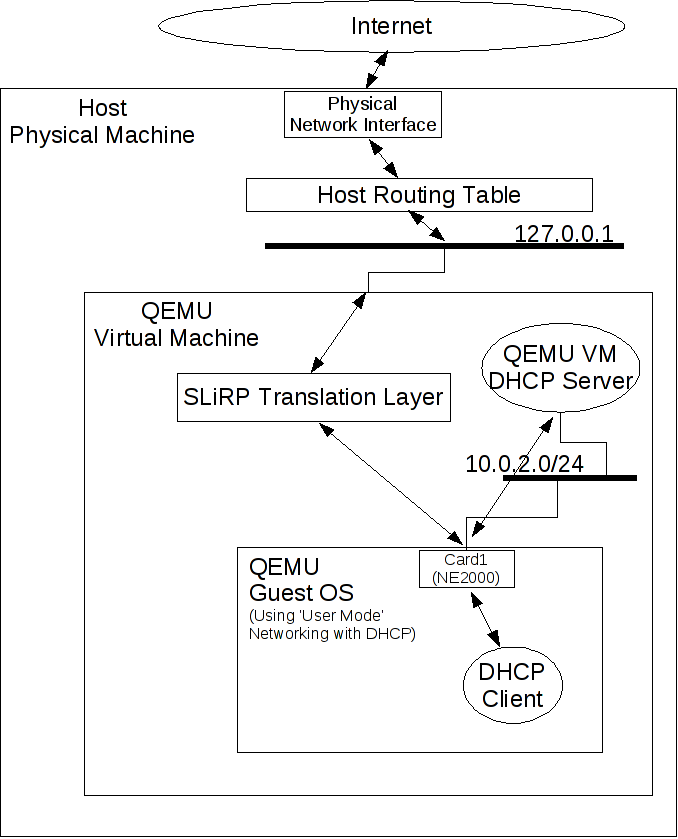
1 User Mode Networking – In this mode, the QEMU virtual machine automatically starts up an internal DHCP server on an internal networkaddress -10.0.2.2/24. This is internal to the guest environment and is not visible from the host environment. If the guest OS is set up for DHCP, the guest will get an IP address from this internal DHCP server. The QEMU virtual machine will also gateway packets onto the host network through 127.0.0.1. In this way, QEMU can provide an automatic network environment for the QEMU user without any manual configuration.所以,一个最最简单的user模式包含了多少的细节啊,每一句每一个字都值得我反复理解!
  C.UTF-8... done
  en_US.UTF-8... done
  zh_CN.UTF-8... done
WARNING: Image format was not specified for 'ubuntu-efi-disk' and probing guessed raw.
         Automatically detecting the format is dangerous for raw images, write operations on block 0 will be restricted.
         Specify the 'raw' format explicitly to remove the restrictions.
qemu-system-x86_64 -bios /usr/share/ovmf/OVMF.fd -drive format=raw,file=ubuntu-efi-disk -m 4G
        search --no-floppy --fs-uuid --set=root 98a1016c-7d13-4b2b-8db9-98e9ec541a69
        linux   /boot/vmlinuz-5.15.0-25-generic root=UUID=98a1016c-7d13-4b2b-8db9-98e9ec541a69 ro quiet splash $vt_handoff
        initrd  /boot/initrd.img-5.15.0-25-generic
sudo losetup --show -Pf ubuntu-efi-disk
dev=$(losetup -l | grep ubuntu-efi-disk | cut -d' ' -f1)
sudo mkfs.ext4 ${dev}p2
The guest OS will see an E1000 NIC with a virtual DHCP server on 10.0.2.2 and will be allocated an address starting from 10.0.2.15. A virtual DNS server will be accessible on 10.0.2.3, and a virtual SAMBA file server (if present) will be accessible on 10.0.2.4 allowing you to access files on the host via SAMBA file shares.我其实早就看到这个图,但是始终没有理解。你从host是不能简单的ping这些ip,但是在虚拟机上是可以自由访问所有的ip的,因为DNS在 10.0.2.3是做了解析的,这个怎么做到的,我不知道,肯定不是简单的在host操作系统层级,应该是qemu-system做了某种映射吧?总而言 之,从guest是可以访问外界的。比如你可以直接在虚拟机里ping www.baidu.com,这不就够了吗?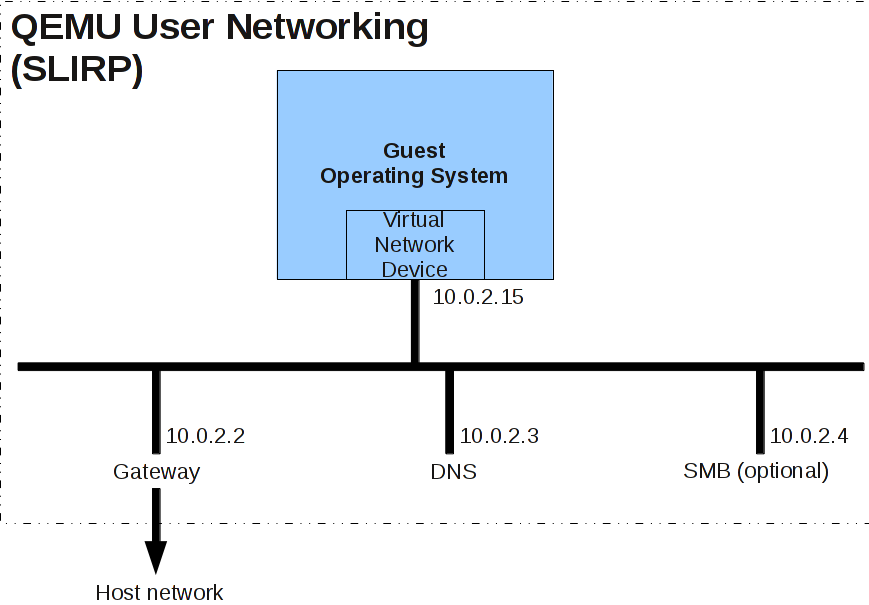
虚拟机里的命令并不仅仅限于虚拟机,而是整个我的host machine!因为我在虚拟机里的关机居然直接把我的笔记本给shutdown了。
所以,这个更像是boot-order参数。
parameter description a,b stand for the floppy drives 1 and 2 c stands for the first hard disk d stands for the first CD-ROM drive n stand for Ether-boot network adapters For example,
qemu-system-ARCH [...] -boot order=ndcfirst tries to boot from network, then from the first CD-ROM drive, and finally from the first hard disk.
qemu-system-x86_64 -bios /usr/share/ovmf/OVMF.fd -drive format=raw,file=ubuntu-efi-disk -m 4G -netdev user,id=network0,hostfwd=tcp::5555-:22 -device e1000,netdev=network0,mac=52:54:00:12:34:56
EFI stub feature in Linux means that the kernel image looks like an EFI application, so the kernel can be directly loaded without a separate bootloader - skipping GRUB (the most popular bootloader for Linux).这个我记得之前只能是在BIOS里的EFI菜单里才能做到,那么也就是说linux kernel遵循了EFI的spec实现了EFI的那些回调函数,然后存储了启动参数?但是这些本来是在ESP的efi的binary才。。。?我还是不 理解。我的理解是BIOS厂商遵循EFI规范允许你存储这些参数在NVRAM里,也就是意味着kernel要能够写这些参数,当然这个是在EFI的接口对 应下。。。
$ sudo gdisk -l /dev/sda
Partition table scan:
  MBR: protective
  BSD: not present
  APM: not present
  GPT: present

Found valid GPT with protective MBR; using GPT.
Disk /dev/sda: 10240000 sectors, 4.9 GiB
Model: QEMU HARDDISK
Sector size (logical/physical): 512/512 bytes
Disk identifier (GUID): 5B513127-16FE-B34D-A5EF-B1996CE64DCD
Partition table holds up to 128 entries
Main partition table begins at sector 2 and ends at sector 33
First usable sector is 34, last usable sector is 10239966
Partitions will be aligned on 128-sector boundaries
Total free space is 94 sectors (47.0 KiB)

Number  Start (sector)    End (sector)  Size       Code  Name
   1             128         1050623   512.9 MiB   EF00  EFI system partition
   2         1050624        10239966   4.4 GiB     8300  Linux
sudo mount /dev/sda1 /boot/efi
EFI_VARS_DIR=/sys/firmware/efi/efivars
EFI_GLOBAL_VARIABLE=8be4df61-93ca-11d2-aa0d-00e098032b8c
OS_INDICATIONS="$EFI_VARS_DIR/OsIndicationsSupported-$EFI_GLOBAL_VARIABLE"

if [ -e "$OS_INDICATIONS" ] && \
   [ "$(( $(printf 0x%x \'"$(cat $OS_INDICATIONS | cut -b5)"\') & 1 ))" = 1 ]; then
  LABEL="UEFI Firmware Settings"
nick@nick-sager:/sys/firmware/efi/efivars$ xxd OsIndicationsSupported-8be4df61-93ca-11d2-aa0d-00e098032b8c
00000000: 0600 0000 7f00 0000 0000 0000            ............
nick@nick-sager:/sys/firmware/efi/efivars$ xxd -d -s64 -g1 Boot0000-8be4df61-93ca-11d2-aa0d-00e098032b8c
00000064: 02 02 04 04 34 00 5c 00 45 00 46 00 49 00 5c 00  ....4.\.E.F.I.\.
00000080: 75 00 62 00 75 00 6e 00 74 00 75 00 5c 00 73 00  u.b.u.n.t.u.\.s.
00000096: 68 00 69 00 6d 00 78 00 36 00 34 00 2e 00 65 00  h.i.m.x.6.4...e.
00000112: 66 00 69 00 00 00 7f ff 04 00 52 43              f.i.......RC
nick@nick-sager:/sys/firmware/efi/efivars$ xxd -d -g1 Boot2001-8be4df61-93ca-11d2-aa0d-00e098032b8c
00000000: 07 00 00 00 01 00 00 00 04 00 45 00 46 00 49 00  ..........E.F.I.
00000016: 20 00 55 00 53 00 42 00 20 00 44 00 65 00 76 00   .U.S.B. .D.e.v.
00000032: 69 00 63 00 65 00 00 00 7f ff 04 00 52 43        i.c.e.......RC
nick@nick-sager:/sys/firmware/efi/efivars$ xxd -d -g1 Boot2002-8be4df61-93ca-11d2-aa0d-00e098032b8c
00000000: 07 00 00 00 01 00 00 00 04 00 45 00 46 00 49 00  ..........E.F.I.
00000016: 20 00 44 00 56 00 44 00 2f 00 43 00 44 00 52 00   .D.V.D./.C.D.R.
00000032: 4f 00 4d 00 00 00 7f ff 04 00 52 43              O.M.......RC
nick@nick-sager:/sys/firmware/efi/efivars$ xxd -d -g1 Boot2003-8be4df61-93ca-11d2-aa0d-00e098032b8c
00000000: 07 00 00 00 01 00 00 00 04 00 45 00 46 00 49 00  ..........E.F.I.
00000016: 20 00 4e 00 65 00 74 00 77 00 6f 00 72 00 6b 00   .N.e.t.w.o.r.k.
00000032: 00 00 7f ff 04 00 52 43                          ......RC
nick@nick-sager:/sys/firmware/efi/efivars$ xxd -d -g1 BootCurrent-8be4df61-93ca-11d2-aa0d-00e098032b8c
00000000: 06 00 00 00 00 00                                ......
nick@nick-sager:/sys/firmware/efi/efivars$ xxd -d -g1 BootOrder-8be4df61-93ca-11d2-aa0d-00e098032b8c
00000000: 07 00 00 00 00 00 01 20 02 20 03 20              ....... . .
总而言之,是和secure boot有关,这个领域就太复杂了,我连碰都不敢碰! 这里给出了权威的解释,不用瞎猜了。Typically,
EFI/ubuntu/grubx64.efion the EFI System Partition (ESP) is the GRUB binary, andEFI/ubuntu/shimx64.efiis the binary for shim. The latter is a relatively simple program that provides a way to boot on a computer with Secure Boot active. On such a computer, an unsigned version of GRUB won't launch, and signing GRUB with Microsoft's keys is impossible, so shim bridges the gap and adds its own security tools that parallel those of Secure Boot. In practice, shim registers itself with the firmware and then launches a program calledgrubx64.efiin the directory from which it was launched, so on a computer without Secure Boot (such as a Mac), launchingshimx64.efiis just like launchinggrubx64.efi. On a computer with Secure Boot active, launchingshimx64.efishould result in GRUB starting up, whereas launchinggrubx64.efidirectly probably won't work.Note that there's some ambiguity possible. In particular, if you want to use a boot manager or boot loader other than GRUB in a Secure Boot environment with shim, you must call that program
grubx64.efi, even though it's not GRUB. Thus, if you were to install rEFInd on a Secure Boot-enabled computer,grubx64.eficould be the rEFInd binary. This binary would probably not reside inEFI/ubuntu, though; both it and a shim binary would probably go inEFI/refind. Also, as you've got a Mac (which doesn't support Secure Boot), there's no need to install rEFInd in this way; it makes much more sense to install rEFInd asEFI/refind/refind_x64.efi(its default location and name).Note that the rEFInd documentation includes a whole page on Secure Boot. Chances are you won't benefit from reading it, user190735, since you're using a Mac. I mention it only in case some other reader comes along who's trying to use rEFInd in conjunction with Secure Boot.
	This directory exposes interfaces for interactive with
	EFI variables.  For more information on EFI variables,
	see 'Variable Services' in the UEFI specification
	(section 7.2 in specification version 2.3 Errata D).

	In summary, EFI variables are named, and are classified
	into separate namespaces through the use of a vendor
	GUID.  They also have an arbitrary binary value
	associated with them.
nick@nick-sager:/etc/grub.d$ locate fwsetup
/boot/grub/x86_64-efi/efifwsetup.mod
/home/nick/Downloads/coreboot/payloads/external/GRUB2/grub2/grub-core/commands/efi/efifwsetup.c
/usr/lib/grub/x86_64-efi/efifwsetup.mod
的确这个是grub的内部命令fwsetup (or firmware-setup) is an option to tell the computer to boot the manufacturer BIOS after the reboot (or to boot directly to manufacturer BIOS if this option is triggered by GRUB).
On a computer using systemctl you can trigger this option with the command
systemctl reboot --firmware-setup
17.4.29 fwsetup
四月二十日 等待变化等待机会
四月二十二日 等待变化等待机会
TUN/TAP provides packet reception and transmission for user space programs. It can be seen as a simple Point-to-Point or Ethernet device, which, instead of receiving packets from physical media, receives them from user space program and instead of sending packets via physical media writes them to the user space program.事实上我目前使用的openvpn本质上也是一个TUN设备。
In order to use the driver a program has to open /dev/net/tun and issue a corresponding ioctl() to register a network device with the kernel. A network device will appear as tunXX or tapXX, depending on the options chosen. When the program closes the file descriptor, the network device and all corresponding routes will disappear.到底是tun还是tap的选项是什么呢?下面有详细的解说。核心就是要先有/dev/net/tun这个设备文件,
Depending on the type of device chosen the userspace program has to read/write IP packets (with tun) or ethernet frames (with tap). Which one is being used depends on the flags given with the ioctl().tun是IP packet,而tap是ethernet frame。
 为了迅速理解,看看这个FAQ是值得的。不过很显然的这是来自同一个作者,大侠没有时间去写冗长的文档,基本上是同样的。因为大侠不会把时间浪费给专栏作家也能看懂的FAQ上,主要精力都在具体的例子里,只有真正的实践者才需要精准的指导,而对于浅尝辄止的随意浏览者是不值得浪费时间的。
bridge它可以把不同桥段的主机自由的连接,而这一点在虚拟化里至关重要。所以,我需要掌握。但是很显然的,这个是一个非常古老的项目,也就是非常的成熟的,没有那么多的人在热衷于维护了。也许有其他的选择? 或者从高度抽象的角度来看,其实它是非常简单的想法,你创建一个设备,赋予它普通用户能够访问的权限,对它进行读写,而背后的内核代码可以根据设置压缩加密转发给另一个指定目的的设备,说白了就是一个程序,而在用户眼里似乎就是一个设备。确实也没有多少需要解释的。
   $ sudo mkdir /dev/net
   $ sudo mknod /dev/net/tun c 10 200
   $ sudo /sbin/modprobe tun
if you want simplicity, use the “User Mode Networking” method and use DHCP in the guest OS. If you want strict control of your IP addressing and routing, use the “TUN/TAP Network Interface” method.我的感觉是兼听则明,一个复杂的议题最好是找两三家来从不同角度来互相应证,这个也是情报工作的基本方法。从他的例子的描述来看
using one virtual bridge on the host system. All the virtual machines will be attached to the virtual bridge, and in the same vlan (default vlan 0).,似乎需要把虚拟机和主机配置在一个vlan里然后虚拟机依靠virtual bridge把主机的物理设备转接到虚拟机的虚拟设备上?这里的虚拟设备显然是tun/tap,因为更加的灵活。否则要使用模拟物理设备的虚拟机的模拟网 卡有可能要给它配置全套的环境吧?我的理解就是在上面
user mode下,实际上虚拟机的虚拟物理设备是在一个模拟的物理环境下工作,虚拟机好像真实的操作系统惯例开机使用dhcpclient自动搜索qemu-dhcp-server配置好的环境,这个过程是否可以称之为tunneling呢?我这方面的知识匮乏,感到力不从心。以前在工作中遇到网络问题都是绕着走,现在吃苦头了。
四月二十三日 等待变化等待机会
In case you don't care about configuring every detail of a NIC, you can also create a NIC together with a host backend by using the -nic parameter. For example, you can replace
-netdev user,id=n1 -device virtio-net-pci,netdev=n1with:
-nic user,model=virtio-net-pciUse -nic model=help to get a list of the supported NIC models.
Supported NIC models:
e1000
e1000-82544gc
e1000-82545em
e1000e
i82550
i82551
i82557a
i82557b
i82557c
i82558a
i82558b
i82559a
i82559b
i82559c
i82559er
i82562
i82801
ne2k_pci
pcnet
pvrdma
rtl8139
tulip
virtio-net-pci
virtio-net-pci-non-transitional
virtio-net-pci-transitional
vmxnet3
Unmounting /boot/efi...,这里似乎解释的其他?
systemctl daemon-reload
# UNCONFIGURED FSTAB FOR BASE SYSTEM,这里的一些回答让我大概明白这个是要自己根据当前的磁盘设备写上去的。
grub-mkconfig -o /boot/grub/grub.cfg和直接update-grub似乎差别不是很多吧? 这里有很多的关于initramfs打log的方式,很长,似乎要重新编译? 这里编辑grub参数值得学习,主要是设置console参数
setup serial/console access
edit
/etc/default/grub:
Set
GRUB_CMDLINE_LINUX=""to:GRUB_CMDLINE_LINUX="console=tty0 console=ttyS0,115200n8"Uncomment
GRUB_TERMINAL=consoleBeneath, add the line:
GRUB_SERIAL_COMMAND="serial --speed=115200 --unit=0 --word=8 --parity=no --stop=1"Make the grub config - This MUST be done in a non-
systemd-nspawnshell (that meanschroot)grub-mkconfig -o /boot/grub/grub.cfg
# / was on /dev/nvme0n1p2 during installation
UUID=92d635c6-8ab6-4bfb-8d12-2836774e77c5 /               ext4    rw,errors=remount-ro 0       1
# /boot/efi was on /dev/nvme0n1p1 during installation
UUID=82C1-F9D0  /boot/efi       vfat    umask=0077      0       1
四月二十四日 等待变化等待机会
qemu-system-x86_64 -kernel tmp/vmlinuz-5.15.0-25-generic -initrd tmp/initrd.img-5.15.0-25-generic -m 2G -bios /usr/share/ovmf/OVMF.fd -drive format=raw,file=ubuntu-efi-disk -append "root=PARTUUID=8613E0D8-6556-7A47-922D-EDA26D53D20B"
$ sudo sgdisk -i 2  /dev/loop3
Partition GUID code: 0FC63DAF-8483-4772-8E79-3D69D8477DE4 (Linux filesystem)
Partition unique GUID: 8613E0D8-6556-7A47-922D-EDA26D53D20B
First sector: 1050624 (at 513.0 MiB)
Last sector: 10239966 (at 4.9 GiB)
Partition size: 9189343 sectors (4.4 GiB)
Attribute flags: 0000000000000000
Partition name: 'Linux'
qemu-system-x86_64 -kernel tmp/vmlinuz-5.15.0-25-generic -initrd tmp/initrd.img-5.15.0-25-generic -serial stdio -m 2G -drive format=raw,file=ubuntu-efi-disk -append "root=PARTUUID=8613E0D8-6556-7A47-922D-EDA26D53D20B console=ttyAMA0 console=ttyS0"
[ 0.000000] Command line: root=PARTUUID=8613E0D8-6556-7A47-922D-EDA26D53D20B console=ttyAMA0 console=ttyS0
这位大侠给出了图文并茂的解释,对于没 有多少嵌入式开发经验的人很有帮助。我虽然也用过一会儿ttyUSB0,但是对于真实的serial port却感觉意外。笔记本是没有这个port,那么操作系统还是创建了它的驱动,那么如果我指定stdio作为它的backend,它就输出到了我的命 令行console,是这个道理吗?当然qemu本身就是虚拟机,本身的标准PC就是包含这个硬件的。 其实我真的理解了吗?不理解,因为我尝试着把传递给内核的参数换回成
ttyS0is the device for the first UART serial port on x86 and x86_64 architectures. If you have a PC motherboard with serial ports you'd be using attySnto attach a modem or a serial console.ttyUSB0is the device for the first USB serial convertor. If you have an USB serial cable you'd be using attyUSBnto connect to the serial port of a router.ttyAMA0is the device for the first serial port on ARM architecture. If you have an ARM-based TV box with a serial console and running Android or OpenELEC, you'd be using attyAMAnto attach a console to it.
-append root=PARTUUID=8613E0D8-6556-7A47-922D-EDA26D53D20B console=tty0"或者是
console=stdio,结果输出又回到了qemu的窗口。这个说明了什么?我尝试着解释就是说必须要有额外的硬件比如usb设备并且为其专门创建了对应的驱动并且才能把console的输出redirect到这个设备,否则就只能在qemu的窗口里了? 当我再次精简命令干脆去掉initrd,我看到的输出有不同吗?我感觉没有。我原本的信念是在initrd作为早期临时的一个操作系统把硬件检测的工作做完,那么这个过程实在是太快了,我根本没有看到???
这是正常的boot流程,我即便读过很多次也并不代表真正理解:initrd provides the capability to load a RAM disk by the boot loader. This RAM disk can then be mounted as the root file system and programs can be run from it. Afterwards, a new root file system can be mounted from a different device. The previous root (from initrd) is then moved to a directory and can be subsequently unmounted.
initrd is mainly designed to allow system startup to occur in two phases, where the kernel comes up with a minimum set of compiled-in drivers, and where additional modules are loaded from initrd.
这里是大多数人引用的如何创建Initrd
- the boot loader loads the kernel and the initial RAM disk
- the kernel converts initrd into a “normal” RAM disk and frees the memory used by initrd
- if the root device is not
/dev/ram0, the old (deprecated) change_root procedure is followed. see the “Obsolete root change mechanism” section below.- root device is mounted. if it is
/dev/ram0, the initrd image is then mounted as root- /sbin/init is executed (this can be any valid executable, including shell scripts; it is run with uid 0 and can do basically everything init can do).
- init mounts the “real” root file system
- init places the root file system at the root directory using the pivot_root system call
- init execs the
/sbin/initon the new root filesystem, performing the usual boot sequence- the initrd file system is removed
find . | cpio --quiet -H newc -o | gzip -9 -n > /boot/imagefile.img
$ file initrd.img-5.15.0-25-generic
initrd.img-5.15.0-25-generic: ASCII cpio archive (SVR4 with no CRC)
$ dd if=../initrd.img-5.15.0-25-generic skip=0| file -
/dev/stdin: ASCII cpio archive (SVR4 with no CRC)
$ dd if=../initrd.img-5.15.0-25-generic skip=0| cpio -it
.
kernel
kernel/x86
kernel/x86/microcode
kernel/x86/microcode/AuthenticAMD.bin
62 blocks
$ dd if=../initrd.img-5.15.0-25-generic skip=62| file -
/dev/stdin: ASCII cpio archive (SVR4 with no CRC)
$ dd if=../initrd.img-5.15.0-25-generic skip=62| cpio -it
kernel
kernel/x86
kernel/x86/microcode
kernel/x86/microcode/.enuineIntel.align.0123456789abc
kernel/x86/microcode/GenuineIntel.bin
9004 blocks
$ dd if=../initrd.img-5.15.0-25-generic skip=9066|file -
/dev/stdin: Zstandard compressed data (v0.8+), Dictionary ID: None
$ dd if=../initrd.img-5.15.0-25-generic skip=9066|unzstd | file -
/dev/stdin: ASCII cpio archive (SVR4 with no CRC)
dd if=../initrd.img-5.15.0-25-generic skip=9066|unzstd | cpio -it这里的文件太多了
$ dd if=../initrd.img-5.15.0-25-generic skip=9066|unzstd | cpio -it
.
bin
conf
conf/arch.conf
conf/conf.d
conf/initramfs.conf
etc
etc/console-setup
etc/console-setup/Uni2-Fixed16.psf.gz
etc/console-setup/cached_UTF-8_del.kmap.gz
etc/default
etc/default/console-setup
etc/default/keyboard
etc/dhcp
etc/dhcp/dhclient-enter-hooks.d
etc/dhcp/dhclient-enter-hooks.d/config
etc/dhcp/dhclient.conf
etc/fstab
etc/ld.so.cache
etc/ld.so.conf
etc/ld.so.conf.d
etc/ld.so.conf.d/libc.conf
etc/ld.so.conf.d/x86_64-linux-gnu.conf
etc/modprobe.d
etc/modprobe.d/amd64-microcode-blacklist.conf
etc/modprobe.d/blacklist-ath_pci.conf
etc/modprobe.d/blacklist-firewire.conf
etc/modprobe.d/blacklist-framebuffer.conf
etc/modprobe.d/blacklist-rare-network.conf
etc/modprobe.d/blacklist.conf
etc/modprobe.d/intel-microcode-blacklist.conf
etc/modprobe.d/iwlwifi.conf
etc/mtab
etc/nsswitch.conf
etc/udev
etc/udev/udev.conf
init
lib
lib32
lib64
libx32
run
sbin
scripts
scripts/functions
scripts/init-bottom
scripts/init-bottom/ORDER
scripts/init-bottom/udev
scripts/init-top
scripts/init-top/ORDER
scripts/init-top/all_generic_ide
scripts/init-top/blacklist
scripts/init-top/udev
scripts/local
scripts/local-premount
scripts/local-premount/ORDER
scripts/local-premount/fixrtc
scripts/local-premount/resume
scripts/nfs
scripts/panic
scripts/panic/ORDER
scripts/panic/console_setup
usr
usr/bin
usr/bin/cpio
usr/bin/dd
usr/bin/dmesg
usr/bin/fstype
usr/bin/halt
usr/bin/ipconfig
usr/bin/kbd_mode
usr/bin/kmod
usr/bin/loadkeys
usr/bin/losetup
usr/bin/minips
usr/bin/nfsmount
usr/bin/pivot_root
usr/bin/poweroff
usr/bin/resume
usr/bin/run-parts
usr/bin/setfont
usr/bin/udevadm
usr/bin/which
usr/bin/wget
usr/bin/wc
usr/bin/uniq
usr/bin/uname
usr/bin/umount
usr/bin/tty
usr/bin/true
usr/bin/tr
usr/bin/touch
usr/bin/test
usr/bin/tee
usr/bin/tail
usr/bin/sync
usr/bin/switch_root
usr/bin/stty
usr/bin/static-sh
usr/bin/stat
usr/bin/sort
usr/bin/sleep
usr/bin/sh
usr/bin/setkeycodes
usr/bin/seq
usr/bin/sed
usr/bin/run-init
usr/bin/rmdir
usr/bin/rm
usr/bin/reset
usr/bin/reboot
usr/bin/readlink
usr/bin/pwd
usr/bin/ps
usr/bin/printf
usr/bin/pidof
usr/bin/openvt
usr/bin/nuke
usr/bin/mv
usr/bin/mount
usr/bin/more
usr/bin/modinfo
usr/bin/mktemp
usr/bin/mkswap
usr/bin/mknod
usr/bin/mkfifo
usr/bin/mkdir
usr/bin/lzop
usr/bin/ls
usr/bin/loadkmap
usr/bin/loadfont
usr/bin/ln
usr/bin/kill
usr/bin/ip
usr/bin/ifconfig
usr/bin/hwclock
usr/bin/hostname
usr/bin/gzip
usr/bin/gunzip
usr/bin/grep
usr/bin/fstrim
usr/bin/fold
usr/bin/find
usr/bin/fgrep
usr/bin/fbset
usr/bin/false
usr/bin/expr
usr/bin/env
usr/bin/egrep
usr/bin/echo
usr/bin/dumpkmap
usr/bin/du
usr/bin/dirname
usr/bin/df
usr/bin/devmem
usr/bin/deluser
usr/bin/deallocvt
usr/bin/date
usr/bin/cut
usr/bin/cp
usr/bin/cmp
usr/bin/clear
usr/bin/chvt
usr/bin/chroot
usr/bin/chmod
usr/bin/cat
usr/bin/busybox
usr/bin/blockdev
usr/bin/basename
usr/bin/awk
usr/bin/ash
usr/bin/arch
usr/bin/acpid
usr/bin/[[
usr/bin/[
usr/bin/yes
usr/lib
usr/lib/firmware
usr/lib/firmware/3com
usr/lib/firmware/3com/typhoon.bin
usr/lib/firmware/acenic
usr/lib/firmware/acenic/tg1.bin
usr/lib/firmware/acenic/tg2.bin
usr/lib/firmware/adaptec
usr/lib/firmware/adaptec/starfire_rx.bin
usr/lib/firmware/adaptec/starfire_tx.bin
usr/lib/firmware/advansys
usr/lib/firmware/advansys/3550.bin
usr/lib/firmware/advansys/38C0800.bin
usr/lib/firmware/advansys/38C1600.bin
usr/lib/firmware/advansys/mcode.bin
usr/lib/firmware/bnx2
usr/lib/firmware/bnx2/bnx2-mips-06-6.2.3.fw
usr/lib/firmware/bnx2/bnx2-mips-09-6.2.1b.fw
usr/lib/firmware/bnx2/bnx2-rv2p-06-6.0.15.fw
usr/lib/firmware/bnx2/bnx2-rv2p-09-6.0.17.fw
usr/lib/firmware/bnx2/bnx2-rv2p-09ax-6.0.17.fw
usr/lib/firmware/bnx2x
usr/lib/firmware/bnx2x/bnx2x-e1-7.13.15.0.fw
usr/lib/firmware/bnx2x/bnx2x-e1-7.13.21.0.fw
usr/lib/firmware/bnx2x/bnx2x-e1h-7.13.15.0.fw
usr/lib/firmware/bnx2x/bnx2x-e1h-7.13.21.0.fw
usr/lib/firmware/bnx2x/bnx2x-e2-7.13.15.0.fw
usr/lib/firmware/bnx2x/bnx2x-e2-7.13.21.0.fw
usr/lib/firmware/cbfw-3.2.5.1.bin
usr/lib/firmware/cis
usr/lib/firmware/cis/DP83903.cis
usr/lib/firmware/cis/LA-PCM.cis
usr/lib/firmware/cis/NE2K.cis
usr/lib/firmware/cis/PCMLM28.cis
usr/lib/firmware/cis/PE-200.cis
usr/lib/firmware/cis/PE520.cis
usr/lib/firmware/cis/tamarack.cis
usr/lib/firmware/ct2fw-3.2.5.1.bin
usr/lib/firmware/ctfw-3.2.5.1.bin
usr/lib/firmware/cxgb3
usr/lib/firmware/cxgb3/ael2005_opt_edc.bin
usr/lib/firmware/cxgb3/ael2005_twx_edc.bin
usr/lib/firmware/cxgb3/ael2020_twx_edc.bin
usr/lib/firmware/cxgb3/t3b_psram-1.1.0.bin
usr/lib/firmware/cxgb3/t3c_psram-1.1.0.bin
usr/lib/firmware/cxgb3/t3fw-7.12.0.bin
usr/lib/firmware/cxgb4
usr/lib/firmware/cxgb4/t4fw-1.26.6.0.bin
usr/lib/firmware/cxgb4/t4fw.bin
usr/lib/firmware/cxgb4/t5fw-1.26.6.0.bin
usr/lib/firmware/cxgb4/t5fw.bin
usr/lib/firmware/cxgb4/t6fw-1.26.6.0.bin
usr/lib/firmware/cxgb4/t6fw.bin
usr/lib/firmware/e100
usr/lib/firmware/e100/d101m_ucode.bin
usr/lib/firmware/e100/d101s_ucode.bin
usr/lib/firmware/e100/d102e_ucode.bin
usr/lib/firmware/ene-ub6250
usr/lib/firmware/ene-ub6250/ms_init.bin
usr/lib/firmware/ene-ub6250/ms_rdwr.bin
usr/lib/firmware/ene-ub6250/msp_rdwr.bin
usr/lib/firmware/ene-ub6250/sd_init1.bin
usr/lib/firmware/ene-ub6250/sd_init2.bin
usr/lib/firmware/ene-ub6250/sd_rdwr.bin
usr/lib/firmware/intel
usr/lib/firmware/intel/ice
usr/lib/firmware/intel/ice/ddp
usr/lib/firmware/intel/ice/ddp/ice-1.3.26.0.pkg
usr/lib/firmware/intel/ice/ddp/ice.pkg
usr/lib/firmware/isci
usr/lib/firmware/isci/isci_firmware.bin
usr/lib/firmware/kaweth
usr/lib/firmware/kaweth/new_code.bin
usr/lib/firmware/kaweth/new_code_fix.bin
usr/lib/firmware/kaweth/trigger_code.bin
usr/lib/firmware/kaweth/trigger_code_fix.bin
usr/lib/firmware/liquidio
usr/lib/firmware/liquidio/lio_210nv_nic.bin
usr/lib/firmware/liquidio/lio_210sv_nic.bin
usr/lib/firmware/liquidio/lio_23xx_nic.bin
usr/lib/firmware/liquidio/lio_410nv_nic.bin
usr/lib/firmware/mellanox
usr/lib/firmware/mellanox/mlxsw_spectrum-13.2008.2406.mfa2
usr/lib/firmware/mellanox/mlxsw_spectrum2-29.2008.2406.mfa2
usr/lib/firmware/mellanox/mlxsw_spectrum3-30.2008.2406.mfa2
usr/lib/firmware/myri10ge_eth_z8e.dat
usr/lib/firmware/myri10ge_ethp_z8e.dat
usr/lib/firmware/myri10ge_rss_eth_z8e.dat
usr/lib/firmware/myri10ge_rss_ethp_z8e.dat
usr/lib/firmware/netronome
usr/lib/firmware/netronome/nic
usr/lib/firmware/netronome/nic/nic_AMDA0058-0011_2x40.nffw
usr/lib/firmware/netronome/nic/nic_AMDA0058-0012_2x40.nffw
usr/lib/firmware/netronome/nic/nic_AMDA0081-0001_1x40.nffw
usr/lib/firmware/netronome/nic/nic_AMDA0081-0001_4x10.nffw
usr/lib/firmware/netronome/nic/nic_AMDA0096-0001_2x10.nffw
usr/lib/firmware/netronome/nic/nic_AMDA0097-0001_2x40.nffw
usr/lib/firmware/netronome/nic/nic_AMDA0097-0001_4x10_1x40.nffw
usr/lib/firmware/netronome/nic/nic_AMDA0097-0001_8x10.nffw
usr/lib/firmware/netronome/nic/nic_AMDA0099-0001_1x10_1x25.nffw
usr/lib/firmware/netronome/nic/nic_AMDA0099-0001_2x10.nffw
usr/lib/firmware/netronome/nic/nic_AMDA0099-0001_2x25.nffw
usr/lib/firmware/netronome/nic_AMDA0058-0011_2x40.nffw
usr/lib/firmware/netronome/nic_AMDA0058-0012_2x40.nffw
usr/lib/firmware/netronome/nic_AMDA0081-0001_1x40.nffw
usr/lib/firmware/netronome/nic_AMDA0081-0001_4x10.nffw
usr/lib/firmware/netronome/nic_AMDA0096-0001_2x10.nffw
usr/lib/firmware/netronome/nic_AMDA0097-0001_2x40.nffw
usr/lib/firmware/netronome/nic_AMDA0097-0001_4x10_1x40.nffw
usr/lib/firmware/netronome/nic_AMDA0097-0001_8x10.nffw
usr/lib/firmware/netronome/nic_AMDA0099-0001_1x10_1x25.nffw
usr/lib/firmware/netronome/nic_AMDA0099-0001_2x10.nffw
usr/lib/firmware/netronome/nic_AMDA0099-0001_2x25.nffw
usr/lib/firmware/ositech
usr/lib/firmware/ositech/Xilinx7OD.bin
usr/lib/firmware/phanfw.bin
usr/lib/firmware/qed
usr/lib/firmware/qed/qed_init_values_zipped-8.42.2.0.bin
usr/lib/firmware/ql2100_fw.bin
usr/lib/firmware/ql2200_fw.bin
usr/lib/firmware/ql2300_fw.bin
usr/lib/firmware/ql2322_fw.bin
usr/lib/firmware/ql2400_fw.bin
usr/lib/firmware/ql2500_fw.bin
usr/lib/firmware/qlogic
usr/lib/firmware/qlogic/1040.bin
usr/lib/firmware/qlogic/12160.bin
usr/lib/firmware/qlogic/1280.bin
usr/lib/firmware/rtl_nic
usr/lib/firmware/rtl_nic/rtl8105e-1.fw
usr/lib/firmware/rtl_nic/rtl8106e-1.fw
usr/lib/firmware/rtl_nic/rtl8106e-2.fw
usr/lib/firmware/rtl_nic/rtl8107e-1.fw
usr/lib/firmware/rtl_nic/rtl8107e-2.fw
usr/lib/firmware/rtl_nic/rtl8125a-3.fw
usr/lib/firmware/rtl_nic/rtl8125b-2.fw
usr/lib/firmware/rtl_nic/rtl8153a-2.fw
usr/lib/firmware/rtl_nic/rtl8153a-3.fw
usr/lib/firmware/rtl_nic/rtl8153a-4.fw
usr/lib/firmware/rtl_nic/rtl8153b-2.fw
usr/lib/firmware/rtl_nic/rtl8153c-1.fw
usr/lib/firmware/rtl_nic/rtl8156a-2.fw
usr/lib/firmware/rtl_nic/rtl8156b-2.fw
usr/lib/firmware/rtl_nic/rtl8168d-1.fw
usr/lib/firmware/rtl_nic/rtl8168d-2.fw
usr/lib/firmware/rtl_nic/rtl8168e-1.fw
usr/lib/firmware/rtl_nic/rtl8168e-2.fw
usr/lib/firmware/rtl_nic/rtl8168e-3.fw
usr/lib/firmware/rtl_nic/rtl8168f-1.fw
usr/lib/firmware/rtl_nic/rtl8168f-2.fw
usr/lib/firmware/rtl_nic/rtl8168fp-3.fw
usr/lib/firmware/rtl_nic/rtl8168g-2.fw
usr/lib/firmware/rtl_nic/rtl8168g-3.fw
usr/lib/firmware/rtl_nic/rtl8168h-1.fw
usr/lib/firmware/rtl_nic/rtl8168h-2.fw
usr/lib/firmware/rtl_nic/rtl8402-1.fw
usr/lib/firmware/rtl_nic/rtl8411-1.fw
usr/lib/firmware/rtl_nic/rtl8411-2.fw
usr/lib/firmware/slicoss
usr/lib/firmware/slicoss/gbdownload.sys
usr/lib/firmware/slicoss/gbrcvucode.sys
usr/lib/firmware/slicoss/oasisdownload.sys
usr/lib/firmware/slicoss/oasisrcvucode.sys
usr/lib/firmware/sun
usr/lib/firmware/sun/cassini.bin
usr/lib/firmware/tehuti
usr/lib/firmware/tehuti/bdx.bin
usr/lib/firmware/tigon
usr/lib/firmware/tigon/tg3.bin
usr/lib/firmware/tigon/tg3_tso.bin
usr/lib/firmware/tigon/tg3_tso5.bin
usr/lib/firmware/vxge
usr/lib/firmware/vxge/X3fw-pxe.ncf
usr/lib/firmware/vxge/X3fw.ncf
usr/lib/initramfs-tools
usr/lib/initramfs-tools/bin
usr/lib/initramfs-tools/bin/gcc_s1-stub
usr/lib/klibc-K8e6DOmVI9JpyGMLR7qNe5iZeBk.so
usr/lib/modprobe.d
usr/lib/modprobe.d/aliases.conf
usr/lib/modprobe.d/blacklist_linux_5.15.0-25-generic.conf
usr/lib/modprobe.d/fbdev-blacklist.conf
usr/lib/modprobe.d/systemd.conf
usr/lib/modules
usr/lib/modules/5.15.0-25-generic
usr/lib/modules/5.15.0-25-generic/kernel
usr/lib/modules/5.15.0-25-generic/kernel/arch
usr/lib/modules/5.15.0-25-generic/kernel/arch/x86
usr/lib/modules/5.15.0-25-generic/kernel/arch/x86/crypto
usr/lib/modules/5.15.0-25-generic/kernel/arch/x86/crypto/blake2s-x86_64.ko
usr/lib/modules/5.15.0-25-generic/kernel/arch/x86/crypto/chacha-x86_64.ko
usr/lib/modules/5.15.0-25-generic/kernel/arch/x86/crypto/crc32-pclmul.ko
usr/lib/modules/5.15.0-25-generic/kernel/arch/x86/crypto/curve25519-x86_64.ko
usr/lib/modules/5.15.0-25-generic/kernel/arch/x86/crypto/poly1305-x86_64.ko
usr/lib/modules/5.15.0-25-generic/kernel/crypto
usr/lib/modules/5.15.0-25-generic/kernel/crypto/blake2b_generic.ko
usr/lib/modules/5.15.0-25-generic/kernel/crypto/crc32_generic.ko
usr/lib/modules/5.15.0-25-generic/kernel/crypto/xor.ko
usr/lib/modules/5.15.0-25-generic/kernel/drivers
usr/lib/modules/5.15.0-25-generic/kernel/drivers/acpi
usr/lib/modules/5.15.0-25-generic/kernel/drivers/acpi/platform_profile.ko
usr/lib/modules/5.15.0-25-generic/kernel/drivers/acpi/video.ko
usr/lib/modules/5.15.0-25-generic/kernel/drivers/ata
usr/lib/modules/5.15.0-25-generic/kernel/drivers/ata/acard-ahci.ko
usr/lib/modules/5.15.0-25-generic/kernel/drivers/ata/ahci.ko
usr/lib/modules/5.15.0-25-generic/kernel/drivers/ata/ahci_platform.ko
usr/lib/modules/5.15.0-25-generic/kernel/drivers/ata/libahci.ko
usr/lib/modules/5.15.0-25-generic/kernel/drivers/ata/libahci_platform.ko
usr/lib/modules/5.15.0-25-generic/kernel/drivers/ata/pata_acpi.ko
usr/lib/modules/5.15.0-25-generic/kernel/drivers/ata/pata_ali.ko
usr/lib/modules/5.15.0-25-generic/kernel/drivers/ata/pata_amd.ko
usr/lib/modules/5.15.0-25-generic/kernel/drivers/ata/pata_artop.ko
usr/lib/modules/5.15.0-25-generic/kernel/drivers/ata/pata_atiixp.ko
usr/lib/modules/5.15.0-25-generic/kernel/drivers/ata/pata_atp867x.ko
usr/lib/modules/5.15.0-25-generic/kernel/drivers/ata/pata_cmd640.ko
usr/lib/modules/5.15.0-25-generic/kernel/drivers/ata/pata_cmd64x.ko
usr/lib/modules/5.15.0-25-generic/kernel/drivers/ata/pata_cypress.ko
usr/lib/modules/5.15.0-25-generic/kernel/drivers/ata/pata_efar.ko
usr/lib/modules/5.15.0-25-generic/kernel/drivers/ata/pata_hpt366.ko
usr/lib/modules/5.15.0-25-generic/kernel/drivers/ata/pata_hpt37x.ko
usr/lib/modules/5.15.0-25-generic/kernel/drivers/ata/pata_hpt3x2n.ko
usr/lib/modules/5.15.0-25-generic/kernel/drivers/ata/pata_hpt3x3.ko
usr/lib/modules/5.15.0-25-generic/kernel/drivers/ata/pata_it8213.ko
usr/lib/modules/5.15.0-25-generic/kernel/drivers/ata/pata_it821x.ko
usr/lib/modules/5.15.0-25-generic/kernel/drivers/ata/pata_jmicron.ko
usr/lib/modules/5.15.0-25-generic/kernel/drivers/ata/pata_legacy.ko
usr/lib/modules/5.15.0-25-generic/kernel/drivers/ata/pata_marvell.ko
usr/lib/modules/5.15.0-25-generic/kernel/drivers/ata/pata_mpiix.ko
usr/lib/modules/5.15.0-25-generic/kernel/drivers/ata/pata_netcell.ko
usr/lib/modules/5.15.0-25-generic/kernel/drivers/ata/pata_ninja32.ko
usr/lib/modules/5.15.0-25-generic/kernel/drivers/ata/pata_ns87410.ko
usr/lib/modules/5.15.0-25-generic/kernel/drivers/ata/pata_ns87415.ko
usr/lib/modules/5.15.0-25-generic/kernel/drivers/ata/pata_oldpiix.ko
usr/lib/modules/5.15.0-25-generic/kernel/drivers/ata/pata_opti.ko
usr/lib/modules/5.15.0-25-generic/kernel/drivers/ata/pata_optidma.ko
usr/lib/modules/5.15.0-25-generic/kernel/drivers/ata/pata_pcmcia.ko
usr/lib/modules/5.15.0-25-generic/kernel/drivers/ata/pata_pdc2027x.ko
usr/lib/modules/5.15.0-25-generic/kernel/drivers/ata/pata_pdc202xx_old.ko
usr/lib/modules/5.15.0-25-generic/kernel/drivers/ata/pata_piccolo.ko
usr/lib/modules/5.15.0-25-generic/kernel/drivers/ata/pata_platform.ko
usr/lib/modules/5.15.0-25-generic/kernel/drivers/ata/pata_radisys.ko
usr/lib/modules/5.15.0-25-generic/kernel/drivers/ata/pata_rdc.ko
usr/lib/modules/5.15.0-25-generic/kernel/drivers/ata/pata_rz1000.ko
usr/lib/modules/5.15.0-25-generic/kernel/drivers/ata/pata_sch.ko
usr/lib/modules/5.15.0-25-generic/kernel/drivers/ata/pata_serverworks.ko
usr/lib/modules/5.15.0-25-generic/kernel/drivers/ata/pata_sil680.ko
usr/lib/modules/5.15.0-25-generic/kernel/drivers/ata/pata_sl82c105.ko
usr/lib/modules/5.15.0-25-generic/kernel/drivers/ata/pata_triflex.ko
usr/lib/modules/5.15.0-25-generic/kernel/drivers/ata/pata_via.ko
usr/lib/modules/5.15.0-25-generic/kernel/drivers/ata/pdc_adma.ko
usr/lib/modules/5.15.0-25-generic/kernel/drivers/ata/sata_dwc_460ex.ko
usr/lib/modules/5.15.0-25-generic/kernel/drivers/ata/sata_inic162x.ko
usr/lib/modules/5.15.0-25-generic/kernel/drivers/ata/sata_mv.ko
usr/lib/modules/5.15.0-25-generic/kernel/drivers/ata/sata_nv.ko
usr/lib/modules/5.15.0-25-generic/kernel/drivers/ata/sata_promise.ko
usr/lib/modules/5.15.0-25-generic/kernel/drivers/ata/sata_qstor.ko
usr/lib/modules/5.15.0-25-generic/kernel/drivers/ata/sata_sil.ko
usr/lib/modules/5.15.0-25-generic/kernel/drivers/ata/sata_sil24.ko
usr/lib/modules/5.15.0-25-generic/kernel/drivers/ata/sata_sis.ko
usr/lib/modules/5.15.0-25-generic/kernel/drivers/ata/sata_svw.ko
usr/lib/modules/5.15.0-25-generic/kernel/drivers/ata/sata_sx4.ko
usr/lib/modules/5.15.0-25-generic/kernel/drivers/ata/sata_uli.ko
usr/lib/modules/5.15.0-25-generic/kernel/drivers/ata/sata_via.ko
usr/lib/modules/5.15.0-25-generic/kernel/drivers/ata/sata_vsc.ko
usr/lib/modules/5.15.0-25-generic/kernel/drivers/base
usr/lib/modules/5.15.0-25-generic/kernel/drivers/base/regmap
usr/lib/modules/5.15.0-25-generic/kernel/drivers/base/regmap/regmap-slimbus.ko
usr/lib/modules/5.15.0-25-generic/kernel/drivers/base/regmap/regmap-spi-avmm.ko
usr/lib/modules/5.15.0-25-generic/kernel/drivers/base/regmap/regmap-spmi.ko
usr/lib/modules/5.15.0-25-generic/kernel/drivers/bcma
usr/lib/modules/5.15.0-25-generic/kernel/drivers/bcma/bcma.ko
usr/lib/modules/5.15.0-25-generic/kernel/drivers/block
usr/lib/modules/5.15.0-25-generic/kernel/drivers/block/aoe
usr/lib/modules/5.15.0-25-generic/kernel/drivers/block/aoe/aoe.ko
usr/lib/modules/5.15.0-25-generic/kernel/drivers/block/brd.ko
usr/lib/modules/5.15.0-25-generic/kernel/drivers/block/cryptoloop.ko
usr/lib/modules/5.15.0-25-generic/kernel/drivers/block/drbd
usr/lib/modules/5.15.0-25-generic/kernel/drivers/block/drbd/drbd.ko
usr/lib/modules/5.15.0-25-generic/kernel/drivers/block/floppy.ko
usr/lib/modules/5.15.0-25-generic/kernel/drivers/block/mtip32xx
usr/lib/modules/5.15.0-25-generic/kernel/drivers/block/mtip32xx/mtip32xx.ko
usr/lib/modules/5.15.0-25-generic/kernel/drivers/block/nbd.ko
usr/lib/modules/5.15.0-25-generic/kernel/drivers/block/null_blk
usr/lib/modules/5.15.0-25-generic/kernel/drivers/block/null_blk/null_blk.ko
usr/lib/modules/5.15.0-25-generic/kernel/drivers/block/paride
usr/lib/modules/5.15.0-25-generic/kernel/drivers/block/paride/aten.ko
usr/lib/modules/5.15.0-25-generic/kernel/drivers/block/paride/bpck.ko
usr/lib/modules/5.15.0-25-generic/kernel/drivers/block/paride/comm.ko
usr/lib/modules/5.15.0-25-generic/kernel/drivers/block/paride/dstr.ko
usr/lib/modules/5.15.0-25-generic/kernel/drivers/block/paride/epat.ko
usr/lib/modules/5.15.0-25-generic/kernel/drivers/block/paride/epia.ko
usr/lib/modules/5.15.0-25-generic/kernel/drivers/block/paride/fit2.ko
usr/lib/modules/5.15.0-25-generic/kernel/drivers/block/paride/fit3.ko
usr/lib/modules/5.15.0-25-generic/kernel/drivers/block/paride/friq.ko
usr/lib/modules/5.15.0-25-generic/kernel/drivers/block/paride/frpw.ko
usr/lib/modules/5.15.0-25-generic/kernel/drivers/block/paride/kbic.ko
usr/lib/modules/5.15.0-25-generic/kernel/drivers/block/paride/ktti.ko
usr/lib/modules/5.15.0-25-generic/kernel/drivers/block/paride/on20.ko
usr/lib/modules/5.15.0-25-generic/kernel/drivers/block/paride/on26.ko
usr/lib/modules/5.15.0-25-generic/kernel/drivers/block/paride/paride.ko
usr/lib/modules/5.15.0-25-generic/kernel/drivers/block/paride/pcd.ko
usr/lib/modules/5.15.0-25-generic/kernel/drivers/block/paride/pd.ko
usr/lib/modules/5.15.0-25-generic/kernel/drivers/block/paride/pf.ko
usr/lib/modules/5.15.0-25-generic/kernel/drivers/block/paride/pg.ko
usr/lib/modules/5.15.0-25-generic/kernel/drivers/block/paride/pt.ko
usr/lib/modules/5.15.0-25-generic/kernel/drivers/block/pktcdvd.ko
usr/lib/modules/5.15.0-25-generic/kernel/drivers/block/rbd.ko
usr/lib/modules/5.15.0-25-generic/kernel/drivers/block/rnbd
usr/lib/modules/5.15.0-25-generic/kernel/drivers/block/rnbd/rnbd-client.ko
usr/lib/modules/5.15.0-25-generic/kernel/drivers/block/rnbd/rnbd-server.ko
usr/lib/modules/5.15.0-25-generic/kernel/drivers/block/rsxx
usr/lib/modules/5.15.0-25-generic/kernel/drivers/block/rsxx/rsxx.ko
usr/lib/modules/5.15.0-25-generic/kernel/drivers/block/sx8.ko
usr/lib/modules/5.15.0-25-generic/kernel/drivers/block/virtio_blk.ko
usr/lib/modules/5.15.0-25-generic/kernel/drivers/block/xen-blkback
usr/lib/modules/5.15.0-25-generic/kernel/drivers/block/xen-blkback/xen-blkback.ko
usr/lib/modules/5.15.0-25-generic/kernel/drivers/block/zram
usr/lib/modules/5.15.0-25-generic/kernel/drivers/block/zram/zram.ko
usr/lib/modules/5.15.0-25-generic/kernel/drivers/bus
usr/lib/modules/5.15.0-25-generic/kernel/drivers/bus/mhi
usr/lib/modules/5.15.0-25-generic/kernel/drivers/bus/mhi/core
usr/lib/modules/5.15.0-25-generic/kernel/drivers/bus/mhi/core/mhi.ko
usr/lib/modules/5.15.0-25-generic/kernel/drivers/bus/mhi/mhi_pci_generic.ko
usr/lib/modules/5.15.0-25-generic/kernel/drivers/clk
usr/lib/modules/5.15.0-25-generic/kernel/drivers/clk/clk-cdce706.ko
usr/lib/modules/5.15.0-25-generic/kernel/drivers/clk/clk-cs2000-cp.ko
usr/lib/modules/5.15.0-25-generic/kernel/drivers/clk/clk-lmk04832.ko
usr/lib/modules/5.15.0-25-generic/kernel/drivers/clk/clk-max9485.ko
usr/lib/modules/5.15.0-25-generic/kernel/drivers/clk/clk-palmas.ko
usr/lib/modules/5.15.0-25-generic/kernel/drivers/clk/clk-pwm.ko
usr/lib/modules/5.15.0-25-generic/kernel/drivers/clk/clk-si5341.ko
usr/lib/modules/5.15.0-25-generic/kernel/drivers/clk/clk-si5351.ko
usr/lib/modules/5.15.0-25-generic/kernel/drivers/clk/clk-si544.ko
usr/lib/modules/5.15.0-25-generic/kernel/drivers/clk/clk-twl6040.ko
usr/lib/modules/5.15.0-25-generic/kernel/drivers/clk/clk-wm831x.ko
usr/lib/modules/5.15.0-25-generic/kernel/drivers/clk/xilinx
usr/lib/modules/5.15.0-25-generic/kernel/drivers/clk/xilinx/xlnx_vcu.ko
usr/lib/modules/5.15.0-25-generic/kernel/drivers/dca
usr/lib/modules/5.15.0-25-generic/kernel/drivers/dca/dca.ko
usr/lib/modules/5.15.0-25-generic/kernel/drivers/dma
usr/lib/modules/5.15.0-25-generic/kernel/drivers/dma/dw
usr/lib/modules/5.15.0-25-generic/kernel/drivers/dma/dw/dw_dmac.ko
usr/lib/modules/5.15.0-25-generic/kernel/drivers/dma/dw/dw_dmac_core.ko
usr/lib/modules/5.15.0-25-generic/kernel/drivers/dma/idma64.ko
usr/lib/modules/5.15.0-25-generic/kernel/drivers/extcon
usr/lib/modules/5.15.0-25-generic/kernel/drivers/extcon/extcon-usb-gpio.ko
usr/lib/modules/5.15.0-25-generic/kernel/drivers/extcon/extcon-usbc-cros-ec.ko
usr/lib/modules/5.15.0-25-generic/kernel/drivers/firewire
usr/lib/modules/5.15.0-25-generic/kernel/drivers/firewire/firewire-core.ko
usr/lib/modules/5.15.0-25-generic/kernel/drivers/firewire/firewire-ohci.ko
usr/lib/modules/5.15.0-25-generic/kernel/drivers/firewire/firewire-sbp2.ko
usr/lib/modules/5.15.0-25-generic/kernel/drivers/fpga
usr/lib/modules/5.15.0-25-generic/kernel/drivers/fpga/dfl.ko
usr/lib/modules/5.15.0-25-generic/kernel/drivers/fpga/fpga-bridge.ko
usr/lib/modules/5.15.0-25-generic/kernel/drivers/fpga/fpga-mgr.ko
usr/lib/modules/5.15.0-25-generic/kernel/drivers/fpga/fpga-region.ko
usr/lib/modules/5.15.0-25-generic/kernel/drivers/gpio
usr/lib/modules/5.15.0-25-generic/kernel/drivers/gpio/gpio-104-dio-48e.ko
usr/lib/modules/5.15.0-25-generic/kernel/drivers/gpio/gpio-104-idi-48.ko
usr/lib/modules/5.15.0-25-generic/kernel/drivers/gpio/gpio-104-idio-16.ko
usr/lib/modules/5.15.0-25-generic/kernel/drivers/gpio/gpio-aaeon.ko
usr/lib/modules/5.15.0-25-generic/kernel/drivers/gpio/gpio-adp5520.ko
usr/lib/modules/5.15.0-25-generic/kernel/drivers/gpio/gpio-adp5588.ko
usr/lib/modules/5.15.0-25-generic/kernel/drivers/gpio/gpio-aggregator.ko
usr/lib/modules/5.15.0-25-generic/kernel/drivers/gpio/gpio-amd-fch.ko
usr/lib/modules/5.15.0-25-generic/kernel/drivers/gpio/gpio-amd8111.ko
usr/lib/modules/5.15.0-25-generic/kernel/drivers/gpio/gpio-amdpt.ko
usr/lib/modules/5.15.0-25-generic/kernel/drivers/gpio/gpio-arizona.ko
usr/lib/modules/5.15.0-25-generic/kernel/drivers/gpio/gpio-bd9571mwv.ko
usr/lib/modules/5.15.0-25-generic/kernel/drivers/gpio/gpio-da9052.ko
usr/lib/modules/5.15.0-25-generic/kernel/drivers/gpio/gpio-da9055.ko
usr/lib/modules/5.15.0-25-generic/kernel/drivers/gpio/gpio-dln2.ko
usr/lib/modules/5.15.0-25-generic/kernel/drivers/gpio/gpio-dwapb.ko
usr/lib/modules/5.15.0-25-generic/kernel/drivers/gpio/gpio-exar.ko
usr/lib/modules/5.15.0-25-generic/kernel/drivers/gpio/gpio-f7188x.ko
usr/lib/modules/5.15.0-25-generic/kernel/drivers/gpio/gpio-generic.ko
usr/lib/modules/5.15.0-25-generic/kernel/drivers/gpio/gpio-gpio-mm.ko
usr/lib/modules/5.15.0-25-generic/kernel/drivers/gpio/gpio-ich.ko
usr/lib/modules/5.15.0-25-generic/kernel/drivers/gpio/gpio-it87.ko
usr/lib/modules/5.15.0-25-generic/kernel/drivers/gpio/gpio-janz-ttl.ko
usr/lib/modules/5.15.0-25-generic/kernel/drivers/gpio/gpio-kempld.ko
usr/lib/modules/5.15.0-25-generic/kernel/drivers/gpio/gpio-lp3943.ko
usr/lib/modules/5.15.0-25-generic/kernel/drivers/gpio/gpio-lp873x.ko
usr/lib/modules/5.15.0-25-generic/kernel/drivers/gpio/gpio-madera.ko
usr/lib/modules/5.15.0-25-generic/kernel/drivers/gpio/gpio-max3191x.ko
usr/lib/modules/5.15.0-25-generic/kernel/drivers/gpio/gpio-max7300.ko
usr/lib/modules/5.15.0-25-generic/kernel/drivers/gpio/gpio-max7301.ko
usr/lib/modules/5.15.0-25-generic/kernel/drivers/gpio/gpio-max730x.ko
usr/lib/modules/5.15.0-25-generic/kernel/drivers/gpio/gpio-max732x.ko
usr/lib/modules/5.15.0-25-generic/kernel/drivers/gpio/gpio-mb86s7x.ko
usr/lib/modules/5.15.0-25-generic/kernel/drivers/gpio/gpio-mc33880.ko
usr/lib/modules/5.15.0-25-generic/kernel/drivers/gpio/gpio-menz127.ko
usr/lib/modules/5.15.0-25-generic/kernel/drivers/gpio/gpio-ml-ioh.ko
usr/lib/modules/5.15.0-25-generic/kernel/drivers/gpio/gpio-pca953x.ko
usr/lib/modules/5.15.0-25-generic/kernel/drivers/gpio/gpio-pca9570.ko
usr/lib/modules/5.15.0-25-generic/kernel/drivers/gpio/gpio-pcf857x.ko
usr/lib/modules/5.15.0-25-generic/kernel/drivers/gpio/gpio-pci-idio-16.ko
usr/lib/modules/5.15.0-25-generic/kernel/drivers/gpio/gpio-pcie-idio-24.ko
usr/lib/modules/5.15.0-25-generic/kernel/drivers/gpio/gpio-pisosr.ko
usr/lib/modules/5.15.0-25-generic/kernel/drivers/gpio/gpio-rdc321x.ko
usr/lib/modules/5.15.0-25-generic/kernel/drivers/gpio/gpio-sch.ko
usr/lib/modules/5.15.0-25-generic/kernel/drivers/gpio/gpio-sch311x.ko
usr/lib/modules/5.15.0-25-generic/kernel/drivers/gpio/gpio-siox.ko
usr/lib/modules/5.15.0-25-generic/kernel/drivers/gpio/gpio-tpic2810.ko
usr/lib/modules/5.15.0-25-generic/kernel/drivers/gpio/gpio-tps65086.ko
usr/lib/modules/5.15.0-25-generic/kernel/drivers/gpio/gpio-tps65912.ko
usr/lib/modules/5.15.0-25-generic/kernel/drivers/gpio/gpio-tqmx86.ko
usr/lib/modules/5.15.0-25-generic/kernel/drivers/gpio/gpio-twl4030.ko
usr/lib/modules/5.15.0-25-generic/kernel/drivers/gpio/gpio-twl6040.ko
usr/lib/modules/5.15.0-25-generic/kernel/drivers/gpio/gpio-ucb1400.ko
usr/lib/modules/5.15.0-25-generic/kernel/drivers/gpio/gpio-viperboard.ko
usr/lib/modules/5.15.0-25-generic/kernel/drivers/gpio/gpio-virtio.ko
usr/lib/modules/5.15.0-25-generic/kernel/drivers/gpio/gpio-vx855.ko
usr/lib/modules/5.15.0-25-generic/kernel/drivers/gpio/gpio-wcove.ko
usr/lib/modules/5.15.0-25-generic/kernel/drivers/gpio/gpio-winbond.ko
usr/lib/modules/5.15.0-25-generic/kernel/drivers/gpio/gpio-wm831x.ko
usr/lib/modules/5.15.0-25-generic/kernel/drivers/gpio/gpio-wm8350.ko
usr/lib/modules/5.15.0-25-generic/kernel/drivers/gpio/gpio-wm8994.ko
usr/lib/modules/5.15.0-25-generic/kernel/drivers/gpio/gpio-ws16c48.ko
usr/lib/modules/5.15.0-25-generic/kernel/drivers/gpio/gpio-xra1403.ko
usr/lib/modules/5.15.0-25-generic/kernel/drivers/hid
usr/lib/modules/5.15.0-25-generic/kernel/drivers/hid/amd-sfh-hid
usr/lib/modules/5.15.0-25-generic/kernel/drivers/hid/amd-sfh-hid/amd_sfh.ko
usr/lib/modules/5.15.0-25-generic/kernel/drivers/hid/hid-accutouch.ko
usr/lib/modules/5.15.0-25-generic/kernel/drivers/hid/hid-alps.ko
usr/lib/modules/5.15.0-25-generic/kernel/drivers/hid/hid-apple.ko
usr/lib/modules/5.15.0-25-generic/kernel/drivers/hid/hid-appleir.ko
usr/lib/modules/5.15.0-25-generic/kernel/drivers/hid/hid-asus.ko
usr/lib/modules/5.15.0-25-generic/kernel/drivers/hid/hid-aureal.ko
usr/lib/modules/5.15.0-25-generic/kernel/drivers/hid/hid-belkin.ko
usr/lib/modules/5.15.0-25-generic/kernel/drivers/hid/hid-cherry.ko
usr/lib/modules/5.15.0-25-generic/kernel/drivers/hid/hid-chicony.ko
usr/lib/modules/5.15.0-25-generic/kernel/drivers/hid/hid-cmedia.ko
usr/lib/modules/5.15.0-25-generic/kernel/drivers/hid/hid-corsair.ko
usr/lib/modules/5.15.0-25-generic/kernel/drivers/hid/hid-cougar.ko
usr/lib/modules/5.15.0-25-generic/kernel/drivers/hid/hid-cp2112.ko
usr/lib/modules/5.15.0-25-generic/kernel/drivers/hid/hid-creative-sb0540.ko
usr/lib/modules/5.15.0-25-generic/kernel/drivers/hid/hid-elan.ko
usr/lib/modules/5.15.0-25-generic/kernel/drivers/hid/hid-elo.ko
usr/lib/modules/5.15.0-25-generic/kernel/drivers/hid/hid-ezkey.ko
usr/lib/modules/5.15.0-25-generic/kernel/drivers/hid/hid-ft260.ko
usr/lib/modules/5.15.0-25-generic/kernel/drivers/hid/hid-gembird.ko
usr/lib/modules/5.15.0-25-generic/kernel/drivers/hid/hid-generic.ko
usr/lib/modules/5.15.0-25-generic/kernel/drivers/hid/hid-gfrm.ko
usr/lib/modules/5.15.0-25-generic/kernel/drivers/hid/hid-glorious.ko
usr/lib/modules/5.15.0-25-generic/kernel/drivers/hid/hid-google-hammer.ko
usr/lib/modules/5.15.0-25-generic/kernel/drivers/hid/hid-gt683r.ko
usr/lib/modules/5.15.0-25-generic/kernel/drivers/hid/hid-holtek-kbd.ko
usr/lib/modules/5.15.0-25-generic/kernel/drivers/hid/hid-holtek-mouse.ko
usr/lib/modules/5.15.0-25-generic/kernel/drivers/hid/hid-hyperv.ko
usr/lib/modules/5.15.0-25-generic/kernel/drivers/hid/hid-ite.ko
usr/lib/modules/5.15.0-25-generic/kernel/drivers/hid/hid-jabra.ko
usr/lib/modules/5.15.0-25-generic/kernel/drivers/hid/hid-keytouch.ko
usr/lib/modules/5.15.0-25-generic/kernel/drivers/hid/hid-led.ko
usr/lib/modules/5.15.0-25-generic/kernel/drivers/hid/hid-lenovo.ko
usr/lib/modules/5.15.0-25-generic/kernel/drivers/hid/hid-lg-g15.ko
usr/lib/modules/5.15.0-25-generic/kernel/drivers/hid/hid-logitech-dj.ko
usr/lib/modules/5.15.0-25-generic/kernel/drivers/hid/hid-logitech-hidpp.ko
usr/lib/modules/5.15.0-25-generic/kernel/drivers/hid/hid-logitech.ko
usr/lib/modules/5.15.0-25-generic/kernel/drivers/hid/hid-macally.ko
usr/lib/modules/5.15.0-25-generic/kernel/drivers/hid/hid-maltron.ko
usr/lib/modules/5.15.0-25-generic/kernel/drivers/hid/hid-mcp2221.ko
usr/lib/modules/5.15.0-25-generic/kernel/drivers/hid/hid-mf.ko
usr/lib/modules/5.15.0-25-generic/kernel/drivers/hid/hid-microsoft.ko
usr/lib/modules/5.15.0-25-generic/kernel/drivers/hid/hid-monterey.ko
usr/lib/modules/5.15.0-25-generic/kernel/drivers/hid/hid-nti.ko
usr/lib/modules/5.15.0-25-generic/kernel/drivers/hid/hid-ortek.ko
usr/lib/modules/5.15.0-25-generic/kernel/drivers/hid/hid-penmount.ko
usr/lib/modules/5.15.0-25-generic/kernel/drivers/hid/hid-plantronics.ko
usr/lib/modules/5.15.0-25-generic/kernel/drivers/hid/hid-playstation.ko
usr/lib/modules/5.15.0-25-generic/kernel/drivers/hid/hid-primax.ko
usr/lib/modules/5.15.0-25-generic/kernel/drivers/hid/hid-prodikeys.ko
usr/lib/modules/5.15.0-25-generic/kernel/drivers/hid/hid-redragon.ko
usr/lib/modules/5.15.0-25-generic/kernel/drivers/hid/hid-retrode.ko
usr/lib/modules/5.15.0-25-generic/kernel/drivers/hid/hid-rmi.ko
usr/lib/modules/5.15.0-25-generic/kernel/drivers/hid/hid-roccat-arvo.ko
usr/lib/modules/5.15.0-25-generic/kernel/drivers/hid/hid-roccat-common.ko
usr/lib/modules/5.15.0-25-generic/kernel/drivers/hid/hid-roccat-isku.ko
usr/lib/modules/5.15.0-25-generic/kernel/drivers/hid/hid-roccat-lua.ko
usr/lib/modules/5.15.0-25-generic/kernel/drivers/hid/hid-roccat-ryos.ko
usr/lib/modules/5.15.0-25-generic/kernel/drivers/hid/hid-roccat-savu.ko
usr/lib/modules/5.15.0-25-generic/kernel/drivers/hid/hid-roccat.ko
usr/lib/modules/5.15.0-25-generic/kernel/drivers/hid/hid-samsung.ko
usr/lib/modules/5.15.0-25-generic/kernel/drivers/hid/hid-semitek.ko
usr/lib/modules/5.15.0-25-generic/kernel/drivers/hid/hid-sensor-custom.ko
usr/lib/modules/5.15.0-25-generic/kernel/drivers/hid/hid-sensor-hub.ko
usr/lib/modules/5.15.0-25-generic/kernel/drivers/hid/hid-sjoy.ko
usr/lib/modules/5.15.0-25-generic/kernel/drivers/hid/hid-steam.ko
usr/lib/modules/5.15.0-25-generic/kernel/drivers/hid/hid-steelseries.ko
usr/lib/modules/5.15.0-25-generic/kernel/drivers/hid/hid-sunplus.ko
usr/lib/modules/5.15.0-25-generic/kernel/drivers/hid/hid-thrustmaster.ko
usr/lib/modules/5.15.0-25-generic/kernel/drivers/hid/hid-topseed.ko
usr/lib/modules/5.15.0-25-generic/kernel/drivers/hid/hid-u2fzero.ko
usr/lib/modules/5.15.0-25-generic/kernel/drivers/hid/hid-udraw-ps3.ko
usr/lib/modules/5.15.0-25-generic/kernel/drivers/hid/hid-viewsonic.ko
usr/lib/modules/5.15.0-25-generic/kernel/drivers/hid/hid-vivaldi.ko
usr/lib/modules/5.15.0-25-generic/kernel/drivers/hid/hid-xinmo.ko
usr/lib/modules/5.15.0-25-generic/kernel/drivers/hid/hid.ko
usr/lib/modules/5.15.0-25-generic/kernel/drivers/hid/i2c-hid
usr/lib/modules/5.15.0-25-generic/kernel/drivers/hid/i2c-hid/i2c-hid-acpi.ko
usr/lib/modules/5.15.0-25-generic/kernel/drivers/hid/i2c-hid/i2c-hid.ko
usr/lib/modules/5.15.0-25-generic/kernel/drivers/hid/intel-ish-hid
usr/lib/modules/5.15.0-25-generic/kernel/drivers/hid/intel-ish-hid/intel-ish-ipc.ko
usr/lib/modules/5.15.0-25-generic/kernel/drivers/hid/intel-ish-hid/intel-ishtp-hid.ko
usr/lib/modules/5.15.0-25-generic/kernel/drivers/hid/intel-ish-hid/intel-ishtp-loader.ko
usr/lib/modules/5.15.0-25-generic/kernel/drivers/hid/intel-ish-hid/intel-ishtp.ko
usr/lib/modules/5.15.0-25-generic/kernel/drivers/hid/surface-hid
usr/lib/modules/5.15.0-25-generic/kernel/drivers/hid/surface-hid/surface_hid.ko
usr/lib/modules/5.15.0-25-generic/kernel/drivers/hid/surface-hid/surface_hid_core.ko
usr/lib/modules/5.15.0-25-generic/kernel/drivers/hid/surface-hid/surface_kbd.ko
usr/lib/modules/5.15.0-25-generic/kernel/drivers/hid/uhid.ko
usr/lib/modules/5.15.0-25-generic/kernel/drivers/hid/usbhid
usr/lib/modules/5.15.0-25-generic/kernel/drivers/hid/usbhid/usbhid.ko
usr/lib/modules/5.15.0-25-generic/kernel/drivers/hid/usbhid/usbkbd.ko
usr/lib/modules/5.15.0-25-generic/kernel/drivers/hid/usbhid/usbmouse.ko
usr/lib/modules/5.15.0-25-generic/kernel/drivers/hid/wacom.ko
usr/lib/modules/5.15.0-25-generic/kernel/drivers/hv
usr/lib/modules/5.15.0-25-generic/kernel/drivers/hv/hv_utils.ko
usr/lib/modules/5.15.0-25-generic/kernel/drivers/hv/hv_vmbus.ko
usr/lib/modules/5.15.0-25-generic/kernel/drivers/i2c
usr/lib/modules/5.15.0-25-generic/kernel/drivers/i2c/algos
usr/lib/modules/5.15.0-25-generic/kernel/drivers/i2c/algos/i2c-algo-bit.ko
usr/lib/modules/5.15.0-25-generic/kernel/drivers/i2c/algos/i2c-algo-pca.ko
usr/lib/modules/5.15.0-25-generic/kernel/drivers/i2c/busses
usr/lib/modules/5.15.0-25-generic/kernel/drivers/i2c/busses/i2c-ali1535.ko
usr/lib/modules/5.15.0-25-generic/kernel/drivers/i2c/busses/i2c-ali1563.ko
usr/lib/modules/5.15.0-25-generic/kernel/drivers/i2c/busses/i2c-ali15x3.ko
usr/lib/modules/5.15.0-25-generic/kernel/drivers/i2c/busses/i2c-amd-mp2-pci.ko
usr/lib/modules/5.15.0-25-generic/kernel/drivers/i2c/busses/i2c-amd-mp2-plat.ko
usr/lib/modules/5.15.0-25-generic/kernel/drivers/i2c/busses/i2c-amd756-s4882.ko
usr/lib/modules/5.15.0-25-generic/kernel/drivers/i2c/busses/i2c-amd756.ko
usr/lib/modules/5.15.0-25-generic/kernel/drivers/i2c/busses/i2c-amd8111.ko
usr/lib/modules/5.15.0-25-generic/kernel/drivers/i2c/busses/i2c-cbus-gpio.ko
usr/lib/modules/5.15.0-25-generic/kernel/drivers/i2c/busses/i2c-cht-wc.ko
usr/lib/modules/5.15.0-25-generic/kernel/drivers/i2c/busses/i2c-cp2615.ko
usr/lib/modules/5.15.0-25-generic/kernel/drivers/i2c/busses/i2c-cros-ec-tunnel.ko
usr/lib/modules/5.15.0-25-generic/kernel/drivers/i2c/busses/i2c-designware-pci.ko
usr/lib/modules/5.15.0-25-generic/kernel/drivers/i2c/busses/i2c-diolan-u2c.ko
usr/lib/modules/5.15.0-25-generic/kernel/drivers/i2c/busses/i2c-dln2.ko
usr/lib/modules/5.15.0-25-generic/kernel/drivers/i2c/busses/i2c-gpio.ko
usr/lib/modules/5.15.0-25-generic/kernel/drivers/i2c/busses/i2c-i801.ko
usr/lib/modules/5.15.0-25-generic/kernel/drivers/i2c/busses/i2c-isch.ko
usr/lib/modules/5.15.0-25-generic/kernel/drivers/i2c/busses/i2c-ismt.ko
usr/lib/modules/5.15.0-25-generic/kernel/drivers/i2c/busses/i2c-kempld.ko
usr/lib/modules/5.15.0-25-generic/kernel/drivers/i2c/busses/i2c-mlxcpld.ko
usr/lib/modules/5.15.0-25-generic/kernel/drivers/i2c/busses/i2c-nforce2-s4985.ko
usr/lib/modules/5.15.0-25-generic/kernel/drivers/i2c/busses/i2c-nforce2.ko
usr/lib/modules/5.15.0-25-generic/kernel/drivers/i2c/busses/i2c-nvidia-gpu.ko
usr/lib/modules/5.15.0-25-generic/kernel/drivers/i2c/busses/i2c-ocores.ko
usr/lib/modules/5.15.0-25-generic/kernel/drivers/i2c/busses/i2c-parport.ko
usr/lib/modules/5.15.0-25-generic/kernel/drivers/i2c/busses/i2c-pca-platform.ko
usr/lib/modules/5.15.0-25-generic/kernel/drivers/i2c/busses/i2c-piix4.ko
usr/lib/modules/5.15.0-25-generic/kernel/drivers/i2c/busses/i2c-robotfuzz-osif.ko
usr/lib/modules/5.15.0-25-generic/kernel/drivers/i2c/busses/i2c-scmi.ko
usr/lib/modules/5.15.0-25-generic/kernel/drivers/i2c/busses/i2c-simtec.ko
usr/lib/modules/5.15.0-25-generic/kernel/drivers/i2c/busses/i2c-sis5595.ko
usr/lib/modules/5.15.0-25-generic/kernel/drivers/i2c/busses/i2c-sis630.ko
usr/lib/modules/5.15.0-25-generic/kernel/drivers/i2c/busses/i2c-sis96x.ko
usr/lib/modules/5.15.0-25-generic/kernel/drivers/i2c/busses/i2c-taos-evm.ko
usr/lib/modules/5.15.0-25-generic/kernel/drivers/i2c/busses/i2c-tiny-usb.ko
usr/lib/modules/5.15.0-25-generic/kernel/drivers/i2c/busses/i2c-via.ko
usr/lib/modules/5.15.0-25-generic/kernel/drivers/i2c/busses/i2c-viapro.ko
usr/lib/modules/5.15.0-25-generic/kernel/drivers/i2c/busses/i2c-viperboard.ko
usr/lib/modules/5.15.0-25-generic/kernel/drivers/i2c/busses/i2c-virtio.ko
usr/lib/modules/5.15.0-25-generic/kernel/drivers/i2c/busses/i2c-xiic.ko
usr/lib/modules/5.15.0-25-generic/kernel/drivers/i2c/i2c-mux.ko
usr/lib/modules/5.15.0-25-generic/kernel/drivers/i2c/i2c-smbus.ko
usr/lib/modules/5.15.0-25-generic/kernel/drivers/i2c/muxes
usr/lib/modules/5.15.0-25-generic/kernel/drivers/i2c/muxes/i2c-mux-gpio.ko
usr/lib/modules/5.15.0-25-generic/kernel/drivers/i2c/muxes/i2c-mux-ltc4306.ko
usr/lib/modules/5.15.0-25-generic/kernel/drivers/i2c/muxes/i2c-mux-mlxcpld.ko
usr/lib/modules/5.15.0-25-generic/kernel/drivers/i2c/muxes/i2c-mux-pca9541.ko
usr/lib/modules/5.15.0-25-generic/kernel/drivers/i2c/muxes/i2c-mux-pca954x.ko
usr/lib/modules/5.15.0-25-generic/kernel/drivers/i2c/muxes/i2c-mux-reg.ko
usr/lib/modules/5.15.0-25-generic/kernel/drivers/iio
usr/lib/modules/5.15.0-25-generic/kernel/drivers/iio/common
usr/lib/modules/5.15.0-25-generic/kernel/drivers/iio/common/hid-sensors
usr/lib/modules/5.15.0-25-generic/kernel/drivers/iio/common/hid-sensors/hid-sensor-iio-common.ko
usr/lib/modules/5.15.0-25-generic/kernel/drivers/iio/industrialio.ko
usr/lib/modules/5.15.0-25-generic/kernel/drivers/infiniband
usr/lib/modules/5.15.0-25-generic/kernel/drivers/infiniband/core
usr/lib/modules/5.15.0-25-generic/kernel/drivers/infiniband/core/ib_cm.ko
usr/lib/modules/5.15.0-25-generic/kernel/drivers/infiniband/core/ib_core.ko
usr/lib/modules/5.15.0-25-generic/kernel/drivers/infiniband/core/ib_uverbs.ko
usr/lib/modules/5.15.0-25-generic/kernel/drivers/infiniband/core/iw_cm.ko
usr/lib/modules/5.15.0-25-generic/kernel/drivers/infiniband/core/rdma_cm.ko
usr/lib/modules/5.15.0-25-generic/kernel/drivers/infiniband/hw
usr/lib/modules/5.15.0-25-generic/kernel/drivers/infiniband/hw/mlx4
usr/lib/modules/5.15.0-25-generic/kernel/drivers/infiniband/hw/mlx4/mlx4_ib.ko
usr/lib/modules/5.15.0-25-generic/kernel/drivers/infiniband/hw/mlx5
usr/lib/modules/5.15.0-25-generic/kernel/drivers/infiniband/hw/mlx5/mlx5_ib.ko
usr/lib/modules/5.15.0-25-generic/kernel/drivers/infiniband/ulp
usr/lib/modules/5.15.0-25-generic/kernel/drivers/infiniband/ulp/rtrs
usr/lib/modules/5.15.0-25-generic/kernel/drivers/infiniband/ulp/rtrs/rtrs-client.ko
usr/lib/modules/5.15.0-25-generic/kernel/drivers/infiniband/ulp/rtrs/rtrs-core.ko
usr/lib/modules/5.15.0-25-generic/kernel/drivers/infiniband/ulp/rtrs/rtrs-server.ko
usr/lib/modules/5.15.0-25-generic/kernel/drivers/input
usr/lib/modules/5.15.0-25-generic/kernel/drivers/input/ff-memless.ko
usr/lib/modules/5.15.0-25-generic/kernel/drivers/input/keyboard
usr/lib/modules/5.15.0-25-generic/kernel/drivers/input/keyboard/adc-keys.ko
usr/lib/modules/5.15.0-25-generic/kernel/drivers/input/keyboard/adp5520-keys.ko
usr/lib/modules/5.15.0-25-generic/kernel/drivers/input/keyboard/adp5588-keys.ko
usr/lib/modules/5.15.0-25-generic/kernel/drivers/input/keyboard/adp5589-keys.ko
usr/lib/modules/5.15.0-25-generic/kernel/drivers/input/keyboard/applespi.ko
usr/lib/modules/5.15.0-25-generic/kernel/drivers/input/keyboard/cros_ec_keyb.ko
usr/lib/modules/5.15.0-25-generic/kernel/drivers/input/keyboard/dlink-dir685-touchkeys.ko
usr/lib/modules/5.15.0-25-generic/kernel/drivers/input/keyboard/gpio_keys.ko
usr/lib/modules/5.15.0-25-generic/kernel/drivers/input/keyboard/gpio_keys_polled.ko
usr/lib/modules/5.15.0-25-generic/kernel/drivers/input/keyboard/iqs62x-keys.ko
usr/lib/modules/5.15.0-25-generic/kernel/drivers/input/keyboard/lkkbd.ko
usr/lib/modules/5.15.0-25-generic/kernel/drivers/input/keyboard/lm8323.ko
usr/lib/modules/5.15.0-25-generic/kernel/drivers/input/keyboard/lm8333.ko
usr/lib/modules/5.15.0-25-generic/kernel/drivers/input/keyboard/matrix_keypad.ko
usr/lib/modules/5.15.0-25-generic/kernel/drivers/input/keyboard/max7359_keypad.ko
usr/lib/modules/5.15.0-25-generic/kernel/drivers/input/keyboard/mcs_touchkey.ko
usr/lib/modules/5.15.0-25-generic/kernel/drivers/input/keyboard/mpr121_touchkey.ko
usr/lib/modules/5.15.0-25-generic/kernel/drivers/input/keyboard/mtk-pmic-keys.ko
usr/lib/modules/5.15.0-25-generic/kernel/drivers/input/keyboard/newtonkbd.ko
usr/lib/modules/5.15.0-25-generic/kernel/drivers/input/keyboard/opencores-kbd.ko
usr/lib/modules/5.15.0-25-generic/kernel/drivers/input/keyboard/qt1050.ko
usr/lib/modules/5.15.0-25-generic/kernel/drivers/input/keyboard/qt1070.ko
usr/lib/modules/5.15.0-25-generic/kernel/drivers/input/keyboard/qt2160.ko
usr/lib/modules/5.15.0-25-generic/kernel/drivers/input/keyboard/samsung-keypad.ko
usr/lib/modules/5.15.0-25-generic/kernel/drivers/input/keyboard/stowaway.ko
usr/lib/modules/5.15.0-25-generic/kernel/drivers/input/keyboard/sunkbd.ko
usr/lib/modules/5.15.0-25-generic/kernel/drivers/input/keyboard/tca6416-keypad.ko
usr/lib/modules/5.15.0-25-generic/kernel/drivers/input/keyboard/tca8418_keypad.ko
usr/lib/modules/5.15.0-25-generic/kernel/drivers/input/keyboard/tm2-touchkey.ko
usr/lib/modules/5.15.0-25-generic/kernel/drivers/input/keyboard/twl4030_keypad.ko
usr/lib/modules/5.15.0-25-generic/kernel/drivers/input/keyboard/xtkbd.ko
usr/lib/modules/5.15.0-25-generic/kernel/drivers/input/matrix-keymap.ko
usr/lib/modules/5.15.0-25-generic/kernel/drivers/input/mouse
usr/lib/modules/5.15.0-25-generic/kernel/drivers/input/mouse/psmouse.ko
usr/lib/modules/5.15.0-25-generic/kernel/drivers/input/rmi4
usr/lib/modules/5.15.0-25-generic/kernel/drivers/input/rmi4/rmi_core.ko
usr/lib/modules/5.15.0-25-generic/kernel/drivers/input/serio
usr/lib/modules/5.15.0-25-generic/kernel/drivers/input/serio/hyperv-keyboard.ko
usr/lib/modules/5.15.0-25-generic/kernel/drivers/input/sparse-keymap.ko
usr/lib/modules/5.15.0-25-generic/kernel/drivers/mcb
usr/lib/modules/5.15.0-25-generic/kernel/drivers/mcb/mcb.ko
usr/lib/modules/5.15.0-25-generic/kernel/drivers/media
usr/lib/modules/5.15.0-25-generic/kernel/drivers/media/common
usr/lib/modules/5.15.0-25-generic/kernel/drivers/media/common/videobuf2
usr/lib/modules/5.15.0-25-generic/kernel/drivers/media/common/videobuf2/videobuf2-common.ko
usr/lib/modules/5.15.0-25-generic/kernel/drivers/media/common/videobuf2/videobuf2-memops.ko
usr/lib/modules/5.15.0-25-generic/kernel/drivers/media/common/videobuf2/videobuf2-v4l2.ko
usr/lib/modules/5.15.0-25-generic/kernel/drivers/media/common/videobuf2/videobuf2-vmalloc.ko
usr/lib/modules/5.15.0-25-generic/kernel/drivers/media/mc
usr/lib/modules/5.15.0-25-generic/kernel/drivers/media/mc/mc.ko
usr/lib/modules/5.15.0-25-generic/kernel/drivers/media/v4l2-core
usr/lib/modules/5.15.0-25-generic/kernel/drivers/media/v4l2-core/videodev.ko
usr/lib/modules/5.15.0-25-generic/kernel/drivers/message
usr/lib/modules/5.15.0-25-generic/kernel/drivers/message/fusion
usr/lib/modules/5.15.0-25-generic/kernel/drivers/message/fusion/mptbase.ko
usr/lib/modules/5.15.0-25-generic/kernel/drivers/message/fusion/mptfc.ko
usr/lib/modules/5.15.0-25-generic/kernel/drivers/message/fusion/mptsas.ko
usr/lib/modules/5.15.0-25-generic/kernel/drivers/message/fusion/mptscsih.ko
usr/lib/modules/5.15.0-25-generic/kernel/drivers/message/fusion/mptspi.ko
usr/lib/modules/5.15.0-25-generic/kernel/drivers/mfd
usr/lib/modules/5.15.0-25-generic/kernel/drivers/mfd/88pm800.ko
usr/lib/modules/5.15.0-25-generic/kernel/drivers/mfd/88pm805.ko
usr/lib/modules/5.15.0-25-generic/kernel/drivers/mfd/88pm80x.ko
usr/lib/modules/5.15.0-25-generic/kernel/drivers/mfd/arizona-i2c.ko
usr/lib/modules/5.15.0-25-generic/kernel/drivers/mfd/arizona-spi.ko
usr/lib/modules/5.15.0-25-generic/kernel/drivers/mfd/arizona.ko
usr/lib/modules/5.15.0-25-generic/kernel/drivers/mfd/atc260x-core.ko
usr/lib/modules/5.15.0-25-generic/kernel/drivers/mfd/atc260x-i2c.ko
usr/lib/modules/5.15.0-25-generic/kernel/drivers/mfd/axp20x-i2c.ko
usr/lib/modules/5.15.0-25-generic/kernel/drivers/mfd/axp20x.ko
usr/lib/modules/5.15.0-25-generic/kernel/drivers/mfd/bcm590xx.ko
usr/lib/modules/5.15.0-25-generic/kernel/drivers/mfd/bd9571mwv.ko
usr/lib/modules/5.15.0-25-generic/kernel/drivers/mfd/cros_ec_dev.ko
usr/lib/modules/5.15.0-25-generic/kernel/drivers/mfd/da9062-core.ko
usr/lib/modules/5.15.0-25-generic/kernel/drivers/mfd/da9150-core.ko
usr/lib/modules/5.15.0-25-generic/kernel/drivers/mfd/dln2.ko
usr/lib/modules/5.15.0-25-generic/kernel/drivers/mfd/htc-pasic3.ko
usr/lib/modules/5.15.0-25-generic/kernel/drivers/mfd/intel-lpss-acpi.ko
usr/lib/modules/5.15.0-25-generic/kernel/drivers/mfd/intel-lpss-pci.ko
usr/lib/modules/5.15.0-25-generic/kernel/drivers/mfd/intel-lpss.ko
usr/lib/modules/5.15.0-25-generic/kernel/drivers/mfd/intel-m10-bmc.ko
usr/lib/modules/5.15.0-25-generic/kernel/drivers/mfd/intel_pmc_bxt.ko
usr/lib/modules/5.15.0-25-generic/kernel/drivers/mfd/intel_pmt.ko
usr/lib/modules/5.15.0-25-generic/kernel/drivers/mfd/intel_quark_i2c_gpio.ko
usr/lib/modules/5.15.0-25-generic/kernel/drivers/mfd/intel_soc_pmic_bxtwc.ko
usr/lib/modules/5.15.0-25-generic/kernel/drivers/mfd/intel_soc_pmic_chtdc_ti.ko
usr/lib/modules/5.15.0-25-generic/kernel/drivers/mfd/intel_soc_pmic_mrfld.ko
usr/lib/modules/5.15.0-25-generic/kernel/drivers/mfd/iqs62x.ko
usr/lib/modules/5.15.0-25-generic/kernel/drivers/mfd/janz-cmodio.ko
usr/lib/modules/5.15.0-25-generic/kernel/drivers/mfd/kempld-core.ko
usr/lib/modules/5.15.0-25-generic/kernel/drivers/mfd/lm3533-core.ko
usr/lib/modules/5.15.0-25-generic/kernel/drivers/mfd/lm3533-ctrlbank.ko
usr/lib/modules/5.15.0-25-generic/kernel/drivers/mfd/lp3943.ko
usr/lib/modules/5.15.0-25-generic/kernel/drivers/mfd/lp873x.ko
usr/lib/modules/5.15.0-25-generic/kernel/drivers/mfd/lpc_ich.ko
usr/lib/modules/5.15.0-25-generic/kernel/drivers/mfd/lpc_sch.ko
usr/lib/modules/5.15.0-25-generic/kernel/drivers/mfd/madera-i2c.ko
usr/lib/modules/5.15.0-25-generic/kernel/drivers/mfd/madera-spi.ko
usr/lib/modules/5.15.0-25-generic/kernel/drivers/mfd/madera.ko
usr/lib/modules/5.15.0-25-generic/kernel/drivers/mfd/max8907.ko
usr/lib/modules/5.15.0-25-generic/kernel/drivers/mfd/mc13xxx-core.ko
usr/lib/modules/5.15.0-25-generic/kernel/drivers/mfd/mc13xxx-i2c.ko
usr/lib/modules/5.15.0-25-generic/kernel/drivers/mfd/mc13xxx-spi.ko
usr/lib/modules/5.15.0-25-generic/kernel/drivers/mfd/menf21bmc.ko
usr/lib/modules/5.15.0-25-generic/kernel/drivers/mfd/mfd-aaeon.ko
usr/lib/modules/5.15.0-25-generic/kernel/drivers/mfd/mp2629.ko
usr/lib/modules/5.15.0-25-generic/kernel/drivers/mfd/mt6360-core.ko
usr/lib/modules/5.15.0-25-generic/kernel/drivers/mfd/mt6397.ko
usr/lib/modules/5.15.0-25-generic/kernel/drivers/mfd/pcf50633-adc.ko
usr/lib/modules/5.15.0-25-generic/kernel/drivers/mfd/pcf50633-gpio.ko
usr/lib/modules/5.15.0-25-generic/kernel/drivers/mfd/pcf50633.ko
usr/lib/modules/5.15.0-25-generic/kernel/drivers/mfd/rave-sp.ko
usr/lib/modules/5.15.0-25-generic/kernel/drivers/mfd/rdc321x-southbridge.ko
usr/lib/modules/5.15.0-25-generic/kernel/drivers/mfd/retu-mfd.ko
usr/lib/modules/5.15.0-25-generic/kernel/drivers/mfd/rt4831.ko
usr/lib/modules/5.15.0-25-generic/kernel/drivers/mfd/rt5033.ko
usr/lib/modules/5.15.0-25-generic/kernel/drivers/mfd/si476x-core.ko
usr/lib/modules/5.15.0-25-generic/kernel/drivers/mfd/sky81452.ko
usr/lib/modules/5.15.0-25-generic/kernel/drivers/mfd/sm501.ko
usr/lib/modules/5.15.0-25-generic/kernel/drivers/mfd/ti-lmu.ko
usr/lib/modules/5.15.0-25-generic/kernel/drivers/mfd/ti_am335x_tscadc.ko
usr/lib/modules/5.15.0-25-generic/kernel/drivers/mfd/tps6105x.ko
usr/lib/modules/5.15.0-25-generic/kernel/drivers/mfd/tps65010.ko
usr/lib/modules/5.15.0-25-generic/kernel/drivers/mfd/tps6507x.ko
usr/lib/modules/5.15.0-25-generic/kernel/drivers/mfd/tps65086.ko
usr/lib/modules/5.15.0-25-generic/kernel/drivers/mfd/tqmx86.ko
usr/lib/modules/5.15.0-25-generic/kernel/drivers/mfd/ucb1400_core.ko
usr/lib/modules/5.15.0-25-generic/kernel/drivers/mfd/viperboard.ko
usr/lib/modules/5.15.0-25-generic/kernel/drivers/mfd/vx855.ko
usr/lib/modules/5.15.0-25-generic/kernel/drivers/mfd/wcd934x.ko
usr/lib/modules/5.15.0-25-generic/kernel/drivers/mfd/wl1273-core.ko
usr/lib/modules/5.15.0-25-generic/kernel/drivers/mfd/wm8994.ko
usr/lib/modules/5.15.0-25-generic/kernel/drivers/misc
usr/lib/modules/5.15.0-25-generic/kernel/drivers/misc/cardreader
usr/lib/modules/5.15.0-25-generic/kernel/drivers/misc/cardreader/alcor_pci.ko
usr/lib/modules/5.15.0-25-generic/kernel/drivers/misc/cardreader/rtsx_pci.ko
usr/lib/modules/5.15.0-25-generic/kernel/drivers/misc/cardreader/rtsx_usb.ko
usr/lib/modules/5.15.0-25-generic/kernel/drivers/misc/cb710
usr/lib/modules/5.15.0-25-generic/kernel/drivers/misc/cb710/cb710.ko
usr/lib/modules/5.15.0-25-generic/kernel/drivers/misc/eeprom
usr/lib/modules/5.15.0-25-generic/kernel/drivers/misc/eeprom/eeprom_93cx6.ko
usr/lib/modules/5.15.0-25-generic/kernel/drivers/misc/enclosure.ko
usr/lib/modules/5.15.0-25-generic/kernel/drivers/misc/tifm_core.ko
usr/lib/modules/5.15.0-25-generic/kernel/drivers/mmc
usr/lib/modules/5.15.0-25-generic/kernel/drivers/mmc/core
usr/lib/modules/5.15.0-25-generic/kernel/drivers/mmc/core/mmc_block.ko
usr/lib/modules/5.15.0-25-generic/kernel/drivers/mmc/core/sdio_uart.ko
usr/lib/modules/5.15.0-25-generic/kernel/drivers/mmc/host
usr/lib/modules/5.15.0-25-generic/kernel/drivers/mmc/host/alcor.ko
usr/lib/modules/5.15.0-25-generic/kernel/drivers/mmc/host/cb710-mmc.ko
usr/lib/modules/5.15.0-25-generic/kernel/drivers/mmc/host/cqhci.ko
usr/lib/modules/5.15.0-25-generic/kernel/drivers/mmc/host/mmc_spi.ko
usr/lib/modules/5.15.0-25-generic/kernel/drivers/mmc/host/mtk-sd.ko
usr/lib/modules/5.15.0-25-generic/kernel/drivers/mmc/host/of_mmc_spi.ko
usr/lib/modules/5.15.0-25-generic/kernel/drivers/mmc/host/rtsx_pci_sdmmc.ko
usr/lib/modules/5.15.0-25-generic/kernel/drivers/mmc/host/rtsx_usb_sdmmc.ko
usr/lib/modules/5.15.0-25-generic/kernel/drivers/mmc/host/sdhci-acpi.ko
usr/lib/modules/5.15.0-25-generic/kernel/drivers/mmc/host/sdhci-pci.ko
usr/lib/modules/5.15.0-25-generic/kernel/drivers/mmc/host/sdhci-pltfm.ko
usr/lib/modules/5.15.0-25-generic/kernel/drivers/mmc/host/sdhci-xenon-driver.ko
usr/lib/modules/5.15.0-25-generic/kernel/drivers/mmc/host/sdhci.ko
usr/lib/modules/5.15.0-25-generic/kernel/drivers/mmc/host/sdhci_f_sdh30.ko
usr/lib/modules/5.15.0-25-generic/kernel/drivers/mmc/host/sdricoh_cs.ko
usr/lib/modules/5.15.0-25-generic/kernel/drivers/mmc/host/tifm_sd.ko
usr/lib/modules/5.15.0-25-generic/kernel/drivers/mmc/host/toshsd.ko
usr/lib/modules/5.15.0-25-generic/kernel/drivers/mmc/host/usdhi6rol0.ko
usr/lib/modules/5.15.0-25-generic/kernel/drivers/mmc/host/ushc.ko
usr/lib/modules/5.15.0-25-generic/kernel/drivers/mmc/host/via-sdmmc.ko
usr/lib/modules/5.15.0-25-generic/kernel/drivers/mmc/host/vub300.ko
usr/lib/modules/5.15.0-25-generic/kernel/drivers/mmc/host/wbsd.ko
usr/lib/modules/5.15.0-25-generic/kernel/drivers/mtd
usr/lib/modules/5.15.0-25-generic/kernel/drivers/mtd/mtd.ko
usr/lib/modules/5.15.0-25-generic/kernel/drivers/mux
usr/lib/modules/5.15.0-25-generic/kernel/drivers/mux/mux-core.ko
usr/lib/modules/5.15.0-25-generic/kernel/drivers/net
usr/lib/modules/5.15.0-25-generic/kernel/drivers/net/bareudp.ko
usr/lib/modules/5.15.0-25-generic/kernel/drivers/net/caif
usr/lib/modules/5.15.0-25-generic/kernel/drivers/net/caif/caif_serial.ko
usr/lib/modules/5.15.0-25-generic/kernel/drivers/net/caif/caif_virtio.ko
usr/lib/modules/5.15.0-25-generic/kernel/drivers/net/dsa
usr/lib/modules/5.15.0-25-generic/kernel/drivers/net/dsa/b53
usr/lib/modules/5.15.0-25-generic/kernel/drivers/net/dsa/b53/b53_common.ko
usr/lib/modules/5.15.0-25-generic/kernel/drivers/net/dsa/b53/b53_mdio.ko
usr/lib/modules/5.15.0-25-generic/kernel/drivers/net/dsa/b53/b53_mmap.ko
usr/lib/modules/5.15.0-25-generic/kernel/drivers/net/dsa/b53/b53_serdes.ko
usr/lib/modules/5.15.0-25-generic/kernel/drivers/net/dsa/b53/b53_spi.ko
usr/lib/modules/5.15.0-25-generic/kernel/drivers/net/dsa/b53/b53_srab.ko
usr/lib/modules/5.15.0-25-generic/kernel/drivers/net/dsa/bcm-sf2.ko
usr/lib/modules/5.15.0-25-generic/kernel/drivers/net/dsa/hirschmann
usr/lib/modules/5.15.0-25-generic/kernel/drivers/net/dsa/hirschmann/hellcreek_sw.ko
usr/lib/modules/5.15.0-25-generic/kernel/drivers/net/dsa/lan9303-core.ko
usr/lib/modules/5.15.0-25-generic/kernel/drivers/net/dsa/lan9303_i2c.ko
usr/lib/modules/5.15.0-25-generic/kernel/drivers/net/dsa/lan9303_mdio.ko
usr/lib/modules/5.15.0-25-generic/kernel/drivers/net/dsa/lantiq_gswip.ko
usr/lib/modules/5.15.0-25-generic/kernel/drivers/net/dsa/microchip
usr/lib/modules/5.15.0-25-generic/kernel/drivers/net/dsa/microchip/ksz8795.ko
usr/lib/modules/5.15.0-25-generic/kernel/drivers/net/dsa/microchip/ksz8795_spi.ko
usr/lib/modules/5.15.0-25-generic/kernel/drivers/net/dsa/microchip/ksz8863_smi.ko
usr/lib/modules/5.15.0-25-generic/kernel/drivers/net/dsa/microchip/ksz9477.ko
usr/lib/modules/5.15.0-25-generic/kernel/drivers/net/dsa/microchip/ksz9477_i2c.ko
usr/lib/modules/5.15.0-25-generic/kernel/drivers/net/dsa/microchip/ksz9477_spi.ko
usr/lib/modules/5.15.0-25-generic/kernel/drivers/net/dsa/microchip/ksz_common.ko
usr/lib/modules/5.15.0-25-generic/kernel/drivers/net/dsa/mt7530.ko
usr/lib/modules/5.15.0-25-generic/kernel/drivers/net/dsa/mv88e6060.ko
usr/lib/modules/5.15.0-25-generic/kernel/drivers/net/dsa/mv88e6xxx
usr/lib/modules/5.15.0-25-generic/kernel/drivers/net/dsa/mv88e6xxx/mv88e6xxx.ko
usr/lib/modules/5.15.0-25-generic/kernel/drivers/net/dsa/ocelot
usr/lib/modules/5.15.0-25-generic/kernel/drivers/net/dsa/ocelot/mscc_seville.ko
usr/lib/modules/5.15.0-25-generic/kernel/drivers/net/dsa/qca
usr/lib/modules/5.15.0-25-generic/kernel/drivers/net/dsa/qca/ar9331.ko
usr/lib/modules/5.15.0-25-generic/kernel/drivers/net/dsa/qca8k.ko
usr/lib/modules/5.15.0-25-generic/kernel/drivers/net/dsa/realtek-smi.ko
usr/lib/modules/5.15.0-25-generic/kernel/drivers/net/dsa/sja1105
usr/lib/modules/5.15.0-25-generic/kernel/drivers/net/dsa/sja1105/sja1105.ko
usr/lib/modules/5.15.0-25-generic/kernel/drivers/net/dsa/vitesse-vsc73xx-core.ko
usr/lib/modules/5.15.0-25-generic/kernel/drivers/net/dsa/vitesse-vsc73xx-platform.ko
usr/lib/modules/5.15.0-25-generic/kernel/drivers/net/dsa/vitesse-vsc73xx-spi.ko
usr/lib/modules/5.15.0-25-generic/kernel/drivers/net/dsa/xrs700x
usr/lib/modules/5.15.0-25-generic/kernel/drivers/net/dsa/xrs700x/xrs700x.ko
usr/lib/modules/5.15.0-25-generic/kernel/drivers/net/dsa/xrs700x/xrs700x_i2c.ko
usr/lib/modules/5.15.0-25-generic/kernel/drivers/net/dsa/xrs700x/xrs700x_mdio.ko
usr/lib/modules/5.15.0-25-generic/kernel/drivers/net/eql.ko
usr/lib/modules/5.15.0-25-generic/kernel/drivers/net/ethernet
usr/lib/modules/5.15.0-25-generic/kernel/drivers/net/ethernet/3com
usr/lib/modules/5.15.0-25-generic/kernel/drivers/net/ethernet/3com/3c509.ko
usr/lib/modules/5.15.0-25-generic/kernel/drivers/net/ethernet/3com/3c574_cs.ko
usr/lib/modules/5.15.0-25-generic/kernel/drivers/net/ethernet/3com/3c589_cs.ko
usr/lib/modules/5.15.0-25-generic/kernel/drivers/net/ethernet/3com/3c59x.ko
usr/lib/modules/5.15.0-25-generic/kernel/drivers/net/ethernet/3com/typhoon.ko
usr/lib/modules/5.15.0-25-generic/kernel/drivers/net/ethernet/8390
usr/lib/modules/5.15.0-25-generic/kernel/drivers/net/ethernet/8390/8390.ko
usr/lib/modules/5.15.0-25-generic/kernel/drivers/net/ethernet/8390/axnet_cs.ko
usr/lib/modules/5.15.0-25-generic/kernel/drivers/net/ethernet/8390/ne2k-pci.ko
usr/lib/modules/5.15.0-25-generic/kernel/drivers/net/ethernet/8390/pcnet_cs.ko
usr/lib/modules/5.15.0-25-generic/kernel/drivers/net/ethernet/adaptec
usr/lib/modules/5.15.0-25-generic/kernel/drivers/net/ethernet/adaptec/starfire.ko
usr/lib/modules/5.15.0-25-generic/kernel/drivers/net/ethernet/agere
usr/lib/modules/5.15.0-25-generic/kernel/drivers/net/ethernet/agere/et131x.ko
usr/lib/modules/5.15.0-25-generic/kernel/drivers/net/ethernet/alacritech
usr/lib/modules/5.15.0-25-generic/kernel/drivers/net/ethernet/alacritech/slicoss.ko
usr/lib/modules/5.15.0-25-generic/kernel/drivers/net/ethernet/alteon
usr/lib/modules/5.15.0-25-generic/kernel/drivers/net/ethernet/alteon/acenic.ko
usr/lib/modules/5.15.0-25-generic/kernel/drivers/net/ethernet/altera
usr/lib/modules/5.15.0-25-generic/kernel/drivers/net/ethernet/altera/altera_tse.ko
usr/lib/modules/5.15.0-25-generic/kernel/drivers/net/ethernet/amazon
usr/lib/modules/5.15.0-25-generic/kernel/drivers/net/ethernet/amazon/ena
usr/lib/modules/5.15.0-25-generic/kernel/drivers/net/ethernet/amazon/ena/ena.ko
usr/lib/modules/5.15.0-25-generic/kernel/drivers/net/ethernet/amd
usr/lib/modules/5.15.0-25-generic/kernel/drivers/net/ethernet/amd/amd8111e.ko
usr/lib/modules/5.15.0-25-generic/kernel/drivers/net/ethernet/amd/nmclan_cs.ko
usr/lib/modules/5.15.0-25-generic/kernel/drivers/net/ethernet/amd/pcnet32.ko
usr/lib/modules/5.15.0-25-generic/kernel/drivers/net/ethernet/amd/xgbe
usr/lib/modules/5.15.0-25-generic/kernel/drivers/net/ethernet/amd/xgbe/amd-xgbe.ko
usr/lib/modules/5.15.0-25-generic/kernel/drivers/net/ethernet/aquantia
usr/lib/modules/5.15.0-25-generic/kernel/drivers/net/ethernet/aquantia/atlantic
usr/lib/modules/5.15.0-25-generic/kernel/drivers/net/ethernet/aquantia/atlantic/atlantic.ko
usr/lib/modules/5.15.0-25-generic/kernel/drivers/net/ethernet/atheros
usr/lib/modules/5.15.0-25-generic/kernel/drivers/net/ethernet/atheros/alx
usr/lib/modules/5.15.0-25-generic/kernel/drivers/net/ethernet/atheros/alx/alx.ko
usr/lib/modules/5.15.0-25-generic/kernel/drivers/net/ethernet/atheros/atl1c
usr/lib/modules/5.15.0-25-generic/kernel/drivers/net/ethernet/atheros/atl1c/atl1c.ko
usr/lib/modules/5.15.0-25-generic/kernel/drivers/net/ethernet/atheros/atl1e
usr/lib/modules/5.15.0-25-generic/kernel/drivers/net/ethernet/atheros/atl1e/atl1e.ko
usr/lib/modules/5.15.0-25-generic/kernel/drivers/net/ethernet/atheros/atlx
usr/lib/modules/5.15.0-25-generic/kernel/drivers/net/ethernet/atheros/atlx/atl1.ko
usr/lib/modules/5.15.0-25-generic/kernel/drivers/net/ethernet/atheros/atlx/atl2.ko
usr/lib/modules/5.15.0-25-generic/kernel/drivers/net/ethernet/broadcom
usr/lib/modules/5.15.0-25-generic/kernel/drivers/net/ethernet/broadcom/b44.ko
usr/lib/modules/5.15.0-25-generic/kernel/drivers/net/ethernet/broadcom/bcmsysport.ko
usr/lib/modules/5.15.0-25-generic/kernel/drivers/net/ethernet/broadcom/bnx2.ko
usr/lib/modules/5.15.0-25-generic/kernel/drivers/net/ethernet/broadcom/bnx2x
usr/lib/modules/5.15.0-25-generic/kernel/drivers/net/ethernet/broadcom/bnx2x/bnx2x.ko
usr/lib/modules/5.15.0-25-generic/kernel/drivers/net/ethernet/broadcom/bnxt
usr/lib/modules/5.15.0-25-generic/kernel/drivers/net/ethernet/broadcom/bnxt/bnxt_en.ko
usr/lib/modules/5.15.0-25-generic/kernel/drivers/net/ethernet/broadcom/cnic.ko
usr/lib/modules/5.15.0-25-generic/kernel/drivers/net/ethernet/broadcom/genet
usr/lib/modules/5.15.0-25-generic/kernel/drivers/net/ethernet/broadcom/genet/genet.ko
usr/lib/modules/5.15.0-25-generic/kernel/drivers/net/ethernet/broadcom/tg3.ko
usr/lib/modules/5.15.0-25-generic/kernel/drivers/net/ethernet/brocade
usr/lib/modules/5.15.0-25-generic/kernel/drivers/net/ethernet/brocade/bna
usr/lib/modules/5.15.0-25-generic/kernel/drivers/net/ethernet/brocade/bna/bna.ko
usr/lib/modules/5.15.0-25-generic/kernel/drivers/net/ethernet/cadence
usr/lib/modules/5.15.0-25-generic/kernel/drivers/net/ethernet/cadence/macb.ko
usr/lib/modules/5.15.0-25-generic/kernel/drivers/net/ethernet/cadence/macb_pci.ko
usr/lib/modules/5.15.0-25-generic/kernel/drivers/net/ethernet/cavium
usr/lib/modules/5.15.0-25-generic/kernel/drivers/net/ethernet/cavium/common
usr/lib/modules/5.15.0-25-generic/kernel/drivers/net/ethernet/cavium/common/cavium_ptp.ko
usr/lib/modules/5.15.0-25-generic/kernel/drivers/net/ethernet/cavium/liquidio
usr/lib/modules/5.15.0-25-generic/kernel/drivers/net/ethernet/cavium/liquidio/liquidio.ko
usr/lib/modules/5.15.0-25-generic/kernel/drivers/net/ethernet/cavium/liquidio/liquidio_vf.ko
usr/lib/modules/5.15.0-25-generic/kernel/drivers/net/ethernet/cavium/thunder
usr/lib/modules/5.15.0-25-generic/kernel/drivers/net/ethernet/cavium/thunder/nicpf.ko
usr/lib/modules/5.15.0-25-generic/kernel/drivers/net/ethernet/cavium/thunder/nicvf.ko
usr/lib/modules/5.15.0-25-generic/kernel/drivers/net/ethernet/cavium/thunder/thunder_bgx.ko
usr/lib/modules/5.15.0-25-generic/kernel/drivers/net/ethernet/cavium/thunder/thunder_xcv.ko
usr/lib/modules/5.15.0-25-generic/kernel/drivers/net/ethernet/chelsio
usr/lib/modules/5.15.0-25-generic/kernel/drivers/net/ethernet/chelsio/cxgb
usr/lib/modules/5.15.0-25-generic/kernel/drivers/net/ethernet/chelsio/cxgb/cxgb.ko
usr/lib/modules/5.15.0-25-generic/kernel/drivers/net/ethernet/chelsio/cxgb3
usr/lib/modules/5.15.0-25-generic/kernel/drivers/net/ethernet/chelsio/cxgb3/cxgb3.ko
usr/lib/modules/5.15.0-25-generic/kernel/drivers/net/ethernet/chelsio/cxgb4
usr/lib/modules/5.15.0-25-generic/kernel/drivers/net/ethernet/chelsio/cxgb4/cxgb4.ko
usr/lib/modules/5.15.0-25-generic/kernel/drivers/net/ethernet/chelsio/cxgb4vf
usr/lib/modules/5.15.0-25-generic/kernel/drivers/net/ethernet/chelsio/cxgb4vf/cxgb4vf.ko
usr/lib/modules/5.15.0-25-generic/kernel/drivers/net/ethernet/chelsio/inline_crypto
usr/lib/modules/5.15.0-25-generic/kernel/drivers/net/ethernet/chelsio/inline_crypto/ch_ipsec
usr/lib/modules/5.15.0-25-generic/kernel/drivers/net/ethernet/chelsio/inline_crypto/ch_ipsec/ch_ipsec.ko
usr/lib/modules/5.15.0-25-generic/kernel/drivers/net/ethernet/chelsio/inline_crypto/ch_ktls
usr/lib/modules/5.15.0-25-generic/kernel/drivers/net/ethernet/chelsio/inline_crypto/ch_ktls/ch_ktls.ko
usr/lib/modules/5.15.0-25-generic/kernel/drivers/net/ethernet/chelsio/libcxgb
usr/lib/modules/5.15.0-25-generic/kernel/drivers/net/ethernet/chelsio/libcxgb/libcxgb.ko
usr/lib/modules/5.15.0-25-generic/kernel/drivers/net/ethernet/cisco
usr/lib/modules/5.15.0-25-generic/kernel/drivers/net/ethernet/cisco/enic
usr/lib/modules/5.15.0-25-generic/kernel/drivers/net/ethernet/cisco/enic/enic.ko
usr/lib/modules/5.15.0-25-generic/kernel/drivers/net/ethernet/dec
usr/lib/modules/5.15.0-25-generic/kernel/drivers/net/ethernet/dec/tulip
usr/lib/modules/5.15.0-25-generic/kernel/drivers/net/ethernet/dec/tulip/de2104x.ko
usr/lib/modules/5.15.0-25-generic/kernel/drivers/net/ethernet/dec/tulip/de4x5.ko
usr/lib/modules/5.15.0-25-generic/kernel/drivers/net/ethernet/dec/tulip/dmfe.ko
usr/lib/modules/5.15.0-25-generic/kernel/drivers/net/ethernet/dec/tulip/tulip.ko
usr/lib/modules/5.15.0-25-generic/kernel/drivers/net/ethernet/dec/tulip/uli526x.ko
usr/lib/modules/5.15.0-25-generic/kernel/drivers/net/ethernet/dec/tulip/winbond-840.ko
usr/lib/modules/5.15.0-25-generic/kernel/drivers/net/ethernet/dec/tulip/xircom_cb.ko
usr/lib/modules/5.15.0-25-generic/kernel/drivers/net/ethernet/dlink
usr/lib/modules/5.15.0-25-generic/kernel/drivers/net/ethernet/dlink/dl2k.ko
usr/lib/modules/5.15.0-25-generic/kernel/drivers/net/ethernet/dlink/sundance.ko
usr/lib/modules/5.15.0-25-generic/kernel/drivers/net/ethernet/dnet.ko
usr/lib/modules/5.15.0-25-generic/kernel/drivers/net/ethernet/ec_bhf.ko
usr/lib/modules/5.15.0-25-generic/kernel/drivers/net/ethernet/emulex
usr/lib/modules/5.15.0-25-generic/kernel/drivers/net/ethernet/emulex/benet
usr/lib/modules/5.15.0-25-generic/kernel/drivers/net/ethernet/emulex/benet/be2net.ko
usr/lib/modules/5.15.0-25-generic/kernel/drivers/net/ethernet/ethoc.ko
usr/lib/modules/5.15.0-25-generic/kernel/drivers/net/ethernet/fealnx.ko
usr/lib/modules/5.15.0-25-generic/kernel/drivers/net/ethernet/fujitsu
usr/lib/modules/5.15.0-25-generic/kernel/drivers/net/ethernet/fujitsu/fmvj18x_cs.ko
usr/lib/modules/5.15.0-25-generic/kernel/drivers/net/ethernet/google
usr/lib/modules/5.15.0-25-generic/kernel/drivers/net/ethernet/google/gve
usr/lib/modules/5.15.0-25-generic/kernel/drivers/net/ethernet/google/gve/gve.ko
usr/lib/modules/5.15.0-25-generic/kernel/drivers/net/ethernet/huawei
usr/lib/modules/5.15.0-25-generic/kernel/drivers/net/ethernet/huawei/hinic
usr/lib/modules/5.15.0-25-generic/kernel/drivers/net/ethernet/huawei/hinic/hinic.ko
usr/lib/modules/5.15.0-25-generic/kernel/drivers/net/ethernet/intel
usr/lib/modules/5.15.0-25-generic/kernel/drivers/net/ethernet/intel/e100.ko
usr/lib/modules/5.15.0-25-generic/kernel/drivers/net/ethernet/intel/e1000
usr/lib/modules/5.15.0-25-generic/kernel/drivers/net/ethernet/intel/e1000/e1000.ko
usr/lib/modules/5.15.0-25-generic/kernel/drivers/net/ethernet/intel/e1000e
usr/lib/modules/5.15.0-25-generic/kernel/drivers/net/ethernet/intel/e1000e/e1000e.ko
usr/lib/modules/5.15.0-25-generic/kernel/drivers/net/ethernet/intel/fm10k
usr/lib/modules/5.15.0-25-generic/kernel/drivers/net/ethernet/intel/fm10k/fm10k.ko
usr/lib/modules/5.15.0-25-generic/kernel/drivers/net/ethernet/intel/i40e
usr/lib/modules/5.15.0-25-generic/kernel/drivers/net/ethernet/intel/i40e/i40e.ko
usr/lib/modules/5.15.0-25-generic/kernel/drivers/net/ethernet/intel/iavf
usr/lib/modules/5.15.0-25-generic/kernel/drivers/net/ethernet/intel/iavf/iavf.ko
usr/lib/modules/5.15.0-25-generic/kernel/drivers/net/ethernet/intel/ice
usr/lib/modules/5.15.0-25-generic/kernel/drivers/net/ethernet/intel/ice/ice.ko
usr/lib/modules/5.15.0-25-generic/kernel/drivers/net/ethernet/intel/igb
usr/lib/modules/5.15.0-25-generic/kernel/drivers/net/ethernet/intel/igb/igb.ko
usr/lib/modules/5.15.0-25-generic/kernel/drivers/net/ethernet/intel/igbvf
usr/lib/modules/5.15.0-25-generic/kernel/drivers/net/ethernet/intel/igbvf/igbvf.ko
usr/lib/modules/5.15.0-25-generic/kernel/drivers/net/ethernet/intel/igc
usr/lib/modules/5.15.0-25-generic/kernel/drivers/net/ethernet/intel/igc/igc.ko
usr/lib/modules/5.15.0-25-generic/kernel/drivers/net/ethernet/intel/ixgb
usr/lib/modules/5.15.0-25-generic/kernel/drivers/net/ethernet/intel/ixgb/ixgb.ko
usr/lib/modules/5.15.0-25-generic/kernel/drivers/net/ethernet/intel/ixgbe
usr/lib/modules/5.15.0-25-generic/kernel/drivers/net/ethernet/intel/ixgbe/ixgbe.ko
usr/lib/modules/5.15.0-25-generic/kernel/drivers/net/ethernet/intel/ixgbevf
usr/lib/modules/5.15.0-25-generic/kernel/drivers/net/ethernet/intel/ixgbevf/ixgbevf.ko
usr/lib/modules/5.15.0-25-generic/kernel/drivers/net/ethernet/jme.ko
usr/lib/modules/5.15.0-25-generic/kernel/drivers/net/ethernet/marvell
usr/lib/modules/5.15.0-25-generic/kernel/drivers/net/ethernet/marvell/mvmdio.ko
usr/lib/modules/5.15.0-25-generic/kernel/drivers/net/ethernet/marvell/prestera
usr/lib/modules/5.15.0-25-generic/kernel/drivers/net/ethernet/marvell/prestera/prestera.ko
usr/lib/modules/5.15.0-25-generic/kernel/drivers/net/ethernet/marvell/prestera/prestera_pci.ko
usr/lib/modules/5.15.0-25-generic/kernel/drivers/net/ethernet/marvell/skge.ko
usr/lib/modules/5.15.0-25-generic/kernel/drivers/net/ethernet/marvell/sky2.ko
usr/lib/modules/5.15.0-25-generic/kernel/drivers/net/ethernet/mellanox
usr/lib/modules/5.15.0-25-generic/kernel/drivers/net/ethernet/mellanox/mlx4
usr/lib/modules/5.15.0-25-generic/kernel/drivers/net/ethernet/mellanox/mlx4/mlx4_core.ko
usr/lib/modules/5.15.0-25-generic/kernel/drivers/net/ethernet/mellanox/mlx4/mlx4_en.ko
usr/lib/modules/5.15.0-25-generic/kernel/drivers/net/ethernet/mellanox/mlx5
usr/lib/modules/5.15.0-25-generic/kernel/drivers/net/ethernet/mellanox/mlx5/core
usr/lib/modules/5.15.0-25-generic/kernel/drivers/net/ethernet/mellanox/mlx5/core/mlx5_core.ko
usr/lib/modules/5.15.0-25-generic/kernel/drivers/net/ethernet/mellanox/mlxfw
usr/lib/modules/5.15.0-25-generic/kernel/drivers/net/ethernet/mellanox/mlxfw/mlxfw.ko
usr/lib/modules/5.15.0-25-generic/kernel/drivers/net/ethernet/mellanox/mlxsw
usr/lib/modules/5.15.0-25-generic/kernel/drivers/net/ethernet/mellanox/mlxsw/mlxsw_core.ko
usr/lib/modules/5.15.0-25-generic/kernel/drivers/net/ethernet/mellanox/mlxsw/mlxsw_i2c.ko
usr/lib/modules/5.15.0-25-generic/kernel/drivers/net/ethernet/mellanox/mlxsw/mlxsw_minimal.ko
usr/lib/modules/5.15.0-25-generic/kernel/drivers/net/ethernet/mellanox/mlxsw/mlxsw_pci.ko
usr/lib/modules/5.15.0-25-generic/kernel/drivers/net/ethernet/mellanox/mlxsw/mlxsw_spectrum.ko
usr/lib/modules/5.15.0-25-generic/kernel/drivers/net/ethernet/micrel
usr/lib/modules/5.15.0-25-generic/kernel/drivers/net/ethernet/micrel/ks8842.ko
usr/lib/modules/5.15.0-25-generic/kernel/drivers/net/ethernet/micrel/ks8851_common.ko
usr/lib/modules/5.15.0-25-generic/kernel/drivers/net/ethernet/micrel/ks8851_par.ko
usr/lib/modules/5.15.0-25-generic/kernel/drivers/net/ethernet/micrel/ks8851_spi.ko
usr/lib/modules/5.15.0-25-generic/kernel/drivers/net/ethernet/micrel/ksz884x.ko
usr/lib/modules/5.15.0-25-generic/kernel/drivers/net/ethernet/microchip
usr/lib/modules/5.15.0-25-generic/kernel/drivers/net/ethernet/microchip/enc28j60.ko
usr/lib/modules/5.15.0-25-generic/kernel/drivers/net/ethernet/microchip/encx24j600-regmap.ko
usr/lib/modules/5.15.0-25-generic/kernel/drivers/net/ethernet/microchip/encx24j600.ko
usr/lib/modules/5.15.0-25-generic/kernel/drivers/net/ethernet/microchip/lan743x.ko
usr/lib/modules/5.15.0-25-generic/kernel/drivers/net/ethernet/microsoft
usr/lib/modules/5.15.0-25-generic/kernel/drivers/net/ethernet/microsoft/mana
usr/lib/modules/5.15.0-25-generic/kernel/drivers/net/ethernet/microsoft/mana/mana.ko
usr/lib/modules/5.15.0-25-generic/kernel/drivers/net/ethernet/mscc
usr/lib/modules/5.15.0-25-generic/kernel/drivers/net/ethernet/mscc/mscc_ocelot_switch_lib.ko
usr/lib/modules/5.15.0-25-generic/kernel/drivers/net/ethernet/myricom
usr/lib/modules/5.15.0-25-generic/kernel/drivers/net/ethernet/myricom/myri10ge
usr/lib/modules/5.15.0-25-generic/kernel/drivers/net/ethernet/myricom/myri10ge/myri10ge.ko
usr/lib/modules/5.15.0-25-generic/kernel/drivers/net/ethernet/natsemi
usr/lib/modules/5.15.0-25-generic/kernel/drivers/net/ethernet/natsemi/natsemi.ko
usr/lib/modules/5.15.0-25-generic/kernel/drivers/net/ethernet/natsemi/ns83820.ko
usr/lib/modules/5.15.0-25-generic/kernel/drivers/net/ethernet/neterion
usr/lib/modules/5.15.0-25-generic/kernel/drivers/net/ethernet/neterion/s2io.ko
usr/lib/modules/5.15.0-25-generic/kernel/drivers/net/ethernet/neterion/vxge
usr/lib/modules/5.15.0-25-generic/kernel/drivers/net/ethernet/neterion/vxge/vxge.ko
usr/lib/modules/5.15.0-25-generic/kernel/drivers/net/ethernet/netronome
usr/lib/modules/5.15.0-25-generic/kernel/drivers/net/ethernet/netronome/nfp
usr/lib/modules/5.15.0-25-generic/kernel/drivers/net/ethernet/netronome/nfp/nfp.ko
usr/lib/modules/5.15.0-25-generic/kernel/drivers/net/ethernet/ni
usr/lib/modules/5.15.0-25-generic/kernel/drivers/net/ethernet/ni/nixge.ko
usr/lib/modules/5.15.0-25-generic/kernel/drivers/net/ethernet/nvidia
usr/lib/modules/5.15.0-25-generic/kernel/drivers/net/ethernet/nvidia/forcedeth.ko
usr/lib/modules/5.15.0-25-generic/kernel/drivers/net/ethernet/packetengines
usr/lib/modules/5.15.0-25-generic/kernel/drivers/net/ethernet/packetengines/hamachi.ko
usr/lib/modules/5.15.0-25-generic/kernel/drivers/net/ethernet/packetengines/yellowfin.ko
usr/lib/modules/5.15.0-25-generic/kernel/drivers/net/ethernet/pensando
usr/lib/modules/5.15.0-25-generic/kernel/drivers/net/ethernet/pensando/ionic
usr/lib/modules/5.15.0-25-generic/kernel/drivers/net/ethernet/pensando/ionic/ionic.ko
usr/lib/modules/5.15.0-25-generic/kernel/drivers/net/ethernet/qlogic
usr/lib/modules/5.15.0-25-generic/kernel/drivers/net/ethernet/qlogic/netxen
usr/lib/modules/5.15.0-25-generic/kernel/drivers/net/ethernet/qlogic/netxen/netxen_nic.ko
usr/lib/modules/5.15.0-25-generic/kernel/drivers/net/ethernet/qlogic/qed
usr/lib/modules/5.15.0-25-generic/kernel/drivers/net/ethernet/qlogic/qed/qed.ko
usr/lib/modules/5.15.0-25-generic/kernel/drivers/net/ethernet/qlogic/qede
usr/lib/modules/5.15.0-25-generic/kernel/drivers/net/ethernet/qlogic/qede/qede.ko
usr/lib/modules/5.15.0-25-generic/kernel/drivers/net/ethernet/qlogic/qla3xxx.ko
usr/lib/modules/5.15.0-25-generic/kernel/drivers/net/ethernet/qlogic/qlcnic
usr/lib/modules/5.15.0-25-generic/kernel/drivers/net/ethernet/qlogic/qlcnic/qlcnic.ko
usr/lib/modules/5.15.0-25-generic/kernel/drivers/net/ethernet/qualcomm
usr/lib/modules/5.15.0-25-generic/kernel/drivers/net/ethernet/qualcomm/emac
usr/lib/modules/5.15.0-25-generic/kernel/drivers/net/ethernet/qualcomm/emac/qcom-emac.ko
usr/lib/modules/5.15.0-25-generic/kernel/drivers/net/ethernet/qualcomm/rmnet
usr/lib/modules/5.15.0-25-generic/kernel/drivers/net/ethernet/qualcomm/rmnet/rmnet.ko
usr/lib/modules/5.15.0-25-generic/kernel/drivers/net/ethernet/rdc
usr/lib/modules/5.15.0-25-generic/kernel/drivers/net/ethernet/rdc/r6040.ko
usr/lib/modules/5.15.0-25-generic/kernel/drivers/net/ethernet/realtek
usr/lib/modules/5.15.0-25-generic/kernel/drivers/net/ethernet/realtek/8139cp.ko
usr/lib/modules/5.15.0-25-generic/kernel/drivers/net/ethernet/realtek/8139too.ko
usr/lib/modules/5.15.0-25-generic/kernel/drivers/net/ethernet/realtek/atp.ko
usr/lib/modules/5.15.0-25-generic/kernel/drivers/net/ethernet/realtek/r8169.ko
usr/lib/modules/5.15.0-25-generic/kernel/drivers/net/ethernet/rocker
usr/lib/modules/5.15.0-25-generic/kernel/drivers/net/ethernet/rocker/rocker.ko
usr/lib/modules/5.15.0-25-generic/kernel/drivers/net/ethernet/samsung
usr/lib/modules/5.15.0-25-generic/kernel/drivers/net/ethernet/samsung/sxgbe
usr/lib/modules/5.15.0-25-generic/kernel/drivers/net/ethernet/samsung/sxgbe/samsung-sxgbe.ko
usr/lib/modules/5.15.0-25-generic/kernel/drivers/net/ethernet/sfc
usr/lib/modules/5.15.0-25-generic/kernel/drivers/net/ethernet/sfc/falcon
usr/lib/modules/5.15.0-25-generic/kernel/drivers/net/ethernet/sfc/falcon/sfc-falcon.ko
usr/lib/modules/5.15.0-25-generic/kernel/drivers/net/ethernet/sfc/sfc.ko
usr/lib/modules/5.15.0-25-generic/kernel/drivers/net/ethernet/silan
usr/lib/modules/5.15.0-25-generic/kernel/drivers/net/ethernet/silan/sc92031.ko
usr/lib/modules/5.15.0-25-generic/kernel/drivers/net/ethernet/sis
usr/lib/modules/5.15.0-25-generic/kernel/drivers/net/ethernet/sis/sis190.ko
usr/lib/modules/5.15.0-25-generic/kernel/drivers/net/ethernet/sis/sis900.ko
usr/lib/modules/5.15.0-25-generic/kernel/drivers/net/ethernet/smsc
usr/lib/modules/5.15.0-25-generic/kernel/drivers/net/ethernet/smsc/epic100.ko
usr/lib/modules/5.15.0-25-generic/kernel/drivers/net/ethernet/smsc/smc91c92_cs.ko
usr/lib/modules/5.15.0-25-generic/kernel/drivers/net/ethernet/smsc/smsc911x.ko
usr/lib/modules/5.15.0-25-generic/kernel/drivers/net/ethernet/smsc/smsc9420.ko
usr/lib/modules/5.15.0-25-generic/kernel/drivers/net/ethernet/stmicro
usr/lib/modules/5.15.0-25-generic/kernel/drivers/net/ethernet/stmicro/stmmac
usr/lib/modules/5.15.0-25-generic/kernel/drivers/net/ethernet/stmicro/stmmac/dwmac-generic.ko
usr/lib/modules/5.15.0-25-generic/kernel/drivers/net/ethernet/stmicro/stmmac/dwmac-intel.ko
usr/lib/modules/5.15.0-25-generic/kernel/drivers/net/ethernet/stmicro/stmmac/dwmac-loongson.ko
usr/lib/modules/5.15.0-25-generic/kernel/drivers/net/ethernet/stmicro/stmmac/stmmac-pci.ko
usr/lib/modules/5.15.0-25-generic/kernel/drivers/net/ethernet/stmicro/stmmac/stmmac-platform.ko
usr/lib/modules/5.15.0-25-generic/kernel/drivers/net/ethernet/stmicro/stmmac/stmmac.ko
usr/lib/modules/5.15.0-25-generic/kernel/drivers/net/ethernet/sun
usr/lib/modules/5.15.0-25-generic/kernel/drivers/net/ethernet/sun/cassini.ko
usr/lib/modules/5.15.0-25-generic/kernel/drivers/net/ethernet/sun/niu.ko
usr/lib/modules/5.15.0-25-generic/kernel/drivers/net/ethernet/sun/sungem.ko
usr/lib/modules/5.15.0-25-generic/kernel/drivers/net/ethernet/sun/sunhme.ko
usr/lib/modules/5.15.0-25-generic/kernel/drivers/net/ethernet/synopsys
usr/lib/modules/5.15.0-25-generic/kernel/drivers/net/ethernet/synopsys/dwc-xlgmac.ko
usr/lib/modules/5.15.0-25-generic/kernel/drivers/net/ethernet/tehuti
usr/lib/modules/5.15.0-25-generic/kernel/drivers/net/ethernet/tehuti/tehuti.ko
usr/lib/modules/5.15.0-25-generic/kernel/drivers/net/ethernet/ti
usr/lib/modules/5.15.0-25-generic/kernel/drivers/net/ethernet/ti/tlan.ko
usr/lib/modules/5.15.0-25-generic/kernel/drivers/net/ethernet/via
usr/lib/modules/5.15.0-25-generic/kernel/drivers/net/ethernet/via/via-rhine.ko
usr/lib/modules/5.15.0-25-generic/kernel/drivers/net/ethernet/via/via-velocity.ko
usr/lib/modules/5.15.0-25-generic/kernel/drivers/net/ethernet/wiznet
usr/lib/modules/5.15.0-25-generic/kernel/drivers/net/ethernet/wiznet/w5100-spi.ko
usr/lib/modules/5.15.0-25-generic/kernel/drivers/net/ethernet/wiznet/w5100.ko
usr/lib/modules/5.15.0-25-generic/kernel/drivers/net/ethernet/wiznet/w5300.ko
usr/lib/modules/5.15.0-25-generic/kernel/drivers/net/ethernet/xilinx
usr/lib/modules/5.15.0-25-generic/kernel/drivers/net/ethernet/xilinx/ll_temac.ko
usr/lib/modules/5.15.0-25-generic/kernel/drivers/net/ethernet/xilinx/xilinx_emac.ko
usr/lib/modules/5.15.0-25-generic/kernel/drivers/net/ethernet/xilinx/xilinx_emaclite.ko
usr/lib/modules/5.15.0-25-generic/kernel/drivers/net/ethernet/xircom
usr/lib/modules/5.15.0-25-generic/kernel/drivers/net/ethernet/xircom/xirc2ps_cs.ko
usr/lib/modules/5.15.0-25-generic/kernel/drivers/net/fddi
usr/lib/modules/5.15.0-25-generic/kernel/drivers/net/fddi/defxx.ko
usr/lib/modules/5.15.0-25-generic/kernel/drivers/net/fddi/skfp
usr/lib/modules/5.15.0-25-generic/kernel/drivers/net/fddi/skfp/skfp.ko
usr/lib/modules/5.15.0-25-generic/kernel/drivers/net/fjes
usr/lib/modules/5.15.0-25-generic/kernel/drivers/net/fjes/fjes.ko
usr/lib/modules/5.15.0-25-generic/kernel/drivers/net/geneve.ko
usr/lib/modules/5.15.0-25-generic/kernel/drivers/net/gtp.ko
usr/lib/modules/5.15.0-25-generic/kernel/drivers/net/hyperv
usr/lib/modules/5.15.0-25-generic/kernel/drivers/net/hyperv/hv_netvsc.ko
usr/lib/modules/5.15.0-25-generic/kernel/drivers/net/ieee802154
usr/lib/modules/5.15.0-25-generic/kernel/drivers/net/ieee802154/adf7242.ko
usr/lib/modules/5.15.0-25-generic/kernel/drivers/net/ieee802154/at86rf230.ko
usr/lib/modules/5.15.0-25-generic/kernel/drivers/net/ieee802154/atusb.ko
usr/lib/modules/5.15.0-25-generic/kernel/drivers/net/ieee802154/ca8210.ko
usr/lib/modules/5.15.0-25-generic/kernel/drivers/net/ieee802154/cc2520.ko
usr/lib/modules/5.15.0-25-generic/kernel/drivers/net/ieee802154/fakelb.ko
usr/lib/modules/5.15.0-25-generic/kernel/drivers/net/ieee802154/mac802154_hwsim.ko
usr/lib/modules/5.15.0-25-generic/kernel/drivers/net/ieee802154/mcr20a.ko
usr/lib/modules/5.15.0-25-generic/kernel/drivers/net/ieee802154/mrf24j40.ko
usr/lib/modules/5.15.0-25-generic/kernel/drivers/net/ipvlan
usr/lib/modules/5.15.0-25-generic/kernel/drivers/net/ipvlan/ipvlan.ko
usr/lib/modules/5.15.0-25-generic/kernel/drivers/net/ipvlan/ipvtap.ko
usr/lib/modules/5.15.0-25-generic/kernel/drivers/net/macsec.ko
usr/lib/modules/5.15.0-25-generic/kernel/drivers/net/mdio
usr/lib/modules/5.15.0-25-generic/kernel/drivers/net/mdio.ko
usr/lib/modules/5.15.0-25-generic/kernel/drivers/net/mdio/mdio-bcm-unimac.ko
usr/lib/modules/5.15.0-25-generic/kernel/drivers/net/mdio/mdio-bitbang.ko
usr/lib/modules/5.15.0-25-generic/kernel/drivers/net/mdio/mdio-cavium.ko
usr/lib/modules/5.15.0-25-generic/kernel/drivers/net/mdio/mdio-gpio.ko
usr/lib/modules/5.15.0-25-generic/kernel/drivers/net/mdio/mdio-i2c.ko
usr/lib/modules/5.15.0-25-generic/kernel/drivers/net/mdio/mdio-mscc-miim.ko
usr/lib/modules/5.15.0-25-generic/kernel/drivers/net/mdio/mdio-mvusb.ko
usr/lib/modules/5.15.0-25-generic/kernel/drivers/net/mdio/mdio-thunder.ko
usr/lib/modules/5.15.0-25-generic/kernel/drivers/net/mhi_net.ko
usr/lib/modules/5.15.0-25-generic/kernel/drivers/net/mii.ko
usr/lib/modules/5.15.0-25-generic/kernel/drivers/net/net_failover.ko
usr/lib/modules/5.15.0-25-generic/kernel/drivers/net/netconsole.ko
usr/lib/modules/5.15.0-25-generic/kernel/drivers/net/netdevsim
usr/lib/modules/5.15.0-25-generic/kernel/drivers/net/netdevsim/netdevsim.ko
usr/lib/modules/5.15.0-25-generic/kernel/drivers/net/nlmon.ko
usr/lib/modules/5.15.0-25-generic/kernel/drivers/net/ntb_netdev.ko
usr/lib/modules/5.15.0-25-generic/kernel/drivers/net/pcs
usr/lib/modules/5.15.0-25-generic/kernel/drivers/net/pcs/pcs-lynx.ko
usr/lib/modules/5.15.0-25-generic/kernel/drivers/net/pcs/pcs_xpcs.ko
usr/lib/modules/5.15.0-25-generic/kernel/drivers/net/phy
usr/lib/modules/5.15.0-25-generic/kernel/drivers/net/phy/adin.ko
usr/lib/modules/5.15.0-25-generic/kernel/drivers/net/phy/amd.ko
usr/lib/modules/5.15.0-25-generic/kernel/drivers/net/phy/aquantia.ko
usr/lib/modules/5.15.0-25-generic/kernel/drivers/net/phy/at803x.ko
usr/lib/modules/5.15.0-25-generic/kernel/drivers/net/phy/ax88796b.ko
usr/lib/modules/5.15.0-25-generic/kernel/drivers/net/phy/bcm-phy-lib.ko
usr/lib/modules/5.15.0-25-generic/kernel/drivers/net/phy/bcm54140.ko
usr/lib/modules/5.15.0-25-generic/kernel/drivers/net/phy/bcm7xxx.ko
usr/lib/modules/5.15.0-25-generic/kernel/drivers/net/phy/bcm87xx.ko
usr/lib/modules/5.15.0-25-generic/kernel/drivers/net/phy/broadcom.ko
usr/lib/modules/5.15.0-25-generic/kernel/drivers/net/phy/cicada.ko
usr/lib/modules/5.15.0-25-generic/kernel/drivers/net/phy/cortina.ko
usr/lib/modules/5.15.0-25-generic/kernel/drivers/net/phy/davicom.ko
usr/lib/modules/5.15.0-25-generic/kernel/drivers/net/phy/dp83640.ko
usr/lib/modules/5.15.0-25-generic/kernel/drivers/net/phy/dp83822.ko
usr/lib/modules/5.15.0-25-generic/kernel/drivers/net/phy/dp83848.ko
usr/lib/modules/5.15.0-25-generic/kernel/drivers/net/phy/dp83867.ko
usr/lib/modules/5.15.0-25-generic/kernel/drivers/net/phy/dp83869.ko
usr/lib/modules/5.15.0-25-generic/kernel/drivers/net/phy/dp83tc811.ko
usr/lib/modules/5.15.0-25-generic/kernel/drivers/net/phy/et1011c.ko
usr/lib/modules/5.15.0-25-generic/kernel/drivers/net/phy/icplus.ko
usr/lib/modules/5.15.0-25-generic/kernel/drivers/net/phy/intel-xway.ko
usr/lib/modules/5.15.0-25-generic/kernel/drivers/net/phy/lxt.ko
usr/lib/modules/5.15.0-25-generic/kernel/drivers/net/phy/marvell-88x2222.ko
usr/lib/modules/5.15.0-25-generic/kernel/drivers/net/phy/marvell.ko
usr/lib/modules/5.15.0-25-generic/kernel/drivers/net/phy/marvell10g.ko
usr/lib/modules/5.15.0-25-generic/kernel/drivers/net/phy/mediatek-ge.ko
usr/lib/modules/5.15.0-25-generic/kernel/drivers/net/phy/micrel.ko
usr/lib/modules/5.15.0-25-generic/kernel/drivers/net/phy/microchip.ko
usr/lib/modules/5.15.0-25-generic/kernel/drivers/net/phy/microchip_t1.ko
usr/lib/modules/5.15.0-25-generic/kernel/drivers/net/phy/motorcomm.ko
usr/lib/modules/5.15.0-25-generic/kernel/drivers/net/phy/mscc
usr/lib/modules/5.15.0-25-generic/kernel/drivers/net/phy/mscc/mscc.ko
usr/lib/modules/5.15.0-25-generic/kernel/drivers/net/phy/mxl-gpy.ko
usr/lib/modules/5.15.0-25-generic/kernel/drivers/net/phy/national.ko
usr/lib/modules/5.15.0-25-generic/kernel/drivers/net/phy/nxp-c45-tja11xx.ko
usr/lib/modules/5.15.0-25-generic/kernel/drivers/net/phy/nxp-tja11xx.ko
usr/lib/modules/5.15.0-25-generic/kernel/drivers/net/phy/phylink.ko
usr/lib/modules/5.15.0-25-generic/kernel/drivers/net/phy/qsemi.ko
usr/lib/modules/5.15.0-25-generic/kernel/drivers/net/phy/realtek.ko
usr/lib/modules/5.15.0-25-generic/kernel/drivers/net/phy/rockchip.ko
usr/lib/modules/5.15.0-25-generic/kernel/drivers/net/phy/sfp.ko
usr/lib/modules/5.15.0-25-generic/kernel/drivers/net/phy/smsc.ko
usr/lib/modules/5.15.0-25-generic/kernel/drivers/net/phy/spi_ks8995.ko
usr/lib/modules/5.15.0-25-generic/kernel/drivers/net/phy/ste10Xp.ko
usr/lib/modules/5.15.0-25-generic/kernel/drivers/net/phy/teranetics.ko
usr/lib/modules/5.15.0-25-generic/kernel/drivers/net/phy/uPD60620.ko
usr/lib/modules/5.15.0-25-generic/kernel/drivers/net/phy/vitesse.ko
usr/lib/modules/5.15.0-25-generic/kernel/drivers/net/phy/xilinx_gmii2rgmii.ko
usr/lib/modules/5.15.0-25-generic/kernel/drivers/net/plip
usr/lib/modules/5.15.0-25-generic/kernel/drivers/net/plip/plip.ko
usr/lib/modules/5.15.0-25-generic/kernel/drivers/net/ppp
usr/lib/modules/5.15.0-25-generic/kernel/drivers/net/ppp/bsd_comp.ko
usr/lib/modules/5.15.0-25-generic/kernel/drivers/net/ppp/ppp_async.ko
usr/lib/modules/5.15.0-25-generic/kernel/drivers/net/ppp/ppp_deflate.ko
usr/lib/modules/5.15.0-25-generic/kernel/drivers/net/ppp/ppp_mppe.ko
usr/lib/modules/5.15.0-25-generic/kernel/drivers/net/ppp/ppp_synctty.ko
usr/lib/modules/5.15.0-25-generic/kernel/drivers/net/ppp/pppoe.ko
usr/lib/modules/5.15.0-25-generic/kernel/drivers/net/ppp/pppox.ko
usr/lib/modules/5.15.0-25-generic/kernel/drivers/net/ppp/pptp.ko
usr/lib/modules/5.15.0-25-generic/kernel/drivers/net/rionet.ko
usr/lib/modules/5.15.0-25-generic/kernel/drivers/net/slip
usr/lib/modules/5.15.0-25-generic/kernel/drivers/net/slip/slip.ko
usr/lib/modules/5.15.0-25-generic/kernel/drivers/net/sungem_phy.ko
usr/lib/modules/5.15.0-25-generic/kernel/drivers/net/tap.ko
usr/lib/modules/5.15.0-25-generic/kernel/drivers/net/thunderbolt-net.ko
usr/lib/modules/5.15.0-25-generic/kernel/drivers/net/usb
usr/lib/modules/5.15.0-25-generic/kernel/drivers/net/usb/aqc111.ko
usr/lib/modules/5.15.0-25-generic/kernel/drivers/net/usb/asix.ko
usr/lib/modules/5.15.0-25-generic/kernel/drivers/net/usb/ax88179_178a.ko
usr/lib/modules/5.15.0-25-generic/kernel/drivers/net/usb/catc.ko
usr/lib/modules/5.15.0-25-generic/kernel/drivers/net/usb/cdc_eem.ko
usr/lib/modules/5.15.0-25-generic/kernel/drivers/net/usb/cdc_ether.ko
usr/lib/modules/5.15.0-25-generic/kernel/drivers/net/usb/cdc_ncm.ko
usr/lib/modules/5.15.0-25-generic/kernel/drivers/net/usb/ch9200.ko
usr/lib/modules/5.15.0-25-generic/kernel/drivers/net/usb/dm9601.ko
usr/lib/modules/5.15.0-25-generic/kernel/drivers/net/usb/int51x1.ko
usr/lib/modules/5.15.0-25-generic/kernel/drivers/net/usb/kaweth.ko
usr/lib/modules/5.15.0-25-generic/kernel/drivers/net/usb/lan78xx.ko
usr/lib/modules/5.15.0-25-generic/kernel/drivers/net/usb/mcs7830.ko
usr/lib/modules/5.15.0-25-generic/kernel/drivers/net/usb/pegasus.ko
usr/lib/modules/5.15.0-25-generic/kernel/drivers/net/usb/r8152.ko
usr/lib/modules/5.15.0-25-generic/kernel/drivers/net/usb/r8153_ecm.ko
usr/lib/modules/5.15.0-25-generic/kernel/drivers/net/usb/rndis_host.ko
usr/lib/modules/5.15.0-25-generic/kernel/drivers/net/usb/rtl8150.ko
usr/lib/modules/5.15.0-25-generic/kernel/drivers/net/usb/smsc75xx.ko
usr/lib/modules/5.15.0-25-generic/kernel/drivers/net/usb/smsc95xx.ko
usr/lib/modules/5.15.0-25-generic/kernel/drivers/net/usb/sr9700.ko
usr/lib/modules/5.15.0-25-generic/kernel/drivers/net/usb/sr9800.ko
usr/lib/modules/5.15.0-25-generic/kernel/drivers/net/usb/usbnet.ko
usr/lib/modules/5.15.0-25-generic/kernel/drivers/net/virtio_net.ko
usr/lib/modules/5.15.0-25-generic/kernel/drivers/net/vmxnet3
usr/lib/modules/5.15.0-25-generic/kernel/drivers/net/vmxnet3/vmxnet3.ko
usr/lib/modules/5.15.0-25-generic/kernel/drivers/net/vrf.ko
usr/lib/modules/5.15.0-25-generic/kernel/drivers/net/vsockmon.ko
usr/lib/modules/5.15.0-25-generic/kernel/drivers/net/vxlan.ko
usr/lib/modules/5.15.0-25-generic/kernel/drivers/net/wireguard
usr/lib/modules/5.15.0-25-generic/kernel/drivers/net/wireguard/wireguard.ko
usr/lib/modules/5.15.0-25-generic/kernel/drivers/net/wwan
usr/lib/modules/5.15.0-25-generic/kernel/drivers/net/wwan/iosm
usr/lib/modules/5.15.0-25-generic/kernel/drivers/net/wwan/iosm/iosm.ko
usr/lib/modules/5.15.0-25-generic/kernel/drivers/net/wwan/mhi_wwan_ctrl.ko
usr/lib/modules/5.15.0-25-generic/kernel/drivers/net/wwan/mhi_wwan_mbim.ko
usr/lib/modules/5.15.0-25-generic/kernel/drivers/net/wwan/rpmsg_wwan_ctrl.ko
usr/lib/modules/5.15.0-25-generic/kernel/drivers/net/wwan/wwan_hwsim.ko
usr/lib/modules/5.15.0-25-generic/kernel/drivers/ntb
usr/lib/modules/5.15.0-25-generic/kernel/drivers/ntb/ntb.ko
usr/lib/modules/5.15.0-25-generic/kernel/drivers/ntb/ntb_transport.ko
usr/lib/modules/5.15.0-25-generic/kernel/drivers/nvme
usr/lib/modules/5.15.0-25-generic/kernel/drivers/nvme/host
usr/lib/modules/5.15.0-25-generic/kernel/drivers/nvme/host/nvme-core.ko
usr/lib/modules/5.15.0-25-generic/kernel/drivers/nvme/host/nvme-fabrics.ko
usr/lib/modules/5.15.0-25-generic/kernel/drivers/nvme/host/nvme-fc.ko
usr/lib/modules/5.15.0-25-generic/kernel/drivers/nvme/host/nvme-rdma.ko
usr/lib/modules/5.15.0-25-generic/kernel/drivers/nvme/host/nvme-tcp.ko
usr/lib/modules/5.15.0-25-generic/kernel/drivers/nvme/host/nvme.ko
usr/lib/modules/5.15.0-25-generic/kernel/drivers/nvme/target
usr/lib/modules/5.15.0-25-generic/kernel/drivers/nvme/target/nvme-loop.ko
usr/lib/modules/5.15.0-25-generic/kernel/drivers/nvme/target/nvmet-fc.ko
usr/lib/modules/5.15.0-25-generic/kernel/drivers/nvme/target/nvmet-rdma.ko
usr/lib/modules/5.15.0-25-generic/kernel/drivers/nvme/target/nvmet-tcp.ko
usr/lib/modules/5.15.0-25-generic/kernel/drivers/nvme/target/nvmet.ko
usr/lib/modules/5.15.0-25-generic/kernel/drivers/parport
usr/lib/modules/5.15.0-25-generic/kernel/drivers/parport/parport.ko
usr/lib/modules/5.15.0-25-generic/kernel/drivers/pci
usr/lib/modules/5.15.0-25-generic/kernel/drivers/pci/controller
usr/lib/modules/5.15.0-25-generic/kernel/drivers/pci/controller/pci-hyperv-intf.ko
usr/lib/modules/5.15.0-25-generic/kernel/drivers/pci/controller/pci-hyperv.ko
usr/lib/modules/5.15.0-25-generic/kernel/drivers/pci/controller/vmd.ko
usr/lib/modules/5.15.0-25-generic/kernel/drivers/pcmcia
usr/lib/modules/5.15.0-25-generic/kernel/drivers/pcmcia/pcmcia.ko
usr/lib/modules/5.15.0-25-generic/kernel/drivers/pcmcia/pcmcia_core.ko
usr/lib/modules/5.15.0-25-generic/kernel/drivers/phy
usr/lib/modules/5.15.0-25-generic/kernel/drivers/phy/broadcom
usr/lib/modules/5.15.0-25-generic/kernel/drivers/phy/broadcom/phy-bcm-kona-usb2.ko
usr/lib/modules/5.15.0-25-generic/kernel/drivers/phy/intel
usr/lib/modules/5.15.0-25-generic/kernel/drivers/phy/intel/phy-intel-lgm-emmc.ko
usr/lib/modules/5.15.0-25-generic/kernel/drivers/phy/marvell
usr/lib/modules/5.15.0-25-generic/kernel/drivers/phy/marvell/phy-pxa-28nm-hsic.ko
usr/lib/modules/5.15.0-25-generic/kernel/drivers/phy/marvell/phy-pxa-28nm-usb2.ko
usr/lib/modules/5.15.0-25-generic/kernel/drivers/phy/motorola
usr/lib/modules/5.15.0-25-generic/kernel/drivers/phy/motorola/phy-cpcap-usb.ko
usr/lib/modules/5.15.0-25-generic/kernel/drivers/phy/phy-can-transceiver.ko
usr/lib/modules/5.15.0-25-generic/kernel/drivers/phy/phy-lgm-usb.ko
usr/lib/modules/5.15.0-25-generic/kernel/drivers/phy/qualcomm
usr/lib/modules/5.15.0-25-generic/kernel/drivers/phy/qualcomm/phy-qcom-usb-hs.ko
usr/lib/modules/5.15.0-25-generic/kernel/drivers/phy/qualcomm/phy-qcom-usb-hsic.ko
usr/lib/modules/5.15.0-25-generic/kernel/drivers/phy/samsung
usr/lib/modules/5.15.0-25-generic/kernel/drivers/phy/samsung/phy-exynos-usb2.ko
usr/lib/modules/5.15.0-25-generic/kernel/drivers/phy/ti
usr/lib/modules/5.15.0-25-generic/kernel/drivers/phy/ti/phy-tusb1210.ko
usr/lib/modules/5.15.0-25-generic/kernel/drivers/pinctrl
usr/lib/modules/5.15.0-25-generic/kernel/drivers/pinctrl/cirrus
usr/lib/modules/5.15.0-25-generic/kernel/drivers/pinctrl/cirrus/pinctrl-madera.ko
usr/lib/modules/5.15.0-25-generic/kernel/drivers/pinctrl/intel
usr/lib/modules/5.15.0-25-generic/kernel/drivers/pinctrl/intel/pinctrl-alderlake.ko
usr/lib/modules/5.15.0-25-generic/kernel/drivers/pinctrl/intel/pinctrl-broxton.ko
usr/lib/modules/5.15.0-25-generic/kernel/drivers/pinctrl/intel/pinctrl-cannonlake.ko
usr/lib/modules/5.15.0-25-generic/kernel/drivers/pinctrl/intel/pinctrl-cedarfork.ko
usr/lib/modules/5.15.0-25-generic/kernel/drivers/pinctrl/intel/pinctrl-denverton.ko
usr/lib/modules/5.15.0-25-generic/kernel/drivers/pinctrl/intel/pinctrl-elkhartlake.ko
usr/lib/modules/5.15.0-25-generic/kernel/drivers/pinctrl/intel/pinctrl-emmitsburg.ko
usr/lib/modules/5.15.0-25-generic/kernel/drivers/pinctrl/intel/pinctrl-geminilake.ko
usr/lib/modules/5.15.0-25-generic/kernel/drivers/pinctrl/intel/pinctrl-icelake.ko
usr/lib/modules/5.15.0-25-generic/kernel/drivers/pinctrl/intel/pinctrl-jasperlake.ko
usr/lib/modules/5.15.0-25-generic/kernel/drivers/pinctrl/intel/pinctrl-lakefield.ko
usr/lib/modules/5.15.0-25-generic/kernel/drivers/pinctrl/intel/pinctrl-lewisburg.ko
usr/lib/modules/5.15.0-25-generic/kernel/drivers/pinctrl/intel/pinctrl-lynxpoint.ko
usr/lib/modules/5.15.0-25-generic/kernel/drivers/pinctrl/intel/pinctrl-sunrisepoint.ko
usr/lib/modules/5.15.0-25-generic/kernel/drivers/pinctrl/intel/pinctrl-tigerlake.ko
usr/lib/modules/5.15.0-25-generic/kernel/drivers/pinctrl/pinctrl-da9062.ko
usr/lib/modules/5.15.0-25-generic/kernel/drivers/pinctrl/pinctrl-mcp23s08.ko
usr/lib/modules/5.15.0-25-generic/kernel/drivers/pinctrl/pinctrl-mcp23s08_i2c.ko
usr/lib/modules/5.15.0-25-generic/kernel/drivers/pinctrl/pinctrl-mcp23s08_spi.ko
usr/lib/modules/5.15.0-25-generic/kernel/drivers/platform
usr/lib/modules/5.15.0-25-generic/kernel/drivers/platform/chrome
usr/lib/modules/5.15.0-25-generic/kernel/drivers/platform/chrome/cros_ec.ko
usr/lib/modules/5.15.0-25-generic/kernel/drivers/platform/chrome/cros_ec_lpcs.ko
usr/lib/modules/5.15.0-25-generic/kernel/drivers/platform/chrome/cros_ec_spi.ko
usr/lib/modules/5.15.0-25-generic/kernel/drivers/platform/chrome/wilco_ec
usr/lib/modules/5.15.0-25-generic/kernel/drivers/platform/chrome/wilco_ec/wilco_ec.ko
usr/lib/modules/5.15.0-25-generic/kernel/drivers/platform/surface
usr/lib/modules/5.15.0-25-generic/kernel/drivers/platform/surface/aggregator
usr/lib/modules/5.15.0-25-generic/kernel/drivers/platform/surface/aggregator/surface_aggregator.ko
usr/lib/modules/5.15.0-25-generic/kernel/drivers/platform/x86
usr/lib/modules/5.15.0-25-generic/kernel/drivers/platform/x86/asus-wmi.ko
usr/lib/modules/5.15.0-25-generic/kernel/drivers/platform/x86/wmi.ko
usr/lib/modules/5.15.0-25-generic/kernel/drivers/power
usr/lib/modules/5.15.0-25-generic/kernel/drivers/power/supply
usr/lib/modules/5.15.0-25-generic/kernel/drivers/power/supply/axp20x_usb_power.ko
usr/lib/modules/5.15.0-25-generic/kernel/drivers/pwm
usr/lib/modules/5.15.0-25-generic/kernel/drivers/pwm/pwm-cros-ec.ko
usr/lib/modules/5.15.0-25-generic/kernel/drivers/regulator
usr/lib/modules/5.15.0-25-generic/kernel/drivers/regulator/88pg86x.ko
usr/lib/modules/5.15.0-25-generic/kernel/drivers/regulator/88pm800-regulator.ko
usr/lib/modules/5.15.0-25-generic/kernel/drivers/regulator/88pm8607.ko
usr/lib/modules/5.15.0-25-generic/kernel/drivers/regulator/aat2870-regulator.ko
usr/lib/modules/5.15.0-25-generic/kernel/drivers/regulator/act8865-regulator.ko
usr/lib/modules/5.15.0-25-generic/kernel/drivers/regulator/ad5398.ko
usr/lib/modules/5.15.0-25-generic/kernel/drivers/regulator/arizona-ldo1.ko
usr/lib/modules/5.15.0-25-generic/kernel/drivers/regulator/arizona-micsupp.ko
usr/lib/modules/5.15.0-25-generic/kernel/drivers/regulator/as3711-regulator.ko
usr/lib/modules/5.15.0-25-generic/kernel/drivers/regulator/atc260x-regulator.ko
usr/lib/modules/5.15.0-25-generic/kernel/drivers/regulator/axp20x-regulator.ko
usr/lib/modules/5.15.0-25-generic/kernel/drivers/regulator/bcm590xx-regulator.ko
usr/lib/modules/5.15.0-25-generic/kernel/drivers/regulator/bd9571mwv-regulator.ko
usr/lib/modules/5.15.0-25-generic/kernel/drivers/regulator/da903x-regulator.ko
usr/lib/modules/5.15.0-25-generic/kernel/drivers/regulator/da9052-regulator.ko
usr/lib/modules/5.15.0-25-generic/kernel/drivers/regulator/da9055-regulator.ko
usr/lib/modules/5.15.0-25-generic/kernel/drivers/regulator/da9062-regulator.ko
usr/lib/modules/5.15.0-25-generic/kernel/drivers/regulator/da9210-regulator.ko
usr/lib/modules/5.15.0-25-generic/kernel/drivers/regulator/da9211-regulator.ko
usr/lib/modules/5.15.0-25-generic/kernel/drivers/regulator/fan53555.ko
usr/lib/modules/5.15.0-25-generic/kernel/drivers/regulator/fixed.ko
usr/lib/modules/5.15.0-25-generic/kernel/drivers/regulator/gpio-regulator.ko
usr/lib/modules/5.15.0-25-generic/kernel/drivers/regulator/isl6271a-regulator.ko
usr/lib/modules/5.15.0-25-generic/kernel/drivers/regulator/isl9305.ko
usr/lib/modules/5.15.0-25-generic/kernel/drivers/regulator/lm363x-regulator.ko
usr/lib/modules/5.15.0-25-generic/kernel/drivers/regulator/lp3971.ko
usr/lib/modules/5.15.0-25-generic/kernel/drivers/regulator/lp3972.ko
usr/lib/modules/5.15.0-25-generic/kernel/drivers/regulator/lp872x.ko
usr/lib/modules/5.15.0-25-generic/kernel/drivers/regulator/lp8755.ko
usr/lib/modules/5.15.0-25-generic/kernel/drivers/regulator/lp8788-buck.ko
usr/lib/modules/5.15.0-25-generic/kernel/drivers/regulator/lp8788-ldo.ko
usr/lib/modules/5.15.0-25-generic/kernel/drivers/regulator/ltc3589.ko
usr/lib/modules/5.15.0-25-generic/kernel/drivers/regulator/ltc3676.ko
usr/lib/modules/5.15.0-25-generic/kernel/drivers/regulator/max14577-regulator.ko
usr/lib/modules/5.15.0-25-generic/kernel/drivers/regulator/max1586.ko
usr/lib/modules/5.15.0-25-generic/kernel/drivers/regulator/max77693-regulator.ko
usr/lib/modules/5.15.0-25-generic/kernel/drivers/regulator/max77826-regulator.ko
usr/lib/modules/5.15.0-25-generic/kernel/drivers/regulator/max8649.ko
usr/lib/modules/5.15.0-25-generic/kernel/drivers/regulator/max8660.ko
usr/lib/modules/5.15.0-25-generic/kernel/drivers/regulator/max8893.ko
usr/lib/modules/5.15.0-25-generic/kernel/drivers/regulator/max8907-regulator.ko
usr/lib/modules/5.15.0-25-generic/kernel/drivers/regulator/max8925-regulator.ko
usr/lib/modules/5.15.0-25-generic/kernel/drivers/regulator/max8952.ko
usr/lib/modules/5.15.0-25-generic/kernel/drivers/regulator/max8997-regulator.ko
usr/lib/modules/5.15.0-25-generic/kernel/drivers/regulator/max8998.ko
usr/lib/modules/5.15.0-25-generic/kernel/drivers/regulator/mc13783-regulator.ko
usr/lib/modules/5.15.0-25-generic/kernel/drivers/regulator/mc13892-regulator.ko
usr/lib/modules/5.15.0-25-generic/kernel/drivers/regulator/mc13xxx-regulator-core.ko
usr/lib/modules/5.15.0-25-generic/kernel/drivers/regulator/mp8859.ko
usr/lib/modules/5.15.0-25-generic/kernel/drivers/regulator/mt6311-regulator.ko
usr/lib/modules/5.15.0-25-generic/kernel/drivers/regulator/mt6315-regulator.ko
usr/lib/modules/5.15.0-25-generic/kernel/drivers/regulator/mt6323-regulator.ko
usr/lib/modules/5.15.0-25-generic/kernel/drivers/regulator/mt6358-regulator.ko
usr/lib/modules/5.15.0-25-generic/kernel/drivers/regulator/mt6359-regulator.ko
usr/lib/modules/5.15.0-25-generic/kernel/drivers/regulator/mt6360-regulator.ko
usr/lib/modules/5.15.0-25-generic/kernel/drivers/regulator/mt6397-regulator.ko
usr/lib/modules/5.15.0-25-generic/kernel/drivers/regulator/palmas-regulator.ko
usr/lib/modules/5.15.0-25-generic/kernel/drivers/regulator/pca9450-regulator.ko
usr/lib/modules/5.15.0-25-generic/kernel/drivers/regulator/pcap-regulator.ko
usr/lib/modules/5.15.0-25-generic/kernel/drivers/regulator/pcf50633-regulator.ko
usr/lib/modules/5.15.0-25-generic/kernel/drivers/regulator/pv88060-regulator.ko
usr/lib/modules/5.15.0-25-generic/kernel/drivers/regulator/pv88080-regulator.ko
usr/lib/modules/5.15.0-25-generic/kernel/drivers/regulator/pv88090-regulator.ko
usr/lib/modules/5.15.0-25-generic/kernel/drivers/regulator/pwm-regulator.ko
usr/lib/modules/5.15.0-25-generic/kernel/drivers/regulator/qcom-labibb-regulator.ko
usr/lib/modules/5.15.0-25-generic/kernel/drivers/regulator/qcom_spmi-regulator.ko
usr/lib/modules/5.15.0-25-generic/kernel/drivers/regulator/qcom_usb_vbus-regulator.ko
usr/lib/modules/5.15.0-25-generic/kernel/drivers/regulator/rc5t583-regulator.ko
usr/lib/modules/5.15.0-25-generic/kernel/drivers/regulator/rpi-panel-attiny-regulator.ko
usr/lib/modules/5.15.0-25-generic/kernel/drivers/regulator/rt4801-regulator.ko
usr/lib/modules/5.15.0-25-generic/kernel/drivers/regulator/rt4831-regulator.ko
usr/lib/modules/5.15.0-25-generic/kernel/drivers/regulator/rt5033-regulator.ko
usr/lib/modules/5.15.0-25-generic/kernel/drivers/regulator/rt6160-regulator.ko
usr/lib/modules/5.15.0-25-generic/kernel/drivers/regulator/rt6245-regulator.ko
usr/lib/modules/5.15.0-25-generic/kernel/drivers/regulator/rtmv20-regulator.ko
usr/lib/modules/5.15.0-25-generic/kernel/drivers/regulator/rtq2134-regulator.ko
usr/lib/modules/5.15.0-25-generic/kernel/drivers/regulator/rtq6752-regulator.ko
usr/lib/modules/5.15.0-25-generic/kernel/drivers/regulator/sky81452-regulator.ko
usr/lib/modules/5.15.0-25-generic/kernel/drivers/regulator/slg51000-regulator.ko
usr/lib/modules/5.15.0-25-generic/kernel/drivers/regulator/tps51632-regulator.ko
usr/lib/modules/5.15.0-25-generic/kernel/drivers/regulator/tps6105x-regulator.ko
usr/lib/modules/5.15.0-25-generic/kernel/drivers/regulator/tps62360-regulator.ko
usr/lib/modules/5.15.0-25-generic/kernel/drivers/regulator/tps65023-regulator.ko
usr/lib/modules/5.15.0-25-generic/kernel/drivers/regulator/tps6507x-regulator.ko
usr/lib/modules/5.15.0-25-generic/kernel/drivers/regulator/tps65086-regulator.ko
usr/lib/modules/5.15.0-25-generic/kernel/drivers/regulator/tps65090-regulator.ko
usr/lib/modules/5.15.0-25-generic/kernel/drivers/regulator/tps65132-regulator.ko
usr/lib/modules/5.15.0-25-generic/kernel/drivers/regulator/tps6524x-regulator.ko
usr/lib/modules/5.15.0-25-generic/kernel/drivers/regulator/tps6586x-regulator.ko
usr/lib/modules/5.15.0-25-generic/kernel/drivers/regulator/tps65910-regulator.ko
usr/lib/modules/5.15.0-25-generic/kernel/drivers/regulator/tps65912-regulator.ko
usr/lib/modules/5.15.0-25-generic/kernel/drivers/regulator/tps80031-regulator.ko
usr/lib/modules/5.15.0-25-generic/kernel/drivers/regulator/twl-regulator.ko
usr/lib/modules/5.15.0-25-generic/kernel/drivers/regulator/twl6030-regulator.ko
usr/lib/modules/5.15.0-25-generic/kernel/drivers/regulator/userspace-consumer.ko
usr/lib/modules/5.15.0-25-generic/kernel/drivers/regulator/virtual.ko
usr/lib/modules/5.15.0-25-generic/kernel/drivers/regulator/wm831x-dcdc.ko
usr/lib/modules/5.15.0-25-generic/kernel/drivers/regulator/wm831x-isink.ko
usr/lib/modules/5.15.0-25-generic/kernel/drivers/regulator/wm831x-ldo.ko
usr/lib/modules/5.15.0-25-generic/kernel/drivers/regulator/wm8350-regulator.ko
usr/lib/modules/5.15.0-25-generic/kernel/drivers/regulator/wm8400-regulator.ko
usr/lib/modules/5.15.0-25-generic/kernel/drivers/regulator/wm8994-regulator.ko
usr/lib/modules/5.15.0-25-generic/kernel/drivers/reset
usr/lib/modules/5.15.0-25-generic/kernel/drivers/reset/reset-ti-syscon.ko
usr/lib/modules/5.15.0-25-generic/kernel/drivers/rpmsg
usr/lib/modules/5.15.0-25-generic/kernel/drivers/rpmsg/rpmsg_core.ko
usr/lib/modules/5.15.0-25-generic/kernel/drivers/rtc
usr/lib/modules/5.15.0-25-generic/kernel/drivers/rtc/rtc-88pm80x.ko
usr/lib/modules/5.15.0-25-generic/kernel/drivers/rtc/rtc-88pm860x.ko
usr/lib/modules/5.15.0-25-generic/kernel/drivers/rtc/rtc-ab-b5ze-s3.ko
usr/lib/modules/5.15.0-25-generic/kernel/drivers/rtc/rtc-ab-eoz9.ko
usr/lib/modules/5.15.0-25-generic/kernel/drivers/rtc/rtc-abx80x.ko
usr/lib/modules/5.15.0-25-generic/kernel/drivers/rtc/rtc-bq32k.ko
usr/lib/modules/5.15.0-25-generic/kernel/drivers/rtc/rtc-bq4802.ko
usr/lib/modules/5.15.0-25-generic/kernel/drivers/rtc/rtc-cros-ec.ko
usr/lib/modules/5.15.0-25-generic/kernel/drivers/rtc/rtc-da9052.ko
usr/lib/modules/5.15.0-25-generic/kernel/drivers/rtc/rtc-da9055.ko
usr/lib/modules/5.15.0-25-generic/kernel/drivers/rtc/rtc-da9063.ko
usr/lib/modules/5.15.0-25-generic/kernel/drivers/rtc/rtc-ds1286.ko
usr/lib/modules/5.15.0-25-generic/kernel/drivers/rtc/rtc-ds1302.ko
usr/lib/modules/5.15.0-25-generic/kernel/drivers/rtc/rtc-ds1305.ko
usr/lib/modules/5.15.0-25-generic/kernel/drivers/rtc/rtc-ds1307.ko
usr/lib/modules/5.15.0-25-generic/kernel/drivers/rtc/rtc-ds1343.ko
usr/lib/modules/5.15.0-25-generic/kernel/drivers/rtc/rtc-ds1347.ko
usr/lib/modules/5.15.0-25-generic/kernel/drivers/rtc/rtc-ds1374.ko
usr/lib/modules/5.15.0-25-generic/kernel/drivers/rtc/rtc-ds1390.ko
usr/lib/modules/5.15.0-25-generic/kernel/drivers/rtc/rtc-ds1511.ko
usr/lib/modules/5.15.0-25-generic/kernel/drivers/rtc/rtc-ds1553.ko
usr/lib/modules/5.15.0-25-generic/kernel/drivers/rtc/rtc-ds1672.ko
usr/lib/modules/5.15.0-25-generic/kernel/drivers/rtc/rtc-ds1685.ko
usr/lib/modules/5.15.0-25-generic/kernel/drivers/rtc/rtc-ds1742.ko
usr/lib/modules/5.15.0-25-generic/kernel/drivers/rtc/rtc-ds2404.ko
usr/lib/modules/5.15.0-25-generic/kernel/drivers/rtc/rtc-ds3232.ko
usr/lib/modules/5.15.0-25-generic/kernel/drivers/rtc/rtc-em3027.ko
usr/lib/modules/5.15.0-25-generic/kernel/drivers/rtc/rtc-fm3130.ko
usr/lib/modules/5.15.0-25-generic/kernel/drivers/rtc/rtc-ftrtc010.ko
usr/lib/modules/5.15.0-25-generic/kernel/drivers/rtc/rtc-goldfish.ko
usr/lib/modules/5.15.0-25-generic/kernel/drivers/rtc/rtc-hid-sensor-time.ko
usr/lib/modules/5.15.0-25-generic/kernel/drivers/rtc/rtc-isl12022.ko
usr/lib/modules/5.15.0-25-generic/kernel/drivers/rtc/rtc-isl1208.ko
usr/lib/modules/5.15.0-25-generic/kernel/drivers/rtc/rtc-lp8788.ko
usr/lib/modules/5.15.0-25-generic/kernel/drivers/rtc/rtc-m41t80.ko
usr/lib/modules/5.15.0-25-generic/kernel/drivers/rtc/rtc-m41t93.ko
usr/lib/modules/5.15.0-25-generic/kernel/drivers/rtc/rtc-m41t94.ko
usr/lib/modules/5.15.0-25-generic/kernel/drivers/rtc/rtc-m48t35.ko
usr/lib/modules/5.15.0-25-generic/kernel/drivers/rtc/rtc-m48t59.ko
usr/lib/modules/5.15.0-25-generic/kernel/drivers/rtc/rtc-m48t86.ko
usr/lib/modules/5.15.0-25-generic/kernel/drivers/rtc/rtc-max6900.ko
usr/lib/modules/5.15.0-25-generic/kernel/drivers/rtc/rtc-max6902.ko
usr/lib/modules/5.15.0-25-generic/kernel/drivers/rtc/rtc-max6916.ko
usr/lib/modules/5.15.0-25-generic/kernel/drivers/rtc/rtc-max8907.ko
usr/lib/modules/5.15.0-25-generic/kernel/drivers/rtc/rtc-max8925.ko
usr/lib/modules/5.15.0-25-generic/kernel/drivers/rtc/rtc-max8997.ko
usr/lib/modules/5.15.0-25-generic/kernel/drivers/rtc/rtc-max8998.ko
usr/lib/modules/5.15.0-25-generic/kernel/drivers/rtc/rtc-mc13xxx.ko
usr/lib/modules/5.15.0-25-generic/kernel/drivers/rtc/rtc-mcp795.ko
usr/lib/modules/5.15.0-25-generic/kernel/drivers/rtc/rtc-msm6242.ko
usr/lib/modules/5.15.0-25-generic/kernel/drivers/rtc/rtc-mt6397.ko
usr/lib/modules/5.15.0-25-generic/kernel/drivers/rtc/rtc-palmas.ko
usr/lib/modules/5.15.0-25-generic/kernel/drivers/rtc/rtc-pcap.ko
usr/lib/modules/5.15.0-25-generic/kernel/drivers/rtc/rtc-pcf2123.ko
usr/lib/modules/5.15.0-25-generic/kernel/drivers/rtc/rtc-pcf2127.ko
usr/lib/modules/5.15.0-25-generic/kernel/drivers/rtc/rtc-pcf50633.ko
usr/lib/modules/5.15.0-25-generic/kernel/drivers/rtc/rtc-pcf85063.ko
usr/lib/modules/5.15.0-25-generic/kernel/drivers/rtc/rtc-pcf8523.ko
usr/lib/modules/5.15.0-25-generic/kernel/drivers/rtc/rtc-pcf85363.ko
usr/lib/modules/5.15.0-25-generic/kernel/drivers/rtc/rtc-pcf8563.ko
usr/lib/modules/5.15.0-25-generic/kernel/drivers/rtc/rtc-pcf8583.ko
usr/lib/modules/5.15.0-25-generic/kernel/drivers/rtc/rtc-r9701.ko
usr/lib/modules/5.15.0-25-generic/kernel/drivers/rtc/rtc-rc5t583.ko
usr/lib/modules/5.15.0-25-generic/kernel/drivers/rtc/rtc-rp5c01.ko
usr/lib/modules/5.15.0-25-generic/kernel/drivers/rtc/rtc-rs5c348.ko
usr/lib/modules/5.15.0-25-generic/kernel/drivers/rtc/rtc-rs5c372.ko
usr/lib/modules/5.15.0-25-generic/kernel/drivers/rtc/rtc-rv3028.ko
usr/lib/modules/5.15.0-25-generic/kernel/drivers/rtc/rtc-rv3029c2.ko
usr/lib/modules/5.15.0-25-generic/kernel/drivers/rtc/rtc-rv3032.ko
usr/lib/modules/5.15.0-25-generic/kernel/drivers/rtc/rtc-rv8803.ko
usr/lib/modules/5.15.0-25-generic/kernel/drivers/rtc/rtc-rx4581.ko
usr/lib/modules/5.15.0-25-generic/kernel/drivers/rtc/rtc-rx6110.ko
usr/lib/modules/5.15.0-25-generic/kernel/drivers/rtc/rtc-rx8010.ko
usr/lib/modules/5.15.0-25-generic/kernel/drivers/rtc/rtc-rx8025.ko
usr/lib/modules/5.15.0-25-generic/kernel/drivers/rtc/rtc-rx8581.ko
usr/lib/modules/5.15.0-25-generic/kernel/drivers/rtc/rtc-s35390a.ko
usr/lib/modules/5.15.0-25-generic/kernel/drivers/rtc/rtc-sd3078.ko
usr/lib/modules/5.15.0-25-generic/kernel/drivers/rtc/rtc-stk17ta8.ko
usr/lib/modules/5.15.0-25-generic/kernel/drivers/rtc/rtc-tps6586x.ko
usr/lib/modules/5.15.0-25-generic/kernel/drivers/rtc/rtc-tps65910.ko
usr/lib/modules/5.15.0-25-generic/kernel/drivers/rtc/rtc-tps80031.ko
usr/lib/modules/5.15.0-25-generic/kernel/drivers/rtc/rtc-v3020.ko
usr/lib/modules/5.15.0-25-generic/kernel/drivers/rtc/rtc-wilco-ec.ko
usr/lib/modules/5.15.0-25-generic/kernel/drivers/rtc/rtc-wm831x.ko
usr/lib/modules/5.15.0-25-generic/kernel/drivers/rtc/rtc-wm8350.ko
usr/lib/modules/5.15.0-25-generic/kernel/drivers/rtc/rtc-x1205.ko
usr/lib/modules/5.15.0-25-generic/kernel/drivers/scsi
usr/lib/modules/5.15.0-25-generic/kernel/drivers/scsi/3w-9xxx.ko
usr/lib/modules/5.15.0-25-generic/kernel/drivers/scsi/3w-sas.ko
usr/lib/modules/5.15.0-25-generic/kernel/drivers/scsi/3w-xxxx.ko
usr/lib/modules/5.15.0-25-generic/kernel/drivers/scsi/53c700.ko
usr/lib/modules/5.15.0-25-generic/kernel/drivers/scsi/BusLogic.ko
usr/lib/modules/5.15.0-25-generic/kernel/drivers/scsi/a100u2w.ko
usr/lib/modules/5.15.0-25-generic/kernel/drivers/scsi/aacraid
usr/lib/modules/5.15.0-25-generic/kernel/drivers/scsi/aacraid/aacraid.ko
usr/lib/modules/5.15.0-25-generic/kernel/drivers/scsi/advansys.ko
usr/lib/modules/5.15.0-25-generic/kernel/drivers/scsi/aha1740.ko
usr/lib/modules/5.15.0-25-generic/kernel/drivers/scsi/aic7xxx
usr/lib/modules/5.15.0-25-generic/kernel/drivers/scsi/aic7xxx/aic79xx.ko
usr/lib/modules/5.15.0-25-generic/kernel/drivers/scsi/aic7xxx/aic7xxx.ko
usr/lib/modules/5.15.0-25-generic/kernel/drivers/scsi/aic94xx
usr/lib/modules/5.15.0-25-generic/kernel/drivers/scsi/aic94xx/aic94xx.ko
usr/lib/modules/5.15.0-25-generic/kernel/drivers/scsi/am53c974.ko
usr/lib/modules/5.15.0-25-generic/kernel/drivers/scsi/arcmsr
usr/lib/modules/5.15.0-25-generic/kernel/drivers/scsi/arcmsr/arcmsr.ko
usr/lib/modules/5.15.0-25-generic/kernel/drivers/scsi/atp870u.ko
usr/lib/modules/5.15.0-25-generic/kernel/drivers/scsi/be2iscsi
usr/lib/modules/5.15.0-25-generic/kernel/drivers/scsi/be2iscsi/be2iscsi.ko
usr/lib/modules/5.15.0-25-generic/kernel/drivers/scsi/bfa
usr/lib/modules/5.15.0-25-generic/kernel/drivers/scsi/bfa/bfa.ko
usr/lib/modules/5.15.0-25-generic/kernel/drivers/scsi/bnx2fc
usr/lib/modules/5.15.0-25-generic/kernel/drivers/scsi/bnx2fc/bnx2fc.ko
usr/lib/modules/5.15.0-25-generic/kernel/drivers/scsi/bnx2i
usr/lib/modules/5.15.0-25-generic/kernel/drivers/scsi/bnx2i/bnx2i.ko
usr/lib/modules/5.15.0-25-generic/kernel/drivers/scsi/ch.ko
usr/lib/modules/5.15.0-25-generic/kernel/drivers/scsi/csiostor
usr/lib/modules/5.15.0-25-generic/kernel/drivers/scsi/csiostor/csiostor.ko
usr/lib/modules/5.15.0-25-generic/kernel/drivers/scsi/cxgbi
usr/lib/modules/5.15.0-25-generic/kernel/drivers/scsi/cxgbi/cxgb3i
usr/lib/modules/5.15.0-25-generic/kernel/drivers/scsi/cxgbi/cxgb3i/cxgb3i.ko
usr/lib/modules/5.15.0-25-generic/kernel/drivers/scsi/cxgbi/cxgb4i
usr/lib/modules/5.15.0-25-generic/kernel/drivers/scsi/cxgbi/cxgb4i/cxgb4i.ko
usr/lib/modules/5.15.0-25-generic/kernel/drivers/scsi/cxgbi/libcxgbi.ko
usr/lib/modules/5.15.0-25-generic/kernel/drivers/scsi/dc395x.ko
usr/lib/modules/5.15.0-25-generic/kernel/drivers/scsi/device_handler
usr/lib/modules/5.15.0-25-generic/kernel/drivers/scsi/device_handler/scsi_dh_alua.ko
usr/lib/modules/5.15.0-25-generic/kernel/drivers/scsi/device_handler/scsi_dh_emc.ko
usr/lib/modules/5.15.0-25-generic/kernel/drivers/scsi/device_handler/scsi_dh_hp_sw.ko
usr/lib/modules/5.15.0-25-generic/kernel/drivers/scsi/device_handler/scsi_dh_rdac.ko
usr/lib/modules/5.15.0-25-generic/kernel/drivers/scsi/dmx3191d.ko
usr/lib/modules/5.15.0-25-generic/kernel/drivers/scsi/dpt_i2o.ko
usr/lib/modules/5.15.0-25-generic/kernel/drivers/scsi/elx
usr/lib/modules/5.15.0-25-generic/kernel/drivers/scsi/elx/efct.ko
usr/lib/modules/5.15.0-25-generic/kernel/drivers/scsi/esas2r
usr/lib/modules/5.15.0-25-generic/kernel/drivers/scsi/esas2r/esas2r.ko
usr/lib/modules/5.15.0-25-generic/kernel/drivers/scsi/esp_scsi.ko
usr/lib/modules/5.15.0-25-generic/kernel/drivers/scsi/fcoe
usr/lib/modules/5.15.0-25-generic/kernel/drivers/scsi/fcoe/fcoe.ko
usr/lib/modules/5.15.0-25-generic/kernel/drivers/scsi/fcoe/libfcoe.ko
usr/lib/modules/5.15.0-25-generic/kernel/drivers/scsi/fdomain.ko
usr/lib/modules/5.15.0-25-generic/kernel/drivers/scsi/fdomain_pci.ko
usr/lib/modules/5.15.0-25-generic/kernel/drivers/scsi/fnic
usr/lib/modules/5.15.0-25-generic/kernel/drivers/scsi/fnic/fnic.ko
usr/lib/modules/5.15.0-25-generic/kernel/drivers/scsi/hpsa.ko
usr/lib/modules/5.15.0-25-generic/kernel/drivers/scsi/hptiop.ko
usr/lib/modules/5.15.0-25-generic/kernel/drivers/scsi/hv_storvsc.ko
usr/lib/modules/5.15.0-25-generic/kernel/drivers/scsi/imm.ko
usr/lib/modules/5.15.0-25-generic/kernel/drivers/scsi/initio.ko
usr/lib/modules/5.15.0-25-generic/kernel/drivers/scsi/ipr.ko
usr/lib/modules/5.15.0-25-generic/kernel/drivers/scsi/ips.ko
usr/lib/modules/5.15.0-25-generic/kernel/drivers/scsi/isci
usr/lib/modules/5.15.0-25-generic/kernel/drivers/scsi/isci/isci.ko
usr/lib/modules/5.15.0-25-generic/kernel/drivers/scsi/iscsi_boot_sysfs.ko
usr/lib/modules/5.15.0-25-generic/kernel/drivers/scsi/iscsi_tcp.ko
usr/lib/modules/5.15.0-25-generic/kernel/drivers/scsi/libfc
usr/lib/modules/5.15.0-25-generic/kernel/drivers/scsi/libfc/libfc.ko
usr/lib/modules/5.15.0-25-generic/kernel/drivers/scsi/libiscsi.ko
usr/lib/modules/5.15.0-25-generic/kernel/drivers/scsi/libiscsi_tcp.ko
usr/lib/modules/5.15.0-25-generic/kernel/drivers/scsi/libsas
usr/lib/modules/5.15.0-25-generic/kernel/drivers/scsi/libsas/libsas.ko
usr/lib/modules/5.15.0-25-generic/kernel/drivers/scsi/lpfc
usr/lib/modules/5.15.0-25-generic/kernel/drivers/scsi/lpfc/lpfc.ko
usr/lib/modules/5.15.0-25-generic/kernel/drivers/scsi/megaraid
usr/lib/modules/5.15.0-25-generic/kernel/drivers/scsi/megaraid.ko
usr/lib/modules/5.15.0-25-generic/kernel/drivers/scsi/megaraid/megaraid_mbox.ko
usr/lib/modules/5.15.0-25-generic/kernel/drivers/scsi/megaraid/megaraid_mm.ko
usr/lib/modules/5.15.0-25-generic/kernel/drivers/scsi/megaraid/megaraid_sas.ko
usr/lib/modules/5.15.0-25-generic/kernel/drivers/scsi/mpi3mr
usr/lib/modules/5.15.0-25-generic/kernel/drivers/scsi/mpi3mr/mpi3mr.ko
usr/lib/modules/5.15.0-25-generic/kernel/drivers/scsi/mpt3sas
usr/lib/modules/5.15.0-25-generic/kernel/drivers/scsi/mpt3sas/mpt3sas.ko
usr/lib/modules/5.15.0-25-generic/kernel/drivers/scsi/mvsas
usr/lib/modules/5.15.0-25-generic/kernel/drivers/scsi/mvsas/mvsas.ko
usr/lib/modules/5.15.0-25-generic/kernel/drivers/scsi/mvumi.ko
usr/lib/modules/5.15.0-25-generic/kernel/drivers/scsi/myrb.ko
usr/lib/modules/5.15.0-25-generic/kernel/drivers/scsi/myrs.ko
usr/lib/modules/5.15.0-25-generic/kernel/drivers/scsi/pcmcia
usr/lib/modules/5.15.0-25-generic/kernel/drivers/scsi/pcmcia/aha152x_cs.ko
usr/lib/modules/5.15.0-25-generic/kernel/drivers/scsi/pcmcia/fdomain_cs.ko
usr/lib/modules/5.15.0-25-generic/kernel/drivers/scsi/pcmcia/qlogic_cs.ko
usr/lib/modules/5.15.0-25-generic/kernel/drivers/scsi/pcmcia/sym53c500_cs.ko
usr/lib/modules/5.15.0-25-generic/kernel/drivers/scsi/pm8001
usr/lib/modules/5.15.0-25-generic/kernel/drivers/scsi/pm8001/pm80xx.ko
usr/lib/modules/5.15.0-25-generic/kernel/drivers/scsi/pmcraid.ko
usr/lib/modules/5.15.0-25-generic/kernel/drivers/scsi/ppa.ko
usr/lib/modules/5.15.0-25-generic/kernel/drivers/scsi/qedf
usr/lib/modules/5.15.0-25-generic/kernel/drivers/scsi/qedf/qedf.ko
usr/lib/modules/5.15.0-25-generic/kernel/drivers/scsi/qedi
usr/lib/modules/5.15.0-25-generic/kernel/drivers/scsi/qedi/qedi.ko
usr/lib/modules/5.15.0-25-generic/kernel/drivers/scsi/qla1280.ko
usr/lib/modules/5.15.0-25-generic/kernel/drivers/scsi/qla2xxx
usr/lib/modules/5.15.0-25-generic/kernel/drivers/scsi/qla2xxx/qla2xxx.ko
usr/lib/modules/5.15.0-25-generic/kernel/drivers/scsi/qla2xxx/tcm_qla2xxx.ko
usr/lib/modules/5.15.0-25-generic/kernel/drivers/scsi/qla4xxx
usr/lib/modules/5.15.0-25-generic/kernel/drivers/scsi/qla4xxx/qla4xxx.ko
usr/lib/modules/5.15.0-25-generic/kernel/drivers/scsi/qlogicfas408.ko
usr/lib/modules/5.15.0-25-generic/kernel/drivers/scsi/raid_class.ko
usr/lib/modules/5.15.0-25-generic/kernel/drivers/scsi/scsi_debug.ko
usr/lib/modules/5.15.0-25-generic/kernel/drivers/scsi/scsi_transport_fc.ko
usr/lib/modules/5.15.0-25-generic/kernel/drivers/scsi/scsi_transport_iscsi.ko
usr/lib/modules/5.15.0-25-generic/kernel/drivers/scsi/scsi_transport_sas.ko
usr/lib/modules/5.15.0-25-generic/kernel/drivers/scsi/scsi_transport_spi.ko
usr/lib/modules/5.15.0-25-generic/kernel/drivers/scsi/scsi_transport_srp.ko
usr/lib/modules/5.15.0-25-generic/kernel/drivers/scsi/ses.ko
usr/lib/modules/5.15.0-25-generic/kernel/drivers/scsi/sim710.ko
usr/lib/modules/5.15.0-25-generic/kernel/drivers/scsi/smartpqi
usr/lib/modules/5.15.0-25-generic/kernel/drivers/scsi/smartpqi/smartpqi.ko
usr/lib/modules/5.15.0-25-generic/kernel/drivers/scsi/snic
usr/lib/modules/5.15.0-25-generic/kernel/drivers/scsi/snic/snic.ko
usr/lib/modules/5.15.0-25-generic/kernel/drivers/scsi/st.ko
usr/lib/modules/5.15.0-25-generic/kernel/drivers/scsi/stex.ko
usr/lib/modules/5.15.0-25-generic/kernel/drivers/scsi/sym53c8xx_2
usr/lib/modules/5.15.0-25-generic/kernel/drivers/scsi/sym53c8xx_2/sym53c8xx.ko
usr/lib/modules/5.15.0-25-generic/kernel/drivers/scsi/ufs
usr/lib/modules/5.15.0-25-generic/kernel/drivers/scsi/ufs/cdns-pltfrm.ko
usr/lib/modules/5.15.0-25-generic/kernel/drivers/scsi/ufs/tc-dwc-g210-pci.ko
usr/lib/modules/5.15.0-25-generic/kernel/drivers/scsi/ufs/tc-dwc-g210-pltfrm.ko
usr/lib/modules/5.15.0-25-generic/kernel/drivers/scsi/ufs/tc-dwc-g210.ko
usr/lib/modules/5.15.0-25-generic/kernel/drivers/scsi/ufs/ufshcd-core.ko
usr/lib/modules/5.15.0-25-generic/kernel/drivers/scsi/ufs/ufshcd-dwc.ko
usr/lib/modules/5.15.0-25-generic/kernel/drivers/scsi/ufs/ufshcd-pci.ko
usr/lib/modules/5.15.0-25-generic/kernel/drivers/scsi/ufs/ufshcd-pltfrm.ko
usr/lib/modules/5.15.0-25-generic/kernel/drivers/scsi/virtio_scsi.ko
usr/lib/modules/5.15.0-25-generic/kernel/drivers/scsi/vmw_pvscsi.ko
usr/lib/modules/5.15.0-25-generic/kernel/drivers/scsi/wd719x.ko
usr/lib/modules/5.15.0-25-generic/kernel/drivers/scsi/xen-scsifront.ko
usr/lib/modules/5.15.0-25-generic/kernel/drivers/siox
usr/lib/modules/5.15.0-25-generic/kernel/drivers/siox/siox-core.ko
usr/lib/modules/5.15.0-25-generic/kernel/drivers/slimbus
usr/lib/modules/5.15.0-25-generic/kernel/drivers/slimbus/slimbus.ko
usr/lib/modules/5.15.0-25-generic/kernel/drivers/spi
usr/lib/modules/5.15.0-25-generic/kernel/drivers/spi/spi-altera-core.ko
usr/lib/modules/5.15.0-25-generic/kernel/drivers/spi/spi-altera-dfl.ko
usr/lib/modules/5.15.0-25-generic/kernel/drivers/spi/spi-altera-platform.ko
usr/lib/modules/5.15.0-25-generic/kernel/drivers/spi/spi-amd.ko
usr/lib/modules/5.15.0-25-generic/kernel/drivers/spi/spi-axi-spi-engine.ko
usr/lib/modules/5.15.0-25-generic/kernel/drivers/spi/spi-bitbang.ko
usr/lib/modules/5.15.0-25-generic/kernel/drivers/spi/spi-butterfly.ko
usr/lib/modules/5.15.0-25-generic/kernel/drivers/spi/spi-cadence.ko
usr/lib/modules/5.15.0-25-generic/kernel/drivers/spi/spi-dln2.ko
usr/lib/modules/5.15.0-25-generic/kernel/drivers/spi/spi-dw-mmio.ko
usr/lib/modules/5.15.0-25-generic/kernel/drivers/spi/spi-dw-pci.ko
usr/lib/modules/5.15.0-25-generic/kernel/drivers/spi/spi-dw.ko
usr/lib/modules/5.15.0-25-generic/kernel/drivers/spi/spi-gpio.ko
usr/lib/modules/5.15.0-25-generic/kernel/drivers/spi/spi-lantiq-ssc.ko
usr/lib/modules/5.15.0-25-generic/kernel/drivers/spi/spi-lm70llp.ko
usr/lib/modules/5.15.0-25-generic/kernel/drivers/spi/spi-loopback-test.ko
usr/lib/modules/5.15.0-25-generic/kernel/drivers/spi/spi-mux.ko
usr/lib/modules/5.15.0-25-generic/kernel/drivers/spi/spi-mxic.ko
usr/lib/modules/5.15.0-25-generic/kernel/drivers/spi/spi-nxp-fspi.ko
usr/lib/modules/5.15.0-25-generic/kernel/drivers/spi/spi-oc-tiny.ko
usr/lib/modules/5.15.0-25-generic/kernel/drivers/spi/spi-pxa2xx-pci.ko
usr/lib/modules/5.15.0-25-generic/kernel/drivers/spi/spi-pxa2xx-platform.ko
usr/lib/modules/5.15.0-25-generic/kernel/drivers/spi/spi-sc18is602.ko
usr/lib/modules/5.15.0-25-generic/kernel/drivers/spi/spi-sifive.ko
usr/lib/modules/5.15.0-25-generic/kernel/drivers/spi/spi-slave-system-control.ko
usr/lib/modules/5.15.0-25-generic/kernel/drivers/spi/spi-slave-time.ko
usr/lib/modules/5.15.0-25-generic/kernel/drivers/spi/spi-tle62x0.ko
usr/lib/modules/5.15.0-25-generic/kernel/drivers/spi/spi-xcomm.ko
usr/lib/modules/5.15.0-25-generic/kernel/drivers/spi/spi-zynqmp-gqspi.ko
usr/lib/modules/5.15.0-25-generic/kernel/drivers/spi/spidev.ko
usr/lib/modules/5.15.0-25-generic/kernel/drivers/spmi
usr/lib/modules/5.15.0-25-generic/kernel/drivers/spmi/spmi.ko
usr/lib/modules/5.15.0-25-generic/kernel/drivers/ssb
usr/lib/modules/5.15.0-25-generic/kernel/drivers/ssb/ssb.ko
usr/lib/modules/5.15.0-25-generic/kernel/drivers/target
usr/lib/modules/5.15.0-25-generic/kernel/drivers/target/target_core_mod.ko
usr/lib/modules/5.15.0-25-generic/kernel/drivers/thunderbolt
usr/lib/modules/5.15.0-25-generic/kernel/drivers/thunderbolt/thunderbolt.ko
usr/lib/modules/5.15.0-25-generic/kernel/drivers/uio
usr/lib/modules/5.15.0-25-generic/kernel/drivers/uio/uio.ko
usr/lib/modules/5.15.0-25-generic/kernel/drivers/usb
usr/lib/modules/5.15.0-25-generic/kernel/drivers/usb/c67x00
usr/lib/modules/5.15.0-25-generic/kernel/drivers/usb/c67x00/c67x00.ko
usr/lib/modules/5.15.0-25-generic/kernel/drivers/usb/chipidea
usr/lib/modules/5.15.0-25-generic/kernel/drivers/usb/chipidea/ci_hdrc.ko
usr/lib/modules/5.15.0-25-generic/kernel/drivers/usb/chipidea/ci_hdrc_msm.ko
usr/lib/modules/5.15.0-25-generic/kernel/drivers/usb/chipidea/ci_hdrc_pci.ko
usr/lib/modules/5.15.0-25-generic/kernel/drivers/usb/chipidea/ci_hdrc_usb2.ko
usr/lib/modules/5.15.0-25-generic/kernel/drivers/usb/common
usr/lib/modules/5.15.0-25-generic/kernel/drivers/usb/common/ulpi.ko
usr/lib/modules/5.15.0-25-generic/kernel/drivers/usb/dwc2
usr/lib/modules/5.15.0-25-generic/kernel/drivers/usb/dwc2/dwc2_pci.ko
usr/lib/modules/5.15.0-25-generic/kernel/drivers/usb/dwc3
usr/lib/modules/5.15.0-25-generic/kernel/drivers/usb/dwc3/dwc3-haps.ko
usr/lib/modules/5.15.0-25-generic/kernel/drivers/usb/dwc3/dwc3-pci.ko
usr/lib/modules/5.15.0-25-generic/kernel/drivers/usb/dwc3/dwc3.ko
usr/lib/modules/5.15.0-25-generic/kernel/drivers/usb/gadget
usr/lib/modules/5.15.0-25-generic/kernel/drivers/usb/gadget/udc
usr/lib/modules/5.15.0-25-generic/kernel/drivers/usb/gadget/udc/udc-core.ko
usr/lib/modules/5.15.0-25-generic/kernel/drivers/usb/host
usr/lib/modules/5.15.0-25-generic/kernel/drivers/usb/host/bcma-hcd.ko
usr/lib/modules/5.15.0-25-generic/kernel/drivers/usb/host/ehci-fsl.ko
usr/lib/modules/5.15.0-25-generic/kernel/drivers/usb/host/fotg210-hcd.ko
usr/lib/modules/5.15.0-25-generic/kernel/drivers/usb/host/fsl-mph-dr-of.ko
usr/lib/modules/5.15.0-25-generic/kernel/drivers/usb/host/isp116x-hcd.ko
usr/lib/modules/5.15.0-25-generic/kernel/drivers/usb/host/max3421-hcd.ko
usr/lib/modules/5.15.0-25-generic/kernel/drivers/usb/host/oxu210hp-hcd.ko
usr/lib/modules/5.15.0-25-generic/kernel/drivers/usb/host/r8a66597-hcd.ko
usr/lib/modules/5.15.0-25-generic/kernel/drivers/usb/host/ssb-hcd.ko
usr/lib/modules/5.15.0-25-generic/kernel/drivers/usb/host/xhci-pci-renesas.ko
usr/lib/modules/5.15.0-25-generic/kernel/drivers/usb/host/xhci-pci.ko
usr/lib/modules/5.15.0-25-generic/kernel/drivers/usb/host/xhci-plat-hcd.ko
usr/lib/modules/5.15.0-25-generic/kernel/drivers/usb/isp1760
usr/lib/modules/5.15.0-25-generic/kernel/drivers/usb/isp1760/isp1760.ko
usr/lib/modules/5.15.0-25-generic/kernel/drivers/usb/musb
usr/lib/modules/5.15.0-25-generic/kernel/drivers/usb/musb/musb_hdrc.ko
usr/lib/modules/5.15.0-25-generic/kernel/drivers/usb/phy
usr/lib/modules/5.15.0-25-generic/kernel/drivers/usb/phy/phy-generic.ko
usr/lib/modules/5.15.0-25-generic/kernel/drivers/usb/phy/phy-gpio-vbus-usb.ko
usr/lib/modules/5.15.0-25-generic/kernel/drivers/usb/phy/phy-isp1301.ko
usr/lib/modules/5.15.0-25-generic/kernel/drivers/usb/phy/phy-tahvo.ko
usr/lib/modules/5.15.0-25-generic/kernel/drivers/usb/storage
usr/lib/modules/5.15.0-25-generic/kernel/drivers/usb/storage/uas.ko
usr/lib/modules/5.15.0-25-generic/kernel/drivers/usb/storage/ums-alauda.ko
usr/lib/modules/5.15.0-25-generic/kernel/drivers/usb/storage/ums-cypress.ko
usr/lib/modules/5.15.0-25-generic/kernel/drivers/usb/storage/ums-datafab.ko
usr/lib/modules/5.15.0-25-generic/kernel/drivers/usb/storage/ums-eneub6250.ko
usr/lib/modules/5.15.0-25-generic/kernel/drivers/usb/storage/ums-freecom.ko
usr/lib/modules/5.15.0-25-generic/kernel/drivers/usb/storage/ums-isd200.ko
usr/lib/modules/5.15.0-25-generic/kernel/drivers/usb/storage/ums-jumpshot.ko
usr/lib/modules/5.15.0-25-generic/kernel/drivers/usb/storage/ums-karma.ko
usr/lib/modules/5.15.0-25-generic/kernel/drivers/usb/storage/ums-onetouch.ko
usr/lib/modules/5.15.0-25-generic/kernel/drivers/usb/storage/ums-realtek.ko
usr/lib/modules/5.15.0-25-generic/kernel/drivers/usb/storage/ums-sddr09.ko
usr/lib/modules/5.15.0-25-generic/kernel/drivers/usb/storage/ums-sddr55.ko
usr/lib/modules/5.15.0-25-generic/kernel/drivers/usb/storage/ums-usbat.ko
usr/lib/modules/5.15.0-25-generic/kernel/drivers/usb/storage/usb-storage.ko
usr/lib/modules/5.15.0-25-generic/kernel/drivers/vhost
usr/lib/modules/5.15.0-25-generic/kernel/drivers/vhost/vhost_iotlb.ko
usr/lib/modules/5.15.0-25-generic/kernel/drivers/vhost/vringh.ko
usr/lib/modules/5.15.0-25-generic/kernel/drivers/video
usr/lib/modules/5.15.0-25-generic/kernel/drivers/video/backlight
usr/lib/modules/5.15.0-25-generic/kernel/drivers/video/backlight/pwm_bl.ko
usr/lib/modules/5.15.0-25-generic/kernel/fs
usr/lib/modules/5.15.0-25-generic/kernel/fs/btrfs
usr/lib/modules/5.15.0-25-generic/kernel/fs/btrfs/btrfs.ko
usr/lib/modules/5.15.0-25-generic/kernel/fs/f2fs
usr/lib/modules/5.15.0-25-generic/kernel/fs/f2fs/f2fs.ko
usr/lib/modules/5.15.0-25-generic/kernel/fs/fscache
usr/lib/modules/5.15.0-25-generic/kernel/fs/fscache/fscache.ko
usr/lib/modules/5.15.0-25-generic/kernel/fs/isofs
usr/lib/modules/5.15.0-25-generic/kernel/fs/isofs/isofs.ko
usr/lib/modules/5.15.0-25-generic/kernel/fs/jfs
usr/lib/modules/5.15.0-25-generic/kernel/fs/jfs/jfs.ko
usr/lib/modules/5.15.0-25-generic/kernel/fs/lockd
usr/lib/modules/5.15.0-25-generic/kernel/fs/lockd/lockd.ko
usr/lib/modules/5.15.0-25-generic/kernel/fs/netfs
usr/lib/modules/5.15.0-25-generic/kernel/fs/netfs/netfs.ko
usr/lib/modules/5.15.0-25-generic/kernel/fs/nfs
usr/lib/modules/5.15.0-25-generic/kernel/fs/nfs/nfs.ko
usr/lib/modules/5.15.0-25-generic/kernel/fs/nfs/nfsv2.ko
usr/lib/modules/5.15.0-25-generic/kernel/fs/nfs/nfsv3.ko
usr/lib/modules/5.15.0-25-generic/kernel/fs/nfs/nfsv4.ko
usr/lib/modules/5.15.0-25-generic/kernel/fs/nfs_common
usr/lib/modules/5.15.0-25-generic/kernel/fs/nfs_common/grace.ko
usr/lib/modules/5.15.0-25-generic/kernel/fs/nfs_common/nfs_acl.ko
usr/lib/modules/5.15.0-25-generic/kernel/fs/nls
usr/lib/modules/5.15.0-25-generic/kernel/fs/nls/nls_iso8859-1.ko
usr/lib/modules/5.15.0-25-generic/kernel/fs/reiserfs
usr/lib/modules/5.15.0-25-generic/kernel/fs/reiserfs/reiserfs.ko
usr/lib/modules/5.15.0-25-generic/kernel/fs/udf
usr/lib/modules/5.15.0-25-generic/kernel/fs/udf/udf.ko
usr/lib/modules/5.15.0-25-generic/kernel/fs/xfs
usr/lib/modules/5.15.0-25-generic/kernel/fs/xfs/xfs.ko
usr/lib/modules/5.15.0-25-generic/kernel/lib
usr/lib/modules/5.15.0-25-generic/kernel/lib/842
usr/lib/modules/5.15.0-25-generic/kernel/lib/842/842_decompress.ko
usr/lib/modules/5.15.0-25-generic/kernel/lib/crc-itu-t.ko
usr/lib/modules/5.15.0-25-generic/kernel/lib/crc7.ko
usr/lib/modules/5.15.0-25-generic/kernel/lib/crc8.ko
usr/lib/modules/5.15.0-25-generic/kernel/lib/crypto
usr/lib/modules/5.15.0-25-generic/kernel/lib/crypto/libarc4.ko
usr/lib/modules/5.15.0-25-generic/kernel/lib/crypto/libblake2s-generic.ko
usr/lib/modules/5.15.0-25-generic/kernel/lib/crypto/libblake2s.ko
usr/lib/modules/5.15.0-25-generic/kernel/lib/crypto/libchacha.ko
usr/lib/modules/5.15.0-25-generic/kernel/lib/crypto/libchacha20poly1305.ko
usr/lib/modules/5.15.0-25-generic/kernel/lib/crypto/libcurve25519-generic.ko
usr/lib/modules/5.15.0-25-generic/kernel/lib/libcrc32c.ko
usr/lib/modules/5.15.0-25-generic/kernel/lib/lru_cache.ko
usr/lib/modules/5.15.0-25-generic/kernel/lib/lz4
usr/lib/modules/5.15.0-25-generic/kernel/lib/lz4/lz4_compress.ko
usr/lib/modules/5.15.0-25-generic/kernel/lib/lz4/lz4hc_compress.ko
usr/lib/modules/5.15.0-25-generic/kernel/lib/objagg.ko
usr/lib/modules/5.15.0-25-generic/kernel/lib/parman.ko
usr/lib/modules/5.15.0-25-generic/kernel/lib/raid6
usr/lib/modules/5.15.0-25-generic/kernel/lib/raid6/raid6_pq.ko
usr/lib/modules/5.15.0-25-generic/kernel/lib/zstd
usr/lib/modules/5.15.0-25-generic/kernel/lib/zstd/zstd_compress.ko
usr/lib/modules/5.15.0-25-generic/kernel/net
usr/lib/modules/5.15.0-25-generic/kernel/net/802
usr/lib/modules/5.15.0-25-generic/kernel/net/802/garp.ko
usr/lib/modules/5.15.0-25-generic/kernel/net/802/mrp.ko
usr/lib/modules/5.15.0-25-generic/kernel/net/802/stp.ko
usr/lib/modules/5.15.0-25-generic/kernel/net/8021q
usr/lib/modules/5.15.0-25-generic/kernel/net/8021q/8021q.ko
usr/lib/modules/5.15.0-25-generic/kernel/net/bridge
usr/lib/modules/5.15.0-25-generic/kernel/net/bridge/bridge.ko
usr/lib/modules/5.15.0-25-generic/kernel/net/ceph
usr/lib/modules/5.15.0-25-generic/kernel/net/ceph/libceph.ko
usr/lib/modules/5.15.0-25-generic/kernel/net/core
usr/lib/modules/5.15.0-25-generic/kernel/net/core/failover.ko
usr/lib/modules/5.15.0-25-generic/kernel/net/dsa
usr/lib/modules/5.15.0-25-generic/kernel/net/dsa/dsa_core.ko
usr/lib/modules/5.15.0-25-generic/kernel/net/hsr
usr/lib/modules/5.15.0-25-generic/kernel/net/hsr/hsr.ko
usr/lib/modules/5.15.0-25-generic/kernel/net/ieee802154
usr/lib/modules/5.15.0-25-generic/kernel/net/ieee802154/ieee802154.ko
usr/lib/modules/5.15.0-25-generic/kernel/net/ipv4
usr/lib/modules/5.15.0-25-generic/kernel/net/ipv4/gre.ko
usr/lib/modules/5.15.0-25-generic/kernel/net/ipv4/udp_tunnel.ko
usr/lib/modules/5.15.0-25-generic/kernel/net/ipv6
usr/lib/modules/5.15.0-25-generic/kernel/net/ipv6/ip6_tunnel.ko
usr/lib/modules/5.15.0-25-generic/kernel/net/ipv6/ip6_udp_tunnel.ko
usr/lib/modules/5.15.0-25-generic/kernel/net/ipv6/tunnel6.ko
usr/lib/modules/5.15.0-25-generic/kernel/net/llc
usr/lib/modules/5.15.0-25-generic/kernel/net/llc/llc.ko
usr/lib/modules/5.15.0-25-generic/kernel/net/mac802154
usr/lib/modules/5.15.0-25-generic/kernel/net/mac802154/mac802154.ko
usr/lib/modules/5.15.0-25-generic/kernel/net/psample
usr/lib/modules/5.15.0-25-generic/kernel/net/psample/psample.ko
usr/lib/modules/5.15.0-25-generic/kernel/net/sched
usr/lib/modules/5.15.0-25-generic/kernel/net/sched/sch_taprio.ko
usr/lib/modules/5.15.0-25-generic/kernel/net/sunrpc
usr/lib/modules/5.15.0-25-generic/kernel/net/sunrpc/sunrpc.ko
usr/lib/modules/5.15.0-25-generic/kernel/net/tls
usr/lib/modules/5.15.0-25-generic/kernel/net/tls/tls.ko
usr/lib/modules/5.15.0-25-generic/kernel/net/vmw_vsock
usr/lib/modules/5.15.0-25-generic/kernel/net/vmw_vsock/vsock.ko
usr/lib/modules/5.15.0-25-generic/kernel/net/xfrm
usr/lib/modules/5.15.0-25-generic/kernel/net/xfrm/xfrm_algo.ko
usr/lib/modules/5.15.0-25-generic/kernel/sound
usr/lib/modules/5.15.0-25-generic/kernel/sound/ac97_bus.ko
usr/lib/modules/5.15.0-25-generic/kernel/sound/core
usr/lib/modules/5.15.0-25-generic/kernel/sound/core/snd-compress.ko
usr/lib/modules/5.15.0-25-generic/kernel/sound/core/snd-pcm-dmaengine.ko
usr/lib/modules/5.15.0-25-generic/kernel/sound/core/snd-pcm.ko
usr/lib/modules/5.15.0-25-generic/kernel/sound/core/snd-rawmidi.ko
usr/lib/modules/5.15.0-25-generic/kernel/sound/core/snd-seq-device.ko
usr/lib/modules/5.15.0-25-generic/kernel/sound/core/snd-timer.ko
usr/lib/modules/5.15.0-25-generic/kernel/sound/core/snd.ko
usr/lib/modules/5.15.0-25-generic/kernel/sound/soc
usr/lib/modules/5.15.0-25-generic/kernel/sound/soc/snd-soc-core.ko
usr/lib/modules/5.15.0-25-generic/kernel/sound/soundcore.ko
usr/lib/modules/5.15.0-25-generic/modules.alias
usr/lib/modules/5.15.0-25-generic/modules.alias.bin
usr/lib/modules/5.15.0-25-generic/modules.builtin
usr/lib/modules/5.15.0-25-generic/modules.builtin.alias.bin
usr/lib/modules/5.15.0-25-generic/modules.builtin.bin
usr/lib/modules/5.15.0-25-generic/modules.dep
usr/lib/modules/5.15.0-25-generic/modules.dep.bin
usr/lib/modules/5.15.0-25-generic/modules.devname
usr/lib/modules/5.15.0-25-generic/modules.order
usr/lib/modules/5.15.0-25-generic/modules.softdep
usr/lib/modules/5.15.0-25-generic/modules.symbols
usr/lib/modules/5.15.0-25-generic/modules.symbols.bin
usr/lib/systemd
usr/lib/systemd/network
usr/lib/systemd/network/73-usb-net-by-mac.link
usr/lib/systemd/network/99-default.link
usr/lib/systemd/systemd-udevd
usr/lib/udev
usr/lib/udev/ata_id
usr/lib/udev/rules.d
usr/lib/udev/rules.d/50-firmware.rules
usr/lib/udev/rules.d/50-udev-default.rules
usr/lib/udev/rules.d/55-dm.rules
usr/lib/udev/rules.d/60-block.rules
usr/lib/udev/rules.d/60-persistent-storage-dm.rules
usr/lib/udev/rules.d/60-persistent-storage.rules
usr/lib/udev/rules.d/61-persistent-storage-android.rules
usr/lib/udev/rules.d/71-seat.rules
usr/lib/udev/rules.d/73-special-net-names.rules
usr/lib/udev/rules.d/75-net-description.rules
usr/lib/udev/rules.d/80-drivers.rules
usr/lib/udev/rules.d/80-net-setup-link.rules
usr/lib/udev/rules.d/95-dm-notify.rules
usr/lib/udev/scsi_id
usr/lib/x86_64-linux-gnu
usr/lib/x86_64-linux-gnu/ld-linux-x86-64.so.2
usr/lib/x86_64-linux-gnu/libacl.so.1
usr/lib/x86_64-linux-gnu/libacl.so.1.1.2301
usr/lib/x86_64-linux-gnu/libblkid.so.1
usr/lib/x86_64-linux-gnu/libblkid.so.1.1.0
usr/lib/x86_64-linux-gnu/libc.so.6
usr/lib/x86_64-linux-gnu/libcap.so.2
usr/lib/x86_64-linux-gnu/libcap.so.2.44
usr/lib/x86_64-linux-gnu/libcom_err.so.2
usr/lib/x86_64-linux-gnu/libcom_err.so.2.1
usr/lib/x86_64-linux-gnu/libcrypto.so.3
usr/lib/x86_64-linux-gnu/libdevmapper.so.1.02.1
usr/lib/x86_64-linux-gnu/libdns-export.so.1110
usr/lib/x86_64-linux-gnu/libdns-export.so.1110.0.2
usr/lib/x86_64-linux-gnu/libe2p.so.2
usr/lib/x86_64-linux-gnu/libe2p.so.2.3
usr/lib/x86_64-linux-gnu/libext2fs.so.2
usr/lib/x86_64-linux-gnu/libext2fs.so.2.4
usr/lib/x86_64-linux-gnu/libgcc_s.so.1
usr/lib/x86_64-linux-gnu/libisc-export.so.1105
usr/lib/x86_64-linux-gnu/libisc-export.so.1105.0.2
usr/lib/x86_64-linux-gnu/libkmod.so.2
usr/lib/x86_64-linux-gnu/libkmod.so.2.3.7
usr/lib/x86_64-linux-gnu/liblzma.so.5
usr/lib/x86_64-linux-gnu/liblzma.so.5.2.5
usr/lib/x86_64-linux-gnu/libm.so.6
usr/lib/x86_64-linux-gnu/libnss_dns.so.2
usr/lib/x86_64-linux-gnu/libnss_files.so.2
usr/lib/x86_64-linux-gnu/libpcre2-8.so.0
usr/lib/x86_64-linux-gnu/libpcre2-8.so.0.10.4
usr/lib/x86_64-linux-gnu/libpthread.so.0
usr/lib/x86_64-linux-gnu/libresolv.so.2
usr/lib/x86_64-linux-gnu/libselinux.so.1
usr/lib/x86_64-linux-gnu/libudev.so.1
usr/lib/x86_64-linux-gnu/libudev.so.1.7.2
usr/lib/x86_64-linux-gnu/libzstd.so.1
usr/lib/x86_64-linux-gnu/libzstd.so.1.4.8
usr/lib32
usr/lib64
usr/lib64/ld-linux-x86-64.so.2
usr/libx32
usr/sbin
usr/sbin/blkid
usr/sbin/dhclient
usr/sbin/dhclient-script
110945+1 records in
110945+1 records out
56804152 bytes (57 MB, 54 MiB) copied, 0.249625 s, 228 MB/s
usr/sbin/dmsetup
usr/sbin/dumpe2fs
usr/sbin/modprobe
usr/sbin/rmmod
usr/sbin/wait-for-root
var
var/lib
var/lib/dhcp
371149 blocks
四月二十五日 等待变化等待机会
$ journalctl -xeu dnsmasq.service
Apr 25 06:38:25 nick-sager dnsmasq[80522]: dnsmasq: failed to create listening socket for 172.27.232.139: Address already in use
Apr 25 06:38:25 nick-sager dnsmasq[80522]: failed to create listening socket for 172.27.232.139: Address already in use
Apr 25 06:38:25 nick-sager systemd[1]: dnsmasq.service: Control process exited, code=exited, status=2/INVALIDARGUMENT
bind-interfaces依然不解决问题才意识到可能是我已经使用openvpn的tun0设置的这个dns的关系吧?
nick@nick-sager:~/workspace/debootstrap/tmp/initrd$ ifconfig tun0
tun0: flags=4305<UP,POINTOPOINT,RUNNING,NOARP,MULTICAST>  mtu 1500
        inet 172.27.232.139  netmask 255.255.248.0  destination 172.27.232.139
        unspec 00-00-00-00-00-00-00-00-00-00-00-00-00-00-00-00  txqueuelen 500  (UNSPEC)
        RX packets 29709  bytes 10335721 (10.3 MB)
        RX errors 0  dropped 0  overruns 0  frame 0
        TX packets 28234  bytes 3116970 (3.1 MB)
        TX errors 0  dropped 0 overruns 0  carrier 0  collisions 0
# Script to bring a network (tap) device for qemu up.
# The idea is to add the tap device to the same bridge
# as we have default routing to.
ip link set "$1" up第一个参数应该是传入的设备名吧?
ifconfig "$1" 0.0.0.0 up
switch=$(ip route ls | \
    awk '/^default / {
          for(i=0;i<NF;i++) { if ($i == "dev") { print $(i+1); next; } }
         }'
        )
$ echo $switch
enp0s31f6
$ ip route ls
0.0.0.0/1 via 172.27.232.1 dev tun0
default via 192.168.1.1 dev enp0s31f6 proto dhcp metric 100
54.67.3.66 via 192.168.1.1 dev enp0s31f6
128.0.0.0/1 via 172.27.232.1 dev tun0
169.254.0.0/16 dev enp0s31f6 scope link metric 1000
172.17.0.0/16 dev docker0 proto kernel scope link src 172.17.0.1 linkdown
172.27.232.0/21 dev tun0 proto kernel scope link src 172.27.232.139
192.168.1.0/24 dev enp0s31f6 proto kernel scope link src 192.168.1.11 metric 100
# only add the interface to default-route bridge if we
# have such interface (with default route) and if that
# interface is actually a bridge.
# It is possible to have several default routes too
for br in $switch; do
    if [ -d /sys/class/net/$br/bridge/. ]; then
        if [ -n "$ip" ]; then
          ip link set "$1" master "$br"
        else
          brctl addif $br "$1"
        fi
        exit    # exit with status of the previous command
    fi
done
$ cat /etc/qemu/bridge.conf
allow virtbr0
$ qemu-system-x86_64 -kernel tmp/vmlinuz-5.15.0-25-generic -serial stdio -m 2G -drive format=raw,file=ubuntu-efi-disk -append "root=PARTUUID=8613E0D8-6556-7A47-922D-EDA26D53D20B console=ttyS0 earlyprintk=ttyS0" -netdev tap,id=hn0,br=virtbr0 -device virtio-net-pci,netdev=hn0,id=nic1
qemu-system-x86_64: -netdev tap,id=hn0,br=virtbr0: could not configure /dev/net/tun: Operation not permitted
$ ll /dev/net/tun
crw-rw-rw- 1 root root 10, 200 Apr 19 15:01 /dev/net/tun
strace -o qemu.strace qemu-system-x86_64 -kernel tmp/vmlinuz-5.15.0-25-generic -serial stdio -m 2G -drive format=raw,file=ubuntu-efi-disk -append "root=PARTUUID=8613E0D8-6556-7A47-922D-EDA26D53D20B console=ttyS0 earlyprintk=ttyS0" -netdev tap,id=hn0,br=virtbr0 -device virtio-net-pci,netdev=hn0,id=nic1
$ grep -A 3 /dev/net/tun qemu.strace
openat(AT_FDCWD, "/dev/net/tun", O_RDWR) = 14
ioctl(14, TUNGETFEATURES, 0x7fffa04bc858) = 0
ioctl(14, TUNSETVNETHDRSZ, 0x7fffa04bc85c) = -1 EBADFD (File descriptor in bad state)
ioctl(14, TUNSETIFF, 0x7fffa04bc860) = -1 EPERM (Operation not permitted)
$ tunctl -t tap0 -g nick -u nick
Set 'tap0' persistent and owned by uid 1000 gid 1000
qemu-system-x86_64 -kernel tmp/vmlinuz-5.15.0-25-generic -serial stdio -m 2G -drive format=raw,file=ubuntu-efi-disk -append "root=PARTUUID=8613E0D8-6556-7A47-922D-EDA26D53D20B console=ttyS0 earlyprintk=ttyS0" -netdev tap,ifname=tap0,id=hn0,br=virtbr0,script=no,downscript=no -device virtio-net-pci,netdev=hn0,id=nic1
-netdev tap,id=str[,fd=h][,fds=x:y:...:z][,ifname=name][,script=file][,downscript=dfile]
[,br=bridge][,helper=helper][,sndbuf=nbytes][,vnet_hdr=on|off][,vhost=on|off]
[,vhostfd=h][,vhostfds=x:y:...:z][,vhostforce=on|off][,queues=n]
[,poll-us=n]
configure a host TAP network backend with ID 'str'
connected to a bridge (default=br0)
use network scripts 'file' (default=/etc/qemu-ifup)
to configure it and 'dfile' (default=/etc/qemu-ifdown)
to deconfigure it
use '[down]script=no' to disable script execution
use network helper 'helper' (default=/usr/lib/qemu/qemu-bridge-helper) to
configure it
use 'fd=h' to connect to an already opened TAP interface
use 'fds=x:y:...:z' to connect to already opened multiqueue capable TAP interfaces
use 'sndbuf=nbytes' to limit the size of the send buffer (the
default is disabled 'sndbuf=0' to enable flow control set 'sndbuf=1048576')
use vnet_hdr=off to avoid enabling the IFF_VNET_HDR tap flag
use vnet_hdr=on to make the lack of IFF_VNET_HDR support an error condition
use vhost=on to enable experimental in kernel accelerator
(only has effect for virtio guests which use MSIX)
use vhostforce=on to force vhost on for non-MSIX virtio guests
use 'vhostfd=h' to connect to an already opened vhost net device
use 'vhostfds=x:y:...:z to connect to multiple already opened vhost net devices
use 'queues=n' to specify the number of queues to be created for multiqueue TAP
use 'poll-us=n' to specify the maximum number of microseconds that could be
spent on busy polling for vhost net
-netdev bridge,id=str[,br=bridge][,helper=helper]
configure a host TAP network backend with ID 'str' that is
connected to a bridge (default=br0)
using the program 'helper (default=/usr/lib/qemu/qemu-bridge-helper)
$ brctl show
bridge name bridge id STP enabled interfaces
docker0 8000.024265d25948 no
$ networkctl
WARNING: systemd-networkd is not running, output will be incomplete.
IDX LINK TYPE OPERATIONAL SETUP
1 lo loopback n/a unmanaged
2 enp0s31f6 ether n/a unmanaged
3 wlp109s0 wlan n/a unmanaged
5 docker0 bridge n/a unmanaged
12 tun0 none n/a unmanaged
13 tap0 ether n/a unmanaged
6 links listed.
Though both are for tunneling purposes, TUN and TAP can't be used together because they transmit and receive packets at different layers of the network stack. TUN, namely network TUNnel, simulates a network layer device and operates in layer 3 carrying IP packets. TAP, namely network TAP, simulates a link layer device and operates in layer 2 carrying Ethernet frames. TUN is used with routing. TAP can be used to create a user space network bridge.两者相似但是功能是有些许差别吧?这个概念我刚刚学完就忘了因为根本就没有真正的领悟。因为它们具体是怎么实操的离开了实践空谈什么层级都是无用的。
$ ll -d /dev/net
drwxr-xr-x 2 root root 60 Apr 19 15:01 /dev/net/
sudo chmod 0755 /dev/net应该是足够的,因为连它下面的设备文件都是用户可读写的,因为本来内核就是设计这个tun设备是一个用户可以自由创建的设备。这里我有一个非常幼稚的问题,就是为什么目录
This is because the directory itself only contains filenames and inode numbers—that's all.
Read access to the filenames is controlled by the read permission.
Access to the inodes pointed to by the directory is controlled by the execute permission—not the read permission. The inodes contain all the actual details about the file, such as filesize, owner, permissions, time last modified, and the physical location (on your physical hard disk) of the binary data which comprises the file's contents.
To view the names of the files in the directory—you need read permission on the directory. You don't need execute or write permissions for this.
四月二十七日 等待变化等待机会
Tap devices are a Linux kernel feature that allows you to create virtual network interfaces that appear as real network interfaces. Packets sent to a tap interface are delivered to a userspace program, such as QEMU, that has bound itself to the interface.
QEMU can use tap networking for a virtual machine so that packets sent to the tap interface will be sent to the virtual machine and appear as coming from a network interface (usually an Ethernet interface) in the virtual machine. Conversely, everything that the virtual machine sends through its network interface will appear on the tap interface.
Tap devices are supported by the Linux bridge drivers, so it is possible to bridge together tap devices with each other and possibly with other host interfaces such as eth0. This is desirable if you want your virtual machines to be able to talk to each other, or if you want other machines on your LAN to be able to talk to the virtual machines.TAP是被bridge支持的,并不是说它本身就是桥实现的,这个目的显然是方便在不同网段的主机,不管是虚拟机还是物理机互相通讯。这个我开始有些概念了。
qemu-system-x86_64 -kernel tmp/vmlinuz-5.15.0-25-generic -serial stdio -m 2G -drive format=raw,file=ubuntu-efi-disk -append "root=PARTUUID=8613E0D8-6556-7A47-922D-EDA26D53D20B console=ttyS0 earlyprintk=ttyS0" -netdev tap,ifname=tap0,id=network0,br=virtbr0,script=no,downscript=no -device virtio-net,netdev=network0
By default, without any -netdev arguments, QEMU will use user-mode networking with a built-in DHCP server. Your virtual machines will be assigned an IP address when they run their DHCP client, and they will be able to access the physical host's network through IP masquerading done by QEMU.
这里的要点依然是两方面的,首先是qemu使用内部的DHCP server为你的虚拟机分配网址,但是另一方面是虚拟机需要自己主动使用DHCP
client开机就寻找服务,这个听上去似乎是默认的,但是世界上没有配置是没有默认的。对于一个从头创建的操作系统任何配置都是需要自己去做的。所以,
这里才引出了开机服务的问题。这一点我以前是模糊的,因为到底是哪一个服务呢?ubuntu很久以前就专向了systemd,我似乎从那以后就不明白
Networking-Manager的角色到底是什么,至今我对于谁是主角依然是模糊的认识。
Note: ICMPv6 will not work, as support for it is not implemented: Slirp: external icmpv6 not supported yet. Pinging an IPv6 address will not work.
因为我的观察是我的openvpn似乎对于配置IPv6有问题,反而我在主机需要ping -4 www.google.com才能工作,而在虚拟机则似乎天然不需要参数-4,也许是因为它天然就禁止了ipv6所以,默认就是ipv4。这个是一个额外的信息。
QEMU's user-mode networking can offer more capabilities such as built-in TFTP or SMB servers, redirecting host ports to the guest (for example to allow SSH connections to the guest) or attaching guests to VLANs so that they can talk to each other. See the QEMU documentation on the -net user flag for more details.
所以,这几样是我将来可以尝试的部分。
-netdev user,id=str[,ipv4=on|off][,net=addr[/mask]][,host=addr]
[,ipv6=on|off][,ipv6-net=addr[/int]][,ipv6-host=addr]
[,restrict=on|off][,hostname=host][,dhcpstart=addr]
[,dns=addr][,ipv6-dns=addr][,dnssearch=domain][,domainname=domain]
[,tftp=dir][,tftp-server-name=name][,bootfile=f][,hostfwd=rule][,guestfwd=rule][,smb=dir[,smbserver=addr]]
configure a user mode network backend with ID 'str',
its DHCP server and optional services
systemctl --type=service到底还有那些network相关的服务,我居然没有很清楚的概念。其次是通过查看networkd可以看到它启动的一些细节: --no-pager --full可以看到全部的log细节。
~# systemctl --no-pager --full status systemd-networkd
● systemd-networkd.service - Network Configuration
Loaded: loaded (/lib/systemd/system/systemd-networkd.service; enabled; vendor preset: enabled)
Active: active (running) since Sat 2024-04-27 08:45:10 CST; 9min ago
TriggeredBy: ● systemd-networkd.socket
Docs: man:systemd-networkd.service(8)
Main PID: 170 (systemd-network)
Status: "Processing requests..."
Tasks: 1 (limit: 2363)
Memory: 2.7M
CPU: 439ms
CGroup: /system.slice/systemd-networkd.service
└─170 /lib/systemd/systemd-networkd
Apr 27 08:45:09 nick-qemu systemd[1]: Starting Network Configuration...
Apr 27 08:45:10 nick-qemu systemd-networkd[170]: lo: Link UP
Apr 27 08:45:10 nick-qemu systemd-networkd[170]: lo: Gained carrier
Apr 27 08:45:10 nick-qemu systemd-networkd[170]: Enumeration completed
Apr 27 08:45:10 nick-qemu systemd[1]: Started Network Configuration.
Apr 27 08:45:19 nick-qemu systemd-networkd[170]: eth0: Interface name change detected, renamed to ens3.
Apr 27 08:45:19 nick-qemu systemd-networkd[170]: ens3: Link UP
Apr 27 08:45:19 nick-qemu systemd-networkd[170]: ens3: Gained carrier
Apr 27 08:45:20 nick-qemu systemd-networkd[170]: ens3: DHCPv4 address 10.0.2.15/24 via 10.0.2.2
Apr 27 08:45:21 nick-qemu systemd-networkd[170]: ens3: Gained IPv6LL
systemd-resolved is a systemd service that provides network name resolution to local applications via a D-Bus interface, the resolve NSS service (nss-resolve(8)), and a local DNS stub listener on 127.0.0.53.这短短一句话包含了多少的信息啊!我之前为了openvpn的DNS解析看了非常多相关的资料,但是至今也还是模模糊糊的。总之,它是域名解析,但是它的接口居然是有三个不同的来源,首先是D-bus,因为最早通过C-style的library是古老的,
systemd-resolved provides resolver services for Domain Name System (DNS) (including DNSSEC and DNS over TLS), Multicast DNS (mDNS) and Link-Local Multicast Name Resolution (LLMNR)对于不熟悉网络的我来说,这里每一个都是深渊,域名解析本身也是一个危险的领域,因为有安全问题,黑客绑架这个等于从源头垄断了你的访问,而很多政府防火墙的机制就是从这里来的。至于后者我都没有听说过。
To provide domain name resolution for software that reads /etc/resolv.conf directly, such as web browsers, Go and GnuPG, systemd-resolved has four different modes for handling the file—stub, static, uplink and foreign.
这里引出了更多的疑问,为什么Go程序和什么GnuPG要单独拿出来说事呢?
浏览器是直接读这个/etc/resolv.conf的,这个我可以理解,但是另外两个是什么鬼?
~# cat /etc/resolv.conf
# This is /run/systemd/resolve/stub-resolv.conf managed by man:systemd-resolved(8).
# Do not edit.
#
# This file might be symlinked as /etc/resolv.conf. If you're looking at
# /etc/resolv.conf and seeing this text, you have followed the symlink.
#
# This is a dynamic resolv.conf file for connecting local clients to the
# internal DNS stub resolver of systemd-resolved. This file lists all
# configured search domains.
#
# Run "resolvectl status" to see details about the uplink DNS servers
# currently in use.
#
# Third party programs should typically not access this file directly, but only
# through the symlink at /etc/resolv.conf. To manage man:resolv.conf(5) in a
# different way, replace this symlink by a static file or a different symlink.
#
# See man:systemd-resolved.service(8) for details about the supported modes of
# operation for /etc/resolv.conf.
nameserver 127.0.0.53
options edns0 trust-ad
search .
~# ll /etc/resolv.conf
lrwxrwxrwx 1 root root 39 Apr 13 12:01 /etc/resolv.conf -> ../run/systemd/resolve/stub-resolv.conf
~# resolvectl status
Global
Protocols: -LLMNR -mDNS -DNSOverTLS DNSSEC=no/unsupported
resolv.conf mode: stub
Link 2 (ens3)
Current Scopes: DNS
Protocols: +DefaultRoute +LLMNR -mDNS -DNSOverTLS DNSSEC=no/unsupported
Current DNS Server: 10.0.2.3
DNS Servers: 10.0.2.3
四月二十八日 等待变化等待机会
尽管强调了,但是始终没有建立起概念,因为tun/tap是水火不相容的,两者不可能同时起作用。它们都是所谓的tunneling的目的,但是层级不 同,而且操作的对象也不同,tun顾名思义是在routing table做文章,而tap更像是间谍窃取信息的彷佛是信息的短路。也许这个图才能加深印象:Though both are for tunneling purposes, TUN and TAP can't be used together because they transmit and receive packets at different layers of the network stack. TUN, namely network TUNnel, simulates a network layer device and operates in layer 3 carrying IP packets. TAP, namely network TAP, simulates a link layer device and operates in layer 2 carrying Ethernet frames. TUN is used with routing. TAP can be used to create a user space network bridge.
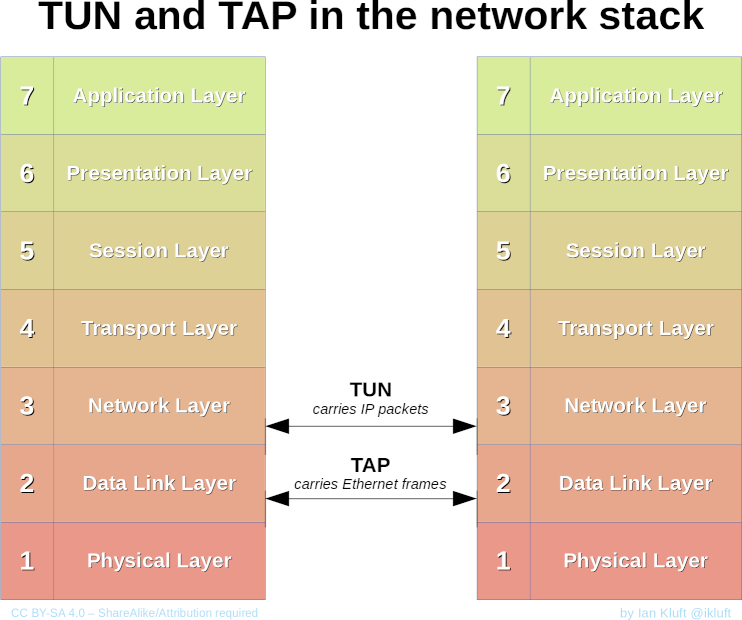
四月二十九日 等待变化等待机会
On Ubuntu 20.04 Netplan replaces the traditional method of configuring network interfaces using the /etc/network/interfaces
file; it aims to make things easier and more centralized (the old way
of configuring interfaces can still be used: check our article about How to switch back networking to /etc/network/interfaces on Ubuntu 20.04 Focal Fossa Linux).
就是说传统的/etc/network/interfaces这个配置文件被跳过了,这个也许是很多非ubuntu的指引不适合的原因吧?
$ cat /etc/netplan/01-network-manager-all.yaml
# Let NetworkManager manage all devices on this system
network:
version: 2
renderer: NetworkManager
nick@nick-sager:~/workspace/debootstrap/tmp/initrd$ netplan --all status
Unknown device type: none
Unknown device type: none
Unknown device type: none
Online state: online
DNS Addresses: 127.0.0.53 (stub)
DNS Search: .
● 1: lo ethernet UNKNOWN/UP (unmanaged)
MAC Address: 00:00:00:00:00:00
Addresses: 127.0.0.1/8
● 2: enp0s31f6 ethernet UP (unmanaged)
MAC Address: d4:93:90:21:08:3d (Intel Corporation)
Addresses: 192.168.1.9/24
DNS Addresses: 218.85.152.99
218.85.157.99
Routes: 192.168.1.0/24 from 192.168.1.9 (link)
● 3: wlp109s0 wifi/"1701_5G" UP (unmanaged)
MAC Address: 0c:9a:3c:69:8f:7f (Intel Corporation)
Addresses: 192.168.1.15/24
240e:37c:1a20:cd00:d2ce:2f6f:b1ec:9089/64
fe80::1ce8:8396:41f5:6725/64 (link)
Routes: default via 192.168.1.1 metric 600 (dhcp)
54.67.3.66 via 192.168.1.1 (boot)
192.168.1.0/24 from 192.168.1.15 metric 600 (link)
240e:37c:1a20:cd00::/64 metric 600 (ra)
fe80::/64 metric 1024
default via fe80::1 metric 600 (ra)
● 5: docker0 bridge DOWN/UP (unmanaged)
MAC Address: 02:42:65:d2:59:48
Addresses: 172.17.0.1/16
Routes: 172.17.0.0/16 from 172.17.0.1 (link)
● 13: tap0 ethernet UP (unmanaged)
MAC Address: 46:2a:b1:11:3f:10
● 20: virtbr0 bridge UP (unmanaged)
MAC Address: 0a:36:50:42:8e:89
Addresses: 172.20.0.1/16
192.168.1.11/32
192.168.1.14/24
DNS Addresses: 218.85.152.99
218.85.157.99
Routes: default via 192.168.1.1 (boot)
172.20.0.0/16 from 172.20.0.1 (link)
192.168.1.0/24 from 192.168.1.14 (link)
● 26: tun0 other UNKNOWN/UP (unmanaged)
Addresses: 172.27.232.148/21
DNS Addresses: 8.8.8.8
DNS Search: .
Routes: 0.0.0.0/1 via 172.27.232.1 (boot)
128.0.0.0/1 via 172.27.232.1 (boot)
169.254.0.0/16 metric 1000 (boot, link)
172.27.232.0/21 from 172.27.232.148 (link)
那么我究竟做了什么呢?这个是虚拟机的网络情况
root@nick-qemu:~# ip a
1: lo: <LOOPBACK,UP,LOWER_UP> mtu 65536 qdisc noqueue state UNKNOWN group default qlen 1000
link/loopback 00:00:00:00:00:00 brd 00:00:00:00:00:00
inet 127.0.0.1/8 scope host lo
valid_lft forever preferred_lft forever
inet6 ::1/128 scope host
valid_lft forever preferred_lft forever
2: ens3: <BROADCAST,MULTICAST,UP,LOWER_UP> mtu 1500 qdisc fq_codel state UP group default qlen 1000
link/ether 52:54:00:12:34:56 brd ff:ff:ff:ff:ff:ff
altname enp0s3
inet 192.168.1.12/24 metric 1024 brd 192.168.1.255 scope global dynamic ens3
valid_lft 85956sec preferred_lft 85956sec
inet6 240e:37c:1a20:cd00:5054:ff:fe12:3456/64 scope global dynamic mngtmpaddr noprefixroute
valid_lft 245562sec preferred_lft 159162sec
inet6 fe80::5054:ff:fe12:3456/64 scope link
valid_lft forever preferred_lft forever
$ qemu-system-x86_64 -kernel tmp/vmlinuz-5.15.0-25-generic -serial stdio -m 2G -drive format=raw,file=ubuntu-efi-disk -append "root=PARTUUID=8613E0D8-6556-7A47-922D-EDA26D53D20B console=ttyS0 earlyprintk=ttyS0" -net nic -net tap,ifname=tap0,br=virtbr0,script=no,downscript=no
四月三十日 等待变化等待机会
$ cat /etc/qemu/bridge.conf
allow virtbr0
sudo brctl addbr virtbr0
$ sudo tunctl -t tap0 -u `whoami`
Set 'tap0' persistent and owned by uid 1000
$ sudo brctl addif virtbr0 tap0
If the bridge is given an IP address and traffic destined for it is allowed, but no real interface (e.g. eth0)
is connected to the bridge, then the virtual machines will be able to
talk to each other and the host system. However, they will not be able
to talk to anything on the external network, provided that you do not
set up IP masquerading on the physical host. This configuration is
called host-only networking by other virtualization software such as VirtualBox.
所以,如法炮制一遍以上过程:
$ sudo tunctl -t tap1 -u `whoami`
Set 'tap1' persistent and owned by uid 1000
$ sudo brctl addif virtbr0 tap1
$ sudo ifconfig tap0 up
$ sudo ifconfig tap1 up
$ sudo ifconfig virtbr0 up
$ sudo dhclient -v -s 192.168.1.1 virtbr0
Internet Systems Consortium DHCP Client 4.4.1
Copyright 2004-2018 Internet Systems Consortium.
All rights reserved.
For info, please visit https://www.isc.org/software/dhcp/
Listening on LPF/virtbr0/0a:36:50:42:8e:89
Sending on LPF/virtbr0/0a:36:50:42:8e:89
Sending on Socket/fallback
DHCPDISCOVER on virtbr0 to 192.168.1.1 port 67 interval 3 (xid=0xeb7a6a11)
DHCPDISCOVER on virtbr0 to 192.168.1.1 port 67 interval 6 (xid=0xeb7a6a11)
...
$ cat /var/lib/dhcp/dhclient.leases
lease {
interface "wlp109s0";
fixed-address 192.168.1.9;
option subnet-mask 255.255.255.0;
option dhcp-lease-time 86400;
option routers 192.168.1.1;
option dhcp-message-type 5;
option dhcp-server-identifier 192.168.1.1;
option domain-name-servers 218.85.152.99,218.85.157.99;
option vivso 0:0:0:0:14:2:6:48:47:57:2d:43:54:a:2:0:29:b:2:0:2b:d:2:0:2d;
renew 5 2024/01/19 00:39:25;
rebind 5 2024/01/19 11:01:00;
expire 5 2024/01/19 14:01:00;
}
lease {
interface "enp0s31f6";
fixed-address 192.168.1.9;
option subnet-mask 255.255.255.0;
option dhcp-lease-time 86400;
option routers 192.168.1.1;
option dhcp-message-type 5;
option dhcp-server-identifier 192.168.1.1;
option domain-name-servers 218.85.152.99,218.85.157.99;
option vivso 0:0:0:0:14:2:6:48:47:57:2d:43:54:a:2:0:29:b:2:0:2b:d:2:0:2d;
renew 1 2024/04/29 10:35:53;
rebind 1 2024/04/29 21:43:01;
expire 2 2024/04/30 00:43:01;
}
lease {
interface "virtbr0";
fixed-address 192.168.1.14;
option subnet-mask 255.255.255.0;
option routers 192.168.1.1;
option dhcp-lease-time 86400;
option dhcp-message-type 5;
option domain-name-servers 218.85.152.99,218.85.157.99;
option dhcp-server-identifier 192.168.1.1;
option vivso 0:0:0:0:14:2:6:48:47:57:2d:43:54:a:2:0:29:b:2:0:2b:d:2:0:2d;
renew 1 2024/04/29 12:04:06;
rebind 1 2024/04/29 21:52:15;
expire 2 2024/04/30 00:52:15;
}
$ sudo dhclient -v -r -s 192.168.1.1 virtbr0
Internet Systems Consortium DHCP Client 4.4.1
Copyright 2004-2018 Internet Systems Consortium.
All rights reserved.
For info, please visit https://www.isc.org/software/dhcp/
Listening on LPF/virtbr0/0a:36:50:42:8e:89
Sending on LPF/virtbr0/0a:36:50:42:8e:89
Sending on Socket/fallback
DHCPRELEASE of 192.168.1.14 on virtbr0 to 192.168.1.1 port 67 (xid=0x421343d8)
qemu-system-x86_64 -kernel tmp/vmlinuz-5.15.0-25-generic -serial stdio -m 2G -drive format=raw,file=ubuntu-efi-disk2 -append "root=PARTUUID=8613E0D8-6556-7A47-922D-EDA26D53D20B console=ttyS0 earlyprintk=ttyS0" -net nic -net tap,ifname=tap1,br=virtbr0,script=no,downscript=no
qemu-system-x86_64 -kernel tmp/vmlinuz-5.15.0-25-generic -serial stdio -m 2G -drive format=raw,file=ubuntu-efi-disk -append "root=PARTUUID=8613E0D8-6556-7A47-922D-EDA26D53D20B console=ttyS0 earlyprintk=ttyS0" -device e1000,netdev=mynet0,mac=52:55:00:d1:55:00 -netdev tap,id=mynet0,ifname=tap0,br=virtbr0,script=no,downscript=no
qemu-system-x86_64 -kernel tmp/vmlinuz-5.15.0-25-generic -serial stdio -m 2G -drive format=raw,file=ubuntu-efi-disk2 -append "root=PARTUUID=8613E0D8-6556-7A47-922D-EDA26D53D20B console=ttyS0 earlyprintk=ttyS0" -device e1000,netdev=mynet1,mac=52:55:00:d1:55:01 -netdev tap,id=mynet1,ifname=tap1,br=virtbr0,script=no,downscript=no
root@nick-qemu:~# cat /etc/netplan/01-network-manager-all.yaml
network:
ethernets:
enp0s3:
addresses: [172.20.0.100/24]
routes:
- to: default
via: 172.20.0.100
on-link: True
nameservers:
addresses: [8.8.8.8, 1.1.1.1]
dhcp4: false
optional: true
version: 2
root@nick-qemu:~# journalctl | grep -A 3 netplan
Apr 30 12:05:29 nick-qemu systemd-networkd[171]: ens3: Re-configuring with /run/systemd/network/10-netplan-enp0s3.network
Apr 30 12:05:29 nick-qemu systemd-networkd[171]: ens3: DHCPv6 lease lost
2: ens3: <BROADCAST,MULTICAST,UP,LOWER_UP> mtu 1500 qdisc fq_codel state UP group default qlen 1000
link/ether 52:55:00:d1:55:00 brd ff:ff:ff:ff:ff:ff
altname enp0s3
inet 192.168.1.100/24 brd 192.168.1.255 scope global ens3
valid_lft forever preferred_lft forever
inet6 fe80::5055:ff:fed1:5500/64 scope link
valid_lft forever preferred_lft forever
五月一日 等待变化等待机会
qemu-system-x86_64 -kernel tmp/vmlinuz-5.15.0-25-generic -serial mon:stdio -m 2G -drive format=raw,file=ubuntu-efi-disk -append "root=PARTUUID=8613E0D8-6556-7A47-922D-EDA26D53D20B console=ttyS0 earlyprintk=ttyS0" -device e1000,netdev=mynet0,mac=52:55:00:d1:55:00 -netdev tap,id=mynet0,ifname=tap0,br=br0,script=no,downscript=no
$ brctl show
bridge name bridge id STP enabled interfaces
br0 8000.dedebd53b90b no
docker0 8000.0242629f11ae no
virtbr0 8000.0a3650428e89 no tap0
tap1
Table 1. Two character prefixes based on the type of interface那么让我猜一猜网卡的那两个数字是什么?是设备的major/minor吗?当然不是!是pci的domain/slot[function]/port/device的序列码。
Prefix Description en Ethernet ib InfiniBand sl Serial line IP (slip) wl Wireless local area network (WLAN) ww Wireless wide area network (WWAN)
Table 2. On-board naming schemes让我来验证一下吧?
Format Description prefixonumber PCI on-board index prefixdnumber Devicetree alias index
$ lspci | grep -i ether
0000:00:1f.6 Ethernet controller: Intel Corporation Device 0dc8 (rev 11)
sudo qemu-system-x86_64 -kernel tmp/vmlinuz-5.15.0-25-generic -serial mon:stdio -m 2G -dr
ive format=raw,file=ubuntu-efi-disk2 -append "root=PARTUUID=8613E0D8-6556-7A47-922D-EDA26D53D20B console=ttyS0 earlyprintk=ttyS0"
-device e1000,netdev=mynet1,mac=52:55:00:d1:55:01 -netdev bridge,id=mynet1,br=virtbr0
# ip route
default via 192.168.1.14 dev ens3 proto static onlink
default via 192.168.1.1 dev ens3 proto dhcp src 192.168.1.17 metric 100
192.168.1.0/24 dev ens3 proto kernel scope link src 192.168.1.17 metric 100
192.168.1.1 dev ens3 proto dhcp scope link src 192.168.1.17 metric 100
218.85.152.99 via 192.168.1.1 dev ens3 proto dhcp src 192.168.1.17 metric 100
218.85.157.99 via 192.168.1.1 dev ens3 proto dhcp src 192.168.1.17 metric 100
五月二日 等待变化等待机会
Deprecated command
Replacement command(s)
arp ip n (ip neighbor) ifconfig ip a (ip addr), ip link, ip -s (ip -stats) iptunnel ip tunnel iwconfig iw nameif ip link, ifrename netstat ss, ip route (for netstat-r), ip -s link (for netstat -i), ip maddr (for netstat-g) route ip r (ip route)
五月五日 等待变化等待机会
In computer networking, promiscuous mode is a mode for a wired network interface controller (NIC) or wireless network interface controller (WNIC) that causes the controller to pass all traffic it receives to the central processing unit (CPU) rather than passing only the frames that the controller is specifically programmed to receive. This mode is normally used for packet sniffing that takes place on a router or on a computer connected to a wired network or one being part of a wireless LAN. Interfaces are placed into promiscuous mode by software bridges often used with hardware virtualization.这里为什么说software bridge是在使用虚拟化技术才需要这个?其实很简单,因为原本所有的网卡都只会接收目的地是自己的包,这个是以太网的特征,每个人都在嘈杂的大厅里听 到别人在讲话,你不要听跟你无关的声音。但是虚拟化可能就不是这样子了,因为你要作为一个二传手来帮助虚拟机传递包。
A network bridge is a computer networking device that creates a single, aggregate network from multiple communication networks or network segments. This function is called network bridging. Bridging is distinct from routing. Routing allows multiple networks to communicate independently and yet remain separate, whereas bridging connects two separate networks as if they were a single network. In the OSI model, bridging is performed in the data link layer (layer 2). If one or more segments of the bridged network are wireless, the device is known as a wireless bridge.所以,我感觉难道bridging就是switch的功能吗?来比较一下routing的概念:
Routing is the process of selecting a path for traffic in a network or between or across multiple networks. Broadly, routing is performed in many types of networks, including circuit-switched networks, such as the public switched telephone network (PSTN), and computer networks, such as the Internet.所以,首先,bridging往往是一个设备的行为,而routing是一个过程。前者的结果是并网,后者并没有改变多个网段。,但是它们在实现上是不是很相似呢?
TAP benefits:
- behaves like a real network adapter (except it is a virtual network adapter)
- can transport any network protocols (IPv4, IPv6, Netalk, IPX, etc, etc)
- Works in layer 2, meaning Ethernet frames are passed over the VPN tunnel
- Can be used in bridges
TAP drawbacks
- causes much more broadcast overhead on the VPN tunnel
- adds the overhead of Ethernet headers on all packets transported over the VPN tunnel
- scales poorly
- can not be used with Android or iOS devices
TUN benefits:
- A lower traffic overhead, transports only traffic which is destined for the VPN client
- Transports only layer 3 IP packets
TUN drawbacks:
- Broadcast traffic is not normally transported
- Can only transport IPv4 (OpenVPN 2.3 adds IPv6)
- Cannot be used in bridges
+--------------------------------+
| FIREWALL |
(public IP)| |192.168.0.1
{INTERNET}=============={eth1 eth0}=============<internal network / 192.168.0.0/24>
| \ / |
| +----------------------+ |
| | iptables and | |
| | routing engine | |
| +--+----------------+--+ |
| |*1 |*2 |
| (openvpn)-------{tun0} |
| 10.8.0.1 |
+--------------------------------+
*1 Only encrypted traffic will pass here, over UDP or TCP and only to the remote OpenVPN client
*2 The unencrypted traffic will pass here. This is the exit/entry point for the VPN tunnel.
五月七日 等待变化等待机会
A software access point, also called virtual router or virtual Wi-Fi, enables a computer to turn its wireless interface into a Wi-Fi access point. It saves the trouble of getting a separate wireless router.它的用意是什么呢?
Creating a software AP is independent from your own network connection (Ethernet, wireless, ...). Many wireless devices even support simultaneous operation both as AP and as wireless "client" at the same time. Using that capability you can create a software AP acting as a "wireless repeater" for an existing network, using a single wireless device.所以,就是一个虚拟的wireless repeater。
就是说我的程序就是所谓的wireless client,而如何绑定它和无线设备是第一步,第二步是所谓的包的控制。不过第一步的前提是创建AP,这个我先创建一个再说:Setting up an access point consists of two main parts:
- Setting up the Wi-Fi link layer, so that wireless clients can associate to your computer's software access point and exchange IP packets with it.
- Setting up the network configuration on your computer, so that it properly relays IP packets between its own internet connection and the wireless clients.
$ sudo iw dev wlp109s0 interface add wlan0_ap type managed addr 12:34:56:78:ab:ce
$ sudo macchanger -r wlan0_ap
Current MAC: 12:34:56:78:ab:ce (unknown)
Permanent MAC: 12:34:56:78:ab:ce (unknown)
New MAC: a2:bb:c0:a7:9d:3b (unknown)
You have first to configure it by creating the file而是命令行直接运行试试看:/etc/hostapd/hostapd.confand reference to it in/etc/default/hostapdwith optionDAEMON_CONF="/etc/hostapd/hostapd.conf".
$ sudo hostapd /etc/hostapd/hostapd.conf
wlan0_ap: interface state UNINITIALIZED->COUNTRY_UPDATE
wlan0_ap: interface state COUNTRY_UPDATE->ENABLED
wlan0_ap: AP-ENABLED
$ brctl show
bridge name bridge id STP enabled interfaces
docker0 8000.0242f17331bf no
virtbr0 8000.0a3650428e89 no wlan0_ap
五月九日 等待变化等待机会
$ ip a s wlp109s0 | awk '$1=="link/ether" {print $2}'
0c:9a:3c:69:8f:7f
$ sudo iw dev wlp109s0 interface add wlan0_ap type managed addr 0c:9a:3c:69:8f:7f
$ sudo ifconfig wlan0_ap up
SIOCSIFFLAGS: Name not unique on network
$ sudo macchanger -r wlan0_ap
Arp
Deprecated arp commands
Replacement
arp -a [host] or --all [host]
.
Shows the entries of the specified host name or IP address. If the [host] parameter is not used, all entries will be displayed.
ip n (or ip neighbor), or ip n show arp -d [ip_addr] or --delete [ip_addr]
.
Removes the ARP cache entry for the specified host.ip n del [ip_addr] (this “invalidates” neighbor entries)
.
ip n f [ip_addr] (or ip n flush [ip_addr])arp -D or --use-device
.
Uses the hardware address associated with the specified interface.Not apparent arp -e
.
Shows the entries in default (Linux) style.Not apparent arp -f [filename] or --file [filename]
.
Similar to the -s option, only this time the address info is taken from the file that [filename] set up. If no [filename] is specified, /etc/ethers is used as default.Not apparent arp -H or --hw-type [type] or -t [type]
.
When setting or reading the ARP cache, this optional parameter tells arp which class of entries it should check for. The default value of this parameter is ether (i.e. hardware code 0x01 for IEEE 802.3 10Mbps Ethernet).Not apparent arp -i [int] or --device [int]
.
Selects an interface. When dumping the ARP cache only entries matching the specified interface will be printed. For example, arp -i eth0 -s 10.21.31.41 A321.ABCF.321A creates a static ARP entry associating IP address 10.21.31.41 with MAC address A321.ABCF.321A on eth0.ip n [add | chg | del | repl] dev [name] arp -n or --numeric
.
Shows IP addresses instead of trying to determine domain names.Not apparent arp -s [ip_addr] [hw_addr] or --set [ip_addr]
.
Manually creates a static ARP address mapping entry for host [ip_addr] with the hardware address set to [hw_addr].ip n add [ip_addr] lladdr [mac_address] dev [device] nud [nud_state] (see example below) arp -v
.
Uses verbose mode to provide more details.ip -s n (or ip -stats n)
五月十二日 等待变化等待机会
五月十六日 等待变化等待机会
LANG=zh_CN.utf8 wine HD_Launcher.exe
$ printf 'Atlantic Revolutions 2.5' | dd of=AtlanticRevolutions conv=notrunc bs=1 seek=14 count=24
封印打开,因为locale能够支持的是在/etc/locale.gen决定了你想有什么语言可以创建。
五月二十二日 等待变化等待机会
这个是bios-boot的流程这个MBR的分区表结构很值得收藏,我怀疑我以前就拷贝过又忘了:这个是uefi-boot的流程
而这个图是我比较喜欢的uefi的具体流程

UEFI 引导模式 Legacy引导模式 UEFI 提供了更好的用户界面 Legacy引导模式是传统的且非常基本的 使用 GPT 分区方案(这个是微软的自我决定,UEFI有所谓的Compatibility Support Module, 但是微软觉得问题太多就决定新版windows不支持,以至于科普小白自以为uefi本身就不支持,这个是典型的在使用windows环境下被灌输的结 果。当然从现象上看,如果使用了UEFI结果又仅仅是MBR分区能不能启动?开了CSM是可以的,可是这个几乎就是BIOS/MBR,根本看不出来你使用 的是UEFI,这个往往是测试一个盲点,我记得大概以前工作中就遇到Quanta的固件里有一些小问题就是这个相关的。只是根本没有人关心这个问题,直到 我自己的旧笔记本是这么设置的,而长期不用掉电恢复为默认的UEFI禁止CSM的时候不能识别我的MBR/ubuntu系统我才意识到这个问题!) 使用 MBR 分区方案其实GPT本来就是兼容保护MBR的,也就是说GPT不用第0个分区,MBR和GPT是可以共存的,这个也是 微软放弃支持MBR/BIOS的一个原因吧,这里是可以混淆的,你到底要首先检查MBR后使用CSM来引导吗?你如果发现第1个分区里的GPT表怎么办? 或者还是一定就是使用GPT搜索方式先找一下再回过头来看MBR,总而言之很麻烦。 UEFI 提供更快的启动时间关于启动速度我感觉评论区很多人说的对,因为现代的UEFI的复杂界面及其应用部分并不见得快,这个也不是它的核心优势了。 相比UEFI,它的速度较慢(的 确它的古老的POST (开机自检)是默认一定要执行的,我以前工作中对于这个还是有些惊奇为什么现代的计算机总要检查内存,这个让我想起了二十几年前我的第一份工作的上司给我 组装电脑任务时候命令我一定要检查内存条的事情,那个时代内存的可靠性是很差的,就如同硬盘的可靠性很差是一个道理,几乎一定有若干区块已经坏了,这个也 就能够说明为什么服务器的内存一定要使用昂贵的自纠错内存条的原因了) 相比UEFI,它的速度较慢 由于 UEFI 使用 GPT 分区方案,因此它可以支持多达 9 zB 的存储设备 Legacy使用的 MBR 分区方案仅支持最多 2 TB 存储设备之前我一直没有重视这个问题的危害性也是我自己的旧笔记本没有这么大的硬盘的原因吧,现在就刻不容缓了,新的电脑一定是要GPT,那么你不使用UEFI能行吗? 这里的问题问的很好也是我想问的:32bit的寻址最多就支持2T是没有错的((2^32)-1 x 512 byte = 2 TB.),但是MBR支持四个分区难道不能再乘以四吗?,这里杠精首先的问题是partition entry明明是16byte为什么非要说才支持32bit的寻址呢?其实这个又是老生常谈, 这个应该是传统的CHS的体制造成的,和32bit寻址有些微妙的联系:The range for sector is 1 through 63; the range for cylinder is 0 through 1023; the range for head is 0 through 255 inclusive.,结果就是64(Sector)x1024(Cylinder)x256(Head)=16777216一个人不暴露思想永远不知道自己其实真的不懂,因为我居然连CHS和LBA两种寻址方式也不懂!尽管仅仅是计算方式的不同,可是它实际上决定了很多磁盘分区大小的上限。比如有些分区类型如 果支持的仅仅是CHS的寻址方式,那么它的上限就是16M,而LBA是扩展了CHS,据说是支持48bit,可是在MBR里它只用了4byte,那么一个 所谓的sector的size不论是物理的还是模拟的都是512半个k,所以,(4G-1)*0.5K=2T,如果分区类型是只支持CHS的那么就更小 了。UEFI 以 32 位和 64 位运行,支持鼠标和触摸板 Legacy在仅支持键盘,仅 16 位模式下运行这里的16位模式运行我猜想是dos16位吧?我对于这个概念是很模糊的,粗浅的理解就是内存上限只有16bit寻址吧? 它允许安全启动,防止加载未经授权的应用程序它还可能阻碍双启动,因为它将操作系统(OS)视为应用程序凡是和安全相关的困难度都是几何级数增长的,它的复杂性我简直不敢想象,如果我需要学习的话这个领域绝对是耗费大量时间和精力的,而且还不一定能明白,因为大多数这领域的问题都是语焉不详,能者不言,言者不能。 它不提供允许加载未经授权的应用程序的安全启动方法,未限制双启动 它具有更简单的更新过程 与UEFI相比,它更复杂刷BIOS吗?不过对于主板上的固件大概都是一样的困难吧?这里的所谓的更新是指的存储在EFI分区的 EFI程序方面的更新,和BIOS完全只能更新主板固件比较当然是相对的容易,因为我的理解就是UEFI是一套标准,需要各个厂商去实现相对应的接口以及 调用,等于是主板厂商和操作系统启动厂商的协同规范,如果主板不更新的前提下启动程序其实是可以玩不少的花样的。
Layout of one 16-byte partition entry (all multi-byte fields are little-endian)
Offset
(bytes)Field
lengthDescription 0x00 1 byte Status or physical drive (bit 7 set is for active or bootable, old MBRs only accept 0x800x00 means inactive, and 0x01–0x7F stand for invalid) 0x01 3 bytes CHS address of first absolute sector in partition.The format is described by three bytes, see the next three rows. 0x01 1 byte
h head x x x x x x x x 0x02 1 byte
c9–8 s5–0 sector in bits 5–0; bits 7–6 are high bits of cylinder x x x x x x x x 0x03 1 byte
c7–0 bits 7–0 of cylinder x x x x x x x x 0x04 1 byte Partition type 0x05 3 bytes CHS address of last absolute sector in partition. The format is described by 3 bytes, see the next 3 rows. 0x05 1 byte
h7–0 head x x x x x x x x >0x06 1 byte
c9–8 s5–0 sector in bits 5–0; bits 7–6 are high bits of cylinder x x x x x x x x 0x07 1 byte
c7–0 bits 7–0 of cylinder x x x x x x x x 0x08 4 bytes LBA of first absolute sector in the partition 0x0C 4 bytes Number of sectors in partition
黑洞是一个写入的设备,而相反的/dev/zero是一个
虚无是一个读取的设备。这个是我自己凭空想象的,正确的说法是这样子的:
两者的功能绝对不是可以轻易替代的,Linux不养闲人,不是可有可无的!!!Yes, both accept and discard all input, but their output is not the same:
- /dev/null produces no output.
- /dev/zero produces a continuous stream of NULL (zero value) bytes.
You can see the difference by executing
cat /dev/nullandcat /dev/zero.
Try cat /dev/null > file and you will find an empty file.
Now try cat /dev/zero > file, while watching the size of the file (watch -n 1 du -h file) continuously increase. This is because reading from /dev/zero gives an endless stream of \0 (null) characters.
Use dd to visualize the difference more appropriately:
$ dd if=/dev/null of=file count=10 0+0 records in 0+0 records out 0 bytes (0 B) copied, 0.000276193 s, 0.0 kB/s$ dd if=/dev/zero of=file count=10 10+0 records in 10+0 records out 5120 bytes (5.1 kB) copied, 0.00090775 s, 5.6 MB/s/dev/zero is used to create dummy files or swap.
垃圾箱里保存了所有的删除的文件,我想我还是不要晴空的好,并不是为了能够恢复,主要是SSD的存储特性决定了块删除是一个很耗损的操作不仅仅是时间更主要是寿命。等到磁盘空间耗尽再说吧?
五月二十三日 等待变化等待机会
Broadcast message from root@nick-sager (Thu 2024-05-23 08:03:56 +08):
Password entry required for 'Enter Auth Password:' (PID 14230).
Please enter password with the systemd-tty-ask-password-agent tool.
这一段简直就是天书,我看了云里雾里。这个是在谈设想还是现实?我需要的是解决结论而不是远景愿景!对于我来说找不到wiki的官方解释,只能追本朔源来分析这个是谁在询问,很明显它是openvpn的结果因为是我运行了openvpn的命令行而不是服务或者daemon,那么为什么我在命令行已经输入了auth/passwd,它还是询问呢?应该是systemd-ask-password就 是systemd在询问。在manpage里的解释大体上就是上面这段天书说的。总而言之,这个是systemd在询问,也许是ssl-cert也许是加 密磁盘,后者跟我没关系,只有plymouth之类启动才能遇到,openvpn的确有用到ssl-certificate,有没有密码保护我不知道,也 许有但是openvpn也许可以选择不回答那么systemd就使用wall服务来通知, 那么后台运行的服务肯定是无法使用frontend来采集用户输入的,这个纯粹就是我的想象,这个只是大体的概念理解。我开始对于天书有些明白而已。尽管 man page说的很清楚,但是人的理解是一个很复杂的过程,正如chatGPT每个字都给你解释了,其实它根本什么都不懂,说的车古录话如同新闻发言人的套话 官话。可是我还是明白了应该怎么做!核心是怎么解决systemd-tty-ask-password-agent抛出的信息,那么照方抓药也从它入手,要明白一个queued概念,它很可能是把之前的事情又翻出来反复问,所以,我就先--list然后看到有进程在问,接下来就是回答Password Agents
systemd 12 and newer support lightweight password agents which can be used to query the user for system-level passwords or passphrases. These are passphrases that are not related to a specific user, but to some kind of hardware or service. Right now this is used exclusively for encrypted harddisk passphrases but later on this is likely to be used to query passphrases of SSL certificates at Apache startup time as well. The basic idea is that a system component requesting a password entry can simply drop a simple .ini-style file into /run/systemd/ask-password which multiple different agents may watch via inotify(), and query the user as necessary. The answer is then sent back to the querier via an AF_UNIX/SOCK_DGRAM socket. Multiple agents might be running at the same time in which case they all should query the user and the agent which answers first wins. Right now systemd ships with the following passphrase agents:
- A Plymouth agent used for querying passwords during boot-up
- A console agent used in similar situations if Plymouth is not available
- A GNOME agent which can be run as part of the normal user session which pops up a notification message and icon which when clicked receives the passphrase from the user. This is useful and necessary in case an encrypted system harddisk is plugged in when the machine is already up.
- A wall(1) agent which sends wall messages as soon as a password shall be entered.
- A simple tty agent which is built into "systemctl start" (and similar commands) and asks passwords to the user during manual startup of a service
- A simple tty agent which can be run manually to respond to all queued passwords
nick@nick-sager:/etc/openvpn$ systemd-tty-ask-password-agent --list
'Enter Auth Username:' (PID 14429)
nick@nick-sager:/etc/openvpn$ systemd-tty-ask-password-agent --query
Not querying 'Enter Auth Username:' (PID 14429), lacking privileges.
nick@nick-sager:/etc/openvpn$ sudo systemd-tty-ask-password-agent --query
🔐 Enter Auth Username: nick
nick@nick-sager:/etc/openvpn$ sudo systemd-tty-ask-password-agent --query
🔐 Enter Auth Password: ******
nick@nick-sager:/etc/openvpn$ sudo systemd-tty-ask-password-agent --list
'Enter Auth Username:' (PID 14449)
nick@nick-sager:/etc/openvpn$ sudo systemd-tty-ask-password-agent --query
🔐 Enter Auth Username: nick
nick@nick-sager:/etc/openvpn$ sudo systemd-tty-ask-password-agent --query
🔐 Enter Auth Password: ******
It is a dynamic table that maps MAC addresses to ports. It is the essential mechanism that separates network switches from Ethernet hubs. Content-addressable memory (CAM) is typically used to efficiently implement the FIB, thus it is sometimes called a CAM table.字数少才事情大。它不是switch,因为我们map的是ports,switch和hub的区别在哪里呢?而实现FIB依赖的是这个CAM table。重要的是理解。
The data link layer, or layer 2, is the second layer of the seven-layer OSI model of computer networking. This layer is the protocol layer that transfers data between nodes on a network segment across the physical layer. The data link layer provides the functional and procedural means to transfer data between network entities and may also provide the means to detect and possibly correct errors that can occur in the physical layer.就是说link这一层的目的是在具体的物理设备之间传递数据包,这个机制还没有任何的网络协议的概念,所以,IP是在上面。有必要复习一下OSI的七层架构
对于link layer,它是 node-to-node data transfer,我不知道的是它还有两个子层:
OSI model Layer Protocol data unit (PDU) Function[27] Host
layers7 Application Data High-level protocols such as for resource sharing or remote file access, e.g. HTTP. 6 Presentation Translation of data between a networking service and an application; including character encoding, data compression and encryption/decryption 5 Session Managing communication sessions, i.e., continuous exchange of information in the form of multiple back-and-forth transmissions between two nodes 4 Transport Segment, Datagram Reliable transmission of data segments between points on a network, including segmentation, acknowledgement and multiplexing Media
layers3 Network Packet Structuring and managing a multi-node network, including addressing, routing and traffic control 2 Data link Frame Transmission of data frames between two nodes connected by a physical layer 1 Physical Bit, Symbol Transmission and reception of raw bit streams over a physical medium
IEEE 802 divides the data link layer into two sublayers:古老的PPP居然就是这个层面的,阅读这些相关的名词我很多都反复听到过,简直就像是在考古了。那么这种
- Medium access control (MAC) layer – responsible for controlling how devices in a network gain access to a medium and permission to transmit data.
- Logical link control (LLC) layer – responsible for identifying and encapsulating network layer protocols, and controls error checking and frame synchronization.
老古董真的没有意义吗?看看我所想要了解的tunnel其实不就是一种点到点的通讯手段吗?
As there are only two endpoints on a tunnel, the tunnel is a point-to-point connection and PPP is a natural choice as a data link layer protocol between the virtual network interfaces. PPP can assign IP addresses to these virtual interfaces, and these IP addresses can be used, for example, to route between the networks on both sides of the tunnel.
In a network utilizing broadcasts for service discovery, address assignment and resolution and other services, as the number of peers on a network grows, the frequency of broadcasts also increases. VLANs can help manage broadcast traffic by forming multiple broadcast domains.我觉得似乎核心是广播,因为它的定义就是
A virtual local area network (VLAN) is any broadcast domain that is partitioned and isolated in a computer network at the data link layer (OSI layer 2).字数越少越重要。很多时候过于技术的细节让我有些读了前面忘了后面,最后能够有印象的就是一些考古轶事。比如我一直认为以太网的碰撞是限制它规模的根本原因,这个难道是古老的故事了吗?
Early network designers often segmented physical LANs with the aim of reducing the size of the Ethernet collision domain—thus improving performance. When Ethernet switches made this a non-issue (because each switch port is a collision domain), attention turned to reducing the size of the data link layer broadcast domain.我以前一直认为过多的switch会让包走更远的道路所以更慢,但是现在看起来它分割了网络让一些昂贵的广播变得更快反而是加快了传播?当然这个也许只有一定条件才成立吧?看来这个确实是学校里的古董概念了,难道不能靠硬件解决算法问题吗?
For Gigabit Ethernet and faster, no hubs or repeaters exist and all devices require full-duplex links.就好像在一个拥挤的大厅里大家开会,难道还是用嘴和耳朵来说和听吗?不能使用耳机麦克风吗?无线的问题肯定是比有线更复杂,这个你们两个互相听不见对方但是却能够干扰碰撞对方的问题似乎在有线环境下很难吧?总之,我很庆幸我不是学网络通信的,没有太多的烦恼。
五月二十四日 等待变化等待机会
The protocols of the link layer operate within the scope of the local network connection to which a host is attached. This regime is called the link in TCP/IP parlance and is the lowest component layer of the suite. The link includes all hosts accessible without traversing a router.所以,我现在模糊概念的东西都在这个范畴:virtual private network (VPN) ,tunneling protocol。
A virtual private network (VPN) is a mechanism for creating a secure connection between a computing device and a computer network, or between two networks, using an insecure communication medium such as the public Internet.这里的概念是从它的目的和结果来入手的,对于寻求实现细节的人帮助不大。这不由得让我联想到所谓的Universal Property,你可以使用事物的普遍的特性来定义任何事物,而不是以描述事物的具体特征来定义。为什么每次我都想到
图灵实验这个奇怪的定义人工智能的方式呢?有时候我真想嘲讽一下当今的时代潮人为
能智工人,也就是所谓的
人工智能的逆序。也许将来可以用在某部小说里来作为一个角色的名字吧?
In computer networks, a tunneling protocol is a communication protocol which allows for the movement of data from one network to another. It can, for example, allow private network communications to be sent across a public network (such as the Internet), or for one network protocol to be carried over an incompatible network, through a process called encapsulation.如果纯粹从目的和结果来看VPN和Tunneling Protocol究竟有多大区别呢?也许字面上前者是注重了安全性,后者注重的是异质的网络环境的穿越。
地下先遣图就明白它有多么的多样性:VPN classification tree based on the topology first, then on the technology used
 看这个图目前还超过了我的能力,提示是先看拓扑再看技术实现路径,目前我还不能完全体会。所以,从分类的角度看问题,如果是从应用场景分类基本普通人都能理解,就是个人到组织,组织内部到组织内部,组织到组织。估计这个都是无用的废话。这个分类似乎更有意义些:
从这个分类似乎也可以揭示出与其说VPN是一项技术还不如说是依靠tunneling实现的一种应用,真正应该关心的是它依赖的tunneling的技术实现。所以,VPN=Tunneling Protocol+Secure EncryptionVPN systems also may be classified by:
- the tunneling protocol used to tunnel the traffic
- the tunnel's termination point location, e.g., on the customer edge or network-provider edge
- the type of topology of connections, such as site-to-site or network-to-network
- the levels of security provided
- the OSI layer they present to the connecting network, such as Layer 2 circuits or Layer 3 network connectivity
- the number of simultaneous connections
In computer networking, port forwarding or port mapping is an application of network address translation (NAT) that redirects a communication request from one address and port number combination to another while the packets are traversing a network gateway, such as a router or firewall. This technique is most commonly used to make services on a host residing on a protected or masqueraded (internal) network available to hosts on the opposite side of the gateway (external network), by remapping the destination IP address and port number of the communication to an internal host.
五月二十五日 等待变化等待机会
Hosts behind NAT-enabled routers do NOT have end-to-end connectivity and cannot participate in some internet protocols. Services that require the initiation of TCP connections from the outside network, or that use stateless protocols such as those using UDP, can be disrupted.第二个情况stateless protocols为什么不可以让我觉得难以理解???其它的一些明显的问题是可以理解的,就是有些协议比如ftp的命令层面是另一路而且直接把传输地址写在了数据包里,这就无解了。总而言之,没有采取问题导向的方式,空学一些原理原则基本是无意义的,一定要实践才有所增益。
/$ usr/sbin/sshd -d -p 8001 -h /home/nick/workspace/arena/ssh_host_rsa_key
$ ssh -C -D 1080 -p 8001 localhost
SOCKS is an Internet protocol that exchanges network packets between a client and server through a proxy server. SOCKS5 optionally provides authentication so only authorized users may access a server. Practically, a SOCKS server proxies TCP connections to an arbitrary IP address, and provides a means for UDP packets to be forwarded. A SOCKS server accepts incoming client connection on TCP port 1080, as defined in RFC 1928.就是说这个协议把所有的1080的请求都发送到它该去的地址,而我的ssh客户端建立了一个dynamic port forwarding侦听1080端口让它们全部走压缩和加密的协议,为了能够看到这一切我使用了一个我自己debug运行的sshd进程侦听端口为 8001,这样子我就不必改动很多配置?其实这一点我没做好,本来应该指定一个自己运行的sshd的配置文件。结果没有所以它依然是使用全局的配置,害得我还是得把sshd_config配置里的AllowTcpForwarding改成yes,这个肯定是有安全隐患的,尤其是我胡里胡涂做实验完了又忘了改什么了。总而言之,我可以在debug模式的sshd看到所有的log输出看到一些流程请求。我觉得这个和openvpn有某些相似之处。
五月二十六日 等待变化等待机会
$ sudo lsof -nP -iTCP -sTCP:LISTEN | grep 8001
$ /usr/sbin/sshd -d -p 8001 -h /home/nick/workspace/arena/ssh_host_rsa_key
$ ssh -L 8080:www.ubuntuforums.org:80 -p 8001 localhost
debug1: server_input_channel_open: ctype direct-tcpip rchan 2 win 2097152 max 32768
debug1: server_request_direct_tcpip: originator 127.0.0.1 port 43576, target www.ubuntuforums.org port 80
debug1: connect_next: host www.ubuntuforums.org ([185.125.188.17]:80) in progress, fd=9
debug1: channel 2: new [direct-tcpip]
debug1: server_input_channel_open: confirm direct-tcpip
debug1: channel 2: connected to www.ubuntuforums.org port 80
debug1: channel 2: free: direct-tcpip, nchannels 3
$ ssh-keygen -t rsa -f rsa_arena
HostKey /home/nick/workspace/arena/rsa_arena
AuthorizedKeysFile /home/nick/workspace/arena/rsa_arena.pub
$ /usr/sbin/sshd -d -p 8001 -f /home/nick/workspace/arena/sshd_config
$ ssh -p 8001 -i rsa_arena localhost
五月二十七日 等待变化等待机会
$ systemctl status --full sshd | grep /usr/sbin/sshd
Process: 512076 ExecStartPre=/usr/sbin/sshd -t (code=exited, status=0/SUCCESS)
└─512098 "sshd: /usr/sbin/sshd -D -o AuthorizedKeysCommand /usr/share/ec2-instance-connect/eic_run_authorized_keys %u %f -o AuthorizedKeysCommandUser ec2-instance-connect [listener] 0 of 10-100 startups"
$ ssh -R 2000:localhost:22 openvpnas@54.67.3.66
$ ssh -p 2000 nick@localhost
openvpnas@ip-172-31-35-59:~$ scp nick@localhost:2000/tmp/id_rsa /tmp/
nick@localhost: Permission denied (publickey).
The source and target may be specified as a local pathname, a remote host with optional path in the form
[user@]host:[path], or a URI in the form scp://[user@]host[:port][/path]. Local file names can be made explicit us‐
ing absolute or relative pathnames to avoid scp treating file names containing ‘:’ as host specifiers.
When copying between two remote hosts, if the URI format is used, a port cannot be specified on the target if the -R
option is used.
openvpnas@ip-172-31-35-59:~$ scp -P 2000 nick@localhost:/tmp/id_rsa /tmp/
id_rsa 100% 2610 17.8KB/s 00:00
五月二十八日 等待变化等待机会
$ ssh -C -D 1080 openvpnas@54.67.3.66
bind [::1]:1080: Cannot assign requested address
Welcome to OpenVPN Access Server Appliance 2.12.3
...
openvpnas@ip-172-31-35-59:~$ sudo netstat -lnp | grep 1080
openvpnas@ip-172-31-35-59:~$
$ ssh -v -4 -C -D 1080 openvpnas@54.67.3.66
...
Authenticated to 54.67.3.66 ([54.67.3.66]:22) using "publickey".
debug1: Local connections to LOCALHOST:1080 forwarded to remote address socks:0
debug1: Local forwarding listening on 127.0.0.1 port 1080.
debug1: channel 0: new [port listener]
debug1: channel 1: new [client-session]
...
$ sudo netstat -lnp | grep 1080
[sudo] password for nick:
tcp 0 0 127.0.0.1:1080 0.0.0.0:* LISTEN 214210/ssh
May 28 17:01:13 ip-172-31-35-59 sshd[523600]: error: connect_to www.wikpedia.com: unknown host (Temporary failure in name resolution)
$ curl -H 'accept: application/dns-json' 'https://cloudflare-dns.com/dns-query?name=www.google.com&type=A' | jq .
% Total % Received % Xferd Average Speed Time Time Time Current
Dload Upload Total Spent Left Speed
100 193 100 193 0 0 367 0 --:--:-- --:--:-- --:--:-- 366
{
"Status": 0,
"TC": false,
"RD": true,
"RA": true,
"AD": false,
"CD": false,
"Question": [
{
"name": "www.google.com",
"type": 1
}
],
"Answer": [
{
"name": "www.google.com",
"type": 1,
"TTL": 126,
"data": "172.217.12.100"
}
]
}
$ ping 8.8.8.8
PING 8.8.8.8 (8.8.8.8) 56(84) bytes of data.
64 bytes from 8.8.8.8: icmp_seq=1 ttl=55 time=35.3 ms
64 bytes from 8.8.8.8: icmp_seq=2 ttl=55 time=35.4 ms
...
$ kdig -d @8.8.8.8 +tls-ca +tls-host=dns.google.com example.com
;; DEBUG: Querying for owner(example.com.), class(1), type(1), server(8.8.8.8), port(853), protocol(TCP)
;; DEBUG: TLS, imported 140 system certificates
;; WARNING: connection timeout for 8.8.8.8@853(TCP)
;; ERROR: failed to query server 8.8.8.8@853(TCP)
$ sudo openvpn --config /etc/openvpn/nick.conf --auth-user-pass /etc/openvpn/auth.txt
--auth-user-pass
Authenticate with server using username/password.
Valid syntaxes:
auth-user-pass
auth-user-pass up
If up is present, it must be a file containing username/password on 2 lines. If the password line is missing, OpenVPN will
prompt for one.
If up is omitted, username/password will be prompted from the console.
五月三十日 等待变化等待机会
$ /usr/sbin/sshd -d -f /home/nick/workspace/arena/sshd_config -p 8001
$ ssh -o ProxyJump=nick@127.0.0.1:8001 openvpnas@54.67.3.66
五月三十一日 等待变化等待机会
X11 connection rejected because of wrong authentication.错误时候而运行xclock正常就意味着这个很可能是firefox自身的问题,至少和X11 forwarding无关。这里虽然不解决问题但 是他给出的思路确实很好。首先有一些不了解的firefox的机制,比如他提到firefox试图检查本地的running instance,这些我还是听不太懂,而且也没有验证,但是基本上是可能的,因为其他的应用没有问题可以运行,说明了这个是纯粹的firefox的某些 问题,然后我发现了这个可以工作。就是说不知道什么原因环境变量$XAUTHORITY没有设置成默认的$HOME/.Xauthority,所以,我在我的$HOME/.bashrc里加上了export XAUTHORITY=$HOME/.Xauthority。问题是解决了。
$ dvdbackup -M -p -o .
$ HandBrakeCLI -e x264 -E av_aac -i Dvd/VIDEO_TS/ -Z "Super HQ 720p30 Surround" -s 1 --subtitle-burned 1 --subtitle-default 1 -t 0
$ for title in {1..6}; do HandBrakeCLI -e x264 -E av_aac -i Dvd/VIDEO_TS/ -Z "Super HQ 720p30 Surround" -s 1 --subtitle-burned 1 --subtitle-default 1 -t ${title} -o video_title_${title}.mp4; done
六月三日 等待变化等待机会
D-Bus is first and foremost an Inter Process Communication (IPC) solution. But it does a bit more than just passing a blob of information from one process to another one. D-Bus is object oriented, where each object can have a set of Methods, Properties and Signals. All the data passed through D-Bus is also required to use the data types provided by D-Bus. This enforces a fairly strict and predictable type checking, which means the application implementing D-Bus will not need to care about parsing message protocols.这里说的很清楚了,就是一个IPC,只不过是更加的object-oriented。因为有了严格的类型因而成为一种类似于RPC的方式来进行通讯。
The D-Bus design is built around a server/client approach, where the server side is most commonly referred to as a D-Bus service. And the client side uses, what is often called, a proxy to do operations on D-Bus objects provided by a specific D-Bus service. Operations can be calling methods or reading or writing object properties. D-Bus object are referenced through D-Bus paths. And a D-Bus service is accessed through a destination reference, which is a bus name and a bus type indicator.这里始终让我不理解的是所谓的path,到底这个用途是什么呢?是所谓的存储的路径吗?有点数据存储的概念吧?
六月七日 等待变化等待机会
$ aptitude search openvpn
p golang-github-apparentlymart-go-openvpn-mgmt-dev - Go client library for OpenVPN's management protocol
i A network-manager-openvpn - network management framework (OpenVPN plugin core)
i network-manager-openvpn-gnome - network management framework (OpenVPN plugin GNOME GUI)
i openvpn - virtual private network daemon
p openvpn-auth-ldap - OpenVPN LDAP authentication module
p openvpn-auth-radius - OpenVPN RADIUS authentication module
i openvpn-systemd-resolved - integrates OpenVPN with systemd-resolved
DBUS_DEST="org.freedesktop.resolve1"
DBUS_NODE="/org/freedesktop/resolve1"
$ gdbus introspect --system --dest org.freedesktop.resolve1 --object-path /org/freedesktop/resolve1
$ busctl get-property org.freedesktop.systemd1 /org/freedesktop/systemd1 org.freedesktop.systemd1.Manager Environment
as 2 "LANG=en_US.UTF-8" "PATH=/usr/local/sbin:/usr/local/bin:/usr/sbin:/usr/bin:/sbin:/bin:/snap/bin"
服务。我不知道它们是不是服务,但是看起来似乎是吧?而运用status命 令可以查询到这些服务的命令行程序名,这个是一个非常有用的方法,我在猜想是不是systemctl使用的也是一个DBus的机制呢?因为在我看来似乎它 是一个更加基本的东西,不过也许我只是瞎猜,说不定是。。。反过来的?因为每一个DBus似乎后面对应着一个systemd的服务?
...
fi.w1.wpa_supplicant1 1295 wpa_supplicant root :1.5 wpa_supplicant.service - -
io.netplan.Netplan - - - (activatable) - - -
net.hadess.PowerProfiles 1242 power-profiles- root :1.13 power-profiles-daemon.service - -
net.hadess.SwitcherooControl 1257 switcheroo-cont root :1.14 switcheroo-control.service - -
...
GNOME Display Manager (GDM) is a display manager (a graphical login manager) for the windowing systems X11 and Wayland.
The X Window System by default uses the XDM display manager. However, resolving XDM configuration issues typically involves editing a configuration file. GDM allows users to customize or troubleshoot settings without having to resort to a command line. Users can pick their session type on a per-login basis.
A pluggable authentication module (PAM) is a mechanism to integrate multiple low-level authentication schemes into a high-level application programming interface (API). PAM allows programs that rely on authentication to be written independently of the underlying authentication scheme.但是我的印象是这个并没有标准化,似乎也是一个比较混乱的状态,似乎各家都是有自己一套???我对于此很是疑惑,所有关于安全的都是一个大大的黑洞。
六月八日 等待变化等待机会
$ sudo apt install -y php php-intl php-mbstring php-xml php-apcu php-curl php-sqlite3 composer
composer update再安装sql
composer mw-install:sqlite然后运行composer serve
http://localhost:4000/mw-config
六月九日 等待变化等待机会
$ php maintenance/run.php importDump.php --skip-to 3000000 ../wikipedia/enwiki-20240501-pages-articles.xml
$ zimdump dump ./Wikipedia_en_computer_maxi_2024-05.zim --dir=wiki
$ s3cmd put --recursive --acl-public --progress -v -M --default-mime-type="text/html" wiki s3://www.staroceans.org/
但是我知道这个--acl-grant是旧的,因为新版的是
AWS CLI S3cmd Description --public-read --acl-public Making an object publicly accessible --private --acl-private Making an object private --grant-full-control --acl-grant=full-control Granting full control over the bucket --grant-read --acl-grant=read Allowing the listing of objects in the bucket --grant-read-acp --acl-grant=read_acp Allowing the reading of ACLs --grant-write --acl-grant=write Allowing recording, overwriting, and deleting of objects
--acl-grant=PERMISSION:EMAIL or USER_CANONICAL_ID
Grant stated permission to a given amazon user. Permission is one of: read, write, read_acp, write_acp,
full_control, all
$ git fetch --all --tags --prune
$ git checkout tags/n7.0 -b nick-n7.0
$ PATH="$HOME/bin:$PATH" PKG_CONFIG_PATH="$HOME/ffmpeg_build/lib/pkgconfig" ./configure --prefix="$HOME/ffmpeg_build" --pkg-config-flags="--static" --extra-cflags="-I$HOME/ffmpeg_build/include" --extra-ldflags="-L$HOME/ffmpeg_build/lib" --extra-libs="-lpthread -lm" --ld="g++" --bindir="$HOME/bin" --enable-gpl --enable-gnutls --enable-libaom --enable-libass --enable-libfdk-aac --enable-libfreetype --enable-libmp3lame --enable-libopus --enable-libsvtav1 --enable-libdav1d --enable-libvorbis --enable-libvpx --enable-libx264 --enable-libx265 --enable-nonfree --enable-iconv && PATH="$HOME/bin:$PATH" make
$ ffmpeg -i La.Révolution.française.1989.FR.DVDRIP.XVID.Part.1.avi -sub_charenc GB2312 -i La.Révolution.française.1989.FR.DVDRIP.XVID.Part.1.srt -map 0:v -map 0:a -c copy -c:s:0 mov_text -metadata:s:s:0 language=fre ~/DS918Video/Napoleon/La.Révolution.française.1989.FR.DVDRIP.XVID.Part.1.mp4
$ ffmpeg -i La.Révolution.française.1989.FR.DVDRIP.XVID.Part.1.avi -sub_charenc GB2312 -i La.Révolution.française.1989.FR.DVDRIP.XVID.Part.1.srt -c:s mov_text -metadata:s:s:0 language=fre ~/DS918Video/Napoleon/La.Révolution.française.1989.FR.DVDRIP.XVID.Part.1.mp4
$ ffmpeg -i '拿破仑1:战争的号角.mkv' -vf "subtitles='拿破仑1:战争的号角.mkv':si=0" '拿破仑1:战争的号角.mp4'
这个帖子的另一个重要价值在于指出了一个非常棒的关于map的指引!当然这个官方的说明还 是权威的。我感觉如果我不摘抄原文的话我有可能反反复复的引用同一个文档。阅读这个说明本来应当是很快乐的事情,可是因为我似乎满足于最基本的需求就没有 动力了。不过我还是学到了一星半点,就是字幕是分所谓的text-based和image-based,前者是mkv的机制,后者的一个代表是dvdsub。而音频里的5.1channel确实是很多个channel,应该是5+1=6吧。这些都是基本的常识,不过很有用。The ordering of the audio streams can be accomplished using FFmpeg's
mapanddispositionoptions. Best syntax for this is arguably:ffmpeg -i input.mkv -map 0:v:0 \ -map 0:a:2 -map 0:a:0 -map 0:a:1 -map 0:a:3 \ -map 0:s -c copy \ -disposition:a:0 default \ reordered.mkvTo unpack this a little:
-map 0:v:0: The first (and only) video stream is selected-map 0:a:1 -map 0:a:0 -map 0:a:2 -map 0:a:3: The audio streams are individually placed. The final digit of each 'set' selects from the 4 audio streams with '0' being the first stream and '3' being the final audio stream. English is of course specified first and is stream 2.-map 0:s: Select all of the subtitle files-c copy: Copy the video, audio and subtitle streams with no re-encoding.-disposition:a:0 default: This sets our required audio stream (English) as the default. Useful if this has been set on another, input audio stream.This worked well on a test file produced on my system and should work well on yours as well...
Notes...
- Selecting streams with the -map option: Beautifully written FFmpeg trac guide to using FFmpeg's
mapoptions- FFmpeg's Main Options: Scroll down from this link to see the usage and options available for FFmpeg's
dispositionoptions.
六月十四日 等待变化等待机会
Warning: failed to launch javaldx - java may not function correctly,这位大侠指出了解决的办法。
$ sudo apt-get install libreoffice-java-common default-jre
$ wget https://download.kiwix.org/zim/wikipedia/wikipedia_en_computer_maxi_2024-05.zim
$ wget https://download.kiwix.org/zim/wikipedia/Wikipedia_en_computer_maxi_2024-05.zim
$ git clone --recursive https://github.com/openzim/libzim.git
meson . build
ninja -C build
ninja -C build install
$ git clone --recursive https://github.com/openzim/zim-tools
meson . build
ninja -C build
ninja -C build install
$ mkdir wiki
$ zimdump dump --dir=wiki wikipedia_en_computer_maxi_2024-05.zim
$ zimdump dump --dir=wiki Wikipedia_en_computer_maxi_2024-05.zim
$ s3cmd sync --check-md5 --acl-public --progress -v --recursive --mime-type="text/html" wiki/A s3://www.staroceans.org/wiki/
$ s3cmd sync --check-md5 --acl-public --progress -v --recursive -M wiki/I s3://www.staroceans.org/wiki/
ALPHA DIGIT "-" / "." / "_" / "~"可是我还是第一次听说domain name的encoding,因为中文域名并不是不存在啊!我实在是懒得看了。
六月十五日 等待变化等待机会
C++语言是这个链接:https://en.wikipedia.org/wiki/C%2B%2B
而C++/CLI是这个链接: c++语言是这个链接:https://en.wikipedia.org/wiki/C%2B%2B/CLI
六月十七日 等待变化等待机会
《喜迁莺--六月天》 六月天,雨水多, 行山遭雨泼。 躲雨进寺不拜佛, 只为观新荷。 雨才霁,前院转, 红墙黄瓦乍现。 石板积水映蓝天, 暗喜偷得闲。
for (auto& entry:m_archive.iterEfficient()) {
/usr/local/bin/s3cmd:4: DeprecationWarning: pkg_resources is deprecated as an API. See https://setuptools.pypa.io/en/latest/pkg_resources.html
__import__('pkg_resources').run_script('s3cmd==2.4.0', 's3cmd')
$ pip install setuptools==66.1.1
六月十八日 等待变化等待机会
《喜迁莺--五月天》 五月天, 梅子甜。 昼长夜渐短。 乍晴乍雨连不完, 湿热苦难堪。 麦子黄, 收割忙。 机器不用人帮。 往昔夏收齐下乡, 人和天争粮。这是老爸的四句帖子
深思高举洁白清忠, 汨罗江上万古悲风。 龙舟竞渡颂扬端午, 纪念屈原爱国忠贞。
六月十九日 等待变化等待机会
《喜迁莺--走步道》 走步道,不骑车。 路上被蜂蛰。 路过禅寺不拜佛。 汗透青衫薄。 触天怒,惹人怨。 美帝嚣张好战。 中华气定若等闲。 盛世享天年。
六月二十日 等待变化等待机会
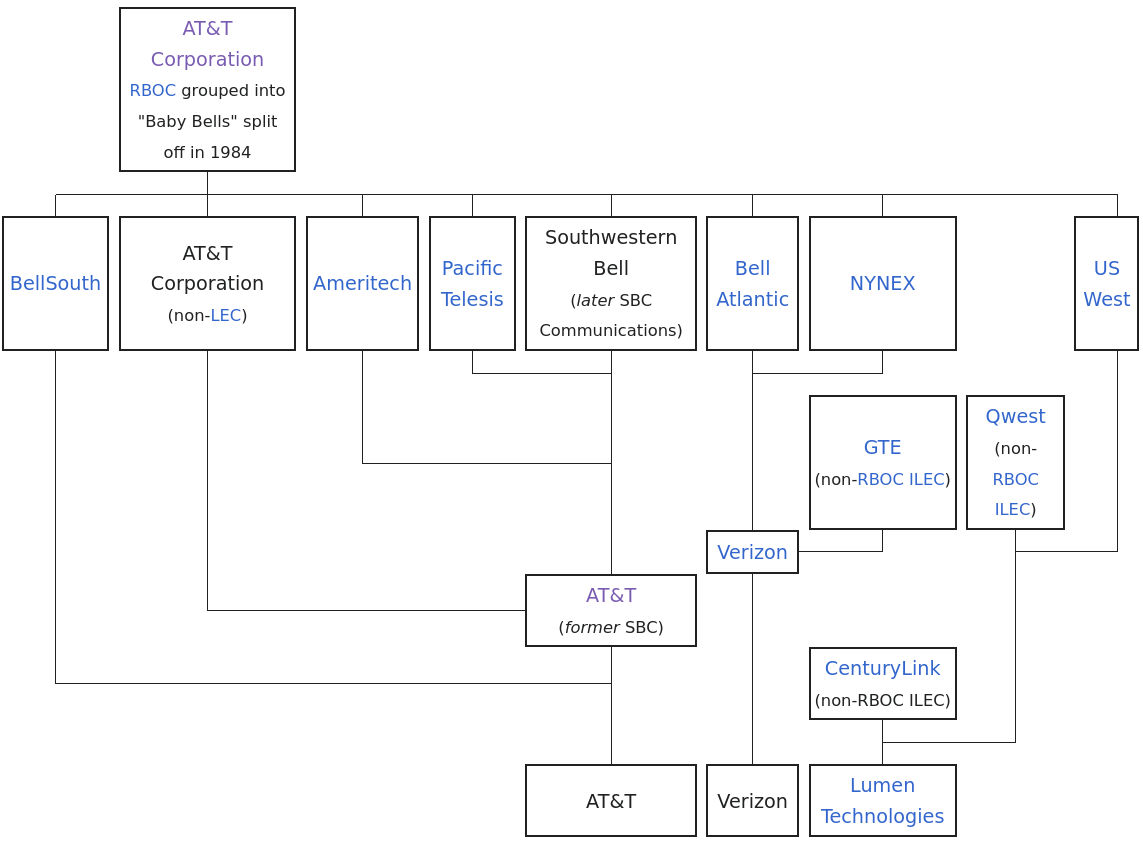
On January 1, 1984, these companies were NYNEX, Pacific Telesis, Ameritech, Bell Atlantic, Southwestern Bell Corporation, BellSouth, and US West.
- NYNEX, merged with Bell Atlantic in 1996, now part of Verizon Communications
- Pacific Telesis, acquired by SBC in 1997, now part of AT&T Inc.
- Ameritech, acquired by SBC in 1999, now part of AT&T Inc.
- Bell Atlantic, merged with GTE in 2000 to form Verizon Communications
- Southwestern Bell Corporation, rebranded as SBC Communications in 1995, acquired AT&T Corporation in 2005
- BellSouth, acquired by AT&T Inc. in 2006
- US West, acquired by Qwest in 2000, which in turn was acquired by CenturyLink in 2011
六月二十一日 等待变化等待机会
$ firefox wiki/A/C++2FCLR
$ firefox wiki/A/C%2B%2B%252FCLR
六月二十三日 等待变化等待机会
$ cmake -S ./llvm/ -B build -DLLVM_INSTALL_UTILS=ON -DCMAKE_BUILD_TYPE=Release -DCMAKE_INSTALL_PREFIX=~/workspace/install -DLLVM_ENABLE_PROJECTS="clang;llvm" -DLLVM_PARALLEL_LINK_JOBS=4
六月二十五日 等待变化等待机会
#!/bin/sh
build_llvm=`pwd`/build-llvm
build_clang=`pwd`/build-clang
installprefix=`pwd`/install
llvm=`pwd`/../llvm-project
mkdir -p $build_llvm
mkdir -p $installprefix
cmake -G Ninja -S $llvm/llvm -B $build_llvm \
-DLLVM_INSTALL_UTILS=ON \
-DCMAKE_INSTALL_PREFIX=$installprefix \
-DCMAKE_BUILD_TYPE=Release \
-DLLVM_INSTALL_GTEST=ON
ninja -C $build_llvm install
cmake -G Ninja -S $llvm/clang -B $build_clang \
-DLLVM_EXTERNAL_LIT=$build_llvm/utils/lit \
-DLLVM_ROOT=$installprefix \
-DCMAKE_INSTALL_PREFIX=$installprefix
ninja -C $build_clang install
$ ffmpeg -i ChinaTalk_00000.mp4 -ss 00:00:00 -to 00:31:50 -c copy ChinaTalk.mp4
$ ffmpeg -i ChinaTalk.mp4 -c:v libx264 -pix_fmt yuv420p ChinaTalk-new.mp4
六月二十六日 等待变化等待机会
$ ./clang -ccc-print-phases /tmp/error.cpp
+- 0: input, "/tmp/error.cpp", c++
+- 1: preprocessor, {0}, c++-cpp-output
+- 2: compiler, {1}, ir
+- 3: backend, {2}, assembler
+- 4: assembler, {3}, object
5: linker, {4}, image
$ clang -std=c++17 -lstdc++ helloworld.cpp -o helloworld
六月二十八日 等待变化等待机会
$ cmake -S ./llvm/ -B build -DLLVM_INSTALL_UTILS=ON -DCMAKE_BUILD_TYPE=Release -DCMAKE_INSTALL_PREFIX=~/workspace/llvm-project/install -DLLVM_ENABLE_PROJECTS="clang;clang-tools-extra;cross-project-tests" -DLLVM_ENABLE_RUNTIMES="all" -DLLVM_INCLUDE_TOOLS=ON -DLLVM_INSTALL_UTILS=ON -DLLVM_LINK_LLVM_DYLIB=ON -DLLVM_STATIC_LINK_CXX_STDLIB=ON -DLLVM_TARGETS_TO_BUILD="X86" -DCLANG_INCLUDE_TESTS=ON -DLLVM_INCLUDE_TESTS=ON -DBUILD_SHARED_LIBS=OFF -DLLVM_BUILD_DOCS=ON -G "Ninja" -DLLVM_BUILD_EXAMPLES=ON -DLLVM_BUILD_LLVM_DYLIB=ON -DLLVM_BUILD_TESTS=ON -DLLVM_BUILD_TOOLS=ON
$ bin/clang++ -c /home/nick/workspace/llvm-project/clang/unittests/AST/CommentParser.cpp -DBUILD_EXAMPLES -DGTEST_HAS_RTTI=0 -D_GNU_SOURCE -D__STDC_CONSTANT_MACROS -D__STDC_FORMAT_MACROS -D__STDC_LIMIT_MACROS -fPIC -fno-semantic-interposition -fvisibility-inlines-hidden -Werror=date-time -Wall -Wextra -Wno-unused-parameter -Wwrite-strings -Wcast-qual -Wno-missing-field-initializers -pedantic -Wno-long-long -Wimplicit-fallthrough -Wno-uninitialized -Wno-nonnull -Wno-redundant-move -Wno-pessimizing-move -Wno-noexcept-type -Wdelete-non-virtual-dtor -Wsuggest-override -Wno-comment -Wno-misleading-indentation -Wctad-maybe-unsupported -fdiagnostics-color -ffunction-sections -fdata-sections -fno-common -Woverloaded-virtual -fno-strict-aliasing -O3 -DNDEBUG -Wno-variadic-macros -fno-exceptions -funwind-tables -fno-rtti -Wno-suggest-override -std=c++17 -I/home/nick/workspace/llvm-project/build/tools/clang/unittests/AST -I/home/nick/workspace/llvm-project/clang/unittests/AST -I/home/nick/workspace/llvm-project/clang/include -I/home/nick/workspace/llvm-project/build/tools/clang/include -I/home/nick/workspace/llvm-project/build/include -I/home/nick/workspace/llvm-project/llvm/include -I/home/nick/workspace/llvm-project/third-party/unittest/googletest/include -I/home/nick/workspace/llvm-project/third-party/unittest/googlemock/include -o /tmp/CommentParser.cpp.o
$ bin/clang++ /tmp/CommentParser.cpp.o lib/libllvm_gtest_main.a lib/libllvm_gtest.a lib/libclangTesting.a lib/libLLVMTestingAnnotations.a lib/libLLVMTestingSupport.a lib/libclang-cpp.so.18.1 lib/libllvm_gtest.a lib/libLLVM.so.18.1 lib/libLLVM.so lib/libLLVMTestingAnnotations.a lib/libLLVMTestingSupport.a lib/libclang-cpp.so lib/libclangTesting.a lib/libllvm_gtest.a lib/libllvm_gtest_main.a lib/libclang-cpp.so lib/libLLVM.so -fPIC -fno-semantic-interposition -fvisibility-inlines-hidden -Werror=date-time -Wall -Wextra -Wno-unused-parameter -Wwrite-strings -Wcast-qual -Wno-missing-field-initializers -pedantic -Wno-long-long -Wimplicit-fallthrough -Wno-uninitialized -Wno-nonnull -Wno-class-memaccess -Wno-redundant-move -Wno-pessimizing-move -Wno-noexcept-type -Wdelete-non-virtual-dtor -Wsuggest-override -Wno-comment -Wno-misleading-indentation -Wctad-maybe-unsupported -fdiagnostics-color -ffunction-sections -fdata-sections -fno-common -Woverloaded-virtual -fno-strict-aliasing -O3 -DNDEBUG -static-libstdc++ -Wl,--gc-sections -Wl,-rpath,/home/nick/workspace/llvm-project/build/lib lib/libllvm_gtest_main.a lib/libllvm_gtest.a lib/libclangTesting.a lib/libLLVMTestingAnnotations.a lib/libLLVMTestingSupport.a lib/libclang-cpp.so.18.1 lib/libllvm_gtest.a lib/libLLVM.so.18.1 -lpthread -o /tmp/CommentParser.exe
六月二十九日 等待变化等待机会
$ cmake -S ./llvm/ -B build -DLLVM_INSTALL_UTILS=ON -DCMAKE_BUILD_TYPE=Release -DCMAKE_INSTALL_PREFIX=~/workspace/llvm-project/install-new -DLLVM_ENABLE_PROJECTS="clang;clang-tools-extra;cross-project-tests;openmp;compiler-rt;lld" -DLLVM_ENABLE_RUNTIMES="all" -DLLVM_INCLUDE_TOOLS=ON -DLLVM_INSTALL_UTILS=ON -DLLVM_LINK_LLVM_DYLIB=ON -DLLVM_STATIC_LINK_CXX_STDLIB=ON -DLLVM_TARGETS_TO_BUILD="X86" -DCLANG_INCLUDE_TESTS=ON -DLLVM_INCLUDE_TESTS=ON -DBUILD_SHARED_LIBS=OFF -DLLVM_BUILD_DOCS=ON -G "Ninja" -DLLVM_BUILD_EXAMPLES=ON -DLLVM_BUILD_LLVM_DYLIB=ON -DLLVM_BUILD_TESTS=ON -DLLVM_BUILD_TOOLS=ON -DLLVM_INSTALL_GTEST=ON -DCMAKE_C_COMPILER=/home/nick/workspace/llvm-project/install/bin/clang-18 -DCMAKE_BUILD_WITH_INSTALL_RPATH=ON
Normally CMake uses the build tree for the RPATH when building executables etc on systems that use RPATH. When the software is installed the executables etc are relinked by CMake to have the install RPATH. If this variable is set to true then the software is always built with the install path for the RPATH and does not need to be relinked when installed.这一段话我读的不是很懂,为什么不是默认使用install path作为RPATH呢?
In computing, rpath designates the run-time search path hard-coded in an executable file or library. Dynamic linking loaders use the rpath to find required libraries.概念就是可执行文件的搜索路径不再依赖系统的设置的,是否高于LD_LIBRARY_PATH呢?看起来不是一定的,相当的复杂,甚至于和是否是setuid/setgid有关,这里的深奥安全考量我也懒得去想了,总之,目前应该说大部分的可执行程序至少在ubuntu里是都有设置setuid的吧,否则sudo没法用怎么办呢?要su吗?
$ getconf ARG_MAX
2097152
$ ulimit -s
8192
这个问题连xargs也无法解决,因为问题出在ls吧? 终于找到了一个解决办法,尽管我并不是很理解,但是xargs是关键。 首先,我们要明白xargs能解决问题的源头which tells you the maximum number of bytes a command line can have after being expanded by the shell.
In Linux < 2.6.23, the limit is usually 128 KB.
In Linux >= 2.6.25, the limit is either 128 KB, or 1/4 of your stack size (see
ulimit -s), whichever is larger.
$ xargs --show-limits
Your environment variables take up 3488 bytes
POSIX upper limit on argument length (this system): 6285920
POSIX smallest allowable upper limit on argument length (all systems): 4096
Maximum length of command we could actually use: 6282432
Size of command buffer we are actually using: 131072
Maximum parallelism (--max-procs must be no greater): 2147483647
$ find wiki/I/ -name *.svg | xargs ls -l | wc -l
351932
$ find . -type f -print0 | xargs -0 ls | wc -l
11988634
七月一日 等待变化等待机会
-rpath dir- Add a directory to the runtime library search path. This is used when linking an ELF executable with shared objects. All
-rpatharguments are concatenated and passed to the runtime linker, which uses them to locate shared objects at runtime. The-rpathoption is also used when locating shared objects which are needed by shared objects explicitly included in the link; see the description of the-rpath-linkoption. If-rpathis not used when linking an ELF executable, the contents of the environment variableLD_RUN_PATHwill be used if it is defined. The-rpathoption may also be used on SunOS. By default, on SunOS, the linker will form a runtime search patch out of all the-Loptions it is given. If a-rpathoption is used, the runtime search path will be formed exclusively using the-rpathoptions, ignoring the-Loptions. This can be useful when using gcc, which adds many-Loptions which may be on NFS mounted filesystems. For compatibility with other ELF linkers, if the-Roption is followed by a directory name, rather than a file name, it is treated as the-rpathoption.-rpath-link DIR- When using ELF or SunOS, one shared library may require another. This happens when an
ld -sharedlink includes a shared library as one of the input files. When the linker encounters such a dependency when doing a non-shared, non-relocateable link, it will automatically try to locate the required shared library and include it in the link, if it is not included explicitly. In such a case, the-rpath-linkoption specifies the first set of directories to search. The-rpath-linkoption may specify a sequence of directory names either by specifying a list of names separated by colons, or by appearing multiple times. The linker uses the following search paths to locate required shared libraries.If the required shared library is not found, the linker will issue a warning and continue with the link.
- Any directories specified by
-rpath-linkoptions.- Any directories specified by
-rpathoptions. The difference between-rpathand-rpath-linkis that directories specified by-rpathoptions are included in the executable and used at runtime, whereas the-rpath-linkoption is only effective at link time.- On an ELF system, if the
-rpathandrpath-linkoptions were not used, search the contents of the environment variableLD_RUN_PATH.- On SunOS, if the
-rpathoption was not used, search any directories specified using-Loptions.- For a native linker, the contents of the environment variable
LD_LIBRARY_PATH.- The default directories, normally `/lib' and `/usr/lib'.
$ g++ -ggdb -O0 /home/nick/workspace/llvm-project/clang/tools/clang-check/ClangCheck.cpp -I/home/nick/workspace/llvm-project/build/tools/clang/tools/clang-check -I/home/nick/workspace/llvm-project/clang/tools/clang-check -I/home/nick/workspace/llvm-project/clang/include -I/home/nick/workspace/llvm-project/build/tools/clang/include -I/home/nick/workspace/llvm-project/build/include -I/home/nick/workspace/llvm-project/llvm/include -DBUILD_EXAMPLES -DGTEST_HAS_RTTI=0 -D_GNU_SOURCE -D__STDC_CONSTANT_MACROS -D__STDC_FORMAT_MACROS -D__STDC_LIMIT_MACROS -fPIC -fno-semantic-interposition -fvisibility-inlines-hidden -Werror=date-time -fno-lifetime-dse -Wall -Wextra -Wno-unused-parameter -Wwrite-strings -Wcast-qual -Wno-missing-field-initializers -pedantic -Wno-long-long -Wimplicit-fallthrough -Wno-uninitialized -Wno-nonnull -Wno-class-memaccess -Wno-redundant-move -Wno-pessimizing-move -Wno-noexcept-type -Wdelete-non-virtual-dtor -Wsuggest-override -Wno-comment -Wno-misleading-indentation -Wctad-maybe-unsupported -fdiagnostics-color -ffunction-sections -fdata-sections -fno-common -Woverloaded-virtual -fno-strict-aliasing -O2 -g -DNDEBUG -fno-exceptions -funwind-tables -fno-rtti -std=c++17 -static-libstdc++ -Wl,-rpath,/home/nick/workspace/llvm-project/build/./lib lib/libclang-cpp.so.18.1 -Wl,-rpath,/home/nick/workspace/llvm-project/build/./lib lib/libLLVM.so.18.1 -o ClangCheck.exe
七月二日 等待变化等待机会
《游泳池归来偶得》 青山本无心, 绿水亦无情。 待到云开日, 无雨便是晴。
七月三日 等待变化等待机会
cmake -S ./llvm/ -B build -DLLVM_INSTALL_UTILS=ON -DCMAKE_BUILD_TYPE=RelWithDebInfo -DCMAKE_INSTALL_PREFIX=~/workspace/llvm-project/install -DLLVM_ENABLE_PROJECTS="clang;clang-tools-extra;cross-project-tests;openmp;compiler-rt;lld" -DLLVM_ENABLE_RUNTIMES="all" -DLLVM_INCLUDE_TOOLS=ON -DLLVM_INSTALL_UTILS=ON -DLLVM_LINK_LLVM_DYLIB=ON -DLLVM_STATIC_LINK_CXX_STDLIB=ON -DLLVM_TARGETS_TO_BUILD="X86" -DCLANG_INCLUDE_TESTS=ON -DLLVM_INCLUDE_TESTS=ON -DBUILD_SHARED_LIBS=OFF -DLLVM_BUILD_DOCS=ON -G "Ninja" -DLLVM_BUILD_EXAMPLES=ON -DLLVM_BUILD_LLVM_DYLIB=ON -DLLVM_BUILD_TESTS=ON -DLLVM_BUILD_TOOLS=ON -DLLVM_INSTALL_GTEST=ON -DCMAKE_BUILD_WITH_INSTALL_RPATH=ON
g++ /home/nick/workspace/llvm-project/clang-tools-extra/pseudo/unittests/TokenTestCopy.cpp -DBUILD_EXAMPLES -DGTEST_HAS_RTTI=0 -D_GNU_SOURCE -D__STDC_CONSTANT_MACROS -D__STDC_FORMAT_MACROS -D__STDC_LIMIT_MACROS -fPIC -fno-semantic-interposition -fvisibility-inlines-hidden -Werror=date-time -fno-lifetime-dse -Wall -Wextra -Wno-unused-parameter -Wwrite-strings -Wcast-qual -Wno-missing-field-initializers -pedantic -Wno-long-long -Wimplicit-fallthrough -Wno-uninitialized -Wno-nonnull -Wno-class-memaccess -Wno-redundant-move -Wno-pessimizing-move -Wno-noexcept-type -Wdelete-non-virtual-dtor -Wsuggest-override -Wno-comment -Wno-misleading-indentation -Wctad-maybe-unsupported -fdiagnostics-color -ffunction-sections -fdata-sections -fno-common -Woverloaded-virtual -fno-strict-aliasing -O0 -g -DNDEBUG -Wno-variadic-macros -fno-exceptions -funwind-tables -fno-rtti -Wno-suggest-override -std=c++17 -I/home/nick/workspace/llvm-project/build/tools/clang/tools/extra/pseudo/unittests -I/home/nick/workspace/llvm-project/clang-tools-extra/pseudo/unittests -I/home/nick/workspace/llvm-project/clang/include -I/home/nick/workspace/llvm-project/build/tools/clang/include -I/home/nick/workspace/llvm-project/build/include -I/home/nick/workspace/llvm-project/llvm/include -I/home/nick/workspace/llvm-project/clang-tools-extra/pseudo/include -I/home/nick/workspace/llvm-project/build/tools/clang/tools/extra/pseudo/include -I/home/nick/workspace/llvm-project/third-party/unittest/googletest/include -I/home/nick/workspace/llvm-project/third-party/unittest/googlemock/include -I/home/nick/workspace/llvm-project/clang-tools-extra/pseudo/lib/../include -static-libstdc++ lib/libclang-cpp.so.18.1 lib/libclangPseudo.a lib/libclangPseudoCXX.a lib/libclangPseudoGrammar.a lib/libLLVMTestingAnnotations.a lib/libLLVMTestingSupport.a lib/libclangLex.a lib/libclangPseudoGrammar.a lib/libclangBasic.a lib/libLLVM.so.18.1 -lpthread -o TokenTestCopy.exe
g++ -ggdb -O0 /home/nick/workspace/llvm-project/clang/tools/clang-check/ClangCheck.cpp -I/home/nick/workspace/llvm-project/build/tools/clang/tools/clang-check -I/home/nick/workspace/llvm-project/clang/tools/clang-check -I/home/nick/workspace/llvm-project/clang/include -I/home/nick/workspace/llvm-project/build/tools/clang/include -I/home/nick/workspace/llvm-project/build/include -I/home/nick/workspace/llvm-project/llvm/include -DBUILD_EXAMPLES -DGTEST_HAS_RTTI=0 -D_GNU_SOURCE -D__STDC_CONSTANT_MACROS -D__STDC_FORMAT_MACROS -D__STDC_LIMIT_MACROS -fPIC -fno-semantic-interposition -fvisibility-inlines-hidden -Werror=date-time -fno-lifetime-dse -Wall -Wextra -Wno-unused-parameter -Wwrite-strings -Wcast-qual -Wno-missing-field-initializers -pedantic -Wno-long-long -Wimplicit-fallthrough -Wno-uninitialized -Wno-nonnull -Wno-class-memaccess -Wno-redundant-move -Wno-pessimizing-move -Wno-noexcept-type -Wdelete-non-virtual-dtor -Wsuggest-override -Wno-comment -Wno-misleading-indentation -Wctad-maybe-unsupported -fdiagnostics-color -ffunction-sections -fdata-sections -fno-common -Woverloaded-virtual -fno-strict-aliasing -O2 -g -DNDEBUG -fno-exceptions -funwind-tables -fno-rtti -std=c++17 -static-libstdc++ -Wl,-rpath,/home/nick/workspace/llvm-project/build/./lib lib/libclang-cpp.so.18.1 -Wl,-rpath,/home/nick/workspace/llvm-project/build/./lib lib/libLLVM.so.18.1 -o ClangCheck.exe
所以,一定要加上这个开关-DLLVM_PARALLEL_LINK_JOBS=1,而鉴于我的cpu只有所谓的32,这个我是深表怀疑的,那么我使用-DLLVM_PARALLEL_COMPILE_JOBS=16吧?- LLVM_PARALLEL_{COMPILE,LINK}_JOBS:STRING
Building the llvm toolchain can use a lot of resources, particularly linking. These options, when you use the Ninja generator, allow you to restrict the parallelism. For example, to avoid OOMs or going into swap, permit only one link job per 15GB of RAM available on a 32GB machine, specify
-GNinja -DLLVM_PARALLEL_LINK_JOBS=2.
$ cmake -S ./llvm/ -B build -DLLVM_INSTALL_UTILS=ON -DCMAKE_BUILD_TYPE=Debug -DCMAKE_INSTALL_PREFIX=~/workspace/llvm-project/install -DLLVM_ENABLE_PROJECTS="clang;clang-tools-extra;cross-project-tests;openmp;compiler-rt;lld" -DLLVM_ENABLE_RUNTIMES="all" -DLLVM_INCLUDE_TOOLS=ON -DLLVM_INSTALL_UTILS=ON -DLLVM_LINK_LLVM_DYLIB=ON -DLLVM_STATIC_LINK_CXX_STDLIB=ON -DLLVM_TARGETS_TO_BUILD="X86" -DCLANG_INCLUDE_TESTS=ON -DLLVM_INCLUDE_TESTS=ON -DBUILD_SHARED_LIBS=OFF -DLLVM_BUILD_DOCS=ON -G "Ninja" -DLLVM_BUILD_EXAMPLES=ON -DLLVM_BUILD_LLVM_DYLIB=ON -DLLVM_BUILD_TESTS=ON -DLLVM_BUILD_TOOLS=ON -DLLVM_INSTALL_GTEST=ON -DLLVM_PARALLEL_LINK_JOBS=1 -DLLVM_PARALLEL_COMPILE_JOBS=16 -DLLVM_USE_LINKER=lld
七月五日 等待变化等待机会
struct Foo {
Foo() = default;
};
$29 = (const clang::syntax::TokenBuffer &) @0x7fffffffcde0: {ExpandedTokens = std::vector of length 12, capacity 16 = {{Location = {ID = 2}, Length = 6,
Kind = clang::tok::kw_struct}, {Location = {ID = 9}, Length = 3, Kind = clang::tok::identifier}, {Location = {ID = 13}, Length = 1,
Kind = clang::tok::l_brace}, {Location = {ID = 15}, Length = 3, Kind = clang::tok::identifier}, {Location = {ID = 18}, Length = 1,
Kind = clang::tok::l_paren}, {Location = {ID = 19}, Length = 1, Kind = clang::tok::r_paren}, {Location = {ID = 21}, Length = 1,
Kind = clang::tok::equal}, {Location = {ID = 23}, Length = 7, Kind = clang::tok::kw_default}, {Location = {ID = 30}, Length = 1,
Kind = clang::tok::semi}, {Location = {ID = 32}, Length = 1, Kind = clang::tok::r_brace}, {Location = {ID = 33}, Length = 1,
Kind = clang::tok::semi}, {Location = {ID = 34}, Length = 0, Kind = clang::tok::eof}},
七月六日 等待变化等待机会
auto ExpectedParser = CommonOptionsParser::create(argc, argv, MyToolCategory);
if (!ExpectedParser) {
// Fail gracefully for unsupported options.
llvm::errs() << ExpectedParser.takeError();
return 1;
}
llvm::errs() << toString(ExpectedParser.takeError());
$ ffmpeg -i SVID_20240707_100442_1.mp4 -filter:v "crop=800:480:220:60" /tmp/cropped.mp4
$ find I -type f -maxdepth 1 -print0 | xargs -0 -n 1 bash -c 's3cmd put $0 -M --progress -v --rr --acl-public --skip-existing s3://www.staroceans.org/wiki/$0'
七月八日 等待变化等待机会
is:open is:issue label:"good first issue" 的搜索词等着你去实践。
$ git remote set-url origin https://github.com/nickhuang99/llvm-project.git
七月九日 等待变化等待机会
《夜听老歌不能入眠恍惚间》 遥想登山巅, 只手擎苍天。 梦醒揉双眼, 惆怅更无边。
光明 - 谭艳 词:汪峰 曲:汪峰 当灰烬查封了凝霜的屋檐 当车菊草化作深秋的露水 我用固执的枯藤做成行囊 走向了那布满荆棘的他乡 当大地铺满了悲泣的落叶 当杜鹃花化作远空的雾霭 祝福我吧我最思念的亲人 那就是我向你告别的身影 也许迷途的惆怅 会扯碎我的脚步 可我相信未来会 给我一双梦想的翅膀 虽然失败的苦痛 已让我遍体鳞伤 可我坚信光明就在远方 当灰烬查封了凝霜的屋檐 当车菊草化作深秋的露水 我用固执的枯藤做成行囊 走向了那布满荆棘的他乡 也许征程的迷惘 会扯碎我的手臂 可我相信未来会 给我一双梦想的翅膀 虽然挫折的创伤 已让我寸步难行 可我坚信光明就在远方 我用翅膀掀起那天边的排浪 我用身躯托起那血红的太阳 就在这刺骨而凛冽的大风中 你会听到我赞美未来的呼喊 也许迷途的惆怅 会扯碎我的脚步 可我相信未来会 给我一双梦想的翅膀 虽然失败的苦痛 已让我遍体鳞伤 可我坚信光明就在远方 也许征程的迷惘 会扯碎我的手臂 可我相信未来会 给我一双梦想的翅膀 虽然挫折的创伤 已让我寸步难行 可我坚信光明就在远方 坚信光明 就在远方
$ find . -type f -name '*.cpp' -print0 | xargs -0 cat | grep -vcE '^[[:space:]]*$'
七月十日 等待变化等待机会
/**
* Opaque reference to an error instance. Null serves as the 'success' value.
*/
typedef struct LLVMOpaqueError *LLVMErrorRef;
TranslationUnit Detached
`-SimpleDeclaration
|-'typedef'
|-'struct'
|-'LLVMOpaqueError'
|-DeclaratorList Declarators
| `-SimpleDeclarator ListElement
| |-'*'
| `-'LLVMErrorRef'
`-';'
simple-declaration:
decl-specifier-seq init-declarator-listopt ;
decl-specifier-seq:
decl-specifier attribute-specifier-seqopt
decl-specifier decl-specifier-seq
decl-specifier:
storage-class-specifier
defining-type-specifier
function-specifier
friend
typedef
constexpr
consteval
constinit
inline
class-specifier:
class-head { member-specificationopt }
class-head:
class-key attribute-specifier-seqopt class-head-name class-virt-specifieropt base-clauseopt
class-key attribute-specifier-seqopt base-clauseopt
init-declarator-list:
init-declarator
init-declarator-list , init-declarator
init-declarator:
declarator initializeropt
declarator requires-clause
declarator:
ptr-declarator
noptr-declarator parameters-and-qualifiers trailing-return-type
ptr-declarator:
noptr-declarator
ptr-operator ptr-declarator
rm -rf "reference"
mkdir "reference"
pushd "reference" > /dev/null; \
regex=".*index\\.php.*|.*/Special:.*|.*/Talk:.*" \
regex+="|.*/Help:.*|.*/File:.*|.*/Cppreference:.*" \
regex+="|.*/WhatLinksHere:.*|.*/Template:.*|.*/Category:.*" \
regex+="|.*action=.*|.*printable=.*|.*en.cppreference.com/book.*" ; \
echo $$regex ; \
wget --adjust-extension --page-requisites --convert-links \
--force-directories --recursive --level=15 \
--span-hosts --domains=en.cppreference.com,upload.cppreference.com \
--reject-regex $$regex \
--timeout=5 --tries=50 --no-verbose \
--retry-connrefused --waitretry=10 --read-timeout=20 \
http://en.cppreference.com/w/ ; \
popd > /dev/null
./export.py --url=http://en.cppreference.com/mwiki reference/cppreference-export-ns0,4,8,10.xml 0 4 8 10
七月十一日 等待变化等待机会
偷懒的,也许还有兼容性的设计,它会做一个转换的。
这些实在是太抽象了!我发现还是代码容易理解:
- a glvalue (“generalized” lvalue) is an expression whose evaluation determines the identity of an object or function;
- a prvalue (“pure” rvalue) is an expression whose evaluation
- computes the value of an operand of a built-in operator (such prvalue has no result object), or
- initializes an object (such prvalue is said to have a result object).
- The result object may be a variable, an object created by new-expression, a temporary created by temporary materialization, or a member thereof. Note that non-void discarded expressions have a result object (the materialized temporary). Also, every class and array prvalue has a result object except when it is the operand of
decltype;
void f( std::string&& x){
std::cout << __PRETTY_FUNCTION__ << "rvalue reference overload f(" << x << ")\n";
}
void f(std::string x){
std::cout << __PRETTY_FUNCTION__ << "no reference overload f(" << x << ")\n";
}
结论就是说:至少目前我想不出有什么办法能够让编译器选择rvalue reference的重载,就是说在它和pass by value并存的情况下。
Code Caller Argument Type Function Parameter Type Resulte std::string x("lvalue reference!"); f(x);lvalue reference pass by value wins void f(std::string)no reference overload f(lvalue reference!) std::string x("lvalue reference!"); std::string& y = x; f(y);explicitly using type lvalue reference y to call pass by value always wins void f(std::string)no reference overload f(lvalue reference!) std::string x("lvalue reference!"); std::string& y = x; std::string&& z = "rvalue reference"; f(z);explicitly using type rvalue reference z to call pass by value always wins void f(std::string)no reference overload f(rvalue reference) std::string x("lvalue reference!"); std::string& y = x; std::string&& z = "rvalue reference"; f(std::move("hello world temp")); // error f("hello world");// error f(std::move(x));// error f(std::move(y));// error f(std::move(z));// error
- pass by literal
- pass by rvalue reference of literal
- pass by rvalue rerence of lvalue reference or rvalue reference etc.
compiler considers they are ambiguous error: call to 'f' is ambiguous
七月十二日 等待变化等待机会
Names of rvalue reference variables are lvalues and have to be converted to xvalues to be bound to the function overloads that accept rvalue reference parameters, which is why move constructors and move assignment operators typically use std::move:这一套机制是所谓的overload resolution,这个似乎在语法里无法定义的,是实现层面的一个细节吧?
这是一个及其复杂的过程,可以说是c++重载机制的精华所在,更不要说模板实例化的种种关节技巧都来自于此。可以说一个普通人学习一辈子也未必真的精通。其中单单这个Template Argument Deduction几乎就可以耗费半生来学习所谓的元编程。这里的这个例子简直就是一个让人抓狂的,而使用c++ insights可以非常的完美的解释一切:
- Building the set of candidate functions.
- Trimming the set to only viable functions.
- Analyzing the set to determine the single best viable function (this may involve ranking of implicit conversion sequences).
int f1(int);
int f2(float);
struct A {
using fp1 = int (*)(int);
inline operator fp1 () {
return f1;
}
using fp2 = int (*)(float);
inline operator fp2 () {
return f2;
}
// inline constexpr A() noexcept = default;
};
struct A a;
int i = a.operator A::fp1()(1);
void f( std::string&& x){
std::cout << __PRETTY_FUNCTION__ << "rvalue reference overload f(" << x << ")\n";
}
void f(std::string& x){
std::cout << __PRETTY_FUNCTION__ << "lvalue reference overload f(" << x << ")\n";
}
std::string x("lvalue reference!");
std::string& y = x;
std::string&& z = "rvalue reference";
Code Caller Argument Type Function Parameter Type Resulte f(x); f(y); f(z);x,y,z are passed as value, lvalue, rvalue reference compiler always picks up lvalue reference overload void f(std::string &)lvalue reference overload f(lvalue reference!) void f(std::string &)lvalue reference overload f(lvalue reference!) void f(std::string &)lvalue reference overload f(rvalue reference)f(std::move(x)); f(std::move(y)); f(std::move(z));all x,y,z are using std::move to pass as rvalue reference compiler will match the argument type to pick up rvalue reference overload void f(std::string &&)rvalue reference overload f(lvalue reference!) void f(std::string &&)rvalue reference overload f(lvalue reference!) void f(std::string &&)rvalue reference overload f(rvalue reference)
void f(const std::string &)const lvalue reference overload f(lvalue reference!)
void f(const std::string &)const lvalue reference overload f(lvalue reference!)
void f(const std::string &)const lvalue reference overload f(rvalue reference!)
f(std::move(x));
f(std::move(y));
f(std::move(z));
void f(std::string &&)rvalue reference overload f(lvalue reference!)
void f(std::string &&)rvalue reference overload f(lvalue reference!)
void f(std::string &&)rvalue reference overload f(rvalue reference!)
f(CopyValue(x));
f(CopyReference(x));
f(CopyRvalueReference(x));
保守的reference。
void f(std::string &&)rvalue reference overload f(lvalue reference!)
void f(const std::string &)const lvalue reference overload f(lvalue reference!)
void f(std::string &&)rvalue reference overload f(lvalue reference!)
f(CopyValue(y));
f(CopyReference(y));
f(CopyRvalueReference(y));
f(CopyValue(z));
f(CopyReference(z));
f(CopyRvalueReference(z));
void f(std::string &&)rvalue reference overload f(rvalue reference!)
void f(const std::string &)const lvalue reference overload f(rvalue reference!)
void f(std::string &&)rvalue reference overload f(rvalue reference!)
const std::string& c = "const reference";
f(CopyValue(c));
f(CopyReference(c));
f(CopyRvalueReference(c));
f(c);
f(std::move(c));
void f(const std::string &)const lvalue reference overload f(const reference)
void f(const std::string &)const lvalue reference overload f(const reference)
void f(const std::string &)const lvalue reference overload f(const reference)
void f(const std::string &)const lvalue reference overload f(const reference)
void f(const std::string &)const lvalue reference overload f(const reference)
void f(std::string&& x){
std::cout << __PRETTY_FUNCTION__ << "rvalue reference overload f(" << x << ")\n";
}
void f(std::string x){
std::cout << __PRETTY_FUNCTION__ << "value overload f(" << x << ")\n";
}
std::string x("lvalue reference!");
std::string& y = x;
std::string&& z = "rvalue reference!";
const std::string& c = "const reference";
//f(std::move("hello world temp"));
//f("hello world");
f(x);
f(y);
f(z);
f(c);
//f(std::move(x));
//f(std::move(y));
//f(std::move(z));
f(std::move(c));
//f(CopyValue(x));
//f(CopyReference(x));
//f(CopyRvalueReference(x));
//f(CopyValue(y));
f(CopyReference(y));
//f(CopyRvalueReference(y));
f(CopyValue(c));
f(CopyReference(c));
f(CopyRvalueReference(c));
void f(std::string)value overload f(lvalue reference!)
void f(std::string)value overload f(lvalue reference!)
void f(std::string)value overload f(rvalue reference!)
void f(std::string)value overload f(const reference)
void f(std::string)value overload f(const reference)
void f(std::string)value overload f(lvalue reference!)
void f(std::string)value overload f(const reference)
void f(std::string)value overload f(const reference)
void f(std::string)value overload f(const reference)
void f(std::string&& x){
std::cout << __PRETTY_FUNCTION__ << "rvalue reference overload f(" << x << ")\n";
}
std::string x("lvalue reference!");
std::string& y = x;
std::string&& z = "rvalue reference!";
const std::string& c = "const reference";
f(std::move("hello world temp"));
f("hello world");
//f(x);
//f(y);
//f(z);
//f(c);
f(std::move(x));
f(std::move(y));
f(std::move(z));
//f(std::move(c));
f(CopyValue(x));
//f(CopyReference(x));
f(CopyRvalueReference(x));
f(CopyValue(y));
//f(CopyReference(y));
f(CopyRvalueReference(y));
//f(CopyValue(c));
//f(CopyReference(c));
//f(CopyRvalueReference(c));
有名有姓的变量,我们必须使用std::move,这个就是作者所说的使用者必须被迫强制使用这个,我们就有可能在这个参数的拷贝里做优化实现。
void f(std::string x){
std::cout << __PRETTY_FUNCTION__ << "value overload f(" << x << ")\n";
}
std::string x("lvalue reference!");
std::string& y = x;
std::string&& z = "rvalue reference!";
const std::string& c = "const reference";
f(std::move("hello world temp"));
f("hello world");
f(x);
f(y);
f(z);
f(c);
f(std::move(x));
f(std::move(y));
f(std::move(z));
f(std::move(c));
f(CopyValue(x));
f(CopyReference(x));
f(CopyRvalueReference(x));
f(CopyValue(y));
f(CopyReference(y));
f(CopyRvalueReference(y));
f(CopyValue(c));
f(CopyReference(c));
f(CopyRvalueReference(c));
七月十四日 等待变化等待机会
$ sudo qemu-system-x86_64 -drive file=/dev/sdb,format=raw -m 4G
setup the following values: /etc/ssh/sshd_config
X11Forwarding yes X11DisplayOffset 10 X11UseLocalhost yes
export XAUTHORITY=$HOME/.Xauthority
$ sudo grub-install --target=x86_64-efi --efi-directory=EFI --no-floppy --efi-directory=EFI /dev/sdb
Installing for x86_64-efi platform.
grub-install: warning: EFI variables cannot be set on this system.
grub-install: warning: You will have to complete the GRUB setup manually.
Installation finished. No error reported.
¥ $ sudo grub-install --target=x86_64-efi --efi-directory=EFI --no-floppy --efi-directory=EFI --removable --boot-directory=Linux/boot
EFI
└── BOOT
├── BOOTX64.CSV
├── BOOTX64.EFI
├── grub.cfg
├── grubx64.efi
└── mmx64.efi
nick@nickZen:~/Downloads/ISO/EFI$ cat EFI/BOOT/grub.cfg
search.fs_uuid d5c1a5d5-fc17-4022-ad5a-4cbc7f73ef8c root hd1,gpt1
set prefix=($root)'/boot/grub'
configfile $prefix/grub.cfg
七月十五日 等待变化等待机会
$ sudo qemu-system-x86_64 -drive file=/dev/sdc,format=raw -bios /usr/share/qemu/OVMF.fd -m 4G
$ sudo gdisk -l /dev/sdc
Number Start (sector) End (sector) Size Code Name
1 64 6427779 3.1 GiB 0700 ISO9660
2 6427780 6437919 5.0 MiB EF00 Appended2
3 6437920 6438519 300.0 KiB 0700 Gap1
4 6438912 60618751 25.8 GiB 8300
$ tree EFI/
EFI/
├── EFI
│ └── boot
│ ├── bootx64.efi
│ ├── grubx64.efi
│ └── mmx64.efi
└── NvVars
$ tree -L 2 Linux/
Linux/
├── boot
│ ├── grub
│ └── memtest86+x64.bin
├── boot.catalog
├── casper
│ ├── filesystem.manifest
│ ├── filesystem.manifest-remove
│ ├── filesystem.size
│ ├── filesystem.squashfs
│ ├── filesystem.squashfs.gpg
│ ├── initrd
│ └── vmlinuz
├── dists
│ ├── noble
│ ├── stable -> noble
│ └── unstable -> noble
├── EFI
│ └── boot
├── install
├── md5sum.txt
├── pool
│ ├── main
│ └── universe
├── preseed
│ └── lubuntu.seed
└── ubuntu -> .
$ sudo gdisk -l lubuntu-22.04.4-desktop-amd64.iso
GPT fdisk (gdisk) version 1.0.8
Partition table scan:
MBR: protective
BSD: not present
APM: not present
GPT: present
Found valid GPT with protective MBR; using GPT.
Disk lubuntu-22.04.4-desktop-amd64.iso: 5996404 sectors, 2.9 GiB
Sector size (logical): 512 bytes
Disk identifier (GUID): B898B0C3-ED82-4099-A75A-C2C1FA62C573
Partition table holds up to 248 entries
Main partition table begins at sector 2 and ends at sector 63
First usable sector is 64, last usable sector is 5996340
Partitions will be aligned on 4-sector boundaries
Total free space is 1 sectors (512 bytes)
Number Start (sector) End (sector) Size Code Name
1 64 5985671 2.9 GiB 0700 ISO9660
2 5985672 5995739 4.9 MiB EF00 Appended2
3 5995740 5996339 300.0 KiB 0700 Gap1
dd if=/dev/zero of=kylin.img bs=1M count 4200
$ sudo losetup -Pf --show kylin.img
$ sudo grub-install --target=x86_64-efi --boot-directory=Linux/boot --efi-directory=EFI /dev/loop18
$ sudo qemu-system-x86_64 -boot d -drive file=kylin.img,format=raw --bios /usr/share/qemu/OVMF.fd -m 6
unsquashfs filesystem.squashfs
七月二十一日 等待变化等待机会
$ cat /sys/firmware/efi/fw_platform_size
$ sudo gdisk -l archlinux-2024.07.01-x86_64.iso
[sudo] password for nick:
GPT fdisk (gdisk) version 1.0.8
Partition table scan:
MBR: MBR only
BSD: not present
APM: not present
GPT: present
Found valid MBR and GPT. Which do you want to use?
1 - MBR
2 - GPT
3 - Create blank GPT
Your answer:
Number Start (sector) End (sector) Size Code Name
2 1953792 2291711 165.0 MiB EF00 EFI system partition
Number Start (sector) End (sector) Size Code Name
1 64 1953791 954.0 MiB 0700 ISOHybrid
2 1953792 2291711 165.0 MiB 0700 ISOHybrid1
A 32-bit PC BIOS will search for boot code on an ISO 9660 CD-ROM. The standard allows for booting in two different modes. Either in hard disk emulation when the boot information can be accessed directly from the CD media, or in floppy emulation mode where the boot information is stored in an image file of a floppy disk, which is loaded from the CD and then behaves as a virtual floppy disk.那么GPT呢?只能看规范:原来我在mc里看到的就是这个top level。
也就是说这里32768B都是描述文字,可以直接无障碍读的。我需要关心的是这个
System area (32,768 B) Unused by ISO 9660 Data area Volume descriptor set Path tables, directories and files
检验一下
Volume descriptor (2,048 bytes) Part Type Identifier Version Data Size 1 byte 5 bytes (always 'CD001') 1 byte (always 0x01) 2,041 bytes
$ xxd -d -s 32768 -l 1 archlinux-2024.07.01-x86_64.iso
00032768: 01
所以,01代表了
Basic volume descriptor types Value Type 0 Boot record volume descriptor 1 Primary volume descriptor 2 Supplementary volume descriptor, or enhanced volume descriptor 3 Volume partition descriptor 255 Volume descriptor set terminator
Primary volume descriptor。它的用途是什么呢?
An ISO 9660 compliant disc must contain at least one primary volume descriptor describing the file system and a volume descriptor set terminator for indicating the end of the descriptor sequence. The volume descriptor set terminator is simply a particular type of volume descriptor with the purpose of marking the end of this set of structures. The primary volume descriptor provides information about the volume, characteristics and metadata, including a root directory record that indicates in which sector the root directory is located.
$ xxd -d -s 32775 -l 2041 archlinux-2024.07.01-x86_64.iso
00032775: 0020 2020 2020 2020 2020 2020 2020 2020 .
00032791: 2020 2020 2020 2020 2020 2020 2020 2020
00032807: 2041 5243 485f 3230 3234 3037 2020 2020 ARCH_202407
00032823: 2020 2020 2020 2020 2020 2020 2020 2020
00032839: 2000 0000 0000 0000 0010 be08 0000 08be ...............
00032855: 1000 0000 0000 0000 0000 0000 0000 0000 ................
00032871: 0000 0000 0000 0000 0000 0000 0000 0000 ................
00032887: 0001 0000 0101 0000 0100 0808 00ba 0000 ................
00032903: 0000 0000 ba36 0000 0000 0000 0000 0000 .....6..........
00032919: 3700 0000 0022 0023 0000 0000 0000 2300 7....".#......#.
00032935: 0800 0000 0008 007c 0701 1209 3500 0200 .......|....5...
00032951: 0001 0000 0101 0020 2020 2020 2020 2020 .......
00032967: 2020 2020 2020 2020 2020 2020 2020 2020
00032983: 2020 2020 2020 2020 2020 2020 2020 2020
00032999: 2020 2020 2020 2020 2020 2020 2020 2020
00033015: 2020 2020 2020 2020 2020 2020 2020 2020
00033031: 2020 2020 2020 2020 2020 2020 2020 2020
00033047: 2020 2020 2020 2020 2020 2020 2020 2020
00033063: 2020 2020 2020 2020 2020 2020 2020 2020
00033079: 2020 2020 2020 2041 5243 4820 4c49 4e55 ARCH LINU
00033095: 5820 3c48 5454 5053 3a2f 2f41 5243 484c X <HTTPS://ARCHL
00033111: 494e 5558 2e4f 5247 3e20 2020 2020 2020 INUX.ORG>
00033127: 2020 2020 2020 2020 2020 2020 2020 2020
00033143: 2020 2020 2020 2020 2020 2020 2020 2020
00033159: 2020 2020 2020 2020 2020 2020 2020 2020
00033175: 2020 2020 2020 2020 2020 2020 2020 2020
00033191: 2020 2020 2020 2020 2020 2020 2020 2020
00033207: 2020 2020 2020 2050 5245 5041 5245 4420 PREPARED
00033223: 4259 204d 4b41 5243 4849 534f 2020 2020 BY MKARCHISO
00033239: 2020 2020 2020 2020 2020 2020 2020 2020
00033255: 2020 2020 2020 2020 2020 2020 2020 2020
00033271: 2020 2020 2020 2020 2020 2020 2020 2020
00033287: 2020 2020 2020 2020 2020 2020 2020 2020
00033303: 2020 2020 2020 2020 2020 2020 2020 2020
00033319: 2020 2020 2020 2020 2020 2020 2020 2020
00033335: 2020 2020 2020 2041 5243 4820 4c49 4e55 ARCH LINU
00033351: 5820 4c49 5645 2f52 4553 4355 4520 4456 X LIVE/RESCUE DV
00033367: 4420 2020 2020 2020 2020 2020 2020 2020 D
00033383: 2020 2020 2020 2020 2020 2020 2020 2020
00033399: 2020 2020 2020 2020 2020 2020 2020 2020
00033415: 2020 2020 2020 2020 2020 2020 2020 2020
00033431: 2020 2020 2020 2020 2020 2020 2020 2020
00033447: 2020 2020 2020 2020 2020 2020 2020 2020
00033463: 2020 2020 2020 2020 2020 2020 2020 2020
00033479: 2020 2020 2020 2020 2020 2020 2020 2020
00033495: 2020 2020 2020 2020 2020 2020 2020 2020
00033511: 2020 2020 2020 2020 2020 2020 2020 2020
00033527: 2020 2020 2020 2020 2020 2020 2020 2020
00033543: 2020 2020 2020 2020 2020 2020 2020 2020
00033559: 2020 2020 2020 2020 2020 2020 2020 2020
00033575: 2020 2020 2020 3230 3234 3037 3031 3138 2024070118
00033591: 3039 3030 3030 0032 3032 3430 3730 3131 090000.202407011
00033607: 3830 3930 3030 3000 3030 3030 3030 3030 8090000.00000000
00033623: 3030 3030 3030 3030 0030 3030 3030 3030 00000000.0000000
00033639: 3030 3030 3030 3030 3000 0100 2020 2020 000000000...
00033655: 2020 2020 2020 2020 2020 2020 2020 2020
00033671: 2020 2020 2020 2020 2020 2020 2020 2020
00033687: 2020 2020 2020 2020 2020 2020 2020 2020
00033703: 2020 2020 2020 2020 2020 2020 2020 2020
00033719: 2020 2020 2020 2020 2020 2020 2020 2020
00033735: 2020 2020 2020 2020 2020 2020 2020 2020
00033751: 2020 2020 2020 2020 2020 2020 2020 2020
00033767: 2020 2020 2020 2020 2020 2020 2020 2020
00033783: 2020 2020 2020 2020 2020 2020 2020 2020
00033799: 2020 2020 2020 2020 2020 2020 2020 2020
00033815: 2020 2020 2020 2020 2020 2020 2020 2020
00033831: 2020 2020 2020 2020 2020 2020 2020 2020
00033847: 2020 2020 2020 2020 2020 2020 2020 2020
00033863: 2020 2020 2020 2020 2020 2020 2020 2020
00033879: 2020 2020 2020 2020 2020 2020 2020 2020
00033895: 2020 2020 2020 2020 2020 2020 2020 2020
00033911: 2020 2020 2020 2020 2020 2020 2020 2020
00033927: 2020 2020 2020 2020 2020 2020 2020 2020
00033943: 2020 2020 2020 2020 2020 2020 2020 2020
00033959: 2020 2020 2020 2020 2020 2020 2020 2020
00033975: 2020 2020 2020 2020 2020 2020 2020 2020
00033991: 2020 2020 2020 2020 2020 2020 2020 2020
00034007: 2020 2020 2020 2020 2020 2020 2020 2020
00034023: 2020 2020 2020 2020 2020 2020 2020 2020
00034039: 2020 2020 2020 2020 2020 2020 2020 2020
00034055: 2020 2020 2020 2020 2020 2020 2020 2020
00034071: 2020 2020 2020 2020 2020 2020 2020 2020
00034087: 2020 2020 2020 2020 2020 2020 2020 2020
00034103: 2020 2020 2020 2020 2020 2020 2020 2020
00034119: 2020 2020 2020 2020 2020 2020 2020 2020
00034135: 2020 2020 2020 2020 2020 2020 2020 2020
00034151: 2020 2020 2020 2020 2020 2020 0000 0000 ....
00034167: 0000 0000 0000 0000 0000 0000 0000 0000 ................
00034183: 0000 0000 0000 0000 0000 0000 0000 0000 ................
00034199: 0000 0000 0000 0000 0000 0000 0000 0000 ................
00034215: 0000 0000 0000 0000 0000 0000 0000 0000 ................
00034231: 0000 0000 0000 0000 0000 0000 0000 0000 ................
00034247: 0000 0000 0000 0000 0000 0000 0000 0000 ................
00034263: 0000 0000 0000 0000 0000 0000 0000 0000 ................
00034279: 0000 0000 0000 0000 0000 0000 0000 0000 ................
00034295: 0000 0000 0000 0000 0000 0000 0000 0000 ................
00034311: 0000 0000 0000 0000 0000 0000 0000 0000 ................
00034327: 0000 0000 0000 0000 0000 0000 0000 0000 ................
00034343: 0000 0000 0000 0000 0000 0000 0000 0000 ................
00034359: 0000 0000 0000 0000 0000 0000 0000 0000 ................
00034375: 0000 0000 0000 0000 0000 0000 0000 0000 ................
00034391: 0000 0000 0000 0000 0000 0000 0000 0000 ................
00034407: 0000 0000 0000 0000 0000 0000 0000 0000 ................
00034423: 0000 0000 0000 0000 0000 0000 0000 0000 ................
00034439: 0000 0000 0000 0000 0000 0000 0000 0000 ................
00034455: 0000 0000 0000 0000 0000 0000 0000 0000 ................
00034471: 0000 0000 0000 0000 0000 0000 0000 0000 ................
00034487: 0000 0000 0000 0000 0000 0000 0000 0000 ................
00034503: 0000 0000 0000 0000 0000 0000 0000 0000 ................
00034519: 0000 0000 0000 0000 0000 0000 0000 0000 ................
00034535: 0000 0000 0000 0000 0000 0000 0000 0000 ................
00034551: 0000 0000 0000 0000 0000 0000 0000 0000 ................
00034567: 0000 0000 0000 0000 0000 0000 0000 0000 ................
00034583: 0000 0000 0000 0000 0000 0000 0000 0000 ................
00034599: 0000 0000 0000 0000 0000 0000 0000 0000 ................
00034615: 0000 0000 0000 0000 0000 0000 0000 0000 ................
00034631: 0000 0000 0000 0000 0000 0000 0000 0000 ................
00034647: 0000 0000 0000 0000 0000 0000 0000 0000 ................
00034663: 0000 0000 0000 0000 0000 0000 0000 0000 ................
00034679: 0000 0000 0000 0000 0000 0000 0000 0000 ................
00034695: 0000 0000 0000 0000 0000 0000 0000 0000 ................
00034711: 0000 0000 0000 0000 0000 0000 0000 0000 ................
00034727: 0000 0000 0000 0000 0000 0000 0000 0000 ................
00034743: 0000 0000 0000 0000 0000 0000 0000 0000 ................
00034759: 0000 0000 0000 0000 0000 0000 0000 0000 ................
00034775: 0000 0000 0000 0000 0000 0000 0000 0000 ................
00034791: 0000 0000 0000 0000 0000 0000 0000 0000 ................
00034807: 0000 0000 0000 0000 00 .........
$ xxd -d -s 32769 -l 5 archlinux-2024.07.01-x86_64.iso
00032769: 4344 3030 31 CD001
$ xxd -d -s 34816 -l 1 archlinux-2024.07.01-x86_64.iso
00034816: 00 .
$ xxd -d -s 34816 -l 6 archlinux-2024.07.01-x86_64.iso
00034816: 0043 4430 3031 .CD001
$ xxd -d -s 34823 -l 2041 archlinux-2024.07.01-x86_64.iso
00034823: 454c 2054 4f52 4954 4f20 5350 4543 4946 EL TORITO SPECIF
00034839: 4943 4154 494f 4e00 0000 0000 0000 0000 ICATION.........
00034855: 0000 0000 0000 0000 0000 0000 0000 0000 ................
00034871: 0000 0000 0000 0000 0000 0000 0000 0000 ................
00034887: 7200 0000 0000 0000 0000 0000 0000 0000 r...............
00034903: 0000 0000 0000 0000 0000 0000 0000 0000 ................
00034919: 0000 0000 0000 0000 0000 0000 0000 0000 ................
00034935: 0000 0000 0000 0000 0000 0000 0000 0000 ................
00034951: 0000 0000 0000 0000 0000 0000 0000 0000 ................
...
$ sudo sysctl kernel.dmesg_restrict=0
$ fdisk -l archlinux-2024.07.01-x86_64.iso
Disk archlinux-2024.07.01-x86_64.iso: 1.09 GiB, 1173389312 bytes, 2291776 sectors
Units: sectors of 1 * 512 = 512 bytes
Sector size (logical/physical): 512 bytes / 512 bytes
I/O size (minimum/optimal): 512 bytes / 512 bytes
Disklabel type: dos
Disk identifier: 0xc862cd74
Device Boot Start End Sectors Size Id Type
archlinux-2024.07.01-x86_64.iso1 * 64 1953791 1953728 954M 0 Empty
archlinux-2024.07.01-x86_64.iso2 1953792 2291711 337920 165M ef EFI (FAT-12/16/32)
$ gdisk -l archlinux-2024.07.01-x86_64.iso
GPT fdisk (gdisk) version 1.0.8
Partition table scan:
MBR: MBR only
BSD: not present
APM: not present
GPT: present
Found valid MBR and GPT. Which do you want to use?
1 - MBR
2 - GPT
3 - Create blank GPT
Your answer: 2
Using GPT and creating fresh protective MBR.
Disk archlinux-2024.07.01-x86_64.iso: 2291776 sectors, 1.1 GiB
Sector size (logical): 512 bytes
Disk identifier (GUID): 34323032-3730-4130-B130-303830393030
Partition table holds up to 248 entries
Main partition table begins at sector 2 and ends at sector 63
First usable sector is 64, last usable sector is 2291712
Partitions will be aligned on 64-sector boundaries
Total free space is 1 sectors (512 bytes)
Number Start (sector) End (sector) Size Code Name
1 64 1953791 954.0 MiB 0700 ISOHybrid
2 1953792 2291711 165.0 MiB 0700 ISOHybrid1
$ xxd -d -s 510 -l 2 archlinux-2024.07.01-x86_64.iso
00000510: 55aa U.
$ xxd -d -s 446 -l 64 archlinux-2024.07.01-x86_64.iso
00000446: 8002 0100 003f e0b9 4000 0000 c0cf 1d00 .....?..@.......
00000462: 0000 c1ba ef3f e0ff 00d0 1d00 0028 0500 .....?.......(..
00000478: 0000 0000 0000 0000 0000 0000 0000 0000 ................
00000494: 0000 0000 0000 0000 0000 0000 0000 0000 ................
The range for sector is 1 through 63; the range for cylinder is 0 through 1023; the range for head is 0 through 255 inclusive.这个CHS地址我始终不会计算!真的是太苯了。 head=2 (because 1-5LSB in range of 0-255); sector=1 (because LSB1-5 in range of 1-63), cylinder=0 这个表似乎更加的清晰,原来这个换算还有大小的区别!真的是太复杂了。
不对不对,这个表是BIOS的什么INT-13中断翻译,这个完全无关啊! 这个可能才是正确的做法:
Disk size Sectors/track Heads Cylinders 1 < X ≤ 504 MiB 63 16 X ÷ (63 × 16 × 512) 504 MiB < X ≤ 1008 MiB 63 32 X ÷ (63 × 32 × 512) 1008 MiB < X ≤ 2016 MiB 63 64 X ÷ (63 × 64 × 512) 2016 MiB < X ≤ 4032 MiB 63 128 X ÷ (63 × 128 × 512) 4032 MiB < X ≤ 8032.5 MiB 63 255 X ÷ (63 × 255 × 512)
那么按照这个公式: LBA = (C × HPC + H) × SPT + (S − 1)
LBA and CHS equivalence with 16 heads per cylinder LBA value CHS tuple 0 0, 0, 1 1 0, 0, 2 2 0, 0, 3 62 0, 0, 63 63 0, 1, 1 945 0, 15, 1 1007 0, 15, 63 1008 1, 0, 1 1070 1, 0, 63 1071 1, 1, 1 1133 1, 1, 63 1134 1, 2, 1 2015 1, 15, 63 2016 2, 0, 1 16,127 15, 15, 63 16,128 16, 0, 1 32,255 31, 15, 63 32,256 32, 0, 1 16,450,559 16319, 15, 63 16,514,063 16382, 15, 63
CHS tuples can be mapped to LBA address with the following formula:CHS(0,2,1)的LBA=(0*16 + 2)*63 + (1-1) = 126???这个显然不对!!! 它的partition类型是0x00是无用的! 难道说它不是用CHS吗?我们直接来读这个LBA地址:
- LBA = (C × HPC + H) × SPT + (S − 1)
where
- C, H and S are the cylinder number, the head number, and the sector number
- LBA is the logical block address
- HPC is the maximum number of heads per cylinder (reported by disk drive, typically 16 for 28-bit LBA)
- SPT is the maximum number of sectors per track (reported by disk drive, typically 63 for 28-bit LBA)
$ xxd -d -s 454 -l 8 archlinux-2024.07.01-x86_64.iso
00000454: 4000 0000 c0cf 1d00 @.......
$ fdisk -l -x archlinux-2024.07.01-x86_64.iso
Disk archlinux-2024.07.01-x86_64.iso: 1.09 GiB, 1173389312 bytes, 2291776 sectors
Units: sectors of 1 * 512 = 512 bytes
Sector size (logical/physical): 512 bytes / 512 bytes
I/O size (minimum/optimal): 512 bytes / 512 bytes
Disklabel type: dos
Disk identifier: 0xc862cd74
Device Boot Start End Sectors Id Type Start-C/H/S End-C/H/S Attrs
archlinux-2024.07.01-x86_64.iso1 * 64 1953791 1953728 0 Empty 0/2/1 953/63/32 80
archlinux-2024.07.01-x86_64.iso2 1953792 2291711 337920 ef EFI (FAT-12/16/32) 954/0/1 1023/63/32
七月二十二日 等待变化等待机会
$ xxd -d -s 447 -l 3 archlinux-2024.07.01-x86_64.iso
00000447: 0201 00 ...
$ xxd -d -s 451 -l 3 archlinux-2024.07.01-x86_64.iso
00000451: 3fe0 b9 ?..
所以,已知Head=2, Sector=1, Cylinder=0,根据什么公式计算得到LBA=64 Sectors?我再次看这个表才明白这里有变化和不变化的地方。就是说对于Sectors/track总是63,对于H=2怎么也算不出64。
h7–0 head x x x x x x x x c9–8 s5–0 sector in bits 5–0; bits 7–6 are high bits of cylinder x x x x x x x x c7–0 bits 7–0 of cylinder x x x x x x x x
如果看结束的地址:Head = 0x3F=63, Sector= 0xE0 & 0x3F = 0x20 = 32, Cylinder = (0xE0 & 0xC0) << 2 | 0xb9 = 0x3B9 = 953
那么sector/Head = 63, head/cylinder=32:那么根据公式 LBA = (953*32+63)* 63 + (32-1) =
就在我完全陷入混乱的时候,Linux的祖师爷的名言点醒了我:RTFC!遇事不明就去看源代码! 于是,我下载了fdisk的源代码,看到原来Start/End是读出来的,不是计算的:
struct dos_partition {
unsigned char boot_ind; /* 0x80 - active */
unsigned char bh, bs, bc; /* begin CHS */
unsigned char sys_ind;
unsigned char eh, es, ec; /* end CHS */
unsigned char start_sect[4];
unsigned char nr_sects[4];
} __attribute__((packed));
#define MBR_PT_OFFSET 0x1be
#define MBR_PT_BOOTBITS_SIZE 440
static inline struct dos_partition *mbr_get_partition(unsigned char *mbr, int i)
{
return (struct dos_partition *)
(mbr + MBR_PT_OFFSET + (i * sizeof(struct dos_partition)));
}
static inline uint32_t __dos_assemble_4le(const unsigned char *p)
{
uint32_t last_byte = p[3];
return p[0] | (p[1] << 8) | (p[2] << 16) | (last_byte << 24);
}
static inline unsigned int dos_partition_get_start(struct dos_partition *p)
{
return __dos_assemble_4le(&(p->start_sect[0]));
}
$ xxd -d -s 454 -l 8 archlinux-2024.07.01-x86_64.iso
00000454: 4000 0000 c0cf 1d00 @.......
Status or physical drive (bit 7 set is for active or bootable, old MBRs only accept 0x80, 0x00 means inactive, and 0x01–0x7F stand for invalid)也就是说即便是inactive也是合法的,也要显示出来?那么这样就合理了:
$ xxd -d -s 446 -l 64 archlinux-2024.07.01-x86_64.iso
00000446: 8002 0100 003f e0b9 4000 0000 c0cf 1d00 .....?..@.......
00000462: 0000 c1ba ef3f e0ff 00d0 1d00 0028 0500 .....?.......(..
00000478: 0000 0000 0000 0000 0000 0000 0000 0000 ................
00000494: 0000 0000 0000 0000 0000 0000 0000 0000 ................
MBR_EFI_SYSTEM_PARTITION = 0xef, /* Intel EFI System Partition */
起始地址是0x001dd000=1953792,大小是0x00052800=337920,结束地址是1953792+337920-1=2291711
BINGO!
$ xxd -d -s 512 -l 8 archlinux-2024.07.01-x86_64.iso
00000512: 4546 4920 5041 5254 EFI PART
$ xxd -d -s 584 -l 8 archlinux-2024.07.01-x86_64.iso
00000584: 0200 0000 0000 0000 ........
$ xxd -d -s 596 -l 4 archlinux-2024.07.01-x86_64.iso
00000596: 8000 0000
那么看看第一个分区的类型吧,这个是一个GUID:
$ xxd -d -s 1024 -l 16 archlinux-2024.07.01-x86_64.iso
00001024: a2a0 d0eb e5b9 3344 87c0 68b6 b726 99c7 ......3D..h..&..
Previously, Linux used the same GUID for the data partitions as Windows (Basic data partition: EBD0A0A2-B9E5-4433-87C0-68B6B72699C7). Linux never had a separate unique partition type GUID defined for its data partitions. This created problems when dual-booting Linux and Windows in UEFI-GPT setup. The new GUID (Linux filesystem data: 0FC63DAF-8483-4772-8E79-3D69D8477DE4) was defined jointly by GPT fdisk and GNU Parted developers. It is identified as type code 0x8300 in GPT fdisk.原来这个是专门给windows的data partition,而Linux后来也有了自己的0x8300作为data partition!
接下来看看这个分区的partition GUID和它的起始LBA
ArchLinux的开发者偷懒的设置?
$ xxd -d -s 1040 -l 16 archlinux-2024.07.01-x86_64.iso
00001040: 3230 3234 3037 3041 b131 3038 3039 3030 2024070A.1080900
$ xxd -d -s 1056 -l 16 archlinux-2024.07.01-x86_64.iso
00001056: 4000 0000 0000 0000 ffcf 1d00 0000 0000 @...............
夏月有感 中秋未至月未圆, 满腹闲愁不忍观。 老来有酒邀双影, 少时无邪呼玉盘。 清辉只因心已冷, 圆缺却为相思缠。 敢问嫦娥何所思? 应悔盗药月月惭1。1: 厦门老刘建议改为“应悔盗药夜夜惭“?我给出的解释是:惭者,残也,指的是每个月都有残月圆月,应是人心辗转反侧左右难全所致,说的是嫦娥心绪。
《邂逅重瓣晚樱》 暮春重瓣晚樱稠, 粉白嫣红韵自羞。 杜牧春晚惜花落, 陶潜地偏采菊悠。 静极未惧时光老, 寂照何忧岁月流。 鞠躬尽瘁心自在, 拈花一笑山更幽。
七月二十三日 等待变化等待机会
$ sudo losetup -Pf --show archlinux-2024.07.01-x86_64.iso
/dev/loop43
$ ll /dev/loop43*
brw-rw---- 1 root disk 7, 43 Jul 23 07:11 /dev/loop43
brw-rw---- 1 root disk 259, 9 Jul 23 07:11 /dev/loop43p1
brw-rw---- 1 root disk 259, 10 Jul 23 07:11 /dev/loop43p2
$ sudo mount /dev/loop43p1 Linux/
$ sudo mount /dev/loop43p2 EFI
$ ll Linux
total 1957
dr-xr-xr-x 1 root root 2048 Jul 2 02:09 ./
drwxrwxr-x 9 nick nick 4096 Jul 21 08:17 ../
dr-xr-xr-x 1 root root 2048 Jul 2 02:09 arch/
dr-xr-xr-x 1 root root 2048 Jul 2 02:09 boot/
dr-xr-xr-x 1 root root 2048 Jul 2 02:09 EFI/
dr-xr-xr-x 1 root root 2048 Jul 2 02:09 loader/
-r--r--r-- 1 root root 941056 Jul 2 02:09 shellia32.efi
-r--r--r-- 1 root root 1048448 Jul 2 02:09 shellx64.efi
$ ll EFI
total 1950
drwxr-xr-x 6 root root 512 Jan 1 1970 ./
drwxrwxr-x 9 nick nick 4096 Jul 21 08:17 ../
drwxr-xr-x 3 root root 512 Jul 2 04:09 arch/
drwxr-xr-x 3 root root 512 Jul 2 04:09 boot/
drwxr-xr-x 3 root root 512 Jul 2 04:09 EFI/
drwxr-xr-x 3 root root 512 Jul 2 04:09 loader/
-rwxr-xr-x 1 root root 941056 Jul 2 04:09 shellia32.efi*
-rwxr-xr-x 1 root root 1048448 Jul 2 04:09 shellx64.efi*
$ diff -qr Linux/ EFI
Only in Linux/arch: grubenv
Only in Linux/arch: pkglist.x86_64.txt
Only in Linux/arch: version
Only in Linux/arch: x86_64
Only in Linux/boot: 2024-07-01-18-09-00-00.uuid
Only in Linux/boot: grub
Only in Linux/boot/memtest86+: memtest
Only in Linux/boot: syslinux
$ df -h | grep loop43
/dev/loop43p1 954M 954M 0 100% /home/nick/workspace/Downloads/ISO/Linux
/dev/loop43p2 163M 157M 6.3M 97% /home/nick/workspace/Downloads/ISO/EFI
A loopback.cfg is basically just a grub.cfg that's designed to be used to boot a live distribution from an iso file on a filesystem rather than an actual physical CD.但是这个开宗明义的说明让我感到困惑,我开始怀疑这个不是必须的,也许是开发者电脑中的配置文件,在ISO内其实没有用?
这个实在是太神奇了,怎么知道path to the kernel / initrd within the iso?First some background:
Most GNU/Linux distributions' LiveCDs support being booted with the iso file on a hard drive所以,这个根本不是在ISO里面的必须的,是在开发者电脑进行调试ISO的, without needing to actually burn the image to a CD. This works not by "chainloading" the iso (which is impossible) but by extracting the kernel from the iso, either before hand or at boot time with grub2's "loopback" command. The kernel is then passed a parameter that tells it that it needs to look for its root not in /dev/cdrom, but by loop mounting an iso file. This parameter also tells the kernel (more precisely the initrd scripts) what path the iso can be found at.
The problem is that to actually boot such a distribution you need to know the path to the kernel / initrd within the iso但是这个功能是怎么获得的呢?看起来似乎是必须的?, the particular kernel parameter that distribution uses to specify the path to the iso, and any other kernel parameters relevant to the distribution. Even knowing that, when you boot the iso you don't get the menu and options you'd get when booting the CDROM. With a loopback.cfg you get the full menu of options at boot and don't have to worry about differences between different distributions.
七月二十四日 等待变化等待机会
$ qemu-system-x86_64 -boot d -cdrom archlinux-2024.07.01-x86_64.iso -m 4G

$ qemu-system-x86_64 -boot d -bios /usr/share/qemu/OVMF.fd -cdrom archlinux-2024.07.01-x86_64.iso -m 4G
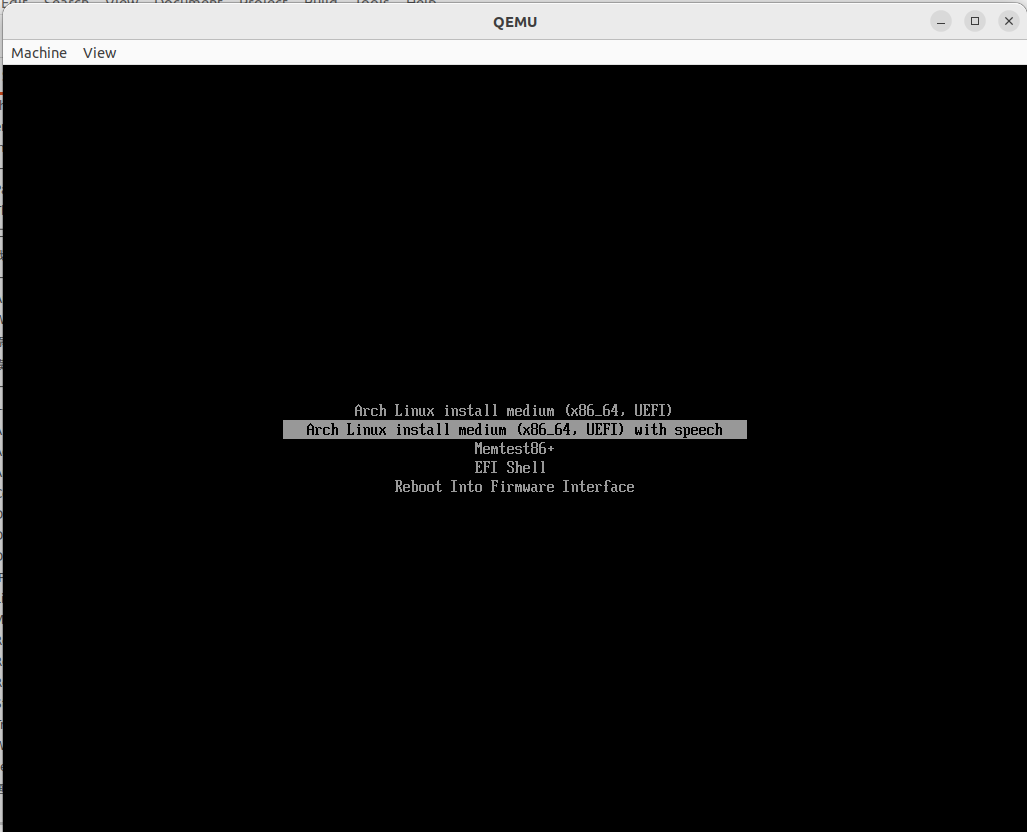
就是说如果启动分区的文件系统是FAT我们才需要安装syslinux。实际上EFI分区就是本质上FAT文件系统,因为它要兼容所有的操作系统就选择windows才能支持的文件系统微软公司里兼容的概念就是你用我的方式。 这里的DISK概念很重要,就是说对于syslinux它必须是工作在一个文件系统,这个听上去是废话,我现在不理解的是它的boot loader在哪里?它说不改变MBR,那bootsector在哪里呢?这里从制作启动盘就能理解它就是建立在DOS-bootable的基础上,就是说专门为了MBR基础上的启动模式,而mkdiskimage之所以需要CHS参数就是假定我们不使用fdisk/gdisk之类的Linux工具吗?这个计算我真的是受够了,实在是太麻烦了,而且还要考虑磁盘大小来改变CHS的参数!SYSLINUX is a boot loader for the Linux operating system which runs on an MS-DOS/Windows FAT filesystem. It is intended to simplify first-time installation of Linux, and for creation of rescue and other special purpose boot disks.
When properly configured, SYSLINUX can be used to completely eliminate the need for distribution of raw boot floppy images. A SYSLINUX floppy can be manipulated using standard MS-DOS (or any OS capable of accessing an MS-DOS filesystem) tools once it has been created.
同时另一个文档我还是不太理解什么是isohybrid的意义?我看到这一段话才明白ISO能够在USB上实现启动也不是自然而然的,是有努力的。mbr.bin is a regular boot code for msdos-like partition tables.
altmbr.bin is also for msdos-style partition tables, but it boots from a partition with a given fixed number, ignoring the "boot" flag -- see below.
gptmbr.bin is a boot code that can be used on a drive with a GPT partition scheme.
Although disk storage devices are usually booted via SYSLINUX, there is an isohybrid feature, which makes the ISO bootable from such devices (e.g. USB stick), in addition to DVD.回过头来看我才明白,所谓的isohybrid就是说它原本的确是一个符合iso9660的文件系统,但是我们钻了一个空子,因为它的开头部分是不用的, 我们把MBR/GPT分区都装在前面的两个sector里,结果就是hybrid了。这个是我的理解,应该是对的。我花了好几天才搞明白这么简单的道理。
ISOLINUX is a boot loader for Linux/i386 that operates off ISO 9660/El Torito CD-ROMs in "no emulation" mode. This avoids the need to create an "emulation disk image" with limited space (for "floppy emulation") or compatibility problems (for "hard disk emulation").这个言简意赅的定义信息量是很多的,首先,它就是一个bootloader,而且是仅仅支持Linux/i386的,这一点和grub2鲜明的对比,后者 支持众多的模式。其次它只能是很有限的CDROM格式启动,什么罗密欧和朱丽叶之类的都不支持了,我猜想吧,而且明确的不支持模拟软盘硬盘模式。这些都是 非常的硬核的玩意儿。
七月二十五日 等待变化等待机会
There are two ways to boot a GPT-formatted disk on a BIOS system. Hybrid booting, and the new GPT-only booting protocol originally proposed by the author, and later adopted by the T13 committee in slightly modified form.那么先看看hybrid booting是如何的,这里的hybrid和我理解是不同的,看来我是误解了。这一段文字极其难懂,也极其重要。
Hybrid booting uses a standard MBR, and has bootable ("active") partitions present, as partitions, in the GPT PMBR sector. This means the PMBR, instead of containing only one "protective" partition (type EE), may contain up to three partitions: a protective partition (EE) *before* the active partition, the active partition, and a protective partition (EE) *after* the active partition. The active partition is limited to the first 2^32 sectors (2 TB) of the disk.我们需要回忆一下什么是protective partition(EE) 也就是EFI GPT protective MBR?而且注意到对于EE和它的兄弟EF(EFI system partition)都没有规定访问方法是否是基于CHS的。就是说它可以第一个是protective,然后是真正的Active,然后还可以有一个protective:
$ xxd -s 446 -l 64 archlinux-2024.07.01-x86_64.iso
000001be: 8002 0100 003f e0b9 4000 0000 c0cf 1d00 .....?..@.......
000001ce: 0000 c1ba ef3f e0ff 00d0 1d00 0028 0500 .....?.......(..
000001de: 0000 0000 0000 0000 0000 0000 0000 0000 ................
000001ee: 0000 0000 0000 0000 0000 0000 0000 0000 ................
A single partition of type EEh, encompassing the entire GPT drive (where "entire" actually means as much of the drive as can be represented in an MBR), is indicated and identifies it as GPT. Operating systems and tools which cannot read GPT disks will generally recognize the disk as containing one partition of unknown type and no empty space, and will typically refuse to modify the disk unless the user explicitly requests and confirms the deletion of this partition. This minimizes accidental erasures. Furthermore, GPT-aware OSes may check the protective MBR and if the enclosed partition type is not of type EEh or if there are multiple partitions defined on the target device, the OS may refuse to manipulate the partition table.所以,保护是说我们设置的MBR有一个类型为EE的分区,它的大小要覆盖整个磁盘,至少是MBR能够表达的最大覆盖,
这个是言简意赅的,只不过没有明确的说你要制作MBR的分区去覆盖整个磁盘,但是span the disk就是这个意思。另一个有意义的是UEFI的规定:What is a Protective MBR?
The Protective MBR, beginning in sector 0, precedes the GPT partition table on the disk. The MBR contains one type 0xEE partition that spans the disk.
这一点如果是UEFI的规定,那就是一个硬指标,你可以玩的花样是很有限的,MBR只能作为数据存储磁盘,除非它是protective。只不过我觉得archLinux没有严格的遵守PMBR的要求。 我想这里比较一下ubuntu的PMBR是如何的。What about mixing and matching GPT and MBR disks on the same system?
GPT and MBR disks can be mixed on systems that support GPT, as described earlier. However, you must be aware of the following restrictions:
- Systems that support UEFI require that boot partition must reside on a GPT disk. Other hard disks can be either MBR or GPT.
- Both MBR and GPT disks can be present in a single dynamic disk group. Volume sets can span both MBR and GPT disks.
$ xxd -s 446 -l 64 ubuntu-24.04-desktop-amd64.iso
000001be: 0000 0200 ee3f e0ff 0100 0000 1f3b b600 .....?.......;..
000001ce: 8000 0100 0000 0100 0000 0000 0100 0000 ................
000001de: 0000 0000 0000 0000 0000 0000 0000 0000 ................
000001ee: 0000 0000 0000 0000 0000 0000 0000 0000 ................
$ gdisk -l ubuntu-24.04-desktop-amd64.iso
GPT fdisk (gdisk) version 1.0.8
Partition table scan:
MBR: protective
BSD: not present
APM: not present
GPT: present
Found valid GPT with protective MBR; using GPT.
Disk ubuntu-24.04-desktop-amd64.iso: 11942688 sectors, 5.7 GiB
Sector size (logical): 512 bytes
Disk identifier (GUID): 1CF7D054-8DB5-4194-971E-3C8665684807
Partition table holds up to 248 entries
Main partition table begins at sector 2 and ends at sector 63
First usable sector is 64, last usable sector is 11942624
Partitions will be aligned on 4-sector boundaries
Total free space is 1 sectors (512 bytes)
Number Start (sector) End (sector) Size Code Name
1 64 11931883 5.7 GiB 0700 ISO9660
2 11931884 11942023 5.0 MiB EF00 Appended2
3 11942024 11942623 300.0 KiB 0700 Gap1
什么叫做its 0xEE partition is smaller than normal and it contains one to three partition definitions that point to the same disk locations as corresponding GPT partitions?令人费解啊。 这里有大量的阅读要做,我先歇一些吧。这个是作者的关于grub-legacy和grub2的说法Hybrid MBR 101 As noted on other pages in this document, a conventional GPT disk contains a protective MBR with a single partition, of type 0xEE (EFI GPT), defined. This partition spans the entire size of the disk or 2 TiB, whichever is smaller. The intent is to keep GPT-unaware OSes and utilities from trying to modify the disk.
A hybrid MBR is a variant on the normal protective MBR. A hybrid MBR contains a type-0xEE partition, but it also contains up to three additional primary partitions, which point to the same space that's marked out by up to three GPT partitions. For instance, suppose you've got a Macintosh that dual-boots macOS and an older version of Windows (Windows 7 or earlier). MacOS is happy on GPT, and so can use GPT partition definitions; but Windows versions prior to Windows 8 (on Macs) are less capable in this respect. Thus, you'll define your partitions first as GPT partitions (including your Windows partitions), and then you'll modify your protective MBR so that its 0xEE partition is smaller than normal and it contains one to three partition definitions that point to the same disk locations as corresponding GPT partitions. You can then install Windows on these hybridized partitions. In the past, Apple's Boot Camp helped automate this process, so you don't need GPT fdisk to set up a hybrid MBR on a Mac; however, GPT fdisk can be useful in maintaining your hybrid MBR after it's configured, and you might want to use it on BIOS-based computers for similar configurations involving other OSes. On any computer, the end result is that GPT-unaware OSes can use up to three primary partitions, while GPT-aware OSes can use all the partitions on the disk.
They appear to be very fussy about hybrid MBRs, though. In particular, if the EFI GPT (0xEE) partition resides anywhere but in the first position of the MBR partition table, these boot loaders treat the disk as if it were MBR-only. The likely result is that some or all of your OSes won't boot. For this reason, if you expect to use GRUB or GRUB 2 with a hybrid MBR, I suggest you place the EFI GPT partition first in the partition table.这个英语的anywhere but in the first position of the MBr partition table是说不放在第一位的话就是MBR-only。这个似乎不适用于archlinux因为它不是用grub*,而是syslinux。总而言之,我应该会大概率使用grub2,那么需要把EE这个protective MBR的partition放在第一位。
The (P)MBR format is the normal PMBR specified in the UEFI documentation, with the first 440 bytes used for the boot code. The partition to be booted is marked by setting bit 2 in the GPT Partition Entry Attributes field (offset 48); this bit is reserved by the UEFI Forum for "Legacy BIOS Bootable".这个说的是这里的GPT partition entry attribute field。而所谓的bit 2是这个attribute。 但是这里我是完全摸不着头脑,因为如果是BIOS而且还要支持GPT才能有这个能力啊?也许作者瞄准的就是这个,可是针对不明白GPT的呢?那就是直接使 用MBR没有办法了,只能支持最大2T的磁盘,而据说大部分的问题是使用BIOS明白GPT但是不理解UEFI的boot。 这一段文字实在是太深奥了,我觉得这个是bootloader的工作,对于我们是否需要理解呢?我的理解就是archLinux也没有遵守这个新协议,你 需要设定为0x80bootable啊!那么让我再确认一下它是否在GPT partition entry里设定了hybrid的标志。
$ xxd -s 1072 -l 8 archlinux-2024.07.01-x86_64.iso
00000430: 0100 0000 0000 0010 ........
What is the Extensible Firmware Interface System Partition (ESP)?
The ESP contains the NTLDR, HAL, Boot.txt, and other files that are needed to boot the system, such as drivers. The Partition GUID defines the ESP:
DEFINE_GUID (PARTITION_SYSTEM_GUID, 0xC12A7328L, 0xF81F, 0x11D2, 0xBA, 0x4B, 0x00, 0xA0, 0xC9, 0x3E, 0xC9, 0x3B)The ESP is approximately 100MBs.
The ESP should be first on the disk. While there is no architectural requirement, there are numerous reasons why it is beneficial to place the ESP first. The primary reason for this is that it is impossible to span volumes when the ESP is logically between the two data partitions that you are attempting to span.
hybrid的模糊概念是从哪里来的,在isolinux里它把能够从iso9660/usb/hd等不同媒体都能启动称之为hybrid,而在很多其他地方大家更加注重的是BIOS/UEFI的混合启动模式的hybrid。当然我个人认为这些都是非常好的东西,都不容易。
七月二十六日 等待变化等待机会
Disk ubuntu-24.04-desktop-amd64.iso: 5.69 GiB, 6114656256 bytes, 11942688 sectors
Units: sectors of 1 * 512 = 512 bytes
Sector size (logical/physical): 512 bytes / 512 bytes
I/O size (minimum/optimal): 512 bytes / 512 bytes
Disklabel type: dos
Disk identifier: 0x00000000
Device Boot Start End Sectors Size Id Type
ubuntu-24.04-desktop-amd64.iso1 1 11942687 11942687 5.7G ee GPT
ubuntu-24.04-desktop-amd64.iso2 * 0 0 1 512B 0 Empty
set timeout=30
loadfont unicode
set menu_color_normal=white/black
set menu_color_highlight=black/light-gray
menuentry "Try or Install Ubuntu" {
set gfxpayload=keep
linux /casper/vmlinuz --- quiet splash
initrd /casper/initrd
}
menuentry "Ubuntu (safe graphics)" {
set gfxpayload=keep
linux /casper/vmlinuz nomodeset --- quiet splash
initrd /casper/initrd
}
grub_platform
if [ "$grub_platform" = "efi" ]; then
menuentry 'Boot from next volume' {
exit 1
}
menuentry 'UEFI Firmware Settings' {
fwsetup
}
else
menuentry 'Test memory' {
linux16 /boot/memtest86+x64.bin
}
fi
七月二十七日 等待变化等待机会
《雨中行步道》 雨中漫步道, 物比人更亲。 山是我知音, 海与我同心。 雨来心正静, 风吹体更轻。 流连景不尽, 踟蹰脚不停。不甚满意又得
《步道行》 雨中行步道, 山远绿翠新。 雨骤心却静, 风狂体更轻。 流连山亲近, 踟蹰海知音。 人言台风至, 风雨我独行。又重读旧作
《心》 斜月三星伴, 意马何物牵? 喜怒忧思怨, 灵台方寸间。最后这一首身为满意遂分享给同学品评
《雨中行》 远眺山知性, 近观海同心。 雨骤幽曲径, 风狂独孤亭。 山耸临风定, 海阔迎波兴。 小憩平心憶, 昂首任我行1。 1:我以为改作然则最后两句似嫌突兀,有人建议纯写景,遂又改昂头我独行似乎更好,但是总有人不以为意。
《雨中行》 远眺山知性, 近观海同心。 雨骤幽曲径, 风狂独孤亭。 草低知风劲, 云乱见天惊。 山耸临风定, 海阔迎波兴。这一首随意吟之
《雨中偶得》 长风猎猎雨潇潇, 独享曲径正逍遥。 路转桥头低头看, 雨打芭蕉更妖娆。早晨起来,决定再改一改:
《雨中行》 雨中步道行, 路旧景却新。 草低知风劲, 云乱见天惊。 雨骤幽曲径, 风狂独孤亭。 猎猎风啸啸, 潇潇雨淋淋。 雨急心却静, 风紧体更轻。 山耸临风定, 海阔迎波兴。 远眺山亲近, 近听海知音。 回首景不尽, 仰天心意平。 凭栏侧耳听, 风雨催不停。渥太华的同学用chatGPT帮我修改了,也不错:
《雨中行》 雨中步道行, 旧路焕新景。 草低风力劲, 云乱天威惊。 雨骤曲径幽, 风狂孤亭静。 猎猎风声啸, 潇潇雨滴淋。 雨急心尤定, 风紧体愈轻。 山耸迎风立, 海阔随波兴。 远眺山常近, 近听海有音。 回首景无限, 仰天心意平。 凭栏侧耳听, 风雨催不停。
ISO-9660 defines that a “Primary Volume Descriptor” must reside at sector 10 (16 decimal), relative to the start of the session, followed by any number of other Volume Descriptors, followed by a “Volume Descriptor Set Terminator.”在偏移
$ xxd -d -s 32768 -l 7 Kylin-Desktop-V10-SP1-2403-HWE-Release-20240430-x86_64.iso
00032768: 0143 4430 3031 01 .CD001.
The El Torito Bootable CD Specification builds on this format by requiring a “Boot Record” Volume Descriptor as defined in section 8.2 of ISO-9660. See figure 7 for a description of the Boot Record. This “Boot Record” must reside at sector 11 (17 decimal) in the last session on the CD.那么看看偏移17*2K=34816
$ xxd -d -s 34816 -l 7 Kylin-Desktop-V10-SP1-2403-HWE-Release-20240430-x86_64.iso
00034816: 0043 4430 3031 01 .CD001.
he Boot Record contains an absolute pointer to the Boot Catalog.真的吗?首先还是要了解这个boot record volume descriptor结构
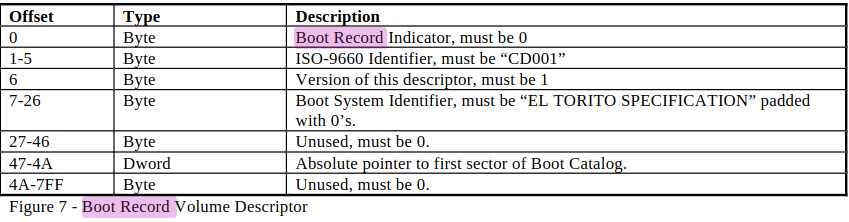 这个表一定是错的,偏移量的计算难道数数都不对吗?EL TORITO SPECIFICATION这几个字母加上空格怎么数都是23,而表里说是7-26的偏移,大概是在EL TORITO的小旅馆里喝多了吧?我怀疑是使用hex的结果,因为下面的boot catalogure的绝对地址就是十六进制!
O$ xxd -d -s 34816 -l 30 Kylin-Desktop-V10-SP1-2403-HWE-Release-20240430-x86_64.iso
00034816: 0043 4430 3031 0145 4c20 544f 5249 544f .CD001.EL TORITO
00034832: 2053 5045 4349 4649 4341 5449 4f4e SPECIFICATION
$ xxd -d -s 34887 -l 8 Kylin-Desktop-V10-SP1-2403-HWE-Release-20240430-x86_64.iso
00034887: c700 0000 0000 0000 ........
看看是不是boot catalogue,The Boot Catalog is a collection of 20 byte entries (as described below), packed 40 entries to the sector. There is no limit to the number of sectors the Boot Catalog uses.
There are 5 types of entries diagrammed in figures 2-6. These entries define a validation procedure for the bootable CD, an Initial/Default entry, a section header, a section entry, and a Section Entry Extension.
This must be the first entry in the boot catalog. The Validation entry validates that a booting catalog is present on the disk and identifies the manufacturer of the CD. If this entry is valid, it is assumed that the rest of the entries are valid.
$ xxd -d -s 407552 -l 32 Kylin-Desktop-V10-SP1-2403-HWE-Release-20240430-x86_64.iso
00407552: 0100 0000 0000 0000 0000 0000 0000 0000 ................
00407568: 0000 0000 0000 0000 0000 0000 aa55 55aa .............UU.
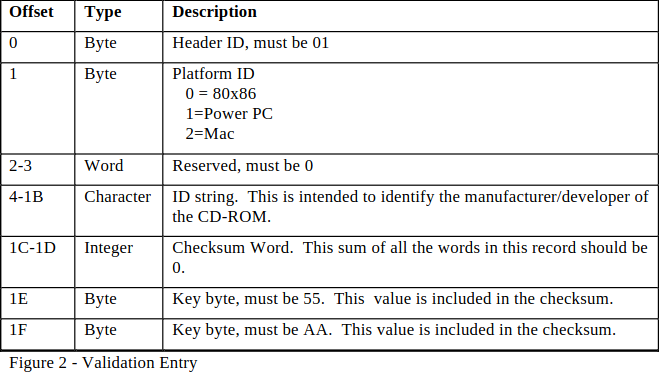 我对这里的定义也表示怀疑,到底谁是对的?为什么偏移1C-1D 不是应该0吗?
Checksum Word. This sum of all the words in this record should be 0.为了验证是不是麒麟犯了错,我决定看看ubuntu或者archLinux的做法: 先找到ubuntu的boot catalogue的绝对地址:
$ xxd -d -s 34887 -l 8 ubuntu-24.04-desktop-amd64.iso
00034887: b403 0000 0000 0000 ........
$ xxd -d -s 1941504 -l 32 ubuntu-24.04-desktop-amd64.iso
01941504: 0100 0000 0000 0000 0000 0000 0000 0000 ................
01941520: 0000 0000 0000 0000 0000 0000 aa55 55aa .............UU.
The initial entry must contain a boot image which consists of generic programs/drivers that use only the BIOS provided INT 13 interface. The BIOS INT 13 interface consists of functions 0-19 and may optionally include functions 40-48. This entry will always be used by a BIOS that does not use any of the provided section headers.
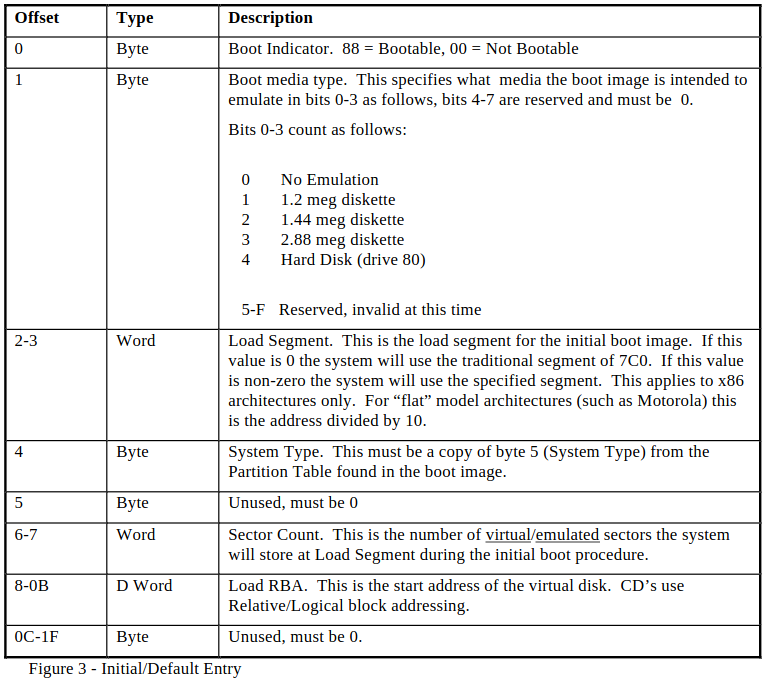
$ xxd -d -s 407584 -l 32 Kylin-Desktop-V10-SP1-2403-HWE-Release-20240430-x86_64.iso
00407584: 8800 0000 0000 0400 7719 1f00 0000 0000 ........w.......
00407600: 0000 0000 0000 0000 0000 0000 0000 0000 ................
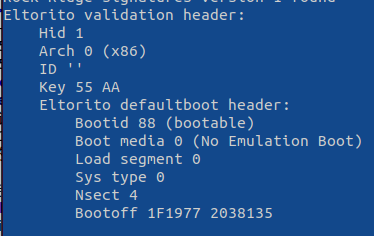
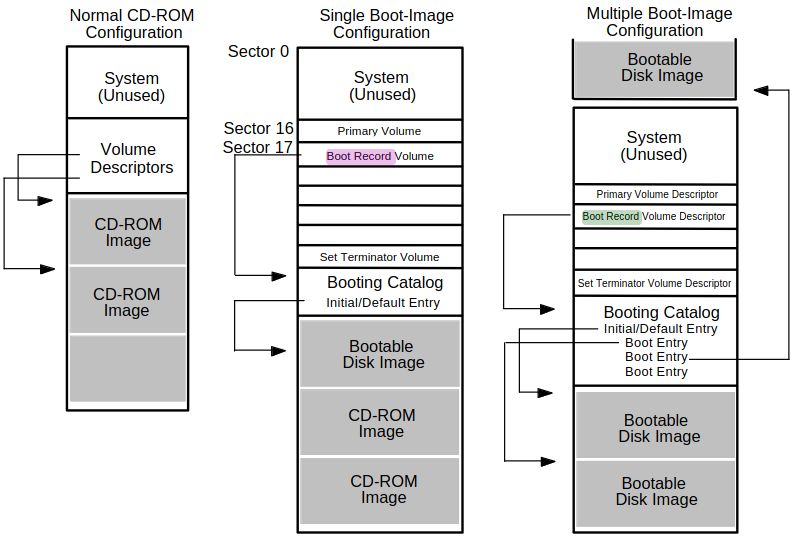
这里说了什么呢?就是说单纯的BIOS是只有在CD/DVD/BD媒介上才能起作用,这个当然是废话吧?这个文件格式本来就是瞄准这些媒介的吗?如果要使用USB,那么必须使用MBR,这个就是麒麟官方ISO不能使用USB安装的根本原因,因为没有MBR的帮助是不可能的。The EL Torito Boot Catalog can offer in the same ISO filesystem alternative boot images for PC-BIOS and for EFI.
But El Torito is interpreted by the firmware only if presented on an optical medium: CD, DVD, BD. For booting PC-BIOS and EFI from USB stick or other hard-disk-like devices, there is need for an MBR and, if desired, for a GPT.
The machine code of the MBR of SYSLINUX can be adjusted to jump with its execution onto the BIOS El Torito boot image of ISOLINUX. This is known as "isohybrid". The MBR and BIOS El Torito boot image written by grub-mkrescue have the same capability. The MBR partition table does not matter for the first stage of BIOS booting.
这一段都是精华,可是我就看不大懂了,什么叫做UEFI legacy partition layout (not to be confused with Legacy BIOS mode)?UEFI有BCS兼容模式但是和这个也不一样吧?UEFI regulates the relation of MBR partition table and GPT. So for booting via EFI firmware, the partition tables do matter. The MBR machine code is to be ignored by EFI, unless in Legacy BIOS mode.
The most modern UEFI layout prescribes an MBR with a single partition which starts at Logical Block Address 1 and covers the whole image size.这就是PMBR的定义! It shall have MBR partition type 0xee. In this case there is a GUID Partition Table (GPT) which in one of its partitions marks the EFI System Partition with the FAT filesystem. Neither MBR partition nor GPT partitions can lead to an address where the ISO filesystem can be mounted, unless the ISO offers a second set of volume descriptors and file tree at a higher block address. Script grub-mkrescue produces this layout for booting via EFI.
The UEFI legacy partition layout (not to be confused with Legacy BIOS mode) prescribes that the EFI System Partition shall be marked by an MBR partition of type 0xef. Other MBR partitions are permissible. E.g. one which starts at Logical Block Address 0 to make the ISO mountable. It is not allowed, nevertheless, to let the ISO partition enclose the EFI System Partition.
Several popular Linux distributions offer a layout that does not comply to either of the UEFI alternatives. The MBR marks the whole ISO by a partition of type 0x00. Another MBR partition of type 0xef marks a data file inside the ISO filesystem with the image of the EFI System Partition FAT filesystem. Nevertheless there is a GPT which also marks the EFI System Partition image file. This GPT is to be ignored by any UEFI compliant firmware. The nesting of the MBR partitions is made acceptable by giving the outer MBR partition the type 0x00, which UEFI specifies to be ignored.这一段我就直接看吐了,我学习了好几天,但是这些都是模模糊糊,没有系统的清晰的图画,现在我更加的糊涂了。
七月二十八日 等待变化等待机会
,尤其是这一个选项-eltorito-alt-boot 是叫你给出另一个启动的所有的参数。但是这里的空白之处并非那么容易,所以,这个官方的说明方式更加的好,这里的这个反向得到麒麟的命令行可以试一下:xorriso -as mkisofs \ ... \ -c isolinux/boot.cat \ -b isolinux/isolinux.bin \ -no-emul-boot -boot-load-size 4 -boot-info-table \ -isohybrid-mbr ./syslinux/usr/lib/syslinux/isohdpfx.bin \ -eltorito-alt-boot \ -e boot/grub/efi.img \ -no-emul-boot -isohybrid-gpt-basdat \ ... \ ./boot1 \ ...
$ sudo xorriso -indev Kylin-Desktop-V10-SP1-2403-HWE-Release-20240430-x86_64.iso -report_el_torito cmd
[sudo] password for nick:
xorriso 1.5.4 : RockRidge filesystem manipulator, libburnia project.
xorriso : NOTE : Loading ISO image tree from LBA 0
xorriso : UPDATE : 548 nodes read in 1 seconds
xorriso : NOTE : Detected El-Torito boot information which currently is set to be discarded
Drive current: -indev 'Kylin-Desktop-V10-SP1-2403-HWE-Release-20240430-x86_64.iso'
Media current: stdio file, overwriteable
Media status : is written , is appendable
Boot record : El Torito
Media summary: 1 session, 2110114 data blocks, 4121m data, 1218g free
Volume id : 'Kylin-Desktop-V10-SP1'
-volid 'Kylin-Desktop-V10-SP1'
-volume_date uuid '2024040715475200'
-boot_image any cat_path='/isolinux/boot.cat'
-boot_image isolinux bin_path='/isolinux/isolinux.bin'
-boot_image any platform_id=0x00
-boot_image any emul_type=no_emulation
-boot_image any load_size=2048
-boot_image any boot_info_table=on
-boot_image any next
-boot_image any efi_path='/boot/grub/efi.img'
-boot_image any platform_id=0xef
-boot_image any emul_type=no_emulation
-boot_image any load_size=29360128
$ sudo xorriso -indev ubuntu-24.04-desktop-amd64.iso -report_el_torito cmd
xorriso 1.5.4 : RockRidge filesystem manipulator, libburnia project.
xorriso : NOTE : Loading ISO image tree from LBA 0
xorriso : UPDATE : 1210 nodes read in 1 seconds
libisofs: NOTE : Found hidden El-Torito image for EFI.
libisofs: NOTE : EFI image start and size: 2982971 * 2048 , 10140 * 512
xorriso : NOTE : Detected El-Torito boot information which currently is set to be discarded
Drive current: -indev 'ubuntu-24.04-desktop-amd64.iso'
Media current: stdio file, overwriteable
Media status : is written , is appendable
Boot record : El Torito , MBR protective-msdos-label grub2-mbr cyl-align-off GPT
Media summary: 1 session, 2985672 data blocks, 5831m data, 1218g free
Volume id : 'Ubuntu 24.04 LTS amd64'
-volid 'Ubuntu 24.04 LTS amd64'
-volume_date uuid '2024042411290900'
-boot_image grub grub2_mbr=--interval:imported_iso:0s-15s:zero_mbrpt,zero_gpt:'ubuntu-24.04-desktop-amd64.iso'
-boot_image any partition_table=on
-boot_image any partition_cyl_align=off
-boot_image any partition_offset=16
-boot_image any mbr_force_bootable=on
-append_partition 2 28732ac11ff8d211ba4b00a0c93ec93b --interval:imported_iso:11931884d-11942023d::'ubuntu-24.04-desktop-amd64.iso'
-boot_image any appended_part_as=gpt
-boot_image any iso_mbr_part_type=a2a0d0ebe5b9334487c068b6b72699c7
-boot_image any cat_path='/boot.catalog'
-boot_image grub bin_path='/boot/grub/i386-pc/eltorito.img'
-boot_image any platform_id=0x00
-boot_image any emul_type=no_emulation
-boot_image any load_size=2048
-boot_image any boot_info_table=on
-boot_image grub grub2_boot_info=on
-boot_image any next
-boot_image any efi_path='--interval:appended_partition_2_start_2982971s_size_10140d:all::'
-boot_image any platform_id=0xef
-boot_image any emul_type=no_emulation
-boot_image any load_size=5191680
$ sudo xorriso -indev archlinux-2024.07.01-x86_64.iso -report_el_torito cmd
xorriso 1.5.4 : RockRidge filesystem manipulator, libburnia project.
xorriso : NOTE : ISO image bears MBR with -boot_image any partition_offset=16
xorriso : NOTE : Loading ISO image tree from LBA 0
xorriso : UPDATE : 110 nodes read in 1 seconds
libisofs: NOTE : Found hidden El-Torito image for EFI.
libisofs: NOTE : EFI image start and size: 488448 * 2048 , 0 * 512
xorriso : NOTE : Detected El-Torito boot information which currently is set to be discarded
Drive current: -indev 'archlinux-2024.07.01-x86_64.iso'
Media current: stdio file, overwriteable
Media status : is written , is appendable
Boot record : El Torito , MBR isohybrid cyl-align-off GPT
Media summary: 1 session, 572944 data blocks, 1119m data, 1218g free
Volume id : 'ARCH_202407'
-volid 'ARCH_202407'
-volume_date uuid '2024070118090000'
-boot_image isolinux system_area=--interval:imported_iso:0s-15s:zero_mbrpt,zero_gpt:'archlinux-2024.07.01-x86_64.iso'
-boot_image any partition_cyl_align=off
-boot_image any partition_offset=16
-boot_image any mbr_force_bootable=on
-append_partition 2 0xef --interval:imported_iso:1953792d-2291711d::'archlinux-2024.07.01-x86_64.iso'
-boot_image any part_like_isohybrid=on
-boot_image any iso_mbr_part_type=0x00
-boot_image any cat_path='/boot/syslinux/boot.cat'
-boot_image isolinux bin_path='/boot/syslinux/isolinux.bin'
-boot_image any platform_id=0x00
-boot_image any emul_type=no_emulation
-boot_image any load_size=2048
-boot_image any boot_info_table=on
-boot_image any next
-boot_image any efi_path='--interval:appended_partition_2_start_488448s_size_337920d:all::'
-boot_image any platform_id=0xef
-boot_image any emul_type=no_emulation
-boot_image any load_size=0
-boot_image isolinux partition_entry=gpt_basdat
$ sudo xorriso -indev openKylin-1.0.2-x86_64.iso -report_el_torito cmd
xorriso 1.5.4 : RockRidge filesystem manipulator, libburnia project.
xorriso : NOTE : Loading ISO image tree from LBA 0
xorriso : UPDATE : 376 nodes read in 1 seconds
xorriso : NOTE : Detected El-Torito boot information which currently is set to be discarded
Drive current: -indev 'openKylin-1.0.2-x86_64.iso'
Media current: stdio file, overwriteable
Media status : is written , is appendable
Boot record : El Torito , MBR isohybrid cyl-align-all GPT APM
Media summary: 1 session, 1942080 data blocks, 3793m data, 1218g free
Volume id : 'openKylin-1.0'
-volid 'openKylin-1.0'
-volume_date uuid '2024031414052600'
-boot_image isolinux system_area=--interval:imported_iso:0s-15s:zero_mbrpt,zero_gpt,zero_apm:'openKylin-1.0.2-x86_64.iso'
-boot_image any partition_cyl_align=all
-boot_image any partition_offset=0
-boot_image any partition_hd_cyl=238
-boot_image any partition_sec_hd=32
-boot_image any mbr_force_bootable=on
-append_partition 2 0xef --interval:imported_iso:7768320d-7783551d::'openKylin-1.0.2-x86_64.iso'
-boot_image any apm_block_size=2048
-boot_image any iso_mbr_part_type=0x00
-boot_image any cat_path='/isolinux/boot.cat'
-boot_image isolinux bin_path='/isolinux/isolinux.bin'
-boot_image any platform_id=0x00
-boot_image any emul_type=no_emulation
-boot_image any load_size=2048
-boot_image any boot_info_table=on
-boot_image any next
-boot_image any efi_path='/boot/grub/efi.img'
-boot_image any platform_id=0xef
-boot_image any emul_type=no_emulation
-boot_image any load_size=4096000
-boot_image isolinux partition_entry=gpt_basdat
-boot_image isolinux partition_entry=apm_hfsplus
$ fdisk -l openKylin-1.0.2-x86_64.iso
Disk openKylin-1.0.2-x86_64.iso: 3.71 GiB, 3985514496 bytes, 7784208 sectors
Units: sectors of 1 * 512 = 512 bytes
Sector size (logical/physical): 512 bytes / 512 bytes
I/O size (minimum/optimal): 512 bytes / 512 bytes
Disklabel type: dos
Disk identifier: 0x374ebf56
Device Boot Start End Sectors Size Id Type
openKylin-1.0.2-x86_64.iso1 * 0 7768319 7768320 3.7G 0 Empty
openKylin-1.0.2-x86_64.iso2 7768320 7783551 15232 7.4M ef EFI (FAT-12/16/32)
O$ fdisk -l ubuntu-24.04-desktop-amd64.iso
Disk ubuntu-24.04-desktop-amd64.iso: 5.69 GiB, 6114656256 bytes, 11942688 sectors
Units: sectors of 1 * 512 = 512 bytes
Sector size (logical/physical): 512 bytes / 512 bytes
I/O size (minimum/optimal): 512 bytes / 512 bytes
Disklabel type: gpt
Disk identifier: 1CF7D054-8DB5-4194-971E-3C8665684807
Device Start End Sectors Size Type
ubuntu-24.04-desktop-amd64.iso1 64 11931883 11931820 5.7G Microsoft basic data
ubuntu-24.04-desktop-amd64.iso2 11931884 11942023 10140 5M EFI System
ubuntu-24.04-desktop-amd64.iso3 11942024 11942623 600 300K Microsoft basic data
$ mount | grep \/boot\/efi
/dev/nvme0n1p1 on /boot/efi type vfat (rw,relatime,fmask=0077,dmask=0077,codepage=437,iocharset=iso8859-1,shortname=mixed,errors=remount-ro)
$ sudo fdisk -l /dev/nvme0n1
Disk /dev/nvme0n1: 1.82 TiB, 2000398934016 bytes, 3907029168 sectors
Disk model: WD Blue SN570 2TB
Units: sectors of 1 * 512 = 512 bytes
Sector size (logical/physical): 512 bytes / 512 bytes
I/O size (minimum/optimal): 512 bytes / 512 bytes
Disklabel type: gpt
Disk identifier: D107060B-0D72-4008-A966-22D0BE31C1FB
Device Start End Sectors Size Type
/dev/nvme0n1p1 2048 1050623 1048576 512M EFI System
/dev/nvme0n1p2 1050624 3907028991 3905978368 1.8T Linux filesystem
$ sudo xxd -d -s 446 -l 16 /dev/nvme1n1
00000446: 0000 0200 eeff ffff 0100 0000 ffff ffff ................
All modern personal computer operating systems support GPT. Some, including macOS and Microsoft Windows on the x86 architecture, support booting from GPT partitions only on systems with EFI firmware, but FreeBSD and most Linux distributions can boot from GPT partitions on systems with either the BIOS or the EFI firmware interface.
顺便说一下MBR的signature和little/big endian应该是无关的,标准里没有说你要把它当作一个word,它是bytecode。当然写汇编的要使用word那就是它们的麻烦事情了。而至于说 boot flag。这个问题也一直困扰着我,因为从BIOS或者说MBR规范的角度看如果它不是0x80,而是PMBR的0x00的话,BIOS是应该拒绝启动 的,The BIOS generally doesn't care anything about your hard drives1. It simply loads the MBR and transfer control to the boot loader in MBR. Therefore technically it'll be possible to boot a GPT drive in BIOS mode, because the GPT drive still has a protective MBR at the beginning. You just need a bootloader that supports GPT disks (such as Grub and many other Linux bootloaders)
1There are some buggy BIOSes that eagerly unnecessarily do things they aren't supposed to do like checking the MBR signature or the active boot flag and refuse to boot on such drives
Some BIOSes test if the boot flag of at least one partition is set, otherwise they ignore the device in boot-order. Therefore, even if thebootloader does not need the flag, it has to be set to start the boot code from BIOS.就是说即便bootloader压根儿不考虑,因为它是知道这个是GPT/PMBR,但是启动它的BIOS不答应,那么bootloader也就没有机会 运行了。所以,这个是PMBR的困扰,我常常想应不应该用0x80替代0x00?当然这个会迷惑UEFI的BCS以为这个是真正的MBR/BIOS模式而 不去寻找GPT表?
所以,你不能幻想GPT的表有多长你可以安全的写其余部分,因此必须创建一个特别的分区,这个就是安装程序里额外要创建BIOS Boot Partition的原因,However, here a small problem arises. On MBR drives the boot loaders often cheat a bit by storing a part of them in the next sectors called "MBR gap", "boot track", or "embedding area" which are often left empty by disk partitioning tools. On a GPT disk the sectors right after the MBR are GPT data structures, hence can't be used for that purpose and you need to create a small BIOS Boot Partition for Grub to store its data
When used, the BIOS boot partition contains the second stage of the boot loader program, such as the GRUB 2; the first stage is the code that is contained within the Master Boot Record (MBR). Use of this partition is not the only way BIOS-based boot can be performed while using GPT-partitioned hard drives; however, complex boot loaders such as GRUB 2 cannot fit entirely within the confines of the MBR's 398 to 446 bytes of space, thus they need an ancillary storage space. On MBR disks, such boot loaders typically use the sectors immediately following the MBR for this storage; that space is usually known as the "MBR gap". No equivalent unused space exists on GPT disks, and the BIOS boot partition is a way to officially allocate such space for use by the boot loader.这里我才真正明白我在安装lubuntu的时候为什么遇到这个“grub-bios"的原因,因为我在笔记本的BIOS设置成了BIOS启动模式,因此安装菜单识别了我的机器如果想要用GPT磁盘格式就只能这样子来额外的要求存储空间来方grub的其余部分。
非常的详尽,很好。Create a megabyte partition (+1M with fdisk or gdisk) on the disk with no file system and with partition type GUID
21686148-6449-6E6F-744E-656564454649.
- Select partition type
BIOS bootforfdisk.- Select partition type code
ef02forgdisk.- For
partedset/activate the flagbios_grubon the partition.
Grub also supports hard coding the sector that contains the next stage so it can boot without a post-MBR gap or BIOS boot partition, but that's fragile because you need to update Grub after every OS update. Therefore this isn't recommended
For more information you can read
磁盘上限是由于MBR采用32位磁盘寻址造成的:Another way is to convert the GPT drive back to MBR if your HDD is not too big. In fact it's possible to have MBR disks above 2 TB, upto ~233 sectors (i.e. 4 TB and 16 TB for disks with 512-byte and 4096-byte sector respectively) with a big partition lasting from just before the half disk margin. There are multiple tools to do the conversion without loss of data like gdisk, MiniTool Partition Wizard, AOMEI Partition Assistant, EaseUS Partition Master... (I'm not affiliated with any of them).
The 2-TB barrier is the result of this 32-bit limitation. Because the maximum number that can be represented by using 32 bits is 4,294,967,295, it translates to 2.199 TB of capacity by using 512-byte sectors (approximately 2.2 TB). Therefore, a capacity beyond 2.2 TB isn't addressable by using the MBR partitioning scheme.这个在我看来是无解的,为什么能够突破呢?我暂时不想去深究了,今天实在是有点累了。
Rock Ridge is the name of a set of additional information which enhance an ISO 9660 filesystem so that it can represent a POSIX compliant filesystem with ownership, access permissions, symbolic links, and other attributes. Rock Ridge allows filenames of up to 255 bytes and paths of up to 1024 bytes.看来朱丽叶仅仅是提供了文件树,这个还是一个比较简单的功能。
Joliet is the name of an additional directory tree which provides filenames up to 64 characters encoded as UTF-16. A Joliet tree is mainly interesting for reading the ISO image by operating systems of Microsoft Corporation. Production of this directory tree may be enabled by option -J.至于HFS+这个是为了苹果准备的,我就没有多大兴趣了。至于说这里提到的工具mkisofs,
xorrisofs understands options of program mkisofs from cdrtools by Joerg Schilling. Its implementation is part of program xorriso which shares no source code with cdrtools.,就是说其实我不一定要明白mkisofs的命令,因为xorrisofs重新实现了一遍所以它才能明白这些选项。不过两个manpage参照阅读也是好的。
xorrisofs is actually a command mode of program xorriso, which gets entered either by xorriso command "-as mkisofs" or by starting the program by one of the names "xorrisofs", "mkisofs", "genisoimage", or "genisofs".可是在我的系统里
/usr/bin/mkisofs -> genisoimage,而/usr/bin/xorrisofs -> xorris,而这两个家伙/usr/bin/xorriso,/usr/bin/genisoimage是不同的程序啊!难道说它们之间达到了互操作级别的兼容?
七月二十九日 等待变化等待机会
debug1: kex: host key algorithm: (no match)
Unable to negotiate with 192.168.1.12 port 22: no matching host key type found. Their offer: ssh-rsa,spki-sign-rsa
ssh -v -oHostKeyAlgorithms=+ssh-rsa username@ipaddress这些问答网站的内容很不错,但是国内访问可能有问题,我本来想使用kiwix的离线库来存储镜像,可是单单stackoverflow的zim文件就是80G,这个真的是太大了,而且没有查询功能的static html怎么使用也是一个问题。
BIOS-mode GRUB on MBR -- This is the traditional PC
configuration. In it, GRUB is split into multiple stages. The first
stage resides in the first 440 bytes of the Master Boot Record (MBR).
This first stage then loads and executes a second stage of GRUB, which
typically resides in the sectors immediately following the MBR. This
space is officially unallocated on most MBR disks, so putting GRUB code
there is a bit risky; but it usually works OK. Additional code resides
in files, typically in the /boot/grub directory of the OS
used to install GRUB. There are numerous variants on this configuration
possible. For instance, putting the GRUB first stage in a Partition Boot
Record (PBR; the first sector of a partition) was once popular, but is
pretty uncommon today, and in fact I'm not 100% sure that modern GRUB 2
still supports this option.
这个基本上就是我昨天体会到的,虽然以前模模糊糊知道,但是没有这么清晰的理解。
BIOS-mode GRUB on GPT -- In this variant, the first stage of GRUB still resides in the MBR (which for GPT is known as a protective MBR,
which primarily exists to stop GPT-unaware tools from messing with the
disk). The sectors following the MBR on a GPT disk, though, are GPT data
structures and so cannot be used by GRUB. Instead, GRUB 2 relies on a
partition known as the BIOS Boot Partition, which has a GPT type code of 21686148-6449-6E6F-744E-656564454649 ("bios_grub flag" set in libparted-based tools, or type EF02 in GPT fdisk). Additional files reside in the /boot/grub directory, as with BIOS/MBR GRUB installations.
这个是我之前尝试安装lubuntu时候遇到的情况,当我无意中把笔记本的BIOS摄制成只能才有BIOS启动模式的时候,在安装程序里会建议打钩这个bios_grub 。但是我觉得安装程序可能有问题因为我在自定义安装而不是使用全部硬盘空间的情况下总是失败。
EFI-mode GRUB on MBR -- In this configuration, the first GRUB code resides in a GRUB EFI binary stored on the EFI System Partition (ESP; type code 0xEF on an MBR disk). This file could be named anything, but it's typically called这个模式和目前最流行的下面的模式的唯一差别就在于分区是由MBR掌管还是GPT掌管,两者的区别当然是分区的类型代码的不同,此外,在EFI/GPT下还要标注这个ESP是bootable,这个也许是适应多个ESP的考虑吧?grubx64.efiin a subdirectory ofEFInamed after the distribution (such asEFI/ubuntu/grubx64.efi), or sometimesEFI/BOOT/bootx64.efi(the "fallback filename," most commonly used on bootable external media like USB drives). As with BIOS-mode GRUB, additional configuration and driver files reside elsewhere, typically in/boot/grubon the installation OS; however, some distributions put these file on the ESP alongside the main GRUB binary. Note that this is the least common of the four configurations, since few EFI-based computers boot from MBR disks.
EFI-mode GRUB on GPT -- This configuration is just like EFI-mode on MBR, except that the ESP has a type code of C12A7328-F81F-11D2-BA4B-00A0C93EC93B ("boot flag" set on libparted-based tools, or type EF00 in GPT fdisk). This configuration is rapidly becoming the most common one, as the transition from BIOS to EFI is proceeding quickly.总之,这个帖子可以说非常全面的总结了grub在四种组合中的存在方式,非常的全面!值得收藏。
$ loop=$(sudo losetup -Pf --show Kylin-Desktop-V10-SP1-2403-HWE-Release-20240430-x86_64.iso)
$ echo "loop device is $loop and prepare to mount to kylin"
$ sudo mount $loop Kylin
$ mkdir CD_root
$ sudo rsync -avr ./Kylin CD_root
$ xorrisofs -o kylin_iso_boot.iso -b isolinux/isolinux.bin -c isolinux/boot.cat -no-emul-boot -boot-load-size 4 -boot-info-table ./Kylin
$ qemu-system-x86_64 -cdrom kylin_iso_boot.iso -m 4G
$ qemu-system-x86_64 -drive file=kylin_iso_boot.iso,format=raw -m 4G
$ qemu-system-x86_64 -bios /usr/share/qemu/OVMF.fd -drive file=kylin_iso_boot.iso,format=raw -m 4G
也就是说我需要这个isohdp[fp]x*.bin文件,locate isohdpfx.bin发现它的路径是/usr/lib/ISOLINUX/isohdpfx.bin,所以,产生ISO需要这么做:-isohybrid-mbr disk_path
Install disk_path as ISOLINUX isohybrid MBR which makes the boot image given by option -b bootable from USB sticks and hard disks via PC-BIOS. This preparation is normally done by ISOLINUX program isohybrid on the already produced ISO image.
The disk path should lead to one of the Syslinux files isohdp[fp]x*.bin . The MBR gets patched according to isohybrid needs. The first partition describes the range of the ISO image. Its start is at block 0 by default, but may be set to 64 disk blocks by option -partition_offset 16.
$ xorrisofs -o kylin_bios_boot.iso -b isolinux/isolinux.bin -c isolinux/boot.cat -no-emul-boot -boot-load-size 4 -boot-info-table -isohybrid-mbr /usr/lib/ISOLINUX/isohdpfx.bin -partition_offset 16 ./CD_root
$ qemu-system-x86_64 -cdrom kylin_bios_boot.iso -m 4G
$ qemu-system-x86_64 -drive file=kylin_bios_boot.iso,format=raw -m 4G
$ qemu-system-x86_64 -bios /usr/share/qemu/ -drive file=kylin_bios_boot.iso,format=raw -m 4G
$ gdisk -l kylin_bios_boot.iso
GPT fdisk (gdisk) version 1.0.8
Partition table scan:
MBR: MBR only
BSD: not present
APM: not present
GPT: not present
***************************************************************
Found invalid GPT and valid MBR; converting MBR to GPT format
in memory.
***************************************************************
Warning! Secondary partition table overlaps the last partition by
33 blocks!
You will need to delete this partition or resize it in another utility.
Disk kylin_bios_boot.iso: 8440740 sectors, 4.0 GiB
Sector size (logical): 512 bytes
Disk identifier (GUID): BB6C4582-21B8-4CF6-92E0-86F05B2DA5AA
Partition table holds up to 128 entries
Main partition table begins at sector 2 and ends at sector 33
First usable sector is 34, last usable sector is 8440706
Partitions will be aligned on 64-sector boundaries
Total free space is 30 sectors (15.0 KiB)
Number Start (sector) End (sector) Size Code Name
1 64 8440739 4.0 GiB 0700 Microsoft basic data
$ fdisk -l kylin_bios_boot.iso
Disk kylin_bios_boot.iso: 4.02 GiB, 4321658880 bytes, 8440740 sectors
Units: sectors of 1 * 512 = 512 bytes
Sector size (logical/physical): 512 bytes / 512 bytes
I/O size (minimum/optimal): 512 bytes / 512 bytes
Disklabel type: dos
Disk identifier: 0x4aa2f673
Device Boot Start End Sectors Size Id Type
kylin_bios_boot.iso1 * 64 8440739 8440676 4G 17 Hidden HPFS/NTFS
The MBR partitioning system uses a combination of cylinder/head/sector (CHS) addressing and logical block addressing (LBA). The former is klunky and limiting. GPT drops CHS addressing and uses 64-bit LBA mode exclusively. Thus, GPT data structures, and therefore gdisk, do not need to deal with CHS geometries and all the problems they create. Users of fdisk will note that gdisk lacks the options and limitations associated with CHS geometries.因为gdisk决定不使用CHS,那么它怎么办呢?只能使用64位寻址方式,为此,它必须自己创建GPT,而由此引发的虚拟的存在于内存的GPT表肯定没有在MBR创建的分区的结尾部分有GPT的备用表,这个当然是无意义的警告了。
The boot image file has to be the image of an EFI System Partition, i.e. a FAT filesystem with directory /EFI/BOOT and boot files with EFI prescribed names: BOOTIA32.EFI for 32 bit x86, BOOTx64.EFI for 64 bit AMD/x86 (in UEFI-2.4 there is indeed a lower case "x"), BOOTAA64.EFI for 64 bit ARM. The software in the FAT filesystem should be able to find and inspect the ISO filesystem for boot loader configuration and start of operating system. GRUB2 program grub-mkimage can produce such a FAT filesystem with suitable content, which then uses further GRUB2 software from the ISO filesystem.所以,第一步先看看openKylin是否符合,它的确是有这个boot/grub/efi.img
$ file kLinux/boot/grub/efi.img
kLinux/boot/grub/efi.img: DOS/MBR boot sector, code offset 0x3c+2, OEM-ID "mkfs.fat", sectors/cluster 4, root entries 512, sectors 8000 (volumes <=32 MB), Media descriptor 0xf8, sectors/FAT 6, sectors/track 32, heads 64, serial number 0x54c59c6c, unlabeled, FAT (12 bit)
$ dd if=kLinux/boot/grub/efi.img bs=512 count=1
�<�mkfs.fat@� @�)l��TNO NAME FAT12 �[|�"�t
V���^��2�����This is not a bootable disk. Please insert a bootable floppy and
press any key to try again ...
U�1+0 records in
1+0 records out
512 bytes copied, 5.0976e-05 s, 10.0 MB/s
$ loop=$(sudo losetup -Pf --show kLinux/boot/grub/efi.img)
$ echo "loop device is $loop and prepare to mount to ESP"
$ sudo mount $loop ESP
$ find ESP | sed -e "s/[^-][^\/]*\// |/g" -e "s/|\([^ ]\)/|-\1/"
ESP
|-efi
| |-boot
| | |-bootx64.efi
| | |-grubx64.efi
| | |-mmx64.efi
|-NvVars
prefix选项,就是-p,我感觉这个几乎大家都是选择/boot,或者大写因为ISO不分大小写?这个grub-mkimage远比我想像的复杂,或者说它太灵活了,我还没有明白我要选择什么module,而且要自己组合bootable的那些预制的image,比如在
$ ll /usr/lib/grub/i386-pc/*.img
-rw-r--r-- 1 root root 512 Dec 19 2022 /usr/lib/grub/i386-pc/boot_hybrid.img
-rw-r--r-- 1 root root 512 Dec 19 2022 /usr/lib/grub/i386-pc/boot.img
-rw-r--r-- 1 root root 2048 Dec 19 2022 /usr/lib/grub/i386-pc/cdboot.img
-rw-r--r-- 1 root root 512 Dec 19 2022 /usr/lib/grub/i386-pc/diskboot.img
-rw-r--r-- 1 root root 512 Dec 19 2022 /usr/lib/grub/i386-pc/g2hdr.img
-rw-r--r-- 1 root root 10240 Dec 19 2022 /usr/lib/grub/i386-pc/g2ldr.img
-rw-r--r-- 1 root root 10240 Dec 19 2022 /usr/lib/grub/i386-pc/grldr.img
-rw-r--r-- 1 root root 29916 Dec 19 2022 /usr/lib/grub/i386-pc/kernel.img
-rw-r--r-- 1 root root 1024 Dec 19 2022 /usr/lib/grub/i386-pc/lnxboot.img
-rw-r--r-- 1 root root 2848 Dec 19 2022 /usr/lib/grub/i386-pc/lzma_decompress.img
-rw-r--r-- 1 root root 1024 Dec 19 2022 /usr/lib/grub/i386-pc/pxeboot.img
$ dd of=esp.img if=/dev/zero bs=1M count=4
$ mkfs.fat esp.img
$ mkdir esp
$ sudo mount esp.img esp
sudo rsync -avr ESP/* esp
$ xorrisofs -o kylin_efi_bios_boot.iso -b isolinux/isolinux.bin -c isolinux/boot.cat -no-emul-boot -boot-load-size 4 -boot-info-table -eltorito-alt-boot -e 'boot/grub/efi.img' -no-emul-boot -append_partition 2 0xef ./CD_root/boot/grub/efi.img ./CD_root
$ qemu-system-x86_64 -bios /usr/share/qemu/OVMF.fd -drive file=kylin_efi_bios_boot.iso,format=raw -m 4G
$ qemu-system-x86_64 -cdrom kylin_efi_bios_boot.iso -m 4G
$ xorrisofs -o kylin_bios_uefi_mbr_gpt_boot.iso -b isolinux/isolinux.bin -c isolinux/boot.cat -no-emul-boot -boot-load-size 4 -boot-info-table -isohybrid-mbr /usr/lib/ISOLINUX/isohdpfx.bin -partition_offset 16 -eltorito-alt-boot -e 'boot/grub/efi.img' -no-emul-boot -append_partition 2 0xef ./CD_root/boot/grub/efi.img ./CD_root
$ gdisk -l kylin_bios_uefi_mbr_gpt_boot.iso
GPT fdisk (gdisk) version 1.0.8
Partition table scan:
MBR: MBR only
BSD: not present
APM: not present
GPT: not present
***************************************************************
Found invalid GPT and valid MBR; converting MBR to GPT format
in memory.
***************************************************************
Disk kylin_bios_uefi_mbr_gpt_boot.iso: 8399636 sectors, 4.0 GiB
Sector size (logical): 512 bytes
Disk identifier (GUID): A271E6AF-2F47-40FB-93A0-6713497B3CAB
Partition table holds up to 128 entries
Main partition table begins at sector 2 and ends at sector 33
First usable sector is 34, last usable sector is 8399602
Partitions will be aligned on 4-sector boundaries
Total free space is 597 sectors (298.5 KiB)
Number Start (sector) End (sector) Size Code Name
1 64 8390843 4.0 GiB 0700 Microsoft basic data
2 8390844 8399035 4.0 MiB EF00 EFI system partition
七月三十日 等待变化等待机会
$ fdisk -l openKylin-1.0.2-x86_64.iso | grep Disklabel\ type:
Disklabel type: dos
$ fdisk -l ubuntu-24.04-desktop-amd64.iso | grep Disklabel\ type:
Disklabel type: gpt
$ fdisk -l archlinux-2024.07.01-x86_64.iso | grep Disklabel\ type:
Disklabel type: dos
$ gdisk -l lubuntu-22.04.4-desktop-amd64.iso | grep Partition\ table\ scan: -A 4
Partition table scan:
MBR: protective
BSD: not present
APM: not present
GPT: present
$ gdisk -l archlinux-2024.07.01-x86_64.iso | grep Partition\ table\ scan: -A 4
Partition table scan:
MBR: MBR only
BSD: not present
APM: not present
GPT: present
$ gdisk -l kylin_bios_uefi_mbr_gpt_boot.iso | grep Partition\ table\ scan: -A 4
Partition table scan:
MBR: MBR only
BSD: not present
APM: not present
GPT: not present
$ xorrisofs -o kylin_bios_uefi_mbr_gpt_boot_gpt.iso -b isolinux/isolinux.bin -c isolinux/boot.cat -no-emul-boot -boot-load-size 4 -boot-info-table -isohybrid-mbr /usr/lib/ISOLINUX/isohdpfx.bin -partition_offset 16 -eltorito-alt-boot -e 'boot/grub/efi.img' -no-emul-boot -append_partition 2 0xef ./CD_root/boot/grub/efi.img -appended_part_as_gpt ./CD_root
$ gdisk -l kylin_bios_uefi_mbr_gpt_boot_gpt.iso | grep Partition\ table\ scan: -A 4
Partition table scan:
MBR: protective
BSD: not present
APM: not present
GPT: present
| 存储媒介 | 启动模式 | 测试命令 | 启动结果 |
|---|---|---|---|
| CDROM | BIOS | |
SUCCESS |
| CDROM | UEFI | |
SUCCESS |
| USB | BIOS | |
SUCCESS |
| USB | UEFI | |
FAILURE |
行百里者半九十!这最后一步GPT/PMBR却让我找不到方向。一个思路是模仿ubuntu的命令解析,就是ubuntu重新制作的命令,但是这个似乎让我摸不着头脑如何给参数,另一个可能就是manpage里输出的是as_mkisofs的形式:
$ xorriso -indev ubuntu-24.04-desktop-amd64.iso -report_el_torito as_mkisofs
xorriso 1.5.4 : RockRidge filesystem manipulator, libburnia project.
xorriso : NOTE : Loading ISO image tree from LBA 0
xorriso : UPDATE : 1210 nodes read in 1 seconds
libisofs: NOTE : Found hidden El-Torito image for EFI.
libisofs: NOTE : EFI image start and size: 2982971 * 2048 , 10140 * 512
xorriso : NOTE : Detected El-Torito boot information which currently is set to be discarded
Drive current: -indev 'ubuntu-24.04-desktop-amd64.iso'
Media current: stdio file, overwriteable
Media status : is written , is appendable
Boot record : El Torito , MBR protective-msdos-label grub2-mbr cyl-align-off GPT
Media summary: 1 session, 2985672 data blocks, 5831m data, 1186g free
Volume id : 'Ubuntu 24.04 LTS amd64'
-V 'Ubuntu 24.04 LTS amd64'
--modification-date='2024042411290900'
--grub2-mbr --interval:local_fs:0s-15s:zero_mbrpt,zero_gpt:'ubuntu-24.04-desktop-amd64.iso'
--protective-msdos-label
-partition_cyl_align off
-partition_offset 16
--mbr-force-bootable
-append_partition 2 28732ac11ff8d211ba4b00a0c93ec93b --interval:local_fs:11931884d-11942023d::'ubuntu-24.04-desktop-amd64.iso'
-appended_part_as_gpt
-iso_mbr_part_type a2a0d0ebe5b9334487c068b6b72699c7
-c '/boot.catalog'
-b '/boot/grub/i386-pc/eltorito.img'
-no-emul-boot
-boot-load-size 4
-boot-info-table
--grub2-boot-info
-eltorito-alt-boot
-e '--interval:appended_partition_2_start_2982971s_size_10140d:all::'
-no-emul-boot
-boot-load-size 10140
nick@nick-sager:~/workspace/Downloads/IS
踏破铁鞋无觅处,得来全不费工夫。这里给出了关键的参数,不能使用-appended_part_as_gpt,而要使用-isohybrid-gpt-basdat
-isohybrid-gpt-basdat这段话非常的难懂,我在随后的f/gdisk的输出结果中才能慢慢体会到一点点。 所以,这个命令是最终正确的做法:Mark the current El Torito boot image (see options -b and -e) in an actually invalid GPT as partition of type Basic Data. This works only with -isohybrid-mbr and has the same impact on the system area as -efi-boot-part. It cannot be combined with -efi-boot-part or -hfsplus.
The first three boot images which are marked by GPT will also show up as partition entries in MBR. The MBR partition of type 0xEF is what actually is used by EFI firmware for booting from USB stick. The MBR partition for PC-BIOS gets type 0x00 rather than 0x17 in this case. Often the further MBR entries are the ones which actually get used by EFI.
O$ xorrisofs -o kylin_bios_uefi_mbr_gpt_boot_gpt_fix.iso -b isolinux/isolinux.bin -c isolinux/boot.cat -no-emul-boot -boot-load-size 4 -boot-info-table -isohybrid-mbr /usr/lib/ISOLINUX/isohdpfx.bin -partition_offset 16 -eltorito-alt-boot -e 'boot/grub/efi.img' -no-emul-boot -append_partition 2 0xef ./CD_root/boot/grub/efi.img -isohybrid-gpt-basdat ./CD_root
$ gdisk -l kylin_bios_uefi_mbr_gpt_boot_gpt_fix.iso | grep Partition\ table\ scan: -A 4
Partition table scan:
MBR: MBR only
BSD: not present
APM: not present
GPT: present
Number Start (sector) End (sector) Size Code Name
2 8390844 8399035 4.0 MiB EF00 EFI system partition
Device Boot Start End Sectors Size Id Type
kylin_bios_uefi_mbr_gpt_boot_gpt_fix.iso1 * 64 8390843 8390780 4G 0 Empty
kylin_bios_uefi_mbr_gpt_boot_gpt_fix.iso2 8390844 8399035 8192 4M ef EFI (FAT-12/16/32)
$ xxd -s 446 -l 64 kylin_bios_uefi_mbr_gpt_boot_gpt_fix.iso
000001be: 8001 0200 0083 fff0 4000 0000 7c08 8000 ........@...|...
000001ce: 0000 c1f1 ef82 c2f1 bc08 8000 0020 0000 ............. ..
000001de: 0000 0000 0000 0000 0000 0000 0000 0000 ................
000001ee: 0000 0000 0000 0000 0000 0000 0000 0000 ................
Number Start (sector) End (sector) Size Code Name
1 64 8390843 4.0 GiB 0700 ISOHybrid
2 872 9063 4.0 MiB 0700 ISOHybrid1
3 8390844 8399035 4.0 MiB EF00 Appended2
八月一日 等待变化等待机会
$ xxd -s 446 -l 16 kylin_bios_uefi_mbr_gpt_boot_gpt_fix.iso
000001be: 8001 0200 0083 fff0 4000 0000 7c08 8000 ........@...|...
$ xxd -s 1024 -l 128 kylin_bios_uefi_mbr_gpt_boot_gpt_fix.iso
00000400: a2a0 d0eb e5b9 3344 87c0 68b6 b726 99c7 ......3D..h..&..
00000410: 1f34 d80a dcb0 1243 a64d 5889 7c3e b925 .4.....C.MX.|>.%
00000420: 4000 0000 0000 0000 bb08 8000 0000 0000 @...............
00000430: 0100 0000 0000 0010 4900 5300 4f00 4800 ........I.S.O.H.
00000440: 7900 6200 7200 6900 6400 0000 0000 0000 y.b.r.i.d.......
00000450: 0000 0000 0000 0000 0000 0000 0000 0000 ................
00000460: 0000 0000 0000 0000 0000 0000 0000 0000 ................
00000470: 0000 0000 0000 0000 0000 0000 0000 0000 ................
Number Start (sector) End (sector) Size Code Name
1 64 8390843 4.0 GiB 0700 ISOHybrid
$ xxd -s 1152 -l 128 kylin_bios_uefi_mbr_gpt_boot_gpt_fix.iso
00000480: a2a0 d0eb e5b9 3344 87c0 68b6 b726 99c7 ......3D..h..&..
00000490: 1f34 d80a dcb0 1243 a64e 5889 7c3e b925 .4.....C.NX.|>.%
000004a0: 6803 0000 0000 0000 6723 0000 0000 0000 h.......g#......
000004b0: 0100 0000 0000 0010 4900 5300 4f00 4800 ........I.S.O.H.
000004c0: 7900 6200 7200 6900 6400 3100 0000 0000 y.b.r.i.d.1.....
000004d0: 0000 0000 0000 0000 0000 0000 0000 0000 ................
000004e0: 0000 0000 0000 0000 0000 0000 0000 0000 ................
000004f0: 0000 0000 0000 0000 0000 0000 0000 0000 ................
$ xxd -s 1280 -l 128 kylin_bios_uefi_mbr_gpt_boot_gpt_fix.iso
00000500: 2873 2ac1 1ff8 d211 ba4b 00a0 c93e c93b (s*......K...>.;
00000510: 1f34 d80a dcb0 1243 a64f 5889 7c3e b925 .4.....C.OX.|>.%
00000520: bc08 8000 0000 0000 bb28 8000 0000 0000 .........(......
00000530: 0000 0000 0000 0000 4100 7000 7000 6500 ........A.p.p.e.
00000540: 6e00 6400 6500 6400 3200 0000 0000 0000 n.d.e.d.2.......
00000550: 0000 0000 0000 0000 0000 0000 0000 0000 ................
00000560: 0000 0000 0000 0000 0000 0000 0000 0000 ................
00000570: 0000 0000 0000 0000 0000 0000 0000 0000 ................
Value Meaning
- PARTITION_BASIC_DATA_GUID
- ebd0a0a2-b9e5-4433-87c0-68b6b72699c7
The data partition type that is created and recognized by Windows. Only partitions of this type can be assigned drive letters, receive volume GUID paths, host mounted folders (also called volume mount points), and be enumerated by calls to FindFirstVolume and FindNextVolume.
This value can be set only for basic disks, with one exception. If both PARTITION_BASIC_DATA_GUID and GPT_ATTRIBUTE_PLATFORM_REQUIRED are set for a partition on a basic disk that is subsequently converted to a dynamic disk, the partition remains a basic partition, even though the rest of the disk is a dynamic disk. This is because the partition is considered to be an OEM partition on a GPT disk.
- PARTITION_ENTRY_UNUSED_GUID
- 00000000-0000-0000-0000-000000000000
There is no partition. This value can be set for basic and dynamic disks.
- PARTITION_SYSTEM_GUID
- c12a7328-f81f-11d2-ba4b-00a0c93ec93b
The partition is an EFI system partition. This value can be set for basic and dynamic disks.
- PARTITION_MSFT_RESERVED_GUID
- e3c9e316-0b5c-4db8-817d-f92df00215ae
The partition is a Microsoft reserved partition. This value can be set for basic and dynamic disks.
- PARTITION_LDM_METADATA_GUID
- 5808c8aa-7e8f-42e0-85d2-e1e90434cfb3
The partition is a Logical Disk Manager (LDM) metadata partition on a dynamic disk. This value can be set only for dynamic disks.
- PARTITION_LDM_DATA_GUID
- af9b60a0-1431-4f62-bc68-3311714a69ad
The partition is an LDM data partition on a dynamic disk. This value can be set only for dynamic disks.
- PARTITION_MSFT_RECOVERY_GUID
- de94bba4-06d1-4d40-a16a-bfd50179d6ac
The partition is a Microsoft recovery partition. This value can be set for basic and dynamic disks.
$ xxd -s 446 -l 32 kylin_bios_uefi_mbr_gpt_boot_gpt_fix.iso
000001be: 8001 0200 0083 fff0 4000 0000 7c08 8000 ........@...|...
000001ce: 0000 c1f1 ef82 c2f1 bc08 8000 0020 0000 ............. ..
这里明确提到了它是由EFI支持的分区类型,从这一点来说就是一个古老的系统它仅仅支持BIOS/MBR启动,那么它要如何做到支持UEFI/GPT启动呢?在MBR的启动分区里bootloader瞄准的这个虽然不是bootable,但是它的类型是0xEF,导致它被load了,而那个bootable的分区因为类型是不可用的0x00,反而被忽视了,它的作用仅仅是表示不要使用GPT,这个是MBR only。这个真的是很奇怪的组合啊!
Partition Id Occurrence Access Bootable Type Origin Supported By Description EFhMBR Service FS Intel EFI EFI system partition. Can be a FAT12, FAT16, FAT32 (or other) file system EEh
就是说针对古老的系统只支持BIOS/MBR的而不能实现GPT/UEFI启动的话,做法是在bootloader这一层来实现对于GPT的支持,那么在这种方式下的MBR的boot code是bootloader的所谓的first stage,它要load后续的second stage bootloader,比如grub的另一部分,也许是grubx86.efi,这个对应于EFI模式,或者。。。等等再看。总之,是bootloader来实现GPT的机制,那么GPT存在于LBA1,那么只能使用一个单独的分区来存放这个second stage bootloader,这个在一些模式下叫做BIOS Boot Partition, which has a GPT type code of 21686148-6449-6E6F-744E-656564454649 ("bios_grub flag" set in libparted-based tools, or type EF02 in GPT fdisk)。Hybrid MBR (LBA 0 + GPT)
In operating systems that support GPT-based boot through BIOS services rather than EFI, the first sector may also still be used to store the first stage of the bootloader code, but modified to recognize GPT partitions. The bootloader in the MBR must not assume a sector size of 512 bytes.
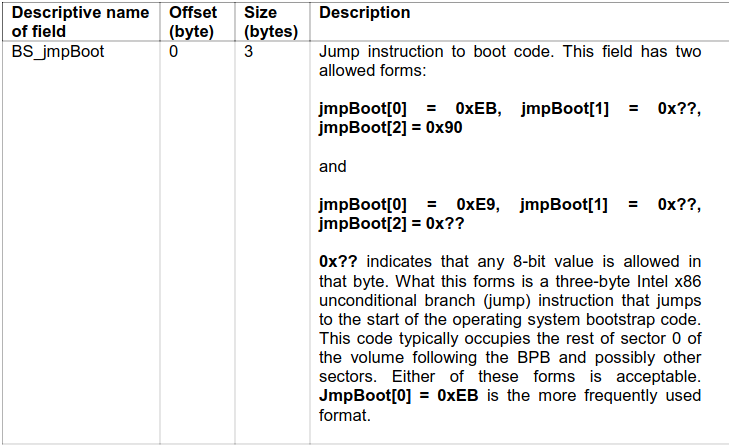
$ xxd -s 446464 -l 11 kylin_bios_uefi_mbr_gpt_boot_gpt_fix.iso
0006d000: eb3c 906d 6b66 732e 6661 74 .<.mkfs.fat
$ sudo mount -o offset=446464 kylin_bios_uefi_mbr_gpt_boot_gpt_fix.iso part1
$ ll part1
total 34
drwxr-xr-x 3 root root 16384 Jan 1 1970 ./
drwxrwxr-x 21 nick nick 4096 Aug 1 08:49 ../
drwxr-xr-x 3 root root 2048 Jan 30 2021 efi/
-rwxr-xr-x 1 root root 11741 Jul 30 09:17 NvVars*
$ sudo mount -o offset=4296112128 kylin_bios_uefi_mbr_gpt_boot_gpt_fix.iso part2
[sudo] password for nick:
mount: part2: /home/nick/workspace/Downloads/ISO/kylin_bios_uefi_mbr_gpt_boot_gpt_fix.iso is already mounted.
Number Start (sector) End (sector) Size Code Name
1 64 8390843 4.0 GiB 0700 ISOHybrid
2 872 9063 4.0 MiB 0700 ISOHybrid1
3 8390844 8399035 4.0 MiB EF00 Appended2
$ sudo mount -v -o offset=$((872*512)),sizelimit=$(((9063-872)*512)) kylin_bios_uefi_mbr_gpt_boot_gpt_fix.iso part1
mount: /dev/loop49 mounted on /home/nick/workspace/Downloads/ISO/part1.
$ sudo mount -v -o offset=$((8390844*512)),sizelimit=$(((8399035-8390844)*512)) kylin_bios_uefi_mbr_gpt_boot_gpt_fix.iso part2
mount: /dev/loop50 mounted on /home/nick/workspace/Downloads/ISO/part2.
$ diff -rq part1 part2
$ find part1 | sed -e "s/[^-][^\/]*\// |/g" -e "s/|\([^ ]\)/|-\1/"
part1
|-efi
| |-boot
| | |-bootx64.efi
| | |-grubx64.efi
| | |-mmx64.efi
|-NvVars
类似于alias的分区表,并不存在说第一个分区是隐含的指向第二个分区,在磁盘偏移不同的两个分区是彼此独立的,但是mount有一个优化:
Since util-linux v2.29, mount re-uses the loop device rather than initializing a new device if the same backing file is already used for some loop device with the same offset and sizelimit. This is necessary to avoid a filesystem corruption.这里我还是持怀疑态度,两个不同偏移即便大小一样怎么就能当作同一个文件系统呢?难道这个是ISO的el-torito的机制在文件系统里我的确是把一个EFI的partition作为一个image文件传递给了xorrisofs,就是/boot/grub/efi.img,是不是在El Torito里它们是一个?
$ xorrisofs -J -o kylin_bios_uefi_mbr_gpt_boot_gpt_fix.iso -b isolinux/isolinux.bin -c isolinux/boot.cat -no-emul-boot -boot-load-size 4 -boot-info-table -isohybrid-mbr /usr/lib/ISOLINUX/isohdpfx.bin -partition_offset 16 -eltorito-alt-boot -e 'boot/grub/efi.img' -no-emul-boot -append_partition 2 0xef ./CD_root/boot/grub/efi.img -isohybrid-gpt-basdat ./CD_root
我们的军事原则是:(1)先打分散和孤立之敌,后打集中和强大之敌。(2)先取小城市、中等城市和广大乡村,后取大城市。(3)以歼灭敌人有生力量为主要 目标,不以保守或夺取城市和地方为主要目标。保守或夺取城市和地方,是歼灭敌人有生力量的结果,往往需要反复多次才能最后地保守或夺取之。(4)每战集中 绝对优势兵力(两倍、三倍、四倍、有时甚至是五倍或六倍于敌之兵力),四面包围敌人,力求全歼,不使漏网。在特殊情况下,则采用给敌以歼灭性打击的方法, 即集中全力打敌正面及其一翼或两翼,求达歼灭其一部、击溃其另一部的目的,以便我军能够迅速转移兵力歼击他部敌军。力求避免打那种得不偿失的、或得失相当 的消耗战。这样,在全体上,我们是劣势(就数量来说),但在每一个局部上,在每一个具体战役上,我们是绝对的优势,这就保证了战役的胜利。随着时间的推 移,我们就将在全体上转变为优势,直到歼灭一切敌人。(5)不打无准备之仗,不打无把握之仗,每战都应力求有准备,力求在敌我条件对比下有胜利的把握。 (6)发扬勇敢战斗、不怕牺牲、不怕疲劳和连续作战(即在短期内不休息地接连打几仗)的作风。(7)力求在运动中歼灭敌人。同时,注重阵地攻击战术,夺取 敌人的据点和城市。(8)在攻城问题上,一切敌人守备薄弱的据点和城市,坚决夺取之。一切敌人有中等程度的守备、而环境又许可加以夺取的据点和城市,相机 夺取之。一切敌人守备强固的据点和城市,则等候条件成熟时然后夺取之。(9)以俘获敌人的全部武器和大部人员,补充自己。我军人力物力的来源,主要在前 线。(10)善于利用两个战役之间的间隙,休息和整训部队。休整的时间,一般地不要过长,尽可能不使敌人获得喘息的时间。
八月二日 等待变化等待机会
$ xorriso -indev openKylin-1.0.2-x86_64.iso -report_el_torito as_mkisofs
xorriso 1.5.4 : RockRidge filesystem manipulator, libburnia project.
xorriso : NOTE : Loading ISO image tree from LBA 0
xorriso : UPDATE : 376 nodes read in 1 seconds
xorriso : NOTE : Detected El-Torito boot information which currently is set to be discarded
Drive current: -indev 'openKylin-1.0.2-x86_64.iso'
Media current: stdio file, overwriteable
Media status : is written , is appendable
Boot record : El Torito , MBR isohybrid cyl-align-all GPT APM
Media summary: 1 session, 1942080 data blocks, 3793m data, 1182g free
Volume id : 'openKylin-1.0'
-V 'openKylin-1.0'
--modification-date='2024031414052600'
-isohybrid-mbr --interval:local_fs:0s-15s:zero_mbrpt,zero_gpt,zero_apm:'openKylin-1.0.2-x86_64.iso'
-partition_cyl_align all
-partition_offset 0
-partition_hd_cyl 238
-partition_sec_hd 32
--mbr-force-bootable
-append_partition 2 0xef --interval:local_fs:7768320d-7783551d::'openKylin-1.0.2-x86_64.iso'
-apm-block-size 2048
-iso_mbr_part_type 0x00
-c '/isolinux/boot.cat'
-b '/isolinux/isolinux.bin'
-no-emul-boot
-boot-load-size 4
-boot-info-table
-eltorito-alt-boot
-e '/boot/grub/efi.img'
-no-emul-boot
-boot-load-size 8000
-isohybrid-gpt-basdat
-isohybrid-apm-hfsplus
$ xorrisofs -J -o kylin_new.iso -V 'kylin-new-iso' --modification-date='2024080214052600' -isohybrid-mbr /usr/lib/ISOLINUX/isohdpfx.bin -partition_cyl_align all -partition_offset 0 -partition_hd_cyl 238 -partition_sec_hd 32 --mbr-force-bootable -append_partition 2 0xef ./CD_root/boot/grub/efi.img -apm-block-size 2048 -iso_mbr_part_type 0x00 -b isolinux/isolinux.bin -c isolinux/boot.cat -no-emul-boot -boot-load-size 4 -boot-info-table -eltorito-alt-boot -e 'boot/grub/efi.img' -no-emul-boot -boot-load-size 8000 -isohybrid-gpt-basdat -isohybrid-apm-hfsplus ./CD_root
nested partition的问题,至少是掩盖吧?
$ gdisk -l kylin_new.iso
GPT fdisk (gdisk) version 1.0.8
Partition table scan:
MBR: MBR only
BSD: not present
APM: not present
GPT: present
Found valid MBR and GPT. Which do you want to use?
1 - MBR
2 - GPT
3 - Create blank GPT
Your answer: 2
Using GPT and creating fresh protective MBR.
Warning! Main partition table overlaps the first partition by 64 blocks!
You will need to delete this partition or resize it in another utility.
Disk kylin_new.iso: 8399816 sectors, 4.0 GiB
Sector size (logical): 512 bytes
Disk identifier (GUID): ACD402AE-F8D9-4A80-8145-BF9477C809DC
Partition table holds up to 208 entries
Main partition table begins at sector 12 and ends at sector 63
First usable sector is 64, last usable sector is 8399762
Partitions will be aligned on 4-sector boundaries
Total free space is 603 sectors (301.5 KiB)
Number Start (sector) End (sector) Size Code Name
2 768 8959 4.0 MiB 0700 ISOHybrid1
3 8390844 8399159 4.1 MiB EF00 Appended2
这一段话很深奥,我还没有理解,这个partition_offset的含义我一直不懂,它和文件系统的superblock有什么关系?Due to option -partition_offset 16, there is a mountable ISO 9660 superblock at the start of the first partition (64 * 512 = 32768): $ sudo mount -o offset=32768 /dvdbuffer/test.iso /mnt/iso2 mount: /dev/loop1 is write-protected, mounting read-only
$ xorriso -as mkisofs -r -V "kylin-new.iso" -o kylin_new.iso -J -J -joliet-long \
-isohybrid-mbr /usr/lib/ISOLINUX/isohdpfx.bin -b isolinux/isolinux.bin -c isolinux/boot.cat -boot-load-size 4 -boot-info-table -no-emul-boot \
-eltorito-alt-boot -e boot/grub/efi.img -no-emul-boot -isohybrid-gpt-basdat -isohybrid-apm-hfsplus \
./CD_root
$ gdisk -l kylin_new.iso
GPT fdisk (gdisk) version 1.0.8
Partition table scan:
MBR: MBR only
BSD: not present
APM: not present
GPT: present
Found valid MBR and GPT. Which do you want to use?
1 - MBR
2 - GPT
3 - Create blank GPT
Your answer: 1
Disk kylin_new.iso: 8399160 sectors, 4.0 GiB
Sector size (logical): 512 bytes
Disk identifier (GUID): CE05F2F3-1BCC-4977-B53F-4D2AB4D5EB9B
Partition table holds up to 128 entries
Main partition table begins at sector 2 and ends at sector 33
First usable sector is 34, last usable sector is 8399126
Partitions will be aligned on 256-sector boundaries
Total free space is 8390901 sectors (4.0 GiB)
Number Start (sector) End (sector) Size Code Name
2 768 8959 4.0 MiB EF00 EFI system partition
$ gdisk -l kylin_new.iso
GPT fdisk (gdisk) version 1.0.8
Partition table scan:
MBR: MBR only
BSD: not present
APM: not present
GPT: present
Found valid MBR and GPT. Which do you want to use?
1 - MBR
2 - GPT
3 - Create blank GPT
Your answer: 2
Using GPT and creating fresh protective MBR.
Warning! Main partition table overlaps the first partition by 64 blocks!
You will need to delete this partition or resize it in another utility.
Disk kylin_new.iso: 8399160 sectors, 4.0 GiB
Sector size (logical): 512 bytes
Disk identifier (GUID): 7F3E5F8A-71D9-47CF-A6D1-4A87DE97C955
Partition table holds up to 208 entries
Main partition table begins at sector 12 and ends at sector 63
First usable sector is 64, last usable sector is 8399106
Partitions will be aligned on 256-sector boundaries
Total free space is 3 sectors (1.5 KiB)
Number Start (sector) End (sector) Size Code Name
2 768 8959 4.0 MiB 0700 ISOHybrid1
$ fdisk -l kylin_new.iso
Disk kylin_new.iso: 4.01 GiB, 4300369920 bytes, 8399160 sectors
Units: sectors of 1 * 512 = 512 bytes
Sector size (logical/physical): 512 bytes / 512 bytes
I/O size (minimum/optimal): 512 bytes / 512 bytes
Disklabel type: dos
Disk identifier: 0x2ed51551
Device Boot Start End Sectors Size Id Type
kylin_new.iso1 * 0 8399159 8399160 4G 0 Empty
kylin_new.iso2 768 8959 8192 4M ef EFI (FAT-12/16/32)
它这个好的地方还包括了其他架构的CPU的解释,比如arm64根本就不支持传统的PC-BIOS,那么根本就不存在hybrid的选项,那么对于增加一个分区就必须使用-append_partition 2 0xef /srv/.../efi.img这种直截了当的命令参数,因为hybrid选项是帮助你创建分区了。这里分区序列号很关键,我之前就是在这里犯迷糊,如果已经有两个分区了,那当然就不是2了。
- -isohybrid-mbr .../isohdpfx.bin installs an MBR at the start of the ISO image所以,这里是否应该使用-partition-offset 16是一个考虑,我还是没有完全理解分区从0开始有什么问题。. This enables booting from USB stick via legacy BIOS. We need to extract the first 432 bytes of the ISO into a disk file and give that file as argument to our -isohybrid-mbr option. 如果我添加了-partition-offset 16就导致我会在gdisk里GPT模式下看到原先隐藏的主分区,这个似乎是个问题吧?
- -b isolinux/isolinux.bin marks the file /isolinux/isolinux.bin in the ISO as EL Torito boot image for legacy BIOS这个解释的太好了!就是添加El Torito的boot record的动作吧?这个和下面的添加UEFI的启动分区影象类似的给了直接的boot loader的文件. This enables booting from CD, DVD or BD media. We keep it.
- -c isolinux/boot.cat publishes the El Torito boot catalog as data file in the ISO. This is purely ornamental. 说的太好了,它没有什么大用,我看不到这个文件有什么用途。也许学习制作菜单才能明白吧?We keep it.
- -boot-load-size 4 -boot-info-table -no-emul-boot are additional options for the BIOS boot image.的确他们的具体作用并不是都清楚 We keep them.
- -eltorito-alt-boot ends这个说的太好了,我一直以为它是开始一个新的,原来是结束旧的 the definition of the BIOS boot image. We keep it.
- -e boot/grub/efi.img marks the file /boot/grub/efi.img in the ISO as EL Torito boot image for EFI这个是非常关键的参数,是EFI启动的关键,但是分区表也是自动配置的吗?. This enables booting from CD, DVD or BD media. We keep it.
- -no-emul-boot is a necessary addtitional option to -e. We keep it.
- -isohybrid-gpt-basdat causes the creation of a partition of type 0xef in the MBR partition table这个说明太关键了,终于点出了它的重要性,我一直不理解它的作用,因为参数名称非常的令人费解,这里说是在MBR里创建,但是参数名字却说的是GPT所以,才迷惑人。. It also causes production of a GPT 所 以,它是两重的作用,相当于定调要使用GPT,因为添加了一个boot image,应该说hybrid就意味着MBR/GPT共存,所以一定会在两个分区表都添加这个分区,并且在MBR里设定它是EFI分区类型,至于说为什 么GPT变成invalid是因为没有设定成PMBR,可是如果是PMBR就纯粹是GPT,那也就不算是hybrid了。所以,hybrid是一个没有规 范的约定成俗,是纯粹为了兼而有之的做法,完全是一种漏洞。which stays invalid, nevertheless, because of the existence of the MBR partition. The MBR partition marks the -e boot image as EFI System Partition. This is needed for booting via EFI from USB stick. We keep it.
- -isohybrid-apm-hfsplus causes production of an Apple Partition Map纯粹为了苹果 with a partition entry for the -e boot image. It is useless, though, because no HFS+ filesystem image is present which would be used by some Macs as boot entry point. We keep it just because we only make necessary changes here.
The candidates for MBR booting will normally use El Torito rather than MBR if the ISO image is presented on CD, DVD, or BD media. The MBR comes into effect if the image is on a media that is interpreted by the BIOS as some kind of hard disk. Usually real hard disks, floppy disks, USB sticks, memory cards.这个就是大师的精句,我的观点就是从这里来的。我还是保存一份文本吧! 对于初学者最容易犯糊涂的一个就是ISO使用的block size是2K,所以,MBR_LBA = ISO_LBA * 4,在磁盘世界里大家用的都是LBA size=0.5K
这个是完整的汇编的入门,可是我实在是没有兴趣也没有使用的场景,我仅仅需要理解大师文档里突然冒出来的汇编写法是设呢意思而已。其实我也不需要理解了,因为那个是计算CHS地址,真的需要吗?另一个事情是大师所说的MBR是一个非传统的结构而是现代的,就是说在分区表(偏移446)前6个byte是所谓的disk signature
EAXis the full 32-bit valueAXis the lower 16-bitsALis the lower 8 bitsAHis the bits 8 through 15 (zero-based), the top half of AXSo AX is composed of AH:AL halves, and is itself the low half of EAX. (The upper half of EAX isn't directly accessible as a 16-bit register; you can shift or rotate EAX if you want to get at it.)
x86-64 CPUs extend the integer registers to 64-bit:
RAXis the full 64-bit value, with EAX and its sub-components mapped to the lower 32 bits. The upper half of 64-bit registers is only accessible in 64-bit mode, unlike 32-bit registers which can be used in any mode on CPUs that support them.All of this also applies to EBX/RBX, ECX/RCX, and EDX/RDX. The other registers like EDI/RDI have a DI low 16-bit partial register, but no high-8 part, and the low-8 DIL is only accessible in 64-bit mode: Assembly registers in 64-bit architecture
As for booting Legacy BIOS from a GPT partitioned drive: UEFI specs define that a GPT begins by an MBR with a single partition in its table which must be of type 0xEE and begin at block 1. The code area of the MBR is to be ignored by UEFI and thus can be used for the first stage boot code which a Legacy BIOS will execute.这个是为什么PC-BIOS模式下能够启动的原因,因为在MBR的bootsector部分就是0-445的部分可以存放isolinux的first stage bootloader,而它的地址是el torito的boot catalogue(原理上吧?)
八月三日 等待变化等待机会
O$ ll Kylin/EFI/BOOT/
total 1649
dr-xr-xr-x 2 root root 2048 Apr 7 15:16 ./
dr-xr-xr-x 3 root root 2048 Apr 7 15:16 ../
-r-xr-xr-x 1 root root 561152 Apr 7 15:16 BOOT.EFI*
-r-xr-xr-x 1 root root 561152 Apr 7 15:16 BOOTX64.EFI*
-r-xr-xr-x 1 root root 561152 Apr 7 15:16 grubx64.efi*
-r--r--r-- 1 root root 666 Apr 7 15:47 TRANS.TBL
$ xorriso -as mkisofs -r -V "Kylin-Desktop-V10-x86_64" -o kylin_fixed.iso -J -joliet-long -isohybrid-mbr /usr/lib/ISOLINUX/isohdpfx.bin -b isolinux/isolinux.bin -c isolinux/boot.cat -boot-load-size 4 -boot-info-table -no-emul-boot -eltorito-alt-boot -e boot/grub/efi.img -no-emul-boot -isohybrid-gpt-basdat ./CD_data
八月四日 等待变化等待机会
$ qemu-system-x86_64 --enable-kvm -bios /usr/share/qemu/OVMF.fd -device qemu-xhci -drive file=Kylin-Desktop-V10-SP1-2403-HWE-Release-20240430-x86_64.iso,format=raw,media=disk -m 4G
这个也许是这两天最大的笑话!如果我对于qemu有一点点的信心的话,我早该想到了!我之所以总是遇到启动失败的原因是我的USB坏了,因为我换了一个U盘一切就正常了!,很明显的我反复拷贝都出现同样的错误,应该是某些特定的存储区域坏了,很多时候可能都没有引起问题,但是某些内核敏感的代码检测某些magic number发现了拒绝启动。所以,在qemu上正常的情况应该是可靠的!
当然还有很多问题,但是最起码第一步是可行的它可以让官方的麒麟ISO在UEFI模式下的USB启动安装。但是如果在-nographic模式下必须这样做:
- first press Ctrl + A (A is just key a, not the alt key),
- then release the keys,
- afterwards press X (lowercase x; no Shift, case matters).
default live
label live
menu label ^Try Kylin without installing
kernel /casper/vmlinuz
append boot=casper initrd=/casper/initrd.lz fsck.mode=skip audit=0 security= console=ttyS0 debug break=top debug= live --
八月五日 等待变化等待机会
$ ll _install/
total 20
drwxrwxr-x 5 nick nick 4096 Aug 5 05:31 ./
drwxrwxr-x 39 nick nick 4096 Aug 5 05:31 ../
drwxrwxr-x 2 nick nick 4096 Aug 5 05:31 bin/
lrwxrwxrwx 1 nick nick 11 Aug 5 05:31 linuxrc -> bin/busybox*
drwxrwxr-x 2 nick nick 4096 Aug 5 05:31 sbin/
drwxrwxr-x 4 nick nick 4096 Aug 5 05:31 usr/
$ cat init
#!/bin/sh
dmesg -n 1
mount -t devtmpfs none /dev
mount -t proc none /proc
mount -t sysfs none /sys
setsid nick /bin/sh
newc The new (SVR4) portable format, which supports file systems having more than 65536 i-nodes. (4294967295 bytes)
$ find . | cpio -R root:root -H newc -o | xz > ../rootfs.xz
$ cp /usr/lib/syslinux/modules/bios/ldlinux.c32 busyboxyISO/
$ cp /usr/lib/ISOLINUX/isolinux.bin busyboxISO/
$ sudo cp /boot/vmlinuz-6.5.0-44-generic busyboxISO/kernel
$ cp rootfs.xz busyboxISO/
$ cat isolinux.cfg
default kernel initrd=rootfs.xz
$ xorriso -as mkisofs -o ../busybox.iso -b isolinux.bin -c boot.cat -no-emul-boot -boot-load-size 4 -boot-info-table ./
$ qemu-system-x86_64 -cdrom busybox.iso -m 4G
| package name | description |
|---|---|
| isolinux | collection of bootloaders (ISO 9660 bootloader) |
| syslinux | collection of bootloaders (DOS FAT and NTFS bootloader) |
| syslinux-common | collection of bootloaders (common) |
| syslinux-efi | collection of bootloaders (UEFI bootloader) |
| syslinux-utils | collection of bootloaders (utilities) |
| extlinux | collection of bootloaders (Linux ext2/ext3/ext4, btrfs, and xfs bootloader) |
| pxelinux | collection of bootloaders (PXE network bootloader) |
八月六日 等待变化等待机会
- Stage 1 - Part 1 - Load MBR
- At boot, the BIOS loads the 440 byte MBR boot code at the start of the disk (
/usr/lib/syslinux/bios/mbr.binor/usr/lib/syslinux/bios/gptmbr.bin).
- Stage 1 - Part 2 - Search active partition
- The Stage 1 MBR boot code looks for the partition that is marked as active (boot flag in MBR disks). Let us assume this is the
/bootpartition, for example.
这里要明白使用extlinux把它安装到ext2/3/4的分区里,而它仅仅是创建一个文件那么简单吗?对比一下Linux文件系统的第一个sector的变化吧?- Stage 2 - Part 1 - Execute volume boot record
- The Stage 1 MBR boot code executes the Volume Boot Record (VBR) of the
/bootpartition. In the case of Syslinux, the VBR boot code is the starting sector of/boot/syslinux/ldlinux.syswhich is created by theextlinux --installcommand. Note thatldlinux.sysis not the same asldlinux.c32.
$ fdisk -l kylinUSB.img
Disk kylinUSB.img: 4.88 GiB, 5242880000 bytes, 10240000 sectors
Units: sectors of 1 * 512 = 512 bytes
Sector size (logical/physical): 512 bytes / 512 bytes
I/O size (minimum/optimal): 512 bytes / 512 bytes
Disklabel type: dos
Disk identifier: 0x7fc434ad
Device Boot Start End Sectors Size Id Type
kylinUSB.img1 * 2048 10239999 10237952 4.9G 83 Linux
$ xxd -s $((2048*512)) -l 512 kylinUSB.img
00100000: 0000 0000 0000 0000 0000 0000 0000 0000 ................
00100010: 0000 0000 0000 0000 0000 0000 0000 0000 ................
...
$ sudo mkdir fat/extlinux
$ sudo extlinux -i fat/extlinux
fat/extlinux is device /dev/loop13p1
Warning: unable to obtain device geometry (defaulting to 64 heads, 32 sectors)
(on hard disks, this is usually harmless.)
$ xxd -s $((2048*512)) -l 512 kylinUSB.img
00100000: eb58 9053 5953 4c49 4e55 5800 0200 0000 .X.SYSLINUX.....
00100010: 0000 0000 0000 0000 2000 4000 0000 0000 ........ .@.....
00100020: 0038 9c00 0000 0000 0000 0000 0000 0000 .8..............
00100030: 0000 0000 0000 0000 0000 0000 0000 0000 ................
00100040: 0000 0000 0000 0000 0000 0000 0000 0000 ................
00100050: 0000 0000 0000 0000 0000 fafc 31c9 8ed1 ............1...
00100060: bc76 7b52 0657 1e56 8ec1 b126 bf78 7bf3 .v{R.W.V...&.x{.
00100070: a58e d9bb 7800 0fb4 370f a056 20d2 781b ....x...7..V .x.
00100080: 31c0 b106 893f 8947 02f3 64a5 8a0e 187c 1....?.G..d....|
00100090: 884d f850 5050 50cd 13eb 628b 55aa 8b75 .M.PPPP...b.U..u
001000a0: a8c1 ee04 01f2 83fa 4f76 3181 fab2 0773 ........Ov1....s
001000b0: 2bf6 45b4 7f75 2538 4db8 7420 663d 2147 +.E..u%8M.t f=!G
001000c0: 5054 7510 807d b8ed 750a 66ff 75ec 66ff PTu..}..u.f.u.f.
001000d0: 75e8 eb0f 5151 66ff 75bc eb07 5151 66ff u...QQf.u...QQf.
001000e0: 361c 7cb4 08e8 e900 7213 20e4 750f c1ea 6.|.....r. .u...
001000f0: 0842 8916 1a7c 83e1 3f89 0e18 7cfb bbaa .B...|..?...|...
00100100: 55b4 41e8 cb00 7210 81fb 55aa 750a f6c1 U.A...r...U.u...
00100110: 0174 05c6 0646 7d00 66b8 0010 2000 66ba .t...F}.f... .f.
00100120: 0000 0000 bb00 80e8 0e00 6681 3e1c 80dc ..........f.>...
00100130: 50a1 5f75 74e9 f802 6603 0660 7b66 1316 P._ut...f..`{f..
00100140: 647b b910 00eb 2b66 5266 5006 536a 016a d{....+fRfP.Sj.j
00100150: 1089 e666 60b4 42e8 7700 6661 8d64 1072 ...f`.B.w.fa.d.r
00100160: 01c3 6660 31c0 e868 0066 61e2 dac6 0646 ..f`1..h.fa....F
00100170: 7d2b 6660 660f b736 187c 660f b73e 1a7c }+f`f..6.|f..>.|
00100180: 66f7 f631 c987 ca66 f7f7 663d ff03 0000 f..1...f..f=....
00100190: 7717 c0e4 0641 08e1 88c5 88d6 b801 02e8 w....A..........
001001a0: 2f00 6661 7201 c3e2 c931 f68e d6bc 687b /.far....1....h{
001001b0: 8ede 668f 0678 00be da7d ac20 c074 09b4 ..f..x...}. .t..
001001c0: 0ebb 0700 cd10 ebf2 31c0 cd16 cd19 f4eb ........1.......
001001d0: fd8a 1674 7b06 cd13 07c3 426f 6f74 2065 ...t{.....Boot e
001001e0: 7272 6f72 0d0a 0000 0000 0000 0000 0000 rror............
001001f0: 0000 0000 0000 0000 fe02 b23e 1837 55aa ...........>.7U.
$ ll fat/extlinux/
total 196
drwxr-xr-x 2 root root 4096 Aug 6 06:33 ./
drwxr-xr-x 4 root root 4096 Aug 6 06:33 ../
-r--r--r-- 1 root root 119368 Aug 6 06:33 ldlinux.c32
-r--r--r-- 1 root root 59904 Aug 6 06:33 ldlinux.sys
$ lsattr fat/extlinux/ldlinux.sys
----i----------------- fat/extlinux/ldlinux.sys
$ ll
-rw-r--r-- 1 root root 162 Aug 6 06:52 isolinux.cfg
-r--r--r-- 1 root root 119368 Aug 6 06:33 ldlinux.c32
-r--r--r-- 1 root root 59904 Aug 6 06:33 ldlinux.sys
-r--r--r-- 1 root root 24708 Aug 6 06:56 libutil.c32
-rw-r--r-- 1 root root 26148 Aug 6 06:55 menu.c32
$ cat isolinux.cfg
ui menu.c32
menu title this is the title for menu
label first
menu label this is actual menu text
label second
menu label menu text for first
我的猜测是之前看到的开始的sector里的代码和这个ldlinux.sys是紧密关联的吧?总之这里都是bootloader的核心部分。- Stage 2 - Part 2 - Execute
/boot/syslinux/ldlinux.sys- The VBR will load the rest of
/boot/syslinux/ldlinux.sys. The sector location of/boot/syslinux/ldlinux.sysshould not change, otherwise syslinux will not boot.
- Stage 3 - Load
/boot/syslinux/ldlinux.c32- The
/boot/syslinux/ldlinux.syswill load the/boot/syslinux/ldlinux.c32(core module) that contains the rest of the core part of syslinux that could not be fit intoldlinux.sys(due to file-size constraints). Theldlinux.c32file should be present in every Syslinux installation and should match the version ofldlinux.sysinstalled in the partition. Otherwise Syslinux will fail to boot.
- Stage 4 - Search and Load configuration file
- Once Syslinux is fully loaded, it looks for
/boot/syslinux/syslinux.cfg(or/boot/syslinux/extlinux.confin some cases) and loads it if it is found. If no configuration file is found, you will be dropped to a Syslinuxboot:prompt. This step and the rest of non-core parts of Syslinux (/boot/syslinux/*.c32modules, excludinglib*.c32andldlinux.c32) require/boot/syslinux/lib*.c32(library) modules to be present (https://wiki.syslinux.org/wiki/index.php/Common_Problems#ELF). Thelib*.c32library modules and non-core*.c32modules should match the version ofldlinux.sysinstalled in the partition.
八月七日 等待变化等待机会
$ INSTALLROOT=$PWD/install make bios install
$ dd if=/dev/zero of=kylinFAT.img bs=100M count=1
$ fdisk -l kylinFAT.img
Disk kylinFAT.img: 100 MiB, 104857600 bytes, 204800 sectors
Units: sectors of 1 * 512 = 512 bytes
Sector size (logical/physical): 512 bytes / 512 bytes
I/O size (minimum/optimal): 512 bytes / 512 bytes
Disklabel type: dos
Disk identifier: 0x9f60c445
Device Boot Start End Sectors Size Id Type
kylinFAT.img1 * 2048 204799 202752 99M b W95 FAT32
$ sudo losetup -Pf --show kylinFAT.img
/dev/loop18
$ sudo mkfs.fat -F 32 /dev/loop18p1
mkfs.fat 4.2 (2021-01-31)
$ sudo mount /dev/loop18p1 fat
$ sudo mkdir fat/syslinux
$ sudo syslinux -i /dev/loop18p1 -d syslinux
$ sudo dd if=/usr/lib/SYSLINUX/mbr.bin of=/dev/loop18 bs=440 count=1 conv=notrunc
$ sudo cp /usr/lib/syslinux/modules/bios/libutil.c32 fat/syslinux/
$ sudo cp /usr/lib/syslinux/modules/bios/menu.c32 fat/syslinux/
$ sudo cp /usr/lib/syslinux/modules/bios/ldlinux.c32 fat/syslinux/
$ cat fat/syslinux/syslinux.cfg
ui menu.c32
menu title this is the title for menu
label first
menu label this is actual menu text
label second
menu label menu text for first
$ qemu-system-x86_64 -drive file=kylinFAT.img,format=raw,media=disk -m 4G
$ mkdir kylinISO
$ mkdir kylinISO/isolinux
$ cp /usr/lib/ISOLINUX/isolinux.bin kylinISO/isolinux/
$ cp /usr/lib/syslinux/modules/bios/libutil.c32 kylinISO/isolinux/
$ cp /usr/lib/syslinux/modules/bios/menu.c32 kylinISO/isolinux/
$ cp /usr/lib/syslinux/modules/bios/ldlinux.c32 kylinISO/isolinux/
$ cat kylinISO/isolinux/isolinux.cfg
ui menu.c32
menu title this is the title for menu
label first
menu label this is actual menu text
label second
menu label menu text for first
$ xorriso -as mkisofs -o kylinISO.iso -J -b isolinux/isolinux.bin -c isolinux/boot.cat -no-emul-boot -boot-load-size 4 -boot-info-tab ./kylinISO
$ qemu-system-x86_64 -cdrom kylinISO.iso -m 4G
八月八日 等待变化等待机会
所以,一次性的创建这个~/.quiltrc吧。然后在ubuntu的代码包里就可以使用quilt push -a来加载所有的patches了,不过这个也是多余,因为正常的apt-get source就帮你做了,除非我自己手动一步步这么做,但是为什么会出现这个情况呢?几乎没有应用的场景啊?也是有的,比如我使用ubuntu提示的syslinux的git源代码 https://salsa.debian.org/images-team/syslinux.git下载代码后,你是不是需要这样子手动应用patches,当然也许一行脚本可以做到,可是quilt很多的功能告诉你哪些已经加载甚至于图形,当然这个dependency的图我看不懂,可是功能强大啊!一个push,一个pop瞬间控制各个patches,真的是太得心应手了。
quiltuses a special directory for keeping patches. Unfortunatelly, that directory is ./patches/ by default. For Debian packages ./debian/patches/ is far more comfortable. To flawlessly fix this, addexport QUILT_PATCHES=debian/patchesto ~/.quiltrc (creating that file if needed).
八月九日 等待变化等待机会
debian的live-build思路和ubuntu是一致的,实际上后者是前者那里继承来的吧?总之,我稍微尝试了一下在debootstrap失败了,很明显的我的默认的是ubuntu的,不合适。What is a live system?
- Linux kernel image, usually named vmlinuz*
- Initial RAM disk image (initrd): a RAM disk set up for the Linux boot, containing modules possibly needed to mount the System image and some scripts to do it.
- System image: The operating system's filesystem image. Usually, a SquashFS compressed filesystem is used to minimize the live system image size. Note that it is read-only. So, during boot the live system will use a RAM disk and 'union' mechanism to enable writing files within the running system. However, all modifications will be lost upon shutdown unless optional persistence is used (see Persistence).
- Bootloader: A small piece of code crafted to boot from the chosen medium, possibly presenting a prompt or menu to allow selection of options/configuration. It loads the Linux kernel and its initrd to run with an associated system filesystem. Different solutions can be used, depending on the target medium and format of the filesystem containing the previously mentioned components: isolinux to boot from a CD or DVD in ISO9660 format, syslinux for HDD or USB drive booting from a VFAT partition, extlinux for ext2/3/4 and btrfs partitions, pxelinux for PXE netboot, GRUB for ext2/3/4 partitions, etc.
$ giit clone --recursive https://salsa.debian.org/images-team/syslinux.git
$ echo "export QUILT_PATCHES=debian/patches" > ~/.quiltrc
$ quilt push -a
$ sudo ./debian/rules binary binary-arch binary-indep build build-arch build-indep install install-arch install-indep
$ make INSTALLROOT=~/syslinux-install install
八月十日 等待变化等待机会
BIOS
Since version 4.03, the resulting behavior is that the same
"/[[boot/]syslinux/]syslinux.cfg"
file can optionally be used for
SYSLINUX / EXTLINUX / ISOLINUX,
while specific isolinux.cfg and/or extlinux.conf files would take precedence if present.
Since version 4.03, the resulting behavior is that any of the respective config files (or even all of them)
— namely
isolinux.cfg, and/or
extlinux.conf, and/or
syslinux.cfg —
can optionally be located together in the same
"/[[boot/]syslinux/]"
directory.
UEFI
SYSLINUX defaults to searching for the configuration file in the installed directory, where
syslinux.efi is located and containing also its corresponding
" ldlinux.* "
file.
[6.04+] In each searched-for directory,
SYSLINUX searches first for either:
- syslia32.cfg when booting in EFI_ia32 mode
- syslx64.cfg when booting in EFI_x64 mode
and finally SYSLINUX searches for syslinux.cfg
before falling back to the next directory.
The first configuration file that is found stops the search and the configuration file is parsed / used.
Note that syslinux.efi could be optionally renamed.
/boot/syslinux/syslinux.cfg
/syslinux/syslinux.cfg
/syslinux.cfg
DEFAULT linux
LABEL linux
SAY Now booting the kernel from SYSLINUX...
KERNEL vmlinuz.img
APPEND ro root=/dev/sda1 initrd=initrd.img
SYSAPPEND bitmask
八月十一日 等待变化等待机会
$ dd if=/dev/zero of=kylinEFI.img bs=100M count=10
$ gdisk kylinEFI.img
$ gdisk -l kylinEFI.img
GPT fdisk (gdisk) version 1.0.8
Partition table scan:
MBR: protective
BSD: not present
APM: not present
GPT: present
Found valid GPT with protective MBR; using GPT.
Disk kylinEFI.img: 2048000 sectors, 1000.0 MiB
Sector size (logical): 512 bytes
Disk identifier (GUID): 01878283-BFF4-48BE-AEB6-3534875CD5D5
Partition table holds up to 128 entries
Main partition table begins at sector 2 and ends at sector 33
First usable sector is 34, last usable sector is 2047966
Partitions will be aligned on 2048-sector boundaries
Total free space is 2014 sectors (1007.0 KiB)
Number Start (sector) End (sector) Size Code Name
1 2048 2047966 999.0 MiB EF00 EFI system partition
$ sudo losetup -Pf --show kylinEFI.img
/dev/loop47
$ sudo mkfs.fat -F 32 /dev/loop47p1
$ sudo mount /dev/loop47p1 fat
$ sudo mkdir -p fat/EFI/BOOT
$ sudo cp ~/syslinux-install/usr/share/syslinux/efi64/syslinux.efi fat/EFI/BOOT/bootx64.efi
$ sudo cp ~/syslinux-install/usr/share/syslinux/efi64/ldlinux.e64 fat/EFI/BOOT/
$ sudo cp ~/syslinux-install/usr/share/syslinux/efi64/libutil.c32 fat/EFI/BOOT/
$ sudo cp ~/syslinux-install/usr/share/syslinux/efi64/menu.c32 fat/EFI/BOOT/
实际上,这个FAT文件系统里文件名大小写是不敏感的,所以,你要小心Linux下的不同文件互相覆盖。According to the UEFI specs, the default location and naming conventions for storage media are:
- EFI_SYSTEM_PARTITION/EFI/BOOT/BOOTIA32.EFI
- for EFI IA32 firmware.
- EFI_SYSTEM_PARTITION/EFI/BOOT/BOOTX64.EFI
- for EFI X64 firmware.
$ find fat
fat
fat/EFI
fat/EFI/BOOT
fat/EFI/BOOT/ldlinux.e64
fat/EFI/BOOT/libutil.c32
fat/EFI/BOOT/menu.c32
fat/EFI/BOOT/bootx64.efi
fat/EFI/BOOT/syslinux.cfg
$ cat fat/EFI/BOOT/syslinux.cfg
ui menu.c32
menu title this is the title for menu
label first
menu label this is actual menu text
label second
menu label menu text for first
$ qemu-system-x86_64 -m 64 -bios /usr/share/qemu/OVMF.fd -drive file=./kylinEFI.img,format=raw,media=disk -m 4G
八月十二日 等待变化等待机会
sudo mount --bind /dev $HOME/live-ubuntu-from-scratch/chroot/dev
sudo mount --bind /run $HOME/live-ubuntu-from-scratch/chroot/run
这个方法好不好呢?To get the status in the console directly, using ischroot:
ischroot;echo $?Exit codes:
0 if currently running in a chroot 1 if currently not running in a chroot 2 if the detection is not possible (On GNU/Linux this happens if the script is not run as root).
$ arch-chroot /mnt bash -ic 'exec env PS1="(chroot) # " bash --norc'
八月十三日 等待变化等待机会
八月十五日 等待变化等待机会
Using GNU Parted, you can set this using a command such as the following:# parted /dev/disk set partition-number bios_grub onIf you are using gdisk, set the partition type to ‘0xEF02’. With partitioning programs that require setting the GUID directly, it should be ‘21686148-6449-6e6f-744e656564454649’.
loading an operating system directly, using kexec from userspace, and chainloading another bootloader.而什么叫做loading an operating system directly呢?世界上没有直接这个定义,它是multiboot specification定义的。要了解真正的核心读这个spec是必须的。只是目前先放一下,对照着来吧?
$ gdisk -l grubTest.img
GPT fdisk (gdisk) version 1.0.8
Partition table scan:
MBR: protective
BSD: not present
APM: not present
GPT: present
Found valid GPT with protective MBR; using GPT.
Disk grubTest.img: 102400 sectors, 50.0 MiB
Sector size (logical): 512 bytes
Disk identifier (GUID): 69F7A79A-BD23-4288-9AFD-62DA7BB968B5
Partition table holds up to 128 entries
Main partition table begins at sector 2 and ends at sector 33
First usable sector is 34, last usable sector is 102366
Partitions will be aligned on 2048-sector boundaries
Total free space is 2014 sectors (1007.0 KiB)
Number Start (sector) End (sector) Size Code Name
1 2048 4095 1024.0 KiB EF02 BIOS boot partition
2 4096 102366 48.0 MiB 8300 Linux filesystem
$ sudo losetup -Pf --show grubTest.img
/dev/loop13
$ sudo grub-install --target=i386-pc /dev/loop13
Installing for i386-pc platform.
Installation finished. No error reported.
$ sudo mkfs.ext4 /dev/loop13p2
/usr/share/locale/zh_CN/LC_MESSAGES/grub.mo,默认是所有的,所以,我们最好来指定。令我惊讶的是居然默认的en_US的locale不存在?
$ apt-file search grub.mo | grep en_US
$ locate grub.mo | grep en_
/usr/share/locale-langpack/en_AU/LC_MESSAGES/grub.mo
/usr/share/locale-langpack/en_CA/LC_MESSAGES/grub.mo
/usr/share/locale-langpack/en_GB/LC_MESSAGES/grub.mo
/usr/lib/grub/i386-pc/gfxmenu.mod,默认是所有的,所以,最好是指定。removable的模式指定安装路径--boot-directory=
$ sudo mount /dev/loop13p2 linux
$ sudo grub-install -v --target=i386-pc --locales=zh_CN --locales=en_CA --boot-directory=linux/boot /dev/loop13
$ sudo grub-install -v --target=i386-pc --boot-directory=linux/boot /dev/loop13 2>&1 | grep grub-mkimage
grub-install: info: grub-mkimage --directory '/usr/lib/grub/i386-pc' --prefix '(,gpt2)/boot/grub' --output '/home/nick/workspace/Downloads/ISO/linux/boot/grub/i386-pc/core.img' --dtb '' --sbat '' --format 'i386-pc' --compression 'auto' 'ext2' 'part_gpt' 'biosdisk'
linux下,所以,这里才能真正的安装各种grub文件:
O$ ll linux/boot/grub/
total 32
drwxr-xr-x 5 root root 4096 Aug 15 08:31 ./
drwxr-xr-x 3 root root 4096 Aug 15 08:31 ../
drwxr-xr-x 2 root root 4096 Aug 15 08:31 fonts/
-rw-r--r-- 1 root root 1024 Aug 15 08:31 grubenv
drwxr-xr-x 2 root root 12288 Aug 15 08:31 i386-pc/
drwxr-xr-x 2 root root 4096 Aug 15 08:31 locale/
八月十六日 等待变化等待机会
这里的描述我还没有完全领悟,看来我的基础知识还不足:
- Option ROM vs Drivers
- Use of Assembler vs C-Language
- Boot Speed
Legacy BIOS is run by option Read Only Memory (ROM’s), which collectively is limited to 64 KB of storage. The option ROMs that legacy systems run will only work if they are compatible with the hardware that is running with it. If you upgrade your hardware, you have to update the option ROMs to make sure every aspect of the booting process is compatible.就是说BIOS的驱动实际上是写死在这些ROM里的,而操作系统是依赖于BIOS提供的接口访问硬件?内核就算在运行起来可以加载更加先进的驱动,但在初始化阶段只能依赖于ROM里的驱动来访问?这里作者引用这篇文章,保存一份。就算是历史也很枯燥。似乎是UEFI的宣传广告。
八月十七日 等待变化等待机会
Linux尚且如此,Windows更加的糟糕,可以说WIntel联盟本身就是一个巨大的黑盒子,所有的用户都是被他们完全掌控的绵羊。... there are several layers that run between the hardware and the OS...
Even after the computer finishes loading the OS, there are multiple embedded systems also running on the system entirely separate from the OS. Most notably, the Intel Management Engine (ME) runs a complete Minix operating system, while System Management Mode (SMM) is used to run code for certain events (e.g. laptop lid gets closed) in a way that is completely invisible to the running OS.All of these add up to the LinuxBoot project's statement that there are "at least 2.5 kernels between the hardware and Linux,"; those kernels collectively make up the firmware.
LinuxBoot is the firmware and kernel while the user-space initramfs image with Go tools for system booting is available as u-root. Due to this modularity, LinuxBoot can be used with a variety of initramfs images.
A UEFI computer boots in four main phases. The security phase (SEC) and the Pre-EFI Initialization Stage (PEI) are responsible for low-level operations to prepare the hardware and are usually specific to the hardware they are implemented for. After these two stages, the Driver Execution Environment (DXE) loads various drivers, and then the Boot Device Select (BDS) phase can begin.正如作者指出的实际上大多数人只有个模糊的概念:
The BDS phase is where most of what we as users are aware of happens: the system is searched for storage devices, those devices are inspected for bootloaders, and then one of those bootloaders is started. This sounds simple but, due to the many different storage devices and boot schemes available, it can be quite complicated in practice. To manage this complexity, the previous DXE stage loads hundreds of drivers on most systems, implementing support for the majority of the devices the final operating system will be able to use. Further, hardware in the system can provide "option ROMs" that include additional drivers to be loaded and executed prior to BDS. All of these are potentially vulnerable, and it's easy to imagine incredibly damaging attacks based on the extensive capabilities of the largely hidden UEFI.这里的"option ROMs"我是最近才听说这个名字而已,具体是什么完全是一无所知,估计大多数人都是如此吧?
This is where LinuxBoot comes in. It starts during the DXE stage, resulting in most of the drivers (and their associated attack surface) not being loaded. Instead, a Linux kernel is loaded as if it were a driver.就是说Linux内核本身就是一个超级驱动,与其让各个厂家自己提供的千奇百怪的驱动还不如使用Linux内核直接做驱动,这个思想我几年前就看到了,说不定那篇论文就是这个作者。
This brings several immediate advantages. The first, and perhaps most exciting, is that the Linux kernel is an open-source system that has been subject to a great deal of security scrutiny and receives regular fixes. This is almost the exact opposite of the case with existing UEFI drivers. The second is a practical improvement: running Linux at this early stage provides a standardized and well-documented programming environment for developing further modules. This makes it far more practical to extend UEFI's capabilities.这个思路是很好的,问题是怎么做到呢?而且我们可以看到依然有一些是不可替代的部分:SEC和PEI似乎还是不可替代的,我最近得到的感觉是DRAM和它的控制器是最难的部分,内核启动的前提就是内存初始化部分,因为没有内存什么都是空,这个也是BIOS存在的最直接原因。
A Linux kernel alone is not of much use to implement actual system features, a Linux user space is needed. That user space is provided in an initramfs filesystem, much like the standard Linux boot process.
八月十八日 等待变化等待机会
Much like the LinuxBoot initramfs depends on the LinuxBoot kernel to start, so too does the LinuxBoot kernel depend on a previous step in the boot process. This is where coreboot may be involved. LinuxBoot and coreboot are not competitors, rather they address different stages of booting. Remember that the UEFI boot process consists of four stages, of which the third (the driver execution environment or DXE) is the point at which LinuxBoot starts. Coreboot is an implementation of the first two stages, where it can replace the UEFI firmware provided by the motherboard vendor. Coreboot only supports a narrow range of hardware but, when it can be used in concert with LinuxBoot, it enables an almost completely open boot process.就是说coreboot=SEC+PEI,而LinuxBoot=DXE,那么如果它们两个结合起来就是一个完整的链条:coreboot+LinuxBoot=SEC+PEI+DXE,那么所谓的Boot Device Select(BDS)甚至可以理解为一个人为的输入动作,所以,仅仅因为现在coreboot支持的硬件还比较少所以还没有形成气候?
八月十九日 等待变化等待机会
make crossgcc-i386 CPUS=$(nproc) # build i386 toolchain目标结束得到这个You can now run IASL ACPI compiler from /home/nick/workspace/Downloads/coreboot/util/crossgcc/xgcc,就是说我的toolchain编译好了。 模拟器还是安全的,最令人担心的就是这个部分。
八月二十日 等待变化等待机会
粗略一看似乎没有什么,可是细思极恐,UEFI是在模拟BIOS使用CSM但是没有发现MBR,然后试图寻找GPT的情况下启动的?这个是做了多大的跳跃呢?
- UEFI-GPT: The preferred & modern way
- UEFI-MBR: The less preferred & “legacy” way
- BIOS-GPT: The weird hybrid/combo way (via CSM)
- BIOS-MBR: The good ol’ legacy BIOS way (via CSM)
When booting with UEFI-GPT, the firmware first checks for the existence of an ESP partition via its GUID of
The exact folder and file/program name for a bootable [U]EFI program has the following formatC12A7328-F81F-11D2-BA4B-00A0C93EC93B. After it’s found, a “very-specially-named” bootable program is searched under “another-very-specially-named” folder.<ESP>/EFI/BOOT/<.
其实核心还是初始化内存控制器的问题,当然U-Boot有它的特点和它的任务:In x86 platforms the BIOS and [U]EFI “automatically” initializes the memory controller. The difference is that they are physically “part” of the board and come pre-installed.
The x86 CPUs are designed to work closely with the Chipset’s that reside physically on the motherboard.
因为它的主要职能在于初始化内存控制器它甚至于得到了Memory Loader (MLO)的名字:
- be small enough to fit into CPU’s SRAM
- initialize the DRAM memory controller (e.g. DDR3, DDR4, DDR5)
- find the Second-Stage loader (using storage interface like SDHC)
- load it into DRAM & pass the control
Fun fact: U-Boot SPL is also called U-Boot Memory Loader (MLO) because the main reason it exists is to initialize the DRAM memory controller! Hence the name: memory loader.
八月二十一日 等待变化等待机会
$ sudo dd if=debian-live-12.6.0-amd64-standard.iso of=/dev/sdb oflag=direct bs=10M status=progress
removable media path的fallback选项:
这个位置我的理解是除非NVRAM,我猜想是UEFI的环境变量吧?也就是这个存储文件NvVars有设置,否则一定要运行的,所以这里就是所谓的fallback path。我之前看manpage对于这个选项--force-extra-removable没有什么概念,现在才理解,我之前安装因为旧的安装有文件,所以,grub就不覆盖导致启动失败。因为和EFI/boot/肩并肩的有各个操作系统的目录存放各自的启动文件。EFI\boot\bootx64.efi: Fallback bootloader pathThis is the only bootloader pathname that the UEFI firmware on 64-bit X86 systems will look for without any pre-existing NVRAM boot settings, so this is what you want to use on removable media.
Windows will install a copy of its bootloader to this path automatically; when installing GRUB, the
grub-install(orgrub2-installdepending on Linux distribution) command may also put a copy of the respective bootloader here if it does not already exist. If you want, you can usegrub-install --removableto tell it to install to the fallback boot path, orgrub-install --force-extra-removableto overwrite any existing bootloader in the fallback path and replace it with GRUB.
If you want to create a Secure Boot-compatible USB stick for UEFI, you should place a copy of the shim as这句话我的理解就是UEFI的启动入口就是EFI\boot\bootx64.efiand a copy of GRUB asEFI\boot\grubx64.efi, as the shim bootloader will look forgrubx64.efiin the same directory the shim bootloader is in.
EFI\boot\bootx64.efi,而这个所谓的shim直接寻找grubx64.efi,因为这个是我们在grub-install里就这么设置编译的。
我之前一直不明白哪里来的boot manager,应该也是这么来的,就是说在NvVars里记录了一个shortcut,也就是安装程序建议的是否把debian操作系统启动直接写在UEFI设置里跳过其他的配置自动启动,类似于IPMI里遇到的哪些boot option里的默认当前启动之类吧?其实,原理是很容易理解的,在启动多个操作系统的时候,在EFI目录下多个目录是多个操作系统的启动文件,如果要跳过BOOT/bootx64.efi就是用这个方法在NvVars里写上Bootloader path for a permanently installed OS
When an operating system is installed permanently to a UEFI system, there is one new step that absolutely did not exist on classic BIOS. When installing the bootloader, four things are written to the NVRAM memory that holds the firmware settings:
- Bootloader pathname on the EFI System Partition (ESP) that holds the bootloader(s)
- the GUID of the ESP partition
- a descriptive (human-friendly) name for this particular bootloader instance
- optionally, some data for the bootloader
For Windows, the standard UEFI pathname for the Windows boot process will be我查看了一下我的系统是这样子的:\EFI\Microsoft\Boot\bootmgfw.efi, and the descriptive name will be "Windows Boot Manager". The optional data seems to contain a GUID reference to something within the Windows bootloader's BCD configuration file.For Ubuntu, the pathname should be \EFI\Ubuntu\grubx64.efi if you don't need Secure Boot support, or \EFI\Ubuntu\shimx64.efi if the Secure Boot shim is used. The descriptive name is simply "ubuntu" and the optional data is not used.
In Ubuntu, these UEFI NVRAM boot settings can be viewed using the sudo efibootmgr -v command; in Windows, you can start a Command Prompt as Administrator and then use the bcdedit /enum firmware command to view the settings.
The UEFI specification has a standard convention that each vendor should place the bootloader for a permanently installed OS within the path \EFI\<vendor name> on the ESP, so having multiple UEFI bootloaders co-exist on the same ESP is actually supported and should make things easier than with classic BIOS that had a single Master Boot Record per disk.
$ sudo efibootmgr -v
BootCurrent: 0000
Timeout: 2 seconds
BootOrder: 0001,0002
Boot0000* ubuntu HD(1,GPT,78354593-973c-4716-bcc0-09f5975d09ee,0x800,0x100000)/File(\EFI\ubuntu\shimx64.efi)
Boot0001* SYSLINUX HD(1,GPT,67d65c32-557c-4adc-8e2e-4cfc252989f9,0x800,0x1f37df)/File(\EFI\BOOT\BOOTX64.EFI)
Boot0002* SYSLINUX HD(1,GPT,67d65c32-557c-4adc-8e2e-4cfc252989f9,0x800,0x1f37df)/File(\EFI\SYSLINUX\syslinux.efi)
Boot2001* EFI USB Device RC
Boot2002* EFI DVD/CDROM RC
Boot2003* EFI Network RC
secure boot这个概念以后再看。
这个是比较好理解的,就是你运行grub-install的时候它暂时存储编译好的grub.efi,但是为了安全起见它把目标文件系统的UUID也编译 进了,大概就是类似于内核启动寻找rootfs的uuid的机制一样,所以,你要安装在U盘之类最好就是我现在的做法全部在本机做镜像文件,最后在一次性 dd到U盘。Note: On Debian/Ubuntu, the generated GRUB core image will include a baked-in UUID reference to whichever filesystem contains the
/boot/grub/x86_64-efi/grub.efi: a temporary file forgrub-install/bootdirectory, so you won't be able to just make a copy of either/boot/grub/x86_64-efi/grub.efiorgrubx64.efifrom the ESP and transplant it to a removable media: it will just attempt to find the unique UUID of your/bootfilesystem and will drop to rescue mode if it won't find it.
Secure Boot:shimx64.efiand the reasons for itSecure Boot requires that a bootloader must be signed by a certificate that is included in the system's Secure Boot NVRAM variable
db, or the bootloader's SHA256 hash must be whitelisted in the same NVRAM variable. A SHA256 hash will only match a specific version of a particular bootloader, so updates won't be possible unless the firmware variable is also updated. So the certificates are the way to go.
$ sudo grub-install --target=x86_64-efi --removable --force --efi-directory=/boot/efi/ -v
grub-install: info: copying `/usr/lib/grub/x86_64-efi-signed/gcdx64.efi.signed' -> `/boot/efi/EFI/BOOT/grubx64.efi'.
grub-install: info: copying `/usr/lib/shim/shimx64.efi.signed' -> `/boot/efi/EFI/BOOT/BOOTX64.EFI'.
grub-install: info: copying `/usr/lib/shim/mmx64.efi' -> `/boot/efi/EFI/BOOT/mmx64.efi'.
grub-install: info: copying `/usr/lib/shim/BOOTX64.CSV' -> `/boot/efi/EFI/BOOT/BOOTX64.CSV'.
grub-install: info: copying `/boot/grub/x86_64-efi/load.cfg' -> `/boot/efi/EFI/BOOT/grub.cfg'.
九月一日 等待变化等待机会
《客旅香江之一》 客旅香江思从前, 有酒无心愁万千。 今月已解古人恨, 古月难伴今人眠。
《客旅香江之二》 客旅香江更无眠, 辗转四更夜无边。 儿时可期今夜月, 今生再无儿时天。
《客旅香江之三》 漂泊才感离愁多, 霜鬓最恨铜镜磨。 少小窃喜不更事, 老来心绪向谁说?
《客旅香江之四》 客旅香江叹蹉跎, 漂泊四海不算多。 摩诘也曾朝天阙, 归隐山林只向佛。
《客旅香江之五》 客旅香江夜最独, 离愁失路也无殊。 志短才疏学更浅, 空搔白首悔当初。
《客旅香江之六》 客舍难眠夜正稠, 五更月黑近中秋。 香江几曾缺过客, 满街铜臭人欲流。
九月三日 等待变化等待机会
《香江地铁臆想》 杏眼含春欲入魂, 酥胸微动散体芬。 谁家碧玉刚妆就, 梨花带雨疑初婚。
九月九日 等待变化等待机会
$ sudo efibootmgr -v
[sudo] password for nick:
BootCurrent: 0000
Timeout: 2 seconds
BootOrder: 0000,2001,2002,2003
Boot0000* ubuntu HD(1,GPT,78354593-973c-4716-bcc0-09f5975d09ee,0x800,0x100000)/File(\EFI\ubuntu\shimx64.efi)RC
Boot2001* EFI USB Device RC
Boot2002* EFI DVD/CDROM RC
Boot2003* EFI Network RC
gdisk -l /dev/nvme0n1看不到的,因为它只是告诉你ESP的分区是第一个,比如
$ sudo gdisk -l /dev/nvme0n1
GPT fdisk (gdisk) version 1.0.8
Partition table scan:
MBR: protective
BSD: not present
APM: not present
GPT: present
Found valid GPT with protective MBR; using GPT.
Disk /dev/nvme0n1: 3907029168 sectors, 1.8 TiB
Model: WD Blue SN570 2TB
Sector size (logical/physical): 512/512 bytes
Disk identifier (GUID): D107060B-0D72-4008-A966-22D0BE31C1FB
Partition table holds up to 128 entries
Main partition table begins at sector 2 and ends at sector 33
First usable sector is 34, last usable sector is 3907029134
Partitions will be aligned on 2048-sector boundaries
Total free space is 2157 sectors (1.1 MiB)
Number Start (sector) End (sector) Size Code Name
1 2048 1050623 512.0 MiB EF00 EFI System Partition
2 1050624 3907028991 1.8 TiB 8300
$ sudo sgdisk -i 1 /dev/nvme0n1
Partition GUID code: C12A7328-F81F-11D2-BA4B-00A0C93EC93B (EFI system partition)
Partition unique GUID: 78354593-973C-4716-BCC0-09F5975D09EE
First sector: 2048 (at 1024.0 KiB)
Last sector: 1050623 (at 513.0 MiB)
Partition size: 1048576 sectors (512.0 MiB)
Attribute flags: 0000000000000000
Partition name: 'EFI System Partition'
九月十日 等待变化等待机会
dir=stable-diffusion
for i in $(grep --only-matching -e "2024_files/[^\"]*" 2024.htm); do s=${i##2024_files/}; ls ${dir}/$s > /dev/null 2>&1 || ls ${dir}/$s; done
九月十二日 等待变化等待机会
$ wkhtmltopdf --enable-local-file-access 2024.htm /tmp/2024.pdf
co-pilot的模式。我先把要阅读的文档使用pdf格式上传给豆包,然后阅读的时候可以让它来解释,这个非常的强大。
九月十五日 等待变化等待机会
《天净沙--镇海路口警察》 镇海路口警察, 设卡抓车盘查, 骑手认罚无话。 红绿灯下, 过路人你我他。
九月十七日 等待变化等待机会
$ sudo apt install gcc-12 g++-12
$ sudo update-alternatives --install /usr/bin/gcc gcc /usr/bin/gcc-12 60 --slave /usr/bin/g++ g++ /usr/bin/g++-12
$ git clone https://gerrit.libreoffice.org/core libreoffice
九月二十一日 等待变化等待机会
九月二十五日 等待变化等待机会
$ cd linuxcnc-dev
$ ./debian/configure
$ sudo apt-get build-dep .
九月二十八日 等待变化等待机会
CH340 serial converter,那么在linux下会识别设备自动加载驱动创建设备文件,可是相应的设备文件ttyUSB0没有发现,我查看内核日志看到它被一个brltty给关闭了,这不是我一个人的问题:我因为目前视力虽然不好还不至于需要这个专为盲人服务的服务,所以关闭它
$ sudo systemctl stop brltty-udev.service $ sudo systemctl mask brltty-udev.service Created symlink /etc/systemd/system/brltty-udev.service → /dev/null. $ sudo systemctl stop brltty.service $ sudo systemctl disable brltty.service Unit /etc/systemd/system/brltty.service is masked, ignoring.
十月一日 等待变化等待机会
仰面观沧海, 俯首摸青山。 形独幽小径, 树绿蓝云天。 鸟啼越蝉噪, 钟鸣捧人暄。 虑远忧常近, 心高气难连。结果让我佩服的五体投地!豆包改的太好了!可以说化腐朽为神奇!
《静思》 仰面沧海阔,俯首青山绵。 独步幽径处,绿树映蓝天。 鸟啼破蝉噪,钟鸣息人喧。 心忧常虑远,志高意自连。以下是豆包修改的思路:
相比之下,我只能写一些打油诗:
- 确定主题为 “静思”,围绕在自然环境中的思考与感悟展开。
- 将诗句中的表述进行优化,使其更加通顺和富有诗意。如 “沧海阔”“青山绵” 等表述更加生动形象。
- 调整诗句的顺序,使整首诗在逻辑上更加连贯。先描写自然环境,再由自然引出内心的思考。
- 对一些字词进行调整,增强诗句的表现力。例如 “破” 字突出了鸟啼对蝉噪的打破,增加了画面感。
车上偶得 虽无子建七步诗, 却有兄弟真义气。 中秋刚过逢国庆, 月缺人圆欢聚时。
十月三日 等待变化等待机会
寒山子诗云:“重岩中,足清风。扇不摇,凉气通。明月照,白云笼。独自坐,一老翁。”我问豆包能不能配一首诗?这是豆包的答案:
《寒岩独思》 重岩深处逸清风, 明月白云映老翁。 扇止凉生心自静, 独思幽境意无穷。我觉得挺不错的,又想改一下:
《寒岩独思》 重岩深处沐清风, 明月白云伴老翁。 扇止凉生凝思刻, 独坐观心意从容。结果针对我的修改,老爸不太满意而我的朋友却觉得比较好。
十月六日 等待变化等待机会
CONFIG(release, debug|release) {
QMAKE_CXXFLAGS += -Z7 -Fdrelease\\candle.pdb
QMAKE_CFLAGS += -Z7 -Fdrelease\\candle.pdb
QMAKE_LFLAGS += /DEBUG /OPT:REF
}
frmmain.h:73:17: error: looser exception specification on overriding virtual function ‘virtual const char* CancelException::what() const’
73 | const char* what() const override
| ^~~~
十月七日 等待变化等待机会
外星人寄予厚望,要看看。
外星人在哪里被注册为一个服务作为一个后门来运行其它的程序吧,这个是我的猜想。
十月八日 等待变化等待机会
sudo chown -R root:root .wine
sudo wine Candle.exe
sudo chown -R $USER:$USER .wine
十月十日 等待变化等待机会
盲人骑瞎马,即便我自认为已经是身经百战也是被它折磨的完全失去信心了。这一点也可以说明编程,尤其是QT+OpenGL这样子的编程比所谓的一般的脚本语言复杂的多,就算是一个熟练的C++程序员应该也是被搞糊涂了,何况QT的版本变化相当的大,就算是豆包给的是正确的指引也架不住版本的差异,何况它的行为就是一个记忆的模式,而更加像是计算机专业老教授的记忆模式,细节的缺失与错乱导致一个正确的路径也走不下去。我最后只能放弃这种捷径转而走传统的开发者的学习道路,直接下载QT的源代码来学习它的标准的例子。这里使用vscode如果设置了QT的头文件安装路径那真的是太棒了:
/usr/include/x86_64-linux-gnu/qt5;/usr/include/x86_64-linux-gnu/qt5/QtOpenGL;/usr/include/x86_64-linux-gnu/qt5/QtWidgets;/usr/include/x86_64-linux-gnu/qt5/QtGui;/usr/include/x86_64-linux-gnu/qt5/QtSerialPort;/usr/include/x86_64-linux-gnu/qt5/QtCore
《自嘲》 漂泊二十载, 方知少真才。 自顾无长技, 乞骨故土埋。 位高惧德坏, 财巨忧子衰。 卜完周天卦, 纵歌述胸怀。这个是最初的版本
《自嘲》 漂泊二十载, 方知无真才。 自愧无长技, 乞骨故乡埋。 山耸迎风傲, 海平破浪白。 卜完周天卦, 放歌述胸怀。请求豆包润色修改,结果它大改为:
《自嘲》 漂泊岁月二十载, 方觉自身少真才。 常愧无有专长技, 唯愿归乡骨可埋。 山立巍峨迎风傲, 海呈壮阔破浪白。 周天卦象卜完后, 放歌一曲述襟怀。有时候,我对于豆包的修改并不是很满意。
十月十二日 等待变化等待机会
NOR boot和
NAND boot,前者是有地址线的,可以理解就是平常说的BIOS之类的固件写在其中的代码可以不需要bootloader直接在启动时候运行,而后者不能直接启动运行,需要bootloader,这个就是困惑我好久的一个简单的细节。
视频:
$ pdftoppm -png LostInTranslation.pdf LostInTranslation
$ ffmpeg -framerate 27/581 -i "LostInTranslation-%2d.png" -i LostInTranslation.mp3 -c:a aac -c:v libx264 LostInTranslation.mp4
Stream #0:0[0x1](und): Video: h264 (High 4:4:4 Predictive) (avc1 / 0x31637661), yuv444p(progressive), 1500x844 [SAR 1:1 DAR 375:211], 58 kb/s, 0.05 fps, 0.05 tbr, 13824 tbn (default)
$ ffmpeg -i LostInTranslation.mp4 -pix_fmt yuv420p LostInTranslation-420.mp4
十月十四日 等待变化等待机会
The only reason (so far) I've been using QWindows explicitely is for a very specific use case: to draw pure OpenGL content. This is very easy to achieve (by setting an OpenGL surface type on the window), and avoids you to bring in additional dependencies (QtWidgets, QtOpenGL, etc., which have a cost in terms of library size); it allows to create a OpenGL drawing surface in like 10 lines of code which will work on Linux, Windows, Mac, QNX, "embedded Linux", and very likely Android and iOS too. From this point of view it acts as a perfect SDL replacement. :)
十月十七日 等待变化等待机会
$ sudo apt-get build-dep vcmi
$ sudo apt install qttools5-dev
十月十八日 等待变化等待机会
Qt's Meta-Object Compiler (MOC) generates moc files, which are crucial for enabling Qt's unique features in C++. Here's their purpose:In essence, MOC files bridge the gap between Qt's extended features and standard C++.
Signals and Slots:
MOC enables the signals and slots mechanism, which allows objects to communicate with each other in a flexible and decoupled way.Runtime Type Information:
MOC generates code that provides runtime type information for QObject-derived classes, allowing you to determine the type of an object at runtime.Dynamic Properties:
MOC provides support for dynamic properties, which can be added to objects at runtime.QML Integration:
MOC is also used to integrate QML with C++ code, allowing you to use QML to create user interfaces and C++ to handle the underlying logic.
十月十九日 等待变化等待机会
Loading translation 'english.qm'
Failed to install translator
const std::string translationFile = settings["general"]["language"].String()+ ".qm";
QString translationFileResourcePath = QString{":/translation/%1"}.arg(translationFile.c_str());
$ strace -e trace=file -e trace=openat -o /tmp/result.txt ./vcmilauncher
[2024-Oct-19 08:22:15.344946] INFO global [70ea553be180] - Loading translation 'english.qm'
[2024-Oct-19 08:22:15.345022] ERROR global [70ea553be180] - Failed to install translator
$ grep general -A 10 settings.json
"general" : {
"autosaveCountLimit" : 10,
"gameDataLanguage" : "english",
"lastDifficulty" : 0,
"lastMap" : "MAPS/MDEARTH",
"lastSave" : "SAVES/AUTOSAVE/_THE_EMPIRE_OF__20241017T215519/1",
"lastSettingsTab" : 1,
"longTouchTimeMilliseconds" : 750,
"music" : 37,
"sound" : 51
},
$ grep language -A 10 ./config/schemas/settings.json
"language",
"gameDataLanguage",
"lastSave",
"lastSettingsTab",
"lastCampaign",
"lastDifficulty",
"saveFrequency",
"notifications",
"extraDump",
"userRelativePointer",
"relativePointerSpeedMultiplier",
--
"language" : {
"type" : "string",
"enum" : [ "english", "czech", "chinese", "finnish", "french", "german", "hungarian", "italian", "korean", "polish", "portuguese", "russian", "spanish", "swedish", "turkish", "ukrainian", "vietnamese" ],
"default" : "english"
},
"gameDataLanguage" : {
"type" : "string",
"enum" : [ "auto", "english", "czech", "chinese", "finnish", "french", "german", "hungarian", "italian", "korean", "polish", "portuguese", "russian", "spanish", "swedish", "turkish", "ukrainian", "vietnamese" ],
"default" : "auto"
},
"lastSave" : {
bool setupCompleted = settings["launcher"]["setupCompleted"].Bool();
if (!setupCompleted)
detectPreferredLanguage();
$ grep launcher -A 2 ~/.config/vcmi/settings.json
"launcher" : {
"setupCompleted" : true
},
("en-US", "en")
$ locale
LANG=en_US.UTF-8
LANGUAGE=en_US:en
settings.json里的launcher的setupCompleted改为false以便强制执行这个函数,结局是language没有被加上,那么是这个所谓的SettingsStorage没有写成功吗?这个东西挺复杂的,我不明白它是怎么写的。因为声明了两个,难道一个是读,一个是写吗?
SettingsStorage settings;
SettingsStorage persistentStorage;
"launcher" : {
"setupCompleted" : true
},
Host github.com
ForwardX11 no
Host *
ForwardX11 yes
十月二十日 等待变化等待机会
$ ffmpeg -framerate 1/41 -i "LostInTranslation-%2d.png" -i LostInTranslation.mp3 -c:a aac -af "volume=10dB" -c:v libx264 -pix_fmt yuv420p LostInTranslation.mp4
十月二十一日 等待变化等待机会
$ cmake .. --help-variable-list | grep -i install
$ cmake .. --help-variable CMAKE_INSTALL_PREFIX
$ ll ~/.config/vcmi
total 32
drwxrwxr-x 2 nick nick 4096 Oct 21 10:15 ./
drwx------ 58 nick nick 4096 Oct 21 06:23 ../
-rw-rw-r-- 1 nick nick 399 Oct 21 10:15 launcher.conf
-rw-rw-r-- 1 nick nick 97 Oct 21 06:26 mapeditor.conf
-rw-rw-r-- 1 nick nick 5101 Oct 21 10:08 modSettings.json
-rw-rw-r-- 1 nick nick 45 Oct 20 17:19 persistentStorage.json
-rw-rw-r-- 1 nick nick 970 Oct 21 10:15 settings.json
$ ll ~/.local/share/vcmi/
total 1036
drwxrwxr-x 9 nick nick 4096 Oct 21 10:08 ./
drwx------ 47 nick nick 4096 Oct 21 06:39 ../
drwxrwxr-x 2 nick nick 4096 Oct 17 21:38 Data/
drwxrwxr-x 3 nick nick 4096 Oct 21 10:08 Generated/
drwxrwxr-x 3 nick nick 516096 Oct 18 21:49 Maps/
drwxrwxr-x 8 nick nick 4096 Oct 20 17:17 Mods/
drwxrwxr-x 2 nick nick 4096 Oct 17 21:38 Mp3/
drwxrwxr-x 3 nick nick 4096 Oct 17 21:57 Saves/
$ ll ~/.cache/vcmi/
total 13472
drwxrwxr-x 3 nick nick 4096 Oct 21 06:22 ./
drwx------ 79 nick nick 4096 Oct 17 21:32 ../
drwxrwxr-x 2 nick nick 4096 Oct 21 10:08 downloads/
-rw-rw-r-- 1 nick nick 11928512 Oct 21 10:15 VCMI_Client_log.txt
-rw-rw-r-- 1 nick nick 1824507 Oct 21 06:26 VCMI_Editor_log.txt
-rw-rw-r-- 1 nick nick 19328 Oct 21 10:08 VCMI_Launcher_log.txt
十月二十二日 等待变化等待机会
业余的才谈论战略,专业的谈论后勤,在一定层面上战略是用后勤来体现的。
这里我始终有一个愿望是把所谓的
AttackPossibility
one particular way to attack on the battlefield. Each AttackPossibility instance has multiple ...DamageReduce attributes. These represent how much damage an enemy will lose after our attack. Effects can reduce this damage. We add them up and this value is used as attack score. 很显然的,这个是最复杂的基础,而其他的都是在它的基础上的推理演绎,所以这一点看来它更像一种规则,因为它是某种可以预测的结果,是客观的,所以,是规则。PotentialTargets
a set of all AttackPossibility instances 它是一种在目标层级的模拟,目的是计算所谓的DamageCache在给定的HypotheticBattle战场环境下。BattleExchangeVariant
it is an extension of AttackPossibility, a result of a set of units attacking each other for a fixed number of turns according to the turn order. It is kind of an oversimplified battle simulation. A set of units is restricted according to AttackPossibility which particular exchange extends. Exchanges can be waited (when stacks/units wait for a better time to attack) and non-waited (when stack acts right away). For non-waited exchanges the first attack score is taken from AttackPossibility (together with various effects like 2 hex breath, shooters blocking and so on). All the other attacks are simplified, only respect retaliations. At the end we have a final score. 代码里的注释有时候比文档写作者更贴切一些吧?不看代码从函数原型来猜测是针对某一个特定目标的模拟?但是这里就有最最基本的AI的博弈问题,你的策略的最大值就是对手策略的最小值,彼此一定要达到某种平衡才是可能的取值,否则就是一厢情愿。所以,不看代码我的妄想就是这里应该要有minmax算法的部分吧? 从形式上看它和PotentialTargets的函数原型实际上是一回事,因为两者如果运用博弈的观点是会互相影响的,到底你的伤害多少最终会影响到你选择目标,而目标的选择又会反过来影响伤害,而且加上对手的博弈考虑,你的策略是对手要极力避免的,导致你的选择无法达成最优解,只能是一种平衡,那么这两个函数是否应该合起来呢?当然这就太过复杂了,尽量的拆分,在更高一级取舍。大概这个是更高一级的BattleExchangeEvaluator的工作。BattleExchangeEvaluator
calculates all possible BattleExchangeVariants and selects the bestBattleEvaluator
is a top level logic layer which also adds spellcasts and movement to unreachable targets
规则和
选择区分开来,前者在我看来是一种裁判性的中立的,后者则是AI的可选项目。但是这个说起来容易做起来很难啊,另一方面这个取决于是否真的对于将来有用都是问题。
十月二十三日 等待变化等待机会
startBattle,这个是因为虽然BattleProcessor的startBattle方法是终极的workhorse,但是有一个所谓的restartBattle的情况,这个是自动战斗的结果在用户不满意的情况下可以选择的,而这个时候CGameHandler会直接调用BattleProcessor的restartBattle并且进一步调用它的startBattle,显然的这里是否需要存储是一个问题,我印象中是不需要的否则就重复了。不过似乎也差不多吧?
$ git remote set-url origin git@github.com:nickhuang99/vcmi.git
$ git push --set-upstream origin nick-save-before-battle
英语水平直接翻译为English water level然后它们迷惑不解有好几种奇怪的猜想,还以为是信息管制。这里人工智能根本不能理解中文至少我自己都不知道它们在谈论什么!
十月二十四日 等待变化等待机会
伞盖也就是Noto Serif的名头下,为什么是这个名字我懒得看了。但是这个是拉丁文,中日韩需要在所谓的CJK里才有,所以,在ubuntu事先包装好的是这个包fonts-noto-cjk
$ apt-file search NotoSerifCJK-Bold.ttc
fonts-noto-cjk: /usr/share/fonts/opentype/noto/NotoSerifCJK-Bold.ttc
l$ ldd bin/vcmilauncher | grep vcmi
libvcmiqt.so => /home/nick/workspace/vcmi-install/lib/vcmi/libvcmiqt.so (0x00007ae7f3a10000)
libvcmi.so => /home/nick/workspace/vcmi-install/lib/vcmi/libvcmi.so (0x00007ae7f2600000)
$ file NotoSerifCJK-Medium.ttc
NotoSerifCJK-Medium.ttc: OpenType font collection data, 1.0, 5 fonts, at 0x20 OpenType Font data, 16 tables, 1st "BASE"
$ file NotoSerif-Medium.ttf
NotoSerif-Medium.ttf: TrueType Font data, 17 tables, 1st "GDEF", 20 names, Microsoft, language 0x409, Copyright 2022 The Noto Project Authors (https://github.com/notofonts/latin-greek-cyrillic)Noto
$ ls
NotoSerifSC-Black.ttf NotoSerifSC-ExtraBold.ttf NotoSerifSC-Light.ttf NotoSerifSC-Regular.ttf
NotoSerifSC-Bold.ttf NotoSerifSC-ExtraLight.ttf NotoSerifSC-Medium.ttf NotoSerifSC-SemiBold.ttf
十月二十五日 等待变化等待机会
$ cmake .. -DCMAKE_CXX_FLAGS_RELWITHDEBINFO="-O0 -g -DNDEBUG" -DCMAKE_INSTALL_PREFIX=/home/nick/workspace/vcmi-install
十月二十六日 等待变化等待机会
$ cmake .. -DCMAKE_INSTALL_PREFIX=/home/nick/workspace/vcmi-install -D CMAKE_BUILD_TYPE=Debug -D CMAKE_EXPORT_COMPILE_COMMANDS=O

十月二十七日 等待变化等待机会
filelist里originalName是把文件名的twist.h3m.h3m的后缀名去掉了导致路径不对,但是这个是在哪一层出错我gdb了大半夜也没有搞明白。
十月二十八日 等待变化等待机会
十月三十日 等待变化等待机会
$ git apply --reject --whitespace=fix ~/Documents/vcmi-diff/resourcepath.diff
/home/nick/Documents/vcmi-diff/resourcepath.diff:43: trailing whitespace.
std::time_t time = boost::filesystem::last_write_time(*CResourceHandler::get()->getResourceName(ResourcePath(p.resource.getOriginalName(),
Checking patch client/render/AssetGenerator.cpp...
Checking patch client/windows/CMapOverview.cpp...
Checking patch lib/filesystem/ResourcePath.cpp...
Checking patch lib/modding/CModHandler.cpp...
Checking patch test/map/CMapEditManagerTest.cpp...
Applied patch client/render/AssetGenerator.cpp cleanly.
Applied patch client/windows/CMapOverview.cpp cleanly.
Applied patch lib/filesystem/ResourcePath.cpp cleanly.
Applied patch lib/modding/CModHandler.cpp cleanly.
Applied patch test/map/CMapEditManagerTest.cpp cleanly.
warning: 1 line applied after fixing whitespace errors.
十一月七日 等待变化等待机会
void QIODevice::readyRead() [signal]
This signal is emitted once every time new data is available for reading from the device. It will only be emitted again once new data is available, such as when a new payload of network data has arrived on your network socket, or when a new block of data has been appended to your device.
readyRead() is not emitted recursively; if you reenter the event loop or call waitForReadyRead() inside a slot connected to the readyRead() signal, the signal will not be reemitted (although waitForReadyRead() may still return true).
Note for developers implementing classes derived from QIODevice: you should always emit readyRead() when new data has arrived (do not emit it only because there's data still to be read in your buffers). Do not emit readyRead() in other conditions.
十一月八日 等待变化等待机会
$ xz -d ./2024-10-22-raspios-bookworm-arm64-full.img.xz
$ fdisk -l ./2024-10-22-raspios-bookworm-arm64-full.img
Disk ./2024-10-22-raspios-bookworm-arm64-full.img: 14.23 GiB, 15279849472 bytes, 29843456 sectors
Units: sectors of 1 * 512 = 512 bytes
Sector size (logical/physical): 512 bytes / 512 bytes
I/O size (minimum/optimal): 512 bytes / 512 bytes
Disklabel type: dos
Disk identifier: 0x60691ba7
Device Boot Start End Sectors Size Id Type
./2024-10-22-raspios-bookworm-arm64-full.img1 8192 1056767 1048576 512M c W95 FAT32 (LBA)
./2024-10-22-raspios-bookworm-arm64-full.img2 1056768 29843455 28786688 13.7G 83 Linux
$ sudo losetup -Pf --show ./2024-10-22-raspios-bookworm-arm64-full.img
$ sudo mount /dev/loop1p1 dos
$ sudo mount /dev/loop1p2 linux
十一月九日 等待变化等待机会
gsettings set org.freedesktop.Tracker.Miner.Files crawling-interval -2
gsettings set org.freedesktop.Tracker.Miner.Files enable-monitors false
The values could be changed using dconf-editor by navigating through org > freedesktop > Tracker > Miner > Files:
$ sudo ln -s /dev/null org.gnome.Evolution-alarm-notify.desktop
$ sudo mv tracker-miner-fs-3.desktop tracker-miner-fs-3.desktop.backup
$ sudo ln -s /dev/null tracker-miner-fs-3.desktop
十一月十日 等待变化等待机会
$ ffmpeg -y -i video/mercy.m4v -filter_complex "fps=10,scale=480:-1:flags=lanczos,split[s0][s1];[s0]palettegen=max_colors=32[p];[s1][p]paletteuse=dither=bayer" video/mercy.gif
十一月十三日 等待变化等待机会
import easygui
path = easygui.fileopenbox()
十一月二十日 等待变化等待机会
Missing privilege separation directory: /run/sshd我读了这个解释也是不得要领。总之它要创建那个目录让旧体制的systemD的方式运行吗?然后我发现这个目录即便我创建了运行之后程序结束它又被删除了,就是说/run下面的目录是自动被删除的,那么它的创建也是要在运行之初自行创建的。其实,我的核心问题之一是要解决pkexec的DISPLAY问题,我随后发现xclock等等通过ssh -X是没有问题的,问题出在我自己胡乱在/etc/profile里hardcoded了DISPLAY,这个在使用sshd -ddd之后在客户端打印就可以看到 DISPLAY=localhost:12.0注意这个是我本机按照默认DISPLAY跳10个自动分配的。所以,只要你服务端是正确的,客户端也是自动生成的。所以,又回到原点,这个纯粹是pkexec出于安全性考量专门制造出来的问题,和ssh无关。
polkit-agent-helper-1: error response to PolicyKit daemon: GDBus.Error:org.freedesktop.PolicyKit1.Error.Failed: No session for cookie
十一月二十一日 等待变化等待机会
$ pkexec env DISPLAY=$DISPLAY XAUTHORITY=$XAUTHORITY python3 /home/nick/workspace/pythonTest/sendFile.py
$ xhost +SI:localuser:root
$ xhost
access control enabled, only authorized clients can connect
SI:localuser:root
LOCAL:
SI:localuser:nick
text_box.insert(tk.END, str + "\n")
text_box.see(tk.END)
root.update()
Exec=sh -c "pkexec env DISPLAY=\\$DISPLAY XAUTHORITY=\\$XAUTHORITY python3 /home/nick/workspace/pythonTest/sendFile.py"
$ desktop-file-validate sendFile.desktop
$ sudo desktop-file-install sendFile.desktop
十一月二十四日 等待变化等待机会
$ sudo systemctl status openvpnas.service
● openvpnas.service - OpenVPN Access Server
Loaded: loaded (/lib/systemd/system/openvpnas.service; enabled; vendor preset: enabled)
Active: active (running) since Sun 2024-11-24 01:26:25 PST; 2min 1s ago
Main PID: 224978 (python3)
Tasks: 10 (limit: 1130)
Memory: 249.8M
CPU: 3.639s
CGroup: /system.slice/openvpnas.service
├─224978 python3 -c "from pyovpn.sagent.sagent_entry import openvpnas ; openvpnas()" --nodaemon --logfile=/var/log/openvpnas.log --pidfile=
├─225004 /usr/bin/python3 -c "from pyovpn.cserv.wserv_entry import start ; start()" -no -u openvpn_as -g openvpn_as --pidfile /usr/local/openvpn_as/etc/tmp/wserv.pid
├─225005 /usr/bin/python3 -c "from pyovpn.log.logworker import start ; start()"
├─225032 /usr/bin/python3 -c "from pyovpn.sagent.iptworker import start6 ; start6()"
├─225033 /usr/bin/python3 -c "from pyovpn.sagent.iptworker import start ; start()"
├─225041 openvpn-openssl --errors-to-stderr --config stdin
├─225043 openvpn-openssl --errors-to-stderr --config stdin
└─225049 openvpn-openssl --errors-to-stderr --config stdin
$ python3 -m pip install --upgrade pip
$ pip install pyovpn-as
# Note: setting PYTHONUNBUFFERED is necessary to see the output of this service in the journal
# See https://docs.python.org/3/using/cmdline.html#envvar-PYTHONUNBUFFERED
Environment=PYTHONUNBUFFERED=true
ExecStart=/usr/local/openvpn_as/scripts/openvpnas --nodaemon --logfile=/var/log/openvpnas.log --pidfile=
ExecStop=/bin/bash /usr/local/openvpn_as/scripts/openvpn_service_cleanup
#!/usr/bin/env bash
if [ -z "$OPENVPN_AS_NOEXPORT" ]; then
export AS_VERSION="2.12.3"
export AS_BUILD="76774795"
export OPENVPN_AS_BASE="/usr/local/openvpn_as"
export OPENVPN_AS_CONFIG="/usr/local/openvpn_as/etc/as.conf"
export PATH="/usr/local/openvpn_as/scripts:/usr/local/openvpn_as/bin:/usr/local/openvpn_as/sbin:$PATH"
export LD_LIBRARY_PATH="/usr/local/openvpn_as/lib"
export PYTHONPATH="/usr/local/openvpn_as/lib/python:/usr/local/openvpn_as/lib/python"
fi
export PYOVPN_CMDNAME="openvpnas"
exec python3 -c "from pyovpn.sagent.sagent_entry import openvpnas ; openvpnas()" "$@"
$ systemctl restart --user xdg-desktop-portal-gnome
十一月二十五日 等待变化等待机会
openvpn connect android app似乎是能够配置android系统的dns解析。
我至今也没有搞明白TAP和TUN是怎么回事!这里是论坛也许能找到一些帮助!Q: Why doesn't the app support tap-style tunnels?
A: The Android VPN API supports only tun-style tunnels at the moment. This is a limitation of the Android platform. If you try to connect a profile that uses a tap-based tunnel, you will get an error that only layer 3 tunnels are currently supported.
If you really want to see tap-style tunnels supported in OpenVPN Connect, we would encourage you to contact the Google Android team and ask that the VpnService API be extended to allow this. Without such changes to the VpnService API, it is not possible for non-root apps such as OpenVPN Connect to support tap-style tunnels.
十一月二十六日 等待变化等待机会
Did Not Connect: Potential Security Issue
Firefox detected a potential security threat and did not continue to www.google.com because this website requires a secure connection.
What can you do about it?
www.google.com has a security policy called HTTP Strict Transport Security (HSTS), which means that Firefox can only connect to it securely. You can’t add an exception to visit this site.
The issue is most likely with the website, and there is nothing you can do to resolve it. You can notify the website’s administrator about the problem.
$ nslookup www.google.com
Server: 127.0.0.53
Address: 127.0.0.53#53
Non-authoritative answer:
Name: www.google.com
Address: 31.13.94.10
Name: www.google.com
Address: 2001::1
$ resolvectl status
Global
Protocols: -LLMNR -mDNS DNSOverTLS=opportunistic DNSSEC=no/unsupported
resolv.conf mode: stub
Link 2 (enp0s31f6)
Current Scopes: DNS
Protocols: +DefaultRoute +LLMNR -mDNS DNSOverTLS=opportunistic DNSSEC=no/unsupported
Current DNS Server: 218.85.152.99
DNS Servers: 218.85.152.99 218.85.157.99 fe80::1%24077
Link 3 (wlp109s0)
Current Scopes: none
Protocols: -DefaultRoute +LLMNR -mDNS DNSOverTLS=opportunistic DNSSEC=no/unsupported
Link 31 (tun0)
Current Scopes: DNS
Protocols: +DefaultRoute +LLMNR -mDNS DNSOverTLS=opportunistic DNSSEC=no/unsupported
Current DNS Server: 8.8.8.8
DNS Servers: 8.8.8.8
DNS Domain: ~.
~$ ll /etc/systemd/system/ | grep -i resolv
lrwxrwxrwx 1 root root 44 Mar 31 2023 dbus-org.freedesktop.resolve1.service -> /lib/systemd/system/systemd-resolved.service
$ cat /lib/systemd/system/systemd-resolved.service | grep ExecStart
ExecStart=!!/lib/systemd/systemd-resolved
因为是使用UDP,所以是端口53,所以,就在这里侦听到的127.0.0.53,这个就是我当初被搞混乱的地方,最早大家都是说使用libc的库函数 我发现使用豆包比google有时候更加的好,因为豆包是自己总结过的答案,而google仅仅是给你指个路:You still have to walk the path yourself because Google can only show you the path!DNS 查询和响应协议
主从 DNS 协议(区域传送协议)
DNS 安全扩展协议(DNSSEC)
~$ resolvectl query google.com
google.com: 142.250.189.206 -- link: tun0
2607:f8b0:4005:803::200e -- link: tun0
-- Information acquired via protocol DNS in 330.8ms.
-- Data is authenticated: no; Data was acquired via local or encrypted transport: yes
-- Data from: network
- A 记录(Address Record)
- AAAA 记录(IPv6 Address Record)
- CNAME 记录(Canonical Name Record)
- NS 记录(Name Server Record)
- MX 记录(Mail Exchanger Record)
- TXT 记录(Text Record)
- CAA 记录(Certification Authority Authorization Record)
- NAPTR 记录(Naming Authority Pointer Record)
- PTR 记录(Pointer Record)
- SOA 记录(Start of Authority Record)
十一月二十七日 等待变化等待机会
| region | price |
|---|---|
| HongKong | $0.0146 |
| Jakarta | $0.0132 |
| Malaysia | $0.0119 |
| Mumbai | $0.0112 |
| Seoul | $0.013 |
| Singapore | $0.0132 |
| N.Virginia | $0.0104 |
| N.California | $0.0124 |
| Canada(Centra) | $0.0116 |
| USGovCloud(East) | $0.0122 |
script-security 2
up /etc/openvpn/update-resolv-conf
down /etc/openvpn/update-resolv-conf
/usr/bin/xauth: timeout in locking authority file /home/openvpnas/.Xauthority折腾了大半天也没有搞定x11,后来我想干脆不要折腾了,因为我之所以被迫迁移就是之前的服务器硬盘8G被用光了,我也没有好的办法把之前安装的包一个个卸载,干脆这个服务器不要多装东西了。所以,在/etc/ssh/sshd_config里直接设定X11Forwarding no
十一月二十八日 等待变化等待机会
$ autoconf
configure.ac:41: error: possibly undefined macro: AM_INIT_AUTOMAKE
If this token and others are legitimate, please use m4_pattern_allow.
See the Autoconf documentation.
configure.ac:94: error: possibly undefined macro: AM_CONDITIONAL
configure.ac:184: error: possibly undefined macro: AM_PATH_PYTHON
| project | git address |
|---|---|
| util-linux | https://github.com/util-linux/util-linux.git |
| lz4 | https://lz4.github.io/lz4 |
| OpenSSL | https://github.com/openssl/openssl |
fetch-pack: unexpected disconnect while reading sideband packet
fatal: early EOF
fatal: fetch-pack: invalid index-pack output
$ git config --global core.compression 9 repack
$ git config --global core.compression -1
$ git config --global http.postBuffer 2M
ulimit -f 2097152
ulimit -c 2097152
#ulimit -n 2097152 // not in ubuntu!!!
hard fsize 1000000
soft fsize 1000000
GIT_TRACE_PACKET=1 GIT_TRACE=2 GIT_CURL_VERBOSE=1 git clone https://github.com/openssl/openssl
...
13:56:07.472149 http.c:845 == Info: HTTP/2 stream 0 was not closed cleanly: CANCEL (err 8)
13:56:07.472157 http.c:845 == Info: stopped the pause stream!
13:56:07.472168 http.c:845 == Info: Connection #0 to host github.com left intact
error: RPC failed; curl 92 HTTP/2 stream 0 was not closed cleanly: CANCEL (err 8)
error: 817 bytes of body are still expected
13:56:07.472274 pkt-line.c:85 packet: git> 0002
fetch-pack: unexpected disconnect while reading sideband packet
fatal: early EOF
fatal: fetch-pack: invalid index-pack output
git config --global http.version HTTP/1.1
git clone https://github.com/openssl/openssl
git config --global --unset http.version
$ openssl version -a
OpenSSL 3.0.2 15 Mar 2022 (Library: OpenSSL 3.0.2 15 Mar 2022)
built on: Tue Aug 20 17:27:32 2024 UTC
platform: debian-amd64
options: bn(64,64)
compiler: gcc -fPIC -pthread -m64 -Wa,--noexecstack -Wall -Wa,--noexecstack -g -O2 -ffile-prefix-map=/build/openssl-aGUoHt/openssl-3.0.2=. -flto=auto -ffat-lto-objects -flto=auto -ffat-lto-objects -fstack-protector-strong -Wformat -Werror=format-security -DOPENSSL_TLS_SECURITY_LEVEL=2 -DOPENSSL_USE_NODELETE -DL_ENDIAN -DOPENSSL_PIC -DOPENSSL_BUILDING_OPENSSL -DNDEBUG -Wdate-time -D_FORTIFY_SOURCE=2
OPENSSLDIR: "/usr/lib/ssl"
ENGINESDIR: "/usr/lib/x86_64-linux-gnu/engines-3"
MODULESDIR: "/usr/lib/x86_64-linux-gnu/ossl-modules"
Seeding source: os-specific
CPUINFO: OPENSSL_ia32cap=0x7ffaf3bfffebffff:0x98c007bc239c27eb
SSL_OP_IGNORE_UNEXPECTED_EOF
Some TLS implementations do not send the mandatory close_notify alert on shutdown. If the application tries to wait for the close_notify alert but the peer closes the connection without sending it, an error is generated. When this option is enabled the peer does not need to send the close_notify alert and a closed connection will be treated as if the close_notify alert was received.
You should only enable this option if the protocol running over TLS can detect a truncation attack itself, and that the application is checking for that truncation attack.
SSL_shutdown() shuts down an active TLS/SSL connection. It sends the close_notify shutdown alert to the peer.
SSL_shutdown() tries to send the close_notify shutdown alert to the peer. Whether the operation succeeds or not, the SSL_SENT_SHUTDOWN flag is set and a currently open session is considered closed and good and will be kept in the session cache for further reuse.
Note that SSL_shutdown() must not be called if a previous fatal error has occurred on a connection i.e. if SSL_get_error() has returned SSL_ERROR_SYSCALL or SSL_ERROR_SSL.
The shutdown procedure consists of two steps: sending of the close_notify shutdown alert, and reception of the peer's close_notify shutdown alert. The order of those two steps depends on the application.
It is acceptable for an application to only send its shutdown alert and then close the underlying connection without waiting for the peer's response. This way resources can be saved, as the process can already terminate or serve another connection. This should only be done when it is known that the other side will not send more data, otherwise there is a risk of a truncation attack.
When a client only writes and never reads from the connection, and the server has sent a session ticket to establish a session, the client might not be able to resume the session because it did not received and process the session ticket from the server. In case the application wants to be able to resume the session, it is recommended to do a complete shutdown procedure (bidirectional close_notify alerts).
When the underlying connection shall be used for more communications, the complete shutdown procedure must be performed, so that the peers stay synchronized.
SSL_shutdown() only closes the write direction. It is not possible to call SSL_write() after calling SSL_shutdown(). The read direction is closed by the peer.
The behaviour of SSL_shutdown() additionally depends on the underlying BIO. If the underlying BIO is blocking, SSL_shutdown() will only return once the handshake step has been finished or an error occurred.
If the underlying BIO is nonblocking, SSL_shutdown() will also return when the underlying BIO could not satisfy the needs of SSL_shutdown() to continue the handshake. In this case a call to SSL_get_error() with the return value of SSL_shutdown() will yield SSL_ERROR_WANT_READ or SSL_ERROR_WANT_WRITE. The calling process then must repeat the call after taking appropriate action to satisfy the needs of SSL_shutdown(). The action depends on the underlying BIO. When using a nonblocking socket, nothing is to be done, but select() can be used to check for the required condition. When using a buffering BIO, like a BIO pair, data must be written into or retrieved out of the BIO before being able to continue.
After SSL_shutdown() returned 0, it is possible to call SSL_shutdown() again to wait for the peer's close_notify alert. SSL_shutdown() will return 1 in that case. However, it is recommended to wait for it using SSL_read() instead.
SSL_shutdown() can be modified to only set the connection to "shutdown" state but not actually send the close_notify alert messages, see SSL_CTX_set_quiet_shutdown(3). When "quiet shutdown" is enabled, SSL_shutdown() will always succeed and return 1. Note that this is not standard compliant behaviour. It should only be done when the peer has a way to make sure all data has been received and doesn't wait for the close_notify alert message, otherwise an unexpected EOF will be reported.
There are implementations that do not send the required close_notify alert. If there is a need to communicate with such an implementation, and it's clear that all data has been received, do not wait for the peer's close_notify alert. Waiting for the close_notify alert when the peer just closes the connection will result in an error being generated. The error can be ignored using the SSL_OP_IGNORE_UNEXPECTED_EOF. For more information see SSL_CTX_set_options(3).
First to close the connection
When the application is the first party to send the close_notify alert, SSL_shutdown() will only send the alert and then set the SSL_SENT_SHUTDOWN flag (so that the session is considered good and will be kept in the cache). If successful, SSL_shutdown() will return 0.
If a unidirectional shutdown is enough (the underlying connection shall be closed anyway), this first successful call to SSL_shutdown() is sufficient.
In order to complete the bidirectional shutdown handshake, the peer needs to send back a close_notify alert. The SSL_RECEIVED_SHUTDOWN flag will be set after receiving and processing it.
The peer is still allowed to send data after receiving the close_notify event. When it is done sending data, it will send the close_notify alert. SSL_read() should be called until all data is received. SSL_read() will indicate the end of the peer data by returning <= 0 and SSL_get_error() returning SSL_ERROR_ZERO_RETURN.
Peer closes the connection
If the peer already sent the close_notify alert and it was already processed implicitly inside another function (SSL_read(3)), the SSL_RECEIVED_SHUTDOWN flag is set. SSL_read() will return <= 0 in that case, and SSL_get_error() will return SSL_ERROR_ZERO_RETURN. SSL_shutdown() will send the close_notify alert, set the SSL_SENT_SHUTDOWN flag. If successful, SSL_shutdown() will return 1.
Whether SSL_RECEIVED_SHUTDOWN is already set can be checked using the SSL_get_shutdown() (see also SSL_set_shutdown(3) call.
而openvpn的并没有触及这个底层逻辑,这个是asio的代码,这个难道说是asio的错吗?0
The shutdown is not yet finished: the close_notify was sent but the peer did not send it back yet. Call SSL_read() to do a bidirectional shutdown.
int engine::do_shutdown(void*, std::size_t)
{
int result = ::SSL_shutdown(ssl_);
if (result == 0)
result = ::SSL_shutdown(ssl_);
return result;
}
Previously, if a peer unexpectedly shutdown a connection an OpenSSL IO function (such as也就是说这个不可能是openvpn的错误,更不要说是asio之类久经考验的库了。那么唯一能够避免的也许是升级openssl3吗?SSL_read()) would report an error andSSL_get_error()would reportSSL_ERROR_SYSCALLanderrnowould be 0. This was considered a bug in 1.1.1 (you should never getSSL_ERROR_SYSCALLbut witherrnoas 0). However fixing it in 1.1.1 broke some apps. We delayed the fix until the next major version (OpenSSL 3.0).
$ git branch -a | grep openssl-3
remotes/origin/openssl-3.0
remotes/origin/openssl-3.1
remotes/origin/openssl-3.2
remotes/origin/openssl-3.3
remotes/origin/openssl-3.4
$ git switch -c openssl-3.4 origin/openssl-3.4
branch 'openssl-3.4' set up to track 'origin/openssl-3.4'.
Switched to a new branch 'openssl-3.4'
$ git log
commit 74b3781fb4e92fef51fed57fcb1d5795844604d4 (HEAD -> openssl-3.4, origin/openssl-3.4)
...
$ git switch openssl-3.4
十一月三十日 等待变化等待机会
十二月十日 等待变化等待机会
$ eval "$(/home/nick/anaconda3/bin/conda shell.bash hook)"
$ conda init --all
十二月十二日 等待变化等待机会
Websites prove their identity via certificates. Firefox does not trust this site because it uses a certificate that is not valid for www.google.com. The certificate is only valid for the following names: *.facebook.com, *.facebook.net, *.fbcdn.net, *.fbsbx.com, *.m.facebook.com, *.messenger.com, *.xx.fbcdn.net, *.xy.fbcdn.net, *.xz.fbcdn.net, facebook.com, messenger.com
Error code: SSL_ERROR_BAD_CERT_DOMAIN
https://www.google.com/
Unable to communicate securely with peer: requested domain name does not match the server’s certificate.
HTTP Strict Transport Security: false
HTTP Public Key Pinning: true
Certificate chain:
-----BEGIN CERTIFICATE-----
MIIGmTCCBYGgAwIBAgIQCcU6goKeAO3NorvB+50XsDANBgkqhkiG9w0BAQsFADBw
MQswCQYDVQQGEwJVUzEVMBMGA1UEChMMRGlnaUNlcnQgSW5jMRkwFwYDVQQLExB3
d3cuZGlnaWNlcnQuY29tMS8wLQYDVQQDEyZEaWdpQ2VydCBTSEEyIEhpZ2ggQXNz
dXJhbmNlIFNlcnZlciBDQTAeFw0yNDA5MTkwMDAwMDBaFw0yNDEyMTgyMzU5NTla
MG8xCzAJBgNVBAYTAlVTMRMwEQYDVQQIEwpDYWxpZm9ybmlhMRMwEQYDVQQHEwpN
ZW5sbyBQYXJrMR0wGwYDVQQKExRNZXRhIFBsYXRmb3JtcywgSW5jLjEXMBUGA1UE
AwwOKi5mYWNlYm9vay5jb20wWTATBgcqhkjOPQIBBggqhkjOPQMBBwNCAARghYHm
9gsC1Pt9Z7bIQZFF52vEo8nYIcizwBGzTe3OIgyu64z1UdO32uGvtUtm1K0Shbaj
1VRmp5l0o7pPIEeco4ID+TCCA/UwHwYDVR0jBBgwFoAUUWj/kK8CB3U8zNllZGKi
ErhZcjswHQYDVR0OBBYEFOgx48T/9eUPFcbhaz72p7n0/Iq2MIG1BgNVHREEga0w
gaqCDiouZmFjZWJvb2suY29tgg4qLmZhY2Vib29rLm5ldIILKi5mYmNkbi5uZXSC
CyouZmJzYnguY29tghAqLm0uZmFjZWJvb2suY29tgg8qLm1lc3Nlbmdlci5jb22C
DioueHguZmJjZG4ubmV0gg4qLnh5LmZiY2RuLm5ldIIOKi54ei5mYmNkbi5uZXSC
DGZhY2Vib29rLmNvbYINbWVzc2VuZ2VyLmNvbTA+BgNVHSAENzA1MDMGBmeBDAEC
AjApMCcGCCsGAQUFBwIBFhtodHRwOi8vd3d3LmRpZ2ljZXJ0LmNvbS9DUFMwDgYD
VR0PAQH/BAQDAgOIMB0GA1UdJQQWMBQGCCsGAQUFBwMBBggrBgEFBQcDAjB1BgNV
HR8EbjBsMDSgMqAwhi5odHRwOi8vY3JsMy5kaWdpY2VydC5jb20vc2hhMi1oYS1z
ZXJ2ZXItZzYuY3JsMDSgMqAwhi5odHRwOi8vY3JsNC5kaWdpY2VydC5jb20vc2hh
Mi1oYS1zZXJ2ZXItZzYuY3JsMIGDBggrBgEFBQcBAQR3MHUwJAYIKwYBBQUHMAGG
GGh0dHA6Ly9vY3NwLmRpZ2ljZXJ0LmNvbTBNBggrBgEFBQcwAoZBaHR0cDovL2Nh
Y2VydHMuZGlnaWNlcnQuY29tL0RpZ2lDZXJ0U0hBMkhpZ2hBc3N1cmFuY2VTZXJ2
ZXJDQS5jcnQwDAYDVR0TAQH/BAIwADCCAX8GCisGAQQB1nkCBAIEggFvBIIBawFp
AHYA7s3QZNXbGs7FXLedtM0TojKHRny87N7DUUhZRnEftZsAAAGSB6m2jwAABAMA
RzBFAiEAhBPg8xkoXY74jFNhehmMOJ9BSfpy7xVU1EbFHzyTN9ACIDINAs7K8ZbH
GGLKOS1Z6crkbVk2/GUnXCkKvpEN8v2jAHYA2ra/az+1tiKfm8K7XGvocJFxbLtR
hIU0vaQ9MEjX+6sAAAGSB6m2UgAABAMARzBFAiEAtZVuPynZEd44RcpCYMo7g5Sk
Ln4WIOlWPG6fMjs3F/ICIFrGs4WeC5tUr5rFoSXYBcAPfDGeIEv7/NJ8Yc8sIP3i
AHcAPxdLT9ciR1iUHWUchL4NEu2QN38fhWrrwb8ohez4ZG4AAAGSB6m27gAABAMA
SDBGAiEA1kT/bDv5PZQJCv9GCOBSw9+HB3sZ7vldQP3Z4c7wR2ACIQDPTYC1A/4g
t6axcwGd/31J1BMhva7xYrQqToRomate9jANBgkqhkiG9w0BAQsFAAOCAQEAkjLa
KGWVNY0wSK5pSUfPAFfRKg85NdWFK+XMGNeFCDLEoaxRO3VsmyYCz9Qa2oSllgwL
+peqckBQZzgPlUy7M1ZBVlnUvMjS247p/EenPcMuZ90rnrXPnWAd7J9ofWA+dsHa
eelcGF3nMcICN3gp1N7xeLJoSDAEUYe+1y0o4l9JBA5zDbV15zw6NRsWAKpVuulz
E1rQ9/ctc3T3GU00yuGzkYBLwBnABO5+wBd6nWFNuRw720MtVL23VDh8x3z2MYsG
XZh2556IYXpsTY/4MaFAAW3SQu0Noln+GQtUihUDKT+IhjNPEx8s2YACkOVdDpjT
0yyJgwaOajSS1UW0ww==
-----END CERTIFICATE-----
-----BEGIN CERTIFICATE-----
MIIEsTCCA5mgAwIBAgIQBOHnpNxc8vNtwCtCuF0VnzANBgkqhkiG9w0BAQsFADBs
MQswCQYDVQQGEwJVUzEVMBMGA1UEChMMRGlnaUNlcnQgSW5jMRkwFwYDVQQLExB3
d3cuZGlnaWNlcnQuY29tMSswKQYDVQQDEyJEaWdpQ2VydCBIaWdoIEFzc3VyYW5j
ZSBFViBSb290IENBMB4XDTEzMTAyMjEyMDAwMFoXDTI4MTAyMjEyMDAwMFowcDEL
MAkGA1UEBhMCVVMxFTATBgNVBAoTDERpZ2lDZXJ0IEluYzEZMBcGA1UECxMQd3d3
LmRpZ2ljZXJ0LmNvbTEvMC0GA1UEAxMmRGlnaUNlcnQgU0hBMiBIaWdoIEFzc3Vy
YW5jZSBTZXJ2ZXIgQ0EwggEiMA0GCSqGSIb3DQEBAQUAA4IBDwAwggEKAoIBAQC2
4C/CJAbIbQRf1+8KZAayfSImZRauQkCbztyfn3YHPsMwVYcZuU+UDlqUH1VWtMIC
Kq/QmO4LQNfE0DtyyBSe75CxEamu0si4QzrZCwvV1ZX1QK/IHe1NnF9Xt4ZQaJn1
itrSxwUfqJfJ3KSxgoQtxq2lnMcZgqaFD15EWCo3j/018QsIJzJa9buLnqS9UdAn
4t07QjOjBSjEuyjMmqwrIw14xnvmXnG3Sj4I+4G3FhahnSMSTeXXkgisdaScus0X
sh5ENWV/UyU50RwKmmMbGZJ0aAo3wsJSSMs5WqK24V3B3aAguCGikyZvFEohQcft
bZvySC/zA/WiaJJTL17jAgMBAAGjggFJMIIBRTASBgNVHRMBAf8ECDAGAQH/AgEA
MA4GA1UdDwEB/wQEAwIBhjAdBgNVHSUEFjAUBggrBgEFBQcDAQYIKwYBBQUHAwIw
NAYIKwYBBQUHAQEEKDAmMCQGCCsGAQUFBzABhhhodHRwOi8vb2NzcC5kaWdpY2Vy
dC5jb20wSwYDVR0fBEQwQjBAoD6gPIY6aHR0cDovL2NybDQuZGlnaWNlcnQuY29t
L0RpZ2lDZXJ0SGlnaEFzc3VyYW5jZUVWUm9vdENBLmNybDA9BgNVHSAENjA0MDIG
BFUdIAAwKjAoBggrBgEFBQcCARYcaHR0cHM6Ly93d3cuZGlnaWNlcnQuY29tL0NQ
UzAdBgNVHQ4EFgQUUWj/kK8CB3U8zNllZGKiErhZcjswHwYDVR0jBBgwFoAUsT7D
aQP4v0cB1JgmGggC72NkK8MwDQYJKoZIhvcNAQELBQADggEBABiKlYkD5m3fXPwd
aOpKj4PWUS+Na0QWnqxj9dJubISZi6qBcYRb7TROsLd5kinMLYBq8I4g4Xmk/gNH
E+r1hspZcX30BJZr01lYPf7TMSVcGDiEo+afgv2MW5gxTs14nhr9hctJqvIni5ly
/D6q1UEL2tU2ob8cbkdJf17ZSHwD2f2LSaCYJkJA69aSEaRkCldUxPUd1gJea6zu
xICaEnL6VpPX/78whQYwvwt/Tv9XBZ0k7YXDK/umdaisLRbvfXknsuvCnQsH6qqF
0wGjIChBWUMo0oHjqvbsezt3tkBigAVBRQHvFwY+3sAzm2fTYS5yh+Rp/BIAV0Ae
cPUeybQ=
-----END CERTIFICATE-----
~$ openssl x509 -in /tmp/cert.txt -text -noout
Certificate:
Data:
Version: 3 (0x2)
Serial Number:
09:c5:3a:82:82:9e:00:ed:cd:a2:bb:c1:fb:9d:17:b0
Signature Algorithm: sha256WithRSAEncryption
Issuer: C = US, O = DigiCert Inc, OU = www.digicert.com, CN = DigiCert SHA2 High Assurance Server CA
Validity
Not Before: Sep 19 00:00:00 2024 GMT
Not After : Dec 18 23:59:59 2024 GMT
Subject: C = US, ST = California, L = Menlo Park, O = "Meta Platforms, Inc.", CN = *.facebook.com
Subject Public Key Info:
Public Key Algorithm: id-ecPublicKey
Public-Key: (256 bit)
pub:
04:60:85:81:e6:f6:0b:02:d4:fb:7d:67:b6:c8:41:
91:45:e7:6b:c4:a3:c9:d8:21:c8:b3:c0:11:b3:4d:
ed:ce:22:0c:ae:eb:8c:f5:51:d3:b7:da:e1:af:b5:
4b:66:d4:ad:12:85:b6:a3:d5:54:66:a7:99:74:a3:
ba:4f:20:47:9c
ASN1 OID: prime256v1
NIST CURVE: P-256
X509v3 extensions:
X509v3 Authority Key Identifier:
51:68:FF:90:AF:02:07:75:3C:CC:D9:65:64:62:A2:12:B8:59:72:3B
X509v3 Subject Key Identifier:
E8:31:E3:C4:FF:F5:E5:0F:15:C6:E1:6B:3E:F6:A7:B9:F4:FC:8A:B6
X509v3 Subject Alternative Name:
DNS:*.facebook.com, DNS:*.facebook.net, DNS:*.fbcdn.net, DNS:*.fbsbx.com, DNS:*.m.facebook.com, DNS:*.messenger.com, DNS:*.xx.fbcdn.net, DNS:*.xy.fbcdn.net, DNS:*.xz.fbcdn.net, DNS:facebook.com, DNS:messenger.com
X509v3 Certificate Policies:
Policy: 2.23.140.1.2.2
CPS: http://www.digicert.com/CPS
X509v3 Key Usage: critical
Digital Signature, Key Agreement
X509v3 Extended Key Usage:
TLS Web Server Authentication, TLS Web Client Authentication
X509v3 CRL Distribution Points:
Full Name:
URI:http://crl3.digicert.com/sha2-ha-server-g6.crl
Full Name:
URI:http://crl4.digicert.com/sha2-ha-server-g6.crl
Authority Information Access:
OCSP - URI:http://ocsp.digicert.com
CA Issuers - URI:http://cacerts.digicert.com/DigiCertSHA2HighAssuranceServerCA.crt
X509v3 Basic Constraints: critical
CA:FALSE
CT Precertificate SCTs:
Signed Certificate Timestamp:
Version : v1 (0x0)
Log ID : EE:CD:D0:64:D5:DB:1A:CE:C5:5C:B7:9D:B4:CD:13:A2:
32:87:46:7C:BC:EC:DE:C3:51:48:59:46:71:1F:B5:9B
Timestamp : Sep 19 00:23:35.823 2024 GMT
Extensions: none
Signature : ecdsa-with-SHA256
30:45:02:21:00:84:13:E0:F3:19:28:5D:8E:F8:8C:53:
61:7A:19:8C:38:9F:41:49:FA:72:EF:15:54:D4:46:C5:
1F:3C:93:37:D0:02:20:32:0D:02:CE:CA:F1:96:C7:18:
62:CA:39:2D:59:E9:CA:E4:6D:59:36:FC:65:27:5C:29:
0A:BE:91:0D:F2:FD:A3
Signed Certificate Timestamp:
Version : v1 (0x0)
Log ID : DA:B6:BF:6B:3F:B5:B6:22:9F:9B:C2:BB:5C:6B:E8:70:
91:71:6C:BB:51:84:85:34:BD:A4:3D:30:48:D7:FB:AB
Timestamp : Sep 19 00:23:35.762 2024 GMT
Extensions: none
Signature : ecdsa-with-SHA256
30:45:02:21:00:B5:95:6E:3F:29:D9:11:DE:38:45:CA:
42:60:CA:3B:83:94:A4:2E:7E:16:20:E9:56:3C:6E:9F:
32:3B:37:17:F2:02:20:5A:C6:B3:85:9E:0B:9B:54:AF:
9A:C5:A1:25:D8:05:C0:0F:7C:31:9E:20:4B:FB:FC:D2:
7C:61:CF:2C:20:FD:E2
Signed Certificate Timestamp:
Version : v1 (0x0)
Log ID : 3F:17:4B:4F:D7:22:47:58:94:1D:65:1C:84:BE:0D:12:
ED:90:37:7F:1F:85:6A:EB:C1:BF:28:85:EC:F8:64:6E
Timestamp : Sep 19 00:23:35.918 2024 GMT
Extensions: none
Signature : ecdsa-with-SHA256
30:46:02:21:00:D6:44:FF:6C:3B:F9:3D:94:09:0A:FF:
46:08:E0:52:C3:DF:87:07:7B:19:EE:F9:5D:40:FD:D9:
E1:CE:F0:47:60:02:21:00:CF:4D:80:B5:03:FE:20:B7:
A6:B1:73:01:9D:FF:7D:49:D4:13:21:BD:AE:F1:62:B4:
2A:4E:84:68:99:AB:5E:F6
Signature Algorithm: sha256WithRSAEncryption
Signature Value:
92:32:da:28:65:95:35:8d:30:48:ae:69:49:47:cf:00:57:d1:
2a:0f:39:35:d5:85:2b:e5:cc:18:d7:85:08:32:c4:a1:ac:51:
3b:75:6c:9b:26:02:cf:d4:1a:da:84:a5:96:0c:0b:fa:97:aa:
72:40:50:67:38:0f:95:4c:bb:33:56:41:56:59:d4:bc:c8:d2:
db:8e:e9:fc:47:a7:3d:c3:2e:67:dd:2b:9e:b5:cf:9d:60:1d:
ec:9f:68:7d:60:3e:76:c1:da:79:e9:5c:18:5d:e7:31:c2:02:
37:78:29:d4:de:f1:78:b2:68:48:30:04:51:87:be:d7:2d:28:
e2:5f:49:04:0e:73:0d:b5:75:e7:3c:3a:35:1b:16:00:aa:55:
ba:e9:73:13:5a:d0:f7:f7:2d:73:74:f7:19:4d:34:ca:e1:b3:
91:80:4b:c0:19:c0:04:ee:7e:c0:17:7a:9d:61:4d:b9:1c:3b:
db:43:2d:54:bd:b7:54:38:7c:c7:7c:f6:31:8b:06:5d:98:76:
e7:9e:88:61:7a:6c:4d:8f:f8:31:a1:40:01:6d:d2:42:ed:0d:
a2:59:fe:19:0b:54:8a:15:03:29:3f:88:86:33:4f:13:1f:2c:
d9:80:02:90:e5:5d:0e:98:d3:d3:2c:89:83:06:8e:6a:34:92:
d5:45:b4:c3
$ openssl s_client -connect www.google.com:443
CONNECTED(00000003)
depth=2 C = US, O = DigiCert Inc, OU = www.digicert.com, CN = DigiCert High Assurance EV Root CA
verify return:1
depth=1 C = US, O = DigiCert Inc, OU = www.digicert.com, CN = DigiCert SHA2 High Assurance Server CA
verify return:1
depth=0 C = US, ST = California, L = Menlo Park, O = "Meta Platforms, Inc.", CN = *.facebook.com
verify return:1
---
Certificate chain
0 s:C = US, ST = California, L = Menlo Park, O = "Meta Platforms, Inc.", CN = *.facebook.com
i:C = US, O = DigiCert Inc, OU = www.digicert.com, CN = DigiCert SHA2 High Assurance Server CA
a:PKEY: id-ecPublicKey, 256 (bit); sigalg: RSA-SHA256
v:NotBefore: Sep 19 00:00:00 2024 GMT; NotAfter: Dec 18 23:59:59 2024 GMT
1 s:C = US, O = DigiCert Inc, OU = www.digicert.com, CN = DigiCert SHA2 High Assurance Server CA
i:C = US, O = DigiCert Inc, OU = www.digicert.com, CN = DigiCert High Assurance EV Root CA
a:PKEY: rsaEncryption, 2048 (bit); sigalg: RSA-SHA256
v:NotBefore: Oct 22 12:00:00 2013 GMT; NotAfter: Oct 22 12:00:00 2028 GMT
---
Server certificate
-----BEGIN CERTIFICATE-----
MIIGmTCCBYGgAwIBAgIQCcU6goKeAO3NorvB+50XsDANBgkqhkiG9w0BAQsFADBw
MQswCQYDVQQGEwJVUzEVMBMGA1UEChMMRGlnaUNlcnQgSW5jMRkwFwYDVQQLExB3
d3cuZGlnaWNlcnQuY29tMS8wLQYDVQQDEyZEaWdpQ2VydCBTSEEyIEhpZ2ggQXNz
dXJhbmNlIFNlcnZlciBDQTAeFw0yNDA5MTkwMDAwMDBaFw0yNDEyMTgyMzU5NTla
MG8xCzAJBgNVBAYTAlVTMRMwEQYDVQQIEwpDYWxpZm9ybmlhMRMwEQYDVQQHEwpN
ZW5sbyBQYXJrMR0wGwYDVQQKExRNZXRhIFBsYXRmb3JtcywgSW5jLjEXMBUGA1UE
AwwOKi5mYWNlYm9vay5jb20wWTATBgcqhkjOPQIBBggqhkjOPQMBBwNCAARghYHm
9gsC1Pt9Z7bIQZFF52vEo8nYIcizwBGzTe3OIgyu64z1UdO32uGvtUtm1K0Shbaj
1VRmp5l0o7pPIEeco4ID+TCCA/UwHwYDVR0jBBgwFoAUUWj/kK8CB3U8zNllZGKi
ErhZcjswHQYDVR0OBBYEFOgx48T/9eUPFcbhaz72p7n0/Iq2MIG1BgNVHREEga0w
gaqCDiouZmFjZWJvb2suY29tgg4qLmZhY2Vib29rLm5ldIILKi5mYmNkbi5uZXSC
CyouZmJzYnguY29tghAqLm0uZmFjZWJvb2suY29tgg8qLm1lc3Nlbmdlci5jb22C
DioueHguZmJjZG4ubmV0gg4qLnh5LmZiY2RuLm5ldIIOKi54ei5mYmNkbi5uZXSC
DGZhY2Vib29rLmNvbYINbWVzc2VuZ2VyLmNvbTA+BgNVHSAENzA1MDMGBmeBDAEC
AjApMCcGCCsGAQUFBwIBFhtodHRwOi8vd3d3LmRpZ2ljZXJ0LmNvbS9DUFMwDgYD
VR0PAQH/BAQDAgOIMB0GA1UdJQQWMBQGCCsGAQUFBwMBBggrBgEFBQcDAjB1BgNV
HR8EbjBsMDSgMqAwhi5odHRwOi8vY3JsMy5kaWdpY2VydC5jb20vc2hhMi1oYS1z
ZXJ2ZXItZzYuY3JsMDSgMqAwhi5odHRwOi8vY3JsNC5kaWdpY2VydC5jb20vc2hh
Mi1oYS1zZXJ2ZXItZzYuY3JsMIGDBggrBgEFBQcBAQR3MHUwJAYIKwYBBQUHMAGG
GGh0dHA6Ly9vY3NwLmRpZ2ljZXJ0LmNvbTBNBggrBgEFBQcwAoZBaHR0cDovL2Nh
Y2VydHMuZGlnaWNlcnQuY29tL0RpZ2lDZXJ0U0hBMkhpZ2hBc3N1cmFuY2VTZXJ2
ZXJDQS5jcnQwDAYDVR0TAQH/BAIwADCCAX8GCisGAQQB1nkCBAIEggFvBIIBawFp
AHYA7s3QZNXbGs7FXLedtM0TojKHRny87N7DUUhZRnEftZsAAAGSB6m2jwAABAMA
RzBFAiEAhBPg8xkoXY74jFNhehmMOJ9BSfpy7xVU1EbFHzyTN9ACIDINAs7K8ZbH
GGLKOS1Z6crkbVk2/GUnXCkKvpEN8v2jAHYA2ra/az+1tiKfm8K7XGvocJFxbLtR
hIU0vaQ9MEjX+6sAAAGSB6m2UgAABAMARzBFAiEAtZVuPynZEd44RcpCYMo7g5Sk
Ln4WIOlWPG6fMjs3F/ICIFrGs4WeC5tUr5rFoSXYBcAPfDGeIEv7/NJ8Yc8sIP3i
AHcAPxdLT9ciR1iUHWUchL4NEu2QN38fhWrrwb8ohez4ZG4AAAGSB6m27gAABAMA
SDBGAiEA1kT/bDv5PZQJCv9GCOBSw9+HB3sZ7vldQP3Z4c7wR2ACIQDPTYC1A/4g
t6axcwGd/31J1BMhva7xYrQqToRomate9jANBgkqhkiG9w0BAQsFAAOCAQEAkjLa
KGWVNY0wSK5pSUfPAFfRKg85NdWFK+XMGNeFCDLEoaxRO3VsmyYCz9Qa2oSllgwL
+peqckBQZzgPlUy7M1ZBVlnUvMjS247p/EenPcMuZ90rnrXPnWAd7J9ofWA+dsHa
eelcGF3nMcICN3gp1N7xeLJoSDAEUYe+1y0o4l9JBA5zDbV15zw6NRsWAKpVuulz
E1rQ9/ctc3T3GU00yuGzkYBLwBnABO5+wBd6nWFNuRw720MtVL23VDh8x3z2MYsG
XZh2556IYXpsTY/4MaFAAW3SQu0Noln+GQtUihUDKT+IhjNPEx8s2YACkOVdDpjT
0yyJgwaOajSS1UW0ww==
-----END CERTIFICATE-----
subject=C = US, ST = California, L = Menlo Park, O = "Meta Platforms, Inc.", CN = *.facebook.com
issuer=C = US, O = DigiCert Inc, OU = www.digicert.com, CN = DigiCert SHA2 High Assurance Server CA
---
No client certificate CA names sent
Peer signing digest: SHA256
Peer signature type: ECDSA
Server Temp Key: X25519, 253 bits
---
SSL handshake has read 3236 bytes and written 380 bytes
Verification: OK
---
New, TLSv1.3, Cipher is TLS_CHACHA20_POLY1305_SHA256
Server public key is 256 bit
Secure Renegotiation IS NOT supported
Compression: NONE
Expansion: NONE
No ALPN negotiated
Early data was not sent
Verify return code: 0 (ok)
---
---
Post-Handshake New Session Ticket arrived:
SSL-Session:
Protocol : TLSv1.3
Cipher : TLS_CHACHA20_POLY1305_SHA256
Session-ID: 169B2DBEF1E1767C4E7E8754E217FE546AC136F0FC93DDCC195796AFA98D09D8
Session-ID-ctx:
Resumption PSK: 28BB702C181947835600E1C0F28FF57B3BFFC75C664240F571130C04458DDD1F
PSK identity: None
PSK identity hint: None
SRP username: None
TLS session ticket lifetime hint: 172800 (seconds)
TLS session ticket:
0000 - d9 cf 43 49 26 1f a6 5d-1b 71 23 81 a5 c8 ad 48 ..CI&..].q#....H
0010 - 8a 66 1c b8 e5 24 73 da-68 c1 36 0d fe cf 2b 3b .f...$s.h.6...+;
0020 - 00 00 00 00 4a ef 8e f1-90 83 04 ea a0 84 b2 68 ....J..........h
0030 - b7 b3 e5 28 a1 2f f7 f4-3d 50 c4 29 b7 b9 10 64 ...(./..=P.)...d
0040 - 6c b4 88 ab 85 30 51 a8-cb 3e c8 12 29 d1 80 dc l....0Q..>..)...
0050 - 5d 7c 94 84 a5 5c 16 c8-7c bc 3b 90 cf 87 eb fb ]|...\..|.;.....
0060 - 99 a1 cd f3 d4 1c f5 a6-5e b1 c5 8f e3 c8 8d 45 ........^......E
0070 - 92 ea 19 92 52 08 04 c2-63 c4 cd 3e 0c b4 dc 28 ....R...c..>...(
0080 - da 82 ..
Start Time: 1733962688
Timeout : 7200 (sec)
Verify return code: 0 (ok)
Extended master secret: no
Max Early Data: 0
---
read R BLOCK
$ openssl s_client -connect www.google.com:443
CONNECTED(00000003)
depth=2 C = US, O = Google Trust Services LLC, CN = GTS Root R1
verify return:1
depth=1 C = US, O = Google Trust Services, CN = WR2
verify return:1
depth=0 CN = www.google.com
verify return:1
---
Certificate chain
0 s:CN = www.google.com
i:C = US, O = Google Trust Services, CN = WR2
a:PKEY: id-ecPublicKey, 256 (bit); sigalg: RSA-SHA256
v:NotBefore: Nov 4 08:39:37 2024 GMT; NotAfter: Jan 27 08:39:36 2025 GMT
1 s:C = US, O = Google Trust Services, CN = WR2
i:C = US, O = Google Trust Services LLC, CN = GTS Root R1
a:PKEY: rsaEncryption, 2048 (bit); sigalg: RSA-SHA256
v:NotBefore: Dec 13 09:00:00 2023 GMT; NotAfter: Feb 20 14:00:00 2029 GMT
2 s:C = US, O = Google Trust Services LLC, CN = GTS Root R1
i:C = BE, O = GlobalSign nv-sa, OU = Root CA, CN = GlobalSign Root CA
a:PKEY: rsaEncryption, 4096 (bit); sigalg: RSA-SHA256
v:NotBefore: Jun 19 00:00:42 2020 GMT; NotAfter: Jan 28 00:00:42 2028 GMT
---
Server certificate
-----BEGIN CERTIFICATE-----
MIIEWDCCA0CgAwIBAgIQAoSxBBAXbikSDTlMCHenzzANBgkqhkiG9w0BAQsFADA7
MQswCQYDVQQGEwJVUzEeMBwGA1UEChMVR29vZ2xlIFRydXN0IFNlcnZpY2VzMQww
CgYDVQQDEwNXUjIwHhcNMjQxMTA0MDgzOTM3WhcNMjUwMTI3MDgzOTM2WjAZMRcw
FQYDVQQDEw53d3cuZ29vZ2xlLmNvbTBZMBMGByqGSM49AgEGCCqGSM49AwEHA0IA
BIkExubCQdtCqvrCz0ECKXYIqwCOwXZsSRHlvPdgL1nKJ0IXRpKV+fV3liW6DPOE
5Xz9EjoKix22mK4PL8eiWCOjggJDMIICPzAOBgNVHQ8BAf8EBAMCB4AwEwYDVR0l
BAwwCgYIKwYBBQUHAwEwDAYDVR0TAQH/BAIwADAdBgNVHQ4EFgQUhstHZ0eJiOWn
8YrYTKXxL8NreMQwHwYDVR0jBBgwFoAU3hse7XkV1D43JMMhu+w0OW1CsjAwWAYI
KwYBBQUHAQEETDBKMCEGCCsGAQUFBzABhhVodHRwOi8vby5wa2kuZ29vZy93cjIw
JQYIKwYBBQUHMAKGGWh0dHA6Ly9pLnBraS5nb29nL3dyMi5jcnQwGQYDVR0RBBIw
EIIOd3d3Lmdvb2dsZS5jb20wEwYDVR0gBAwwCjAIBgZngQwBAgEwNgYDVR0fBC8w
LTAroCmgJ4YlaHR0cDovL2MucGtpLmdvb2cvd3IyLzlVVmJOMHc1RTZZLmNybDCC
AQYGCisGAQQB1nkCBAIEgfcEgfQA8gB3AM8RVu7VLnyv84db2Wkum+kacWdKsBfs
rAHSW3fOzDsIAAABkvaLUIIAAAQDAEgwRgIhAPDTtjsUa6F6HRn0dqE3Tu+83uBJ
fFyU22OI+GZoVN9qAiEAtC3xUaCftdNCSgwJy4/fcwzCJGfCwwBa26zcRVK/Gx8A
dwDm0jFjQHeMwRBBBtdxuc7B0kD2loSG+7qHMh39HjeOUAAAAZL2i1BlAAAEAwBI
MEYCIQD3DllNLf9dzZoGCnA0wA7eEhrwfkSQOdjSnBivbTItqQIhAO/XQE0i02LS
3h6UsvXZ1sKhbw7xrf/E/2RXZYFyAG0QMA0GCSqGSIb3DQEBCwUAA4IBAQB7jBGa
Asu92E4YWQxq9y9UK+5+fsLXe1AGCI6HA7FlHFS3dDTWjQEV+07ewgEkPywZs3Qs
sX3NrcRIPM5SyJaLAoNgKBjFWLyWuWfMq6hpyI0R6UgZ0IupK/bmT8qT2hAqQN8J
pWGF0p853LuVmBwKkSjvtYh4ZJjJxSaUZKCtfl43SxMam0z9hk2MviPDPmy+fWuA
dFhvfiW1J9uqNxvzgWNP8YVDuK1j8z049x7DI/x0yHmDs9/8vxbiUoFU9BUqyMjP
mt3P0DLbkif+NH6uqjLPVzMFqhUxe3E0nutarul3BFEvwpW480yHIyLnHUqnBL2Z
YUaLxsyeu3X1RV/l
-----END CERTIFICATE-----
subject=CN = www.google.com
issuer=C = US, O = Google Trust Services, CN = WR2
---
No client certificate CA names sent
Peer signing digest: SHA256
Peer signature type: ECDSA
Server Temp Key: X25519, 253 bits
---
SSL handshake has read 4109 bytes and written 396 bytes
Verification: OK
---
New, TLSv1.3, Cipher is TLS_AES_256_GCM_SHA384
Server public key is 256 bit
Secure Renegotiation IS NOT supported
Compression: NONE
Expansion: NONE
No ALPN negotiated
Early data was not sent
Verify return code: 0 (ok)
---
80AB0FF1CF700000:error:0A000126:SSL routines:ssl3_read_n:unexpected eof while reading:../ssl/record/rec_layer_s3.c:317:
$ sudo traceroute -T -p 443 www.google.com
[sudo] password for nick:
traceroute to www.google.com (31.13.88.169), 30 hops max, 60 byte packets
1 172.27.236.1 (172.27.236.1) 210.412 ms 210.452 ms 210.432 ms
2 * * *
3 240.3.12.65 (240.3.12.65) 210.464 ms 240.3.84.71 (240.3.84.71) 210.446 ms *
4 242.8.90.151 (242.8.90.151) 211.104 ms * 242.12.42.5 (242.12.42.5) 211.672 ms
5 240.2.172.15 (240.2.172.15) 225.421 ms 225.668 ms 225.391 ms
6 peer-as16509.pr05.atl1.tfbnw.net (157.240.73.223) 225.507 ms 242.0.170.81 (242.0.170.81) 222.612 ms *
7 240.2.172.15 (240.2.172.15) 224.860 ms 99.83.113.37 (99.83.113.37) 225.570 ms ae16.pr05.atl1.tfbnw.net (157.240.73.222) 224.979 ms
8 99.83.113.36 (99.83.113.36) 224.599 ms po201.asw01.atl1.tfbnw.net (129.134.100.42) 224.608 ms peer-as16509.pr05.atl1.tfbnw.net (157.240.73.223) 225.224 ms
9 psw01.atl3.tfbnw.net (173.252.66.12) 225.628 ms psw04.atl3.tfbnw.net (173.252.65.163) 225.167 ms psw02.atl3.tfbnw.net (173.252.66.11) 225.201 ms
10 msw1ao.02.atl3.tfbnw.net (129.134.114.165) 226.591 ms * *
11 po203.asw01.atl1.tfbnw.net (129.134.100.48) 224.900 ms edge-z-p4-shv-02-atl3.facebook.com (31.13.88.169) 225.009 ms 224.354 ms
deb http://us-east-1.ec2.archive.ubuntu.com/ubuntu/ jammy universe
# deb-src http://us-east-1.ec2.archive.ubuntu.com/ubuntu/ jammy universe
deb http://us-east-1.ec2.archive.ubuntu.com/ubuntu/ jammy-updates universe
# deb-src http://us-east-1.ec2.archive.ubuntu.com/ubuntu/ jammy-updates universe
$ dig us-east-1.ec2.archive.ubuntu.com
; <<>> DiG 9.18.28-0ubuntu0.22.04.1-Ubuntu <<>> us-east-1.ec2.archive.ubuntu.com
;; global options: +cmd
;; Got answer:
;; ->>HEADER<<- opcode: QUERY, status: NOERROR, id: 14453
;; flags: qr rd ra; QUERY: 1, ANSWER: 10, AUTHORITY: 3, ADDITIONAL: 5
;; OPT PSEUDOSECTION:
; EDNS: version: 0, flags:; udp: 65494
;; QUESTION SECTION:
;us-east-1.ec2.archive.ubuntu.com. IN A
;; ANSWER SECTION:
us-east-1.ec2.archive.ubuntu.com. 144 IN A 18.232.150.247
us-east-1.ec2.archive.ubuntu.com. 144 IN A 34.237.137.22
us-east-1.ec2.archive.ubuntu.com. 144 IN A 52.207.133.243
us-east-1.ec2.archive.ubuntu.com. 144 IN A 3.209.10.109
us-east-1.ec2.archive.ubuntu.com. 144 IN A 54.144.148.213
us-east-1.ec2.archive.ubuntu.com. 144 IN A 54.87.19.168
us-east-1.ec2.archive.ubuntu.com. 144 IN A 34.201.250.36
us-east-1.ec2.archive.ubuntu.com. 144 IN A 52.91.65.63
us-east-1.ec2.archive.ubuntu.com. 144 IN A 54.165.17.230
us-east-1.ec2.archive.ubuntu.com. 144 IN A 3.87.126.146
;; AUTHORITY SECTION:
ubuntu.com. 144 IN NS ns2.canonical.com.
ubuntu.com. 144 IN NS ns1.canonical.com.
ubuntu.com. 144 IN NS ns3.canonical.com.
;; ADDITIONAL SECTION:
ns2.canonical.com. 144 IN AAAA 2620:2d:4000:1::44
ns1.canonical.com. 144 IN A 185.125.190.65
ns1.canonical.com. 144 IN AAAA 2620:2d:4000:1::43
ns3.canonical.com. 144 IN A 91.189.91.139
;; Query time: 0 msec
;; SERVER: 127.0.0.53#53(127.0.0.53) (UDP)
;; WHEN: Thu Dec 12 09:02:47 +08 2024
;; MSG SIZE rcvd: 373
$ sudo traceroute -T -p 443 www.google.com
traceroute to www.google.com (199.59.148.20), 30 hops max, 60 byte packets
1 172.27.232.1 (172.27.232.1) 221.888 ms 222.377 ms 222.400 ms
2 * * *
3 240.3.12.99 (240.3.12.99) 222.405 ms 240.3.12.96 (240.3.12.96) 222.391 ms 240.3.12.97 (240.3.12.97) 222.376 ms
4 * 242.2.112.71 (242.2.112.71) 223.779 ms *
5 240.0.236.2 (240.0.236.2) 1165.732 ms 240.0.184.3 (240.0.184.3) 223.324 ms 240.0.236.2 (240.0.236.2) 1165.622 ms
6 * * 242.2.213.67 (242.2.213.67) 224.208 ms
7 100.100.36.42 (100.100.36.42) 223.574 ms 100.100.36.34 (100.100.36.34) 223.509 ms 100.100.36.90 (100.100.36.90) 224.150 ms
8 99.83.112.43 (99.83.112.43) 223.557 ms 223.562 ms 224.515 ms
9 100.100.36.80 (100.100.36.80) 224.037 ms * *
10 99.83.112.43 (99.83.112.43) 223.643 ms 100.100.36.36 (100.100.36.36) 223.598 ms 99.83.112.41 (99.83.112.41) 223.081 ms
11 * * *
12 * * *
13 * * *
14 * * *
15 100.100.36.92 (100.100.36.92) 223.979 ms 100.100.36.46 (100.100.36.46) 224.005 ms *
16 * * *
17 * * *
18 * * *
19 * * *
20 * * *
21 * * *
22 * * *
23 * * *
24 * * *
25 * * *
26 * * *
27 * * *
28 * * *
29 * * *
30 * * *
$ ping -4 www.google.com
PING www.google.com (31.13.94.49) 56(84) bytes of data.
64 bytes from edge-z-p3-shv-01-eze1.facebook.com (31.13.94.49): icmp_seq=1 ttl=49 time=377 ms
...
$ traceroute edge-z-p3-shv-01-eze1.facebook.com
traceroute to edge-z-p3-shv-01-eze1.facebook.com (31.13.94.41), 30 hops max, 60 byte packets
1 172.27.236.1 (172.27.236.1) 210.092 ms 210.634 ms 210.657 ms
2 244.5.0.181 (244.5.0.181) 217.800 ms 216.182.226.40 (216.182.226.40) 231.425 ms ec2-3-236-60-11.compute-1.amazonaws.com (3.236.60.11) 214.968 ms
3 100.66.9.236 (100.66.9.236) 230.784 ms 100.65.120.240 (100.65.120.240) 211.342 ms 100.66.12.4 (100.66.12.4) 258.891 ms
4 242.2.113.67 (242.2.113.67) 211.779 ms 242.12.42.3 (242.12.42.3) 211.743 ms 242.8.91.151 (242.8.91.151) 215.657 ms
5 240.0.184.1 (240.0.184.1) 211.340 ms * *
6 242.3.85.193 (242.3.85.193) 211.296 ms 242.2.213.195 (242.2.213.195) 213.119 ms 241.0.4.243 (241.0.4.243) 210.794 ms
7 100.100.4.78 (100.100.4.78) 211.755 ms 100.100.4.66 (100.100.4.66) 211.750 ms 242.0.171.85 (242.0.171.85) 211.224 ms
8 195.22.206.60 (195.22.206.60) 211.451 ms 211.457 ms 211.453 ms
9 100.100.4.74 (100.100.4.74) 211.660 ms 185.70.203.99 (185.70.203.99) 372.353 ms 100.100.4.72 (100.100.4.72) 211.669 ms
10 185.70.203.109 (185.70.203.109) 364.796 ms 368.024 ms 366.114 ms
11 po222.asw04.eze1.tfbnw.net (129.134.52.234) 367.258 ms 241.0.4.66 (241.0.4.66) 211.033 ms po222.asw04.eze1.tfbnw.net (129.134.52.234) 368.163 ms
12 psw02.eze1.tfbnw.net (129.134.63.4) 365.204 ms 370.318 ms psw04.eze1.tfbnw.net (129.134.62.254) 367.805 ms
13 157.240.63.150 (157.240.63.150) 368.648 ms msw1ab.01.eze1.tfbnw.net (129.134.88.91) 367.764 ms 240.0.184.1 (240.0.184.1) 211.955 ms
14 * * 242.3.84.65 (242.3.84.65) 211.971 ms
15 * * *
16 * * *
17 * * *
18 * * 185.70.203.109 (185.70.203.109) 374.976 ms
19 * * *
20 * * *
21 msw1ad.01.eze1.tfbnw.net (129.134.88.49) 363.238 ms * *
22 * * *
23 * * *
24 * * *
25 * * *
26 * * *
27 * * *
28 * * *
29 * * *
30 * * *
$ dig www.google.com
; <<>> DiG 9.18.28-0ubuntu0.22.04.1-Ubuntu <<>> www.google.com
;; global options: +cmd
;; Got answer:
;; ->>HEADER<<- opcode: QUERY, status: NOERROR, id: 8129
;; flags: qr rd ra; QUERY: 1, ANSWER: 1, AUTHORITY: 4, ADDITIONAL: 9
;; OPT PSEUDOSECTION:
; EDNS: version: 0, flags:; udp: 65494
;; QUESTION SECTION:
;www.google.com. IN A
;; ANSWER SECTION:
www.google.com. 583 IN A 31.13.88.169
;; AUTHORITY SECTION:
google.com. 583 IN NS ns2.google.com.
google.com. 583 IN NS ns1.google.com.
google.com. 583 IN NS ns4.google.com.
google.com. 583 IN NS ns3.google.com.
;; ADDITIONAL SECTION:
ns4.google.com. 583 IN A 216.239.38.10
ns1.google.com. 583 IN AAAA 2001:4860:4802:32::a
ns2.google.com. 583 IN AAAA 2001:4860:4802:34::a
ns2.google.com. 583 IN A 216.239.34.10
ns3.google.com. 583 IN AAAA 2001:4860:4802:36::a
ns4.google.com. 583 IN AAAA 2001:4860:4802:38::a
ns1.google.com. 583 IN A 216.239.32.10
ns3.google.com. 583 IN A 216.239.36.10
;; Query time: 0 msec
;; SERVER: 127.0.0.53#53(127.0.0.53) (UDP)
;; WHEN: Thu Dec 12 10:05:08 +08 2024
;; MSG SIZE rcvd: 307
$ nslookup www.google.com
Server: 127.0.0.53
Address: 127.0.0.53#53
Non-authoritative answer:
Name: www.google.com
Address: 31.13.88.169
Name: www.google.com
Address: 2001::1
$ dig edge-z-p4-shv-02-atl3.facebook.com +noall +answer
edge-z-p4-shv-02-atl3.facebook.com. 24 IN A 108.160.172.200
$ ping www.google.com
PING www.google.com (157.240.17.35) 56(84) bytes of data.
64 bytes from edge-star-mini-shv-01-zrh1.facebook.com (157.240.17.35): icmp_seq=1 ttl=47 time=310 ms
...
$ dig www.google.com +noall +answer
www.google.com. 186 IN A 157.240.17.35
$ dig edge-star-mini-shv-01-zrh1.facebook.com +noall +answer
edge-star-mini-shv-01-zrh1.facebook.com. 3600 IN A 157.240.17.35
那么怎么检测呢?我使用这个检测网站,但是也是不得要领。What are DNS leaks?
In this context, with "DNS leak" we mean an unencrypted DNS query sent by your system OUTSIDE the established VPN tunnel.
What are WebRTC leaks?
WebRTC implement STUN (Session Traversal Utilities for Nat), a protocol that allows to discover the public IP address. To disable it:
- Mozilla Firefox: Type "about:config” in the address bar. Scroll down to “media.peerconnection.enabled”, double click to set it to false.
- Google Chrome: Install Google official extension WebRTC Network Limiter.
- Opera: Type "about:config" in the address bar or go to "Settings". Select "Show advanced settings" and click on "Privacy & security". At "WebRTC" mark select "Disable non-proxied UDP".
$ aptitude search openvpn | grep -e i\\s
i A network-manager-openvpn - network management framework (OpenVPN plugin core)
i network-manager-openvpn-gnome - network management framework (OpenVPN plugin GNOME GUI)
i openvpn - virtual private network daemon
i openvpn-systemd-resolved - integrates OpenVPN with systemd-resolved
十二月十四日 等待变化等待机会
$ openssl genrsa -out server.key 2048
$ openssl req -new -key server.key -out server.csr -subj "/C=CN/ST=FJ/L=XM/O=PARC22/OU=sager1/CN=sager"
$ openssl x509 -req -days 3650 -in server.csr -signkey server.key -out server.crt
$ openssl genrsa -out client.key 2048
$ openssl req -new -key client.key -out client.csr -subj "/C=CN/ST=FJ/L=XM/O=PARC22/OU=zbook1/CN=zbook"
$ openssl x509 -req -days 3650 -in client.csr -CA server.crt -CAkey server.key -CAcreateserial -out client.crt
$ openssl dhparam -out dh2048.pem 2048
Note: cipher 'AES-256-CBC' in --data-ciphers is not supported by ovpn-dco, disabling data channel offload.,看这里据说是一个高级的性能提升。
如果使用DCO就减少了一个context switch的过程
Data packets arrive in the kernel space.
OpenVPN copies the packets to the user space.
OpenVPN decrypts and encrypts packets in the user space.
OpenVPN copies those packets back to the kernel space.
The data packets then get sent to their destination.
安装似乎有些麻烦,我看到这个解说需要把key的属性设为root的才行:
Data packets arrive in the kernel space.
OpenVPN DCO processes the packets in the kernel space.
The data packets then get sent to their destination.
sudo mkdir -p /etc/apt/keyrings # it already exists, but just in case
curl -sSfL https://packages.openvpn.net/packages-repo.gpg > openvpn.asc
sudo mv openvpn.asc /etc/apt/keyrings/
sudo chown root:root /etc/apt/keyrings/openvpn.asc
$ cat /etc/apt/sources.list.d/openvpn3.list
deb [signed-by=/etc/apt/keyrings/openvpn.asc] https://packages.openvpn.net/openvpn3/debian jammy main
十二月十五日 等待变化等待机会
ubuntu@ip-172-31-29-227:~$ sudo systemctl status openvpn | grep Active --color=auto
Active: active (exited) since Thu 2024-12-12 06:43:49 UTC; 2 days ago
ubuntu@ip-172-31-29-227:~$ sudo systemctl status openvpn@server | grep Active --color=auto
Active: active (running) since Sun 2024-12-15 03:22:43 UTC; 36min ago
the ss command shows a DNS resolver running, this resolver is actually the systemd-resolved daemon listening on the server’s own loopback interface — which isn’t accessible to external connections
$ sudo ss -punl sport :53
State Recv-Q Send-Q Local Address:Port Peer Address:Port Process
UNCONN 0 0 127.0.0.53%lo:53 0.0.0.0:* users:(("systemd-resolve",pid=335,fd=13))
十二月二十四日 等待变化等待机会
$ tail /run/systemd/resolve/resolv.conf
#
# See man:systemd-resolved.service(8) for details about the supported modes of
# operation for /etc/resolv.conf.
nameserver 172.31.0.2
nameserver 218.85.157.99
nameserver 8.8.4.4
# Too many DNS servers configured, the following entries may be ignored.
nameserver 8.8.8.8
search .
The /etc/resolv.conf file is a symlink to the /run/systemd/resolve/stub-resolv.conf file.而真正的配置文件/run/systemd/resolve/stub-resolv.conf 是这样配置的
$ tail -n 3 /run/systemd/resolve/stub-resolv.conf
nameserver 127.0.0.53
options edns0 trust-ad
search .
Note: If you don't set the Domains=~. option, then systemd-resolved might use the per-link DNS servers set in the per-link configuration. The Domains=~. option doesn't affect queries of domain names that match the more specific search domains that are specified in per-link configurations. When domain names resolve, they use their respective per-link DNS servers.我想我的配置是search .也许说明了系统会按照网卡来分别搜索吧?我看到了一个网卡的设置:
$ sudo cat /run/systemd/resolve/netif/2
# This is private data. Do not parse.
LLMNR=yes
MDNS=no
DEFAULT_ROUTE=yes
SERVERS=218.85.157.99
DOMAINS=~.
$ ip route
0.0.0.0/1 via 172.27.232.1 dev tun0
default via 192.168.1.1 dev enp0s31f6 proto dhcp metric 100
34.199.45.31 via 192.168.1.1 dev enp0s31f6
128.0.0.0/1 via 172.27.232.1 dev tun0
169.254.0.0/16 dev enp0s31f6 scope link metric 1000
172.27.232.0/22 dev tun0 proto kernel scope link src 172.27.232.17
192.168.1.0/24 dev enp0s31f6 proto kernel scope link src 192.168.1.6 metric 100
$ dig +noall +authority 34.199.45.31
. 86368 IN SOA a.root-servers.net. nstld.verisign-grs.com. 2024122303 1800 900 604800 86400
$ ip route
default via 192.168.1.1 dev enp0s31f6 proto dhcp metric 100
169.254.0.0/16 dev enp0s31f6 scope link metric 1000
192.168.1.0/24 dev enp0s31f6 proto kernel scope link src 192.168.1.6 metric 100
引流或者其他不可告人的目的的手脚
李代桃僵的facebook的代理地址,我错怪了openvpnas吧?。而这个也是我迫切想要wireguard来替代这个的直接原因。
十二月二十七日 等待变化等待机会
$ sudo sacli ConfigQuery
{
"admin_ui.https.ip_address": "all",
"admin_ui.https.port": "943",
"aui.eula_version": "3",
"auth.local.0.enable": "true",
"auth.module.type": "local",
"cs.https.ip_address": "all",
"cs.https.port": "943",
"host.name": "34.199.45.31",
"subscription.bundle": "ewogICJub25jZSIgOiAiMkU1QzFGMzBGQTEwODM4REVFMzBCQjFGMDVBRUJDMUMzMTY2MkY3RkZFNEE2NzMxNjcxN0JEREI3NUQ3REM2RCIsCiAgInN1YmtleSIgOiAiQVNVVkpTRmZaUHBLU05LSGdUa1hNQUtfQVNSUHhwQmdObFhwUkFSVnV1cVNuaUxCdWNIZ2N6VmdfMWEyNGQ2NTAwMTc1NzVmZDA0M2U5YjUyMzUzMzA1NTNmN2M4NGVhOSIsCiAgImlhdCIgOiAxNzA0NzYxMzI2Cn0=",
"subscription.saved_state": "SUBSCRIPTION_OK,tnYefo0Uo3KmKP+aXdloYB4zdWIKrMmICcKe/5Q2hqGqsOLULXObzMA/DH+Vu/AJO6CWd5b/ipJC\n/UcJuqUocDLzTA2zwPQo3Ays1NW2vgKuUligdSnpTb2cy9TKFzxg68qzp0aUR/V5O2T/cFiIH4PN\nXSjk3KK4gU34hYfghXMuVWE52wqJxldpLIITLn3zt9njEyUA4KA0vcnXZxeTdVzYmGn7qAZOOCmN\nfA5dXBvBc0HrOE8br7AZQtOj62zkp7g0kVxkCRTo5toE7Alddk/4fHm6cFAIR7y31wqrt0E4F4+Q\ni9qe6suyoTtxGQ1qK4ngx3dg6HrfEELnNzhAuGj+sTYiW974gjA/ZJSji0EvjVr0mUV9YwfQhxiw\nAMKQjJAr7P43ahxnsO2QXQdMxXQes3jm4d3U1LtSKF0YOrpo2CmJXOSVcx/AJxIoNp06F6ZK8vx4\n7C8vikrPbK4xP3zkc9E6mpCHQlZ29PCP56Zx0zKqPL6saqz8EMCwrEvW7LSHEoDuzuf5OiDCwfuZ\nwoameK4gr3m6d/6ek8Ar3sUjVBZFEA==\n",
"upgrade.current_version": "2.13.1",
"upgrade.initial_version": "2.13.1",
"vpn.client.routing.inter_client": "true",
"vpn.client.routing.reroute_dns": "true",
"vpn.client.routing.reroute_gw": "true",
"vpn.daemon.0.listen.ip_address": "all",
"vpn.daemon.0.listen.port": "443",
"vpn.daemon.0.server.ip_address": "all",
"vpn.server.daemon.tcp.n_daemons": "2",
"vpn.server.daemon.tcp.port": "443",
"vpn.server.daemon.udp.n_daemons": "2",
"vpn.server.enable_cipher_fallback": "true",
"vpn.server.routing.allow_private_nets_to_clients": "true",
"vpn.server.routing.private_access": "route",
"vpn.server.routing.private_network.0": "172.31.0.0/16",
"vpn.server.tls_cc_security": "tls-crypt"
}
In an OpenVPN Access Server user configuration, "vpn.client.routing.reroute_dns" is a setting that determines whether the client's DNS requests will be routed through the VPN tunnel, essentially forcing all DNS lookups to use the DNS servers specified on the VPN server instead of the client's local DNS providers; setting it to "true" means all DNS will be rerouted through the VPN.它的效果是怎么样子的呢?Key points about "vpn.client.routing.reroute_dns":
- Function: Controls whether DNS resolution is handled through the VPN tunnel.
- Value options:
- "true": All DNS requests will be sent through the VPN.
- "false": DNS requests will use the client's local DNS settings.
Why use "reroute_dns":
- Privacy: By forcing DNS queries through the VPN, your actual IP address is masked when resolving domain names, enhancing privacy.
- Security: If the VPN server is configured with trusted DNS providers, it can help protect against DNS hijacking or poisoning attacks.
Important considerations:
- Full tunnel vs. split tunneling: If you are using split tunneling, you may need to adjust the routing settings to ensure only specific traffic is routed through the VPN, including DNS requests if you want to utilize "reroute_dns".
- Performance impact: Rerouting DNS can sometimes introduce slight latency increases depending on the VPN server location and network conditions.
How to configure "reroute_dns" in OpenVPN Access Server:
- Access the user configuration settings in the OpenVPN Access Server management interface.
- Locate the "vpn.client.routing.reroute_dns" option and set it to "true" to enable DNS rerouting or "false" to disable it.
$ dig www.google.com
;; communications error to 172.31.0.2#53: timed out
;; communications error to 172.31.0.2#53: timed out
;; communications error to 172.31.0.2#53: timed out
...
WARNING: recursion requested but not available掩盖起来。
sudo resolvectl domain enp0s31f6 ''
#!/bin/bash
sudo resolvectl flush-caches
sudo resolvectl domain tun0 '~.'
sudo resolvectl domain enp0s31f6 ''
sudo resolvectl default-route tun0 true
sudo resolvectl dns tun0 8.8.4.4 8.8.8.8
$ sudo sacli configquery | grep dns
"vpn.client.routing.reroute_dns": "true",
"vpn.server.dhcp_option.dns.0": "8.8.8.8",
"vpn.server.dhcp_option.dns.1": "8.8.4.4",
$ ifconfig | grep 'inet '
inet 172.27.224.1 netmask 255.255.252.0 destination 172.27.224.1
inet 172.27.228.1 netmask 255.255.252.0 destination 172.27.228.1
inet 172.27.232.1 netmask 255.255.252.0 destination 172.27.232.1
inet 172.27.236.1 netmask 255.255.252.0 destination 172.27.236.1
inet 172.31.32.202 netmask 255.255.240.0 broadcast 172.31.47.255
inet 127.0.0.1 netmask 255.0.0.0
$ ifconfig | grep 'inet '
inet 192.168.1.6 netmask 255.255.255.0 broadcast 192.168.1.255
inet 127.0.0.1 netmask 255.0.0.0
inet 172.27.232.5 netmask 255.255.252.0 destination 172.27.232.5
Dynamic IP Address Network
When a user does not have a specific VPN IP address configured on the User Permissions page, the user's VPN client is assigned an address from this network.
Network Address # of Netmask bits
172.27.224.0 20
$ dig @172.27.224.1 txt www.google.com
; <<>> DiG 9.18.28-0ubuntu0.22.04.1-Ubuntu <<>> @172.27.224.1 txt www.google.com
; (1 server found)
;; global options: +cmd
;; Got answer:
;; ->>HEADER<<- opcode: QUERY, status: NOERROR, id: 10965
;; flags: qr rd ra; QUERY: 1, ANSWER: 0, AUTHORITY: 1, ADDITIONAL: 1
;; OPT PSEUDOSECTION:
; EDNS: version: 0, flags:; udp: 1232
; COOKIE: 64dd8d80cd67b61301000000676ebe603f34e337a9b17e49 (good)
;; QUESTION SECTION:
;www.google.com. IN TXT
;; AUTHORITY SECTION:
google.com. 60 IN SOA ns1.google.com. dns-admin.google.com. 707854421 900 900 1800 60
;; Query time: 247 msec
;; SERVER: 172.27.224.1#53(172.27.224.1) (UDP)
;; WHEN: Fri Dec 27 22:49:04 +08 2024
;; MSG SIZE rcvd: 121
~$ dig @172.27.224.1 txt www.google.com
;; communications error to 172.27.224.1#53: connection refused
;; communications error to 172.27.224.1#53: connection refused
;; communications error to 172.27.224.1#53: connection refused
; <<>> DiG 9.18.28-0ubuntu0.22.04.1-Ubuntu <<>> @172.27.224.1 txt www.google.com
; (1 server found)
;; global options: +cmd
;; no servers could be reached
$ ping -4 www.google.com
PING (142.250.31.104) 56(84) bytes of data.
64 bytes from bj-in-f104.1e100.net (142.250.31.104): icmp_seq=1 ttl=57 time=235 ms
64 bytes from bj-in-f104.1e100.net (142.250.31.104): icmp_seq=3 ttl=57 time=241 ms
...
$ whois 1e100.net | grep -i google
Name Server: NS1.GOOGLE.COM
Name Server: NS2.GOOGLE.COM
Name Server: NS3.GOOGLE.COM
Name Server: NS4.GOOGLE.COM
Registrant Organization: Google LLC
Admin Organization: Google LLC
Tech Organization: Google LLC
Name Server: ns3.google.com
Name Server: ns4.google.com
Name Server: ns1.google.com
Name Server: ns2.google.com
$ resolvectl status | grep -i ' dns '
Current DNS Server: 172.31.0.2
DNS Servers: 172.31.0.2
DNS Domain: ec2.internal
$ dig +noall +stats @172.31.0.2 www.google.com
;; Query time: 1 msec
;; SERVER: 172.31.0.2#53(172.31.0.2) (UDP)
;; WHEN: Fri Dec 27 15:10:57 UTC 2024
;; MSG SIZE rcvd: 139
十二月二十九日 等待变化等待机会
logging {
channel b_query {
file "/var/log/named/query.log" versions 2 size 1m;
print-time yes;
severity info;
};
category queries { b_query; };
};
sudo mkdir /var/log/named
sudo chown bind:bind /var/log/named
sudo touch /var/log/named/query.log
sudo chown bind:bind /var/log/named/query.log
$ ll /etc/systemd/system/ | grep name
lrwxrwxrwx 1 root root 33 Dec 19 08:08 bind9.service -> /lib/systemd/system/named.service
十二月三十日 等待变化等待机会
$ sudo resolvectl status
Global
Protocols: -LLMNR -mDNS DNSOverTLS=opportunistic DNSSEC=no/unsupported
resolv.conf mode: foreign
Current DNS Server: 10.0.0.1
DNS Servers: 10.0.0.1
$ ll /etc/resolv.conf
lrwxrwxrwx 1 root root 29 Dec 18 09:23 /etc/resolv.conf -> ../run/resolvconf/resolv.conf
![]()


